
Managing Your Machine Learning Experiments with MLflow
Say goodbye to tedious experiments tracking and messy models monitoring

There was this painful period of time that I still remember when my teammate and I were working on a machine learning (ML) project.
Tediously and studiously, we were manually transferring the results of our countless experiments to a Google Sheet and organizing our saved models in folders. Of course, we did try to automate the process as much as possible, but managing our ML experiments was still a messy affair.
If the above situation sounds like something you are in, hopefully, this article will be able to help you out and reduce your pain.
Being one of the best open source solutions (see other tools here) for managing ML experiments, MLflow will greatly improve your well being (as a data scientist, machine learning specialist, etc.) and let you and your team remain sane while keeping track of your models 💪.
How can MLflow help me?
With just a few lines of code integrated into your script, you can auto-log your model parameters and metrics into an organized dashboard as shown below.

Clicking into each of the table rows will show you more details, including the path of the model saved for that run (one run is basically one model training).

And as mentioned earlier, the important thing is that all these can be automated with just a few additional lines of code in your script.
In our example code snippet below, we have placed comments above all the lines of code relating to MLflow.
In general, there are three main sections in our example:
1. Setup experiment: Here we set an experiment name (mlflow.set_experiment()) and path (mlflow.set_tracking_uri()) to log our run, before starting our run with mlflow.start_run().
2. Train model: Nothing special here, just normal model training.
3. Logging: Log parameters (mlflow.log_params()), metrics (mlflow.log_metric()) and model (mlflow.sklearn.log_model()).
After running the code, you can execute mlflow ui in your terminal and there will be a link to your MLflow dashboard.
Simple and neat right? 😎
However, what we have shown you so far are in the local environment. What if we would like to collaborate with other teammates? This is where a remote server can come into play and our next section of the article shows you the steps to do that.
Steps to Deploy MLflow on Google Cloud
We list down first the general steps to take before detailing each of the steps with screenshots (feel free to click on each step to navigate). Having a Google Cloud account is the only prerequisite for following the steps. Do note that Google Cloud has a free trial for new signups, so you can experiment at no cost.
- Setup virtual machine to serve MLflow
- Create Cloud Storage bucket to store our models
- Launch MLflow server
- Add user authentication through reverse-proxy with Nginx
- Modify code to allow access to MLflow server
1. Setup Virtual Machine (VM)
Our first step is to set up a Compute Engine VM instance through Google Cloud console.
a) Enable the Compute Engine API after logging in to your Google Cloud console

b) Start Google Cloud Shell
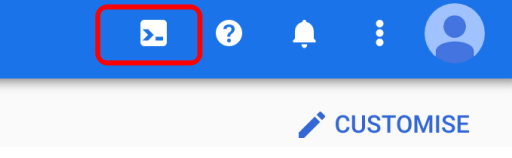
You should see a button similar to the one in red box below in the top right corner of your console page. Click on it and a terminal will pop out. We shall be using this terminal to launch our VM.
c) Create a Compute Engine VM instance
Key in the following into Google Cloud Shell to create a VM instance named mlflow-server.
gcloud compute instances create mlflow-server \
--machine-type n1-standard-1 \
--zone us-central1-a \
--tags mlflow-server \
--metadata startup-script='#! /bin/bash
sudo apt update
sudo apt-get -y install tmux
echo Installing python3-pip
sudo apt install -y python3-pip
export PATH="$HOME/.local/bin:$PATH"
echo Installing mlflow and google_cloud_storage
pip3 install mlflow google-cloud-storage'
A brief description of the parameters in the code above:
- machine-type specifies the amount of CPU and RAM for our VM. You can choose other types from this list.
- zone refers to the data center zone that your cluster resides in. You can choose somewhere that is not too far away from your users.
- tags allow us to identify the instances when adding network firewall rules later.
- metadata startup-script provides a bash script that will be executed when our instance boots up, installing various packages required.
d) Create firewall rule
This is to allow access on port 5000 to our MLflow server.
gcloud compute firewall-rules create mlflow-server \
--direction=INGRESS --priority=999 --network=default \
--action=ALLOW --rules=tcp:5000 --source-ranges=0.0.0.0/0 \
--target-tags=mlflow-server
2. Create Cloud Storage Bucket
Run the code below in the Google Cloud Shell, replacing <BUCKET_NAME> with a unique name of your choice. This bucket will be where we will store our models later.
gsutil mb gs://<BUCKET_NAME>3. Launch MLflow Server
We shall now SSH into our mlflow-server instance.
Go to the Compute Engine page and click on the SSH button for your instance. A terminal for your VM instance should pop out.
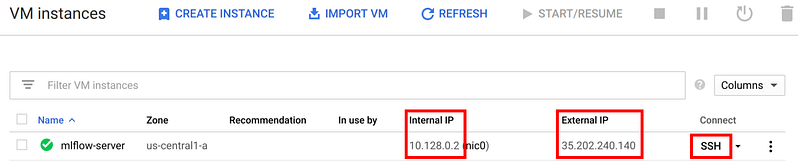
While the terminal gets ready, take note of the internal and external IPs for your mlflow-server instance that is shown on the Compute Engine page. We will need them later.
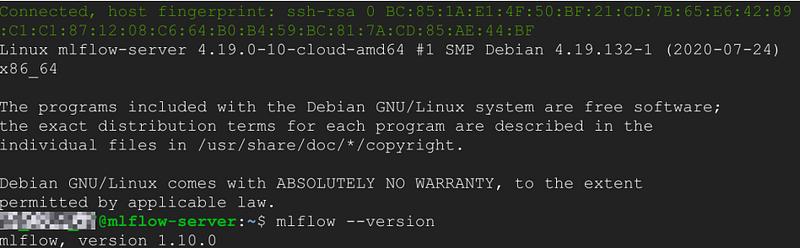
Before launching our MLflow server, let’s do a quick check to ensure that everything has been installed. As our startup script will take a few minutes to finish execution, the packages may not have all been installed if you SSH in too quickly. To check that MLflow has been installed, key in the terminal:
mlflow --versionYou should see the version of MLflow if it has been installed. If not, no worries, either wait a while more or execute the commands in our bash script under step 1c to manually install the packages.
If MLflow has been installed, we can now bring up a new window using tmux by executing:
tmuxAnd launch our MLflow server by running code below, replacing <BUCKET_NAME> and <INTERNAL_IP> respectively with the bucket name in step 2 and your internal IP address noted earlier.
mlflow server \
--backend-store-uri sqlite:///mlflow.db \
--default-artifact-root gs://<BUCKET_NAME> \
--host <INTERNAL_IP>
If you see something similar to screenshot below, congratulations your MLflow server is up and running 😄. You can now visit <External_IP>:5000 in your browser to view your MLflow dashboard.

4. Add User Authentication
If you don’t mind letting anyone who has your external IP address to view your MLflow dashboard, then you can skip this step. But I am guessing you are not such an exhibitionist right? Or are you? 😱
To add user authentication, first let’s stop our MLflow server for now by pressing Ctrl+c. And then say out Terminator’s famous line “I’ll be back” before detaching our window by Ctrl+b d.
a) Install Nginx and Apache Utilities
In our terminal’s main window, execute:
sudo apt-get install nginx apache2-utilsNginx shall set up our web server while Apache Utilities will give us access to the htpasswd command which we will use next to create password file.
b) Add password file
Run the folllowing, replacing <USERNAME> with a cool name.
sudo htpasswd -c /etc/nginx/.htpasswd <USERNAME>Then set your nobody-can-decipher password.
If you need a party, just leave out the -c argument to add additional users:
sudo htpasswd /etc/nginx/.htpasswd <ANOTHER_USER>c) Enable password and reverse-proxy
We need to configure Nginx to let our password file take effect and set up reverse-proxy to our MLflow server. We do this by modifying the default server block file:
sudo nano /etc/nginx/sites-enabled/defaultModify the file by replacing the content under location to the three bold lines:
server {
  location / {
    proxy_pass http://localhost:5000;
    auth_basic "Restricted Content";
    auth_basic_user_file /etc/nginx/.htpasswd;
  }
}
Press Ctrl+x y Enter to save changes and exit the editor.
Restart Nginx for the changes to take effect:
sudo service nginx restartCreate a new session with tmux or re-attach to our earlier tmux session:
tmux attach-session -t 0Launch our MLflow server again but this time around, our host is set to localhost:
mlflow server \
--backend-store-uri sqlite:///mlflow.db \
--default-artifact-root gs://<BUCKET_NAME> \
--host localhost
d) Enable HTTP traffic
Lastly, we enable HTTP traffic for our instance to allow access to our Nginx web server by following the steps in this link. Essentially, when you click on our mlflow-server instance on the Compute Engine page, you can edit and select Allow HTTP traffic and Allow HTTPS traffic under the Firewall section.
Now if you visit your external IP (leave out :5000, just external IP), you should be prompted for credentials. Key in the username and password that you set earlier and “Open Sesame”, your MLflow dashboard is back before your eyes again.
5. Modify Code to Access Server
In order for our scripts to log to the server, we need to modify our code by providing some credentials as environment variables.
a) Create and download the service account json
Follow the steps here to create new service account key.
b) Pip install google-cloud-storage locally
google-cloud-storage package is required to be installed on both the client and server in order to access Google Cloud Storage. We had installed the package on the server through our startup script so you just need to install it locally.
c) Set up credentials as environment variables
In your code, add the following in order for your script to access the server, replacing each of them accordingly:
: Path of downloaded service account key : Username : Password
import os# Set path to service account json file
os.environ['GOOGLE_APPLICATION_CREDENTIALS'] = <GOOGLE_APPLICATION_CREDENTIALS># Set username and password if authentication was added
os.environ['MLFLOW_TRACKING_USERNAME'] = <MLFLOW_TRACKING_USERNAME>
os.environ['MLFLOW_TRACKING_PASSWORD'] = <MLFLOW_TRACKING_PASSWORD>d) Set external IP as MLflow tracking URI
Earlier in our example code, the mlflow.set_tracking_uri() was set to a local folder path. Now set it to
mlflow.set_tracking_uri(<EXTERNAL_IP>:80)You can now easily collaborate with your teammate and log your models to the server. 👏 👏 👏
Our full example code can be found here for your testing convenience.
Through the guide above, we hope that you are now able to deploy MLflow both locally as well as on Google Cloud to manage your ML experiments. In addition, after your experimentation, MLflow will remain useful for monitoring your model after you have deployed it into production.
Thanks for reading and I hope the article was useful :) Please also feel free to comment with any questions or suggestions that you may have.