
Managing Multiple CUDA + cuDNN Installations
And Using Alternatives To Switch Easily Between Them

Table Of Contents
Linux — Download CUDA — Download cuDNN — Install CUDA — Install cuDNN — Update Environment Variables — Update-Alternatives — Select The Default CUDA Alternative — Removing An Alternative
Windows — Install CUDA 11.8 — Install cuDNN for 11.8 — Check Environment Variables — Install CUDA 12.1 — Install cuDNN for 12.1 — Switching CUDA Versions

Typically, repositories such as Stable Diffusion Webui or ComfyUI install PyTorch that come bundled with the necessary CUDA runtime libraries into your Python virtual environment. Since these libraries are isolated and self-contained within each specific environment, they remain unaffected by any system-wide installations of CUDA.
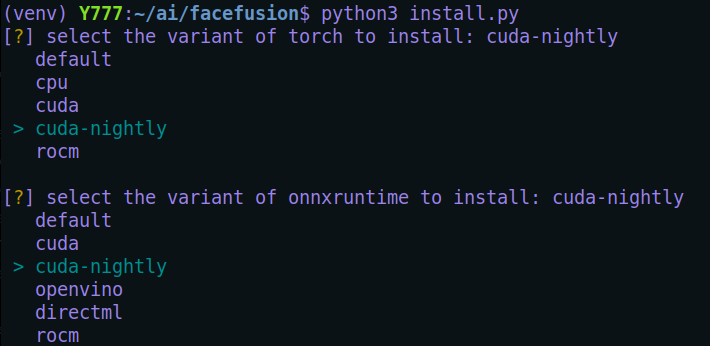
FaceFusion ≤ 2.0 on the other hand specifies a system-wide installation of CUDA 11.8. A recent update introduced an option to install a nightly build for torch and onnxruntime with support for CUDA 12.1. Since I still wanted to keep the existing 2.0 version while trying out the latest version, I thought I’d give multi-install a shot and use update-alternatives to manage the different versions.
There are already existing resources for installing multiple versions of CUDA out there so this won’t add anything new for more experienced users. So this is more a document of what I did and how I did it that some may find useful (including my future self i̶f ̶ when my memory fades).
I already had 11.8 installed so the following will describe installing 12.1.
Download CUDA Installer
You can locate the link to the CUDA version you want from the CUDA Archive.
It is strongly recommend to select and download the installer script (*.run) simply because it is Linux-agnostic and unlike some pre-build packages (like *.deb), you have control where exactly libraries will be installed if preferred.
wget https://developer.download.nvidia.com/compute/cuda/12.1.0/local_installers/cuda_12.1.0_530.30.02_linux.run
Download the cuDNN package
You will need an NVIDIA account to download the cuDNN package from the cuDNN Archive.
At the time of writing the latest available cuDNN for 12.x is :
wget https://developer.nvidia.com/downloads/compute/cudnn/secure/8.9.6/local_installers/12.x/cudnn-linux-x86_64-8.9.6.50_cuda12-archive.tar.xz/
Install CUDA
Note: the second version number towards the end of the file cuda_12.1.0_530.30.02_linux.run
This was the driver version that was used to build these CUDA Libraries.
You should not use any driver that is lower than this version.
Install using the following command:
sudo sh cuda_12.1.0_530.30.02_linux.run --silent --toolkit --toolkitpath=/usr/local/cuda-12.1
--silent
This will force installer to do everything in a silence without any user-interaction.
--toolkit
Install only the toolkit, no drivers, samples, documentation etc
--toolkitpath
By default, it will install into the folder /usr/local/cuda-xx.x according to the version, but if you wish to install into a different folder you can specify it here. I have explicitly given it the default path just for demonstration.
IMPORTANT: The installer creates a symlink /usr/local/cuda that points to the actual installation folder/usr/local/cuda-12.1. Previously, that symlink pointed to /usr/local/cuda-11.8, but this new 12.1 installation will update/replace that symlink to point to /usr/local/cuda-12.1.

This symlink is used by projects to easily reference the CUDA installation without specifying the exact version number. For convenience it is the symlink that is shown in the PATH environment variable.
Install cuDNN
We will now install the CuDNN files that were downloaded earlier. Open a terminal to where they were downloaded earlier.
Extract the contents of the tar file:
tar -xvf cudnn-linux-x86_64–8.9.6.50_cuda12-archive.tar.xz
Change the directory to the extracted folder.
cd cudnn-linux-x86_64–8.9.6.50_cuda12-archiveThere should be 2 folders inside, include and lib. You need to copy the files from these folders into their corresponding directories inside the CUDA toolkit directory. You could do this via a file manager but since you will need elevated privileges, it’ll be easier to do via the terminal.
# Copy header files
sudo cp -P include/cudnn*.h /usr/local/cuda-12.1/include

# Copy library files (it could be lib or lib64)
sudo cp -P lib/libcudnn* /usr/local/cuda-12.1/lib64

# Set read permissions of files for all users
sudo chmod a+r /usr/local/cuda-12.1/include/cudnn*.h
sudo chmod a+r /usr/local/cuda-12.1/lib64/libcudnn*
Update Environment Variables
We need to update the Environment Variables in the shell config file located in your home directory (depending on your shell this could be .bashrc, .bash_profile, .zshrc, or .profile). This will be a hidden file so make sure you make it visible if you are going to do this via the file manager. Otherwise just use:
nano ~/.bashrc
If they don’t exist in the file already, make sure to add the following lines to the end of the file:
export PATH=/path/to/cuda/bin:$PATH
export LD_LIBRARY_PATH=$LD_LIBRARY_PATH:/usr/local/cuda/lib64
Note that the paths point to the symlink.
Update-Alternatives
The update-alternatives command in Linux is a utility for managing symbolic links to determine the default command or library if there are multiple versions of them installed, like in our case CUDA. It allows users to set which version of is to be used system-wide as the default.
You can learn more about it here .
Before starting, we can check the current status of CUDA alternatives and see what is currently set (if any).
# update-alternatives --display <name>
sudo update-alternatives --display cuda
None were found so it’s time to add them using the --install command
# update-alternatives --install <link> <name> <path> <priority>
sudo update-alternatives --install /usr/local/cuda cuda /usr/local/cuda-11.8 10
sudo update-alternatives --install /usr/local/cuda cuda /usr/local/cuda-12.1 10
Link (symlink): /usr/local/cuda
# This is the generic symbolic link that will be created or updated. It’s the link that other programs will use to access CUDA.
Name : cuda
# This is the name or group identifier for the alternatives being managed. This can be anything so long as you remember it
Path : /usr/local/cuda-11.8 and /usr/local/cuda-12.1
# The actual installation path of the specific version of CUDA you’re adding as an alternative
Priority : 10
This is the priority of this alternative. When multiple alternatives are available for the same generic link, the one with the highest priority will be used by default when mode is set to Auto. Since I normally set the default manually, I just set them all to 10.
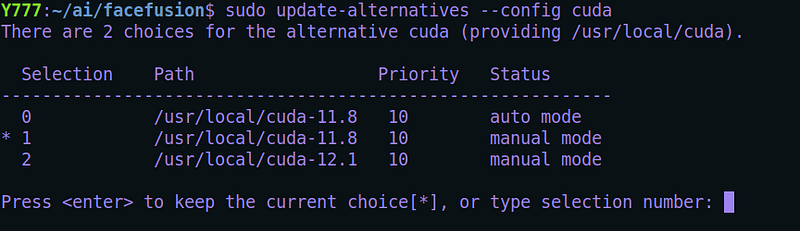
Select The Default CUDA Alternative
Now that we have installed some alternatives for CUDA, it’s time to select the one we want active as the default.
# update-alternatives --config <name>
sudo update-alternatives --config cuda
The output will look something like :
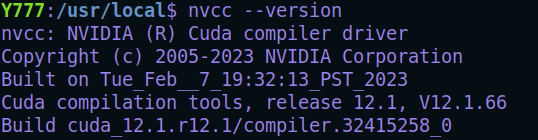
You can now verify the installation using:
nvcc --version
You can verify your driver version using:
nvidia-smi
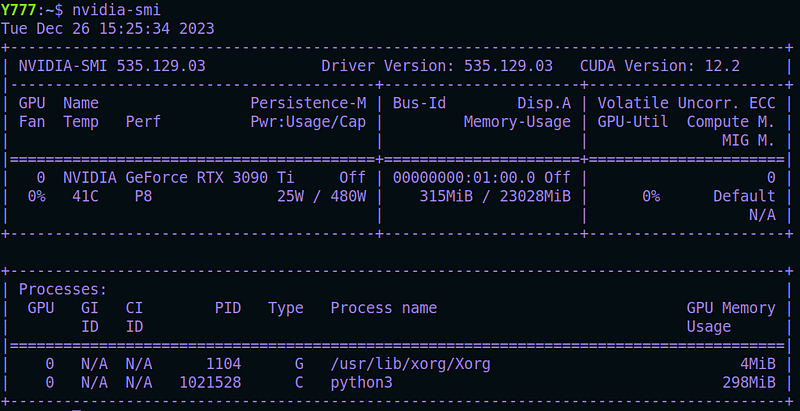
Note that it shows CUDA Version: 12.2 near the upper-right. This doesn’t mean we are using 12.2 since we don’t have it installed. It just reflects the highest version of CUDA that is supported by the currently-installed GPU driver : 535.129.03.
Removing An Alternative
If decide to remove an alternative:
# list cuda alternatives
update-alternatives --list cuda

# remove an alternative
sudo update-alternatives --remove cuda /usr/local/cuda-11.8
cuda will be updated to point to another appropriate alternative (and the group is put back in automatic mode), or removed if there is no such alternative remaining.
Windows
Here are the steps if you were to repeat the steps for Windows:
Install CUDA 11.8
Download CUDA 11.8 for Windows.
Start installation by double-clicking on the file. When presented with Installation Options, choose Custom (Advanced).
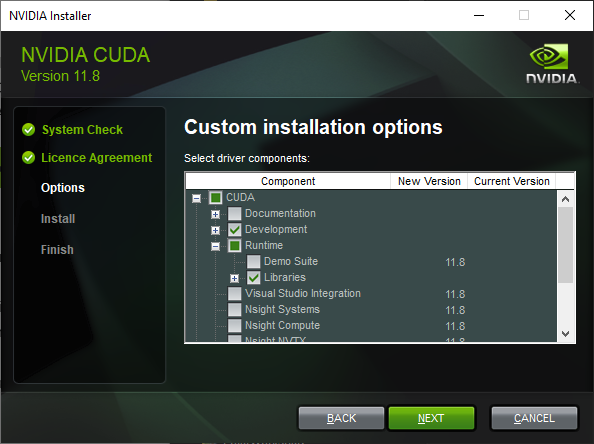
We just want the Runtime libraries (select Development if you plan on compiling your own version of certain packages etc.)
It will be installed in
C:\Program Files\NVIDIA GPU Computing Toolkit\CUDA\v11.8
Install cuDNN for 11.8
Extract cudnn-windows-x86_64–8.9.6.50_cuda11-archive.zip (you will need an NVIDIA account) to a folder.
Inside that extracted folder You will find bin, include, and lib\x64 directories.
From these directories, copy or move inside them to their respective CUDA Toolkit directories, typically located at :
C:\Program Files\NVIDIA GPU Computing Toolkit\CUDA\v11.8\bin
C:\Program Files\NVIDIA GPU Computing Toolkit\CUDA\v11.8\include
C:\Program Files\NVIDIA GPU Computing Toolkit\CUDA\v11.8\lib\x64
Check Environment Variables
Right-click on ‘This PC’ or ‘My Computer’ on your desktop or in File Explorer.
Click‘Properties > Advanced system settings > Environment Variables.
Under System Variables, find the entry Path and select it, then click Edit button. You should see a path to the C:\Program Files\NVIDIA GPU Computing Toolkit\CUDA\v11.8\bin directory. If not, then add it.
Click ‘OK’ to close all dialog boxes.
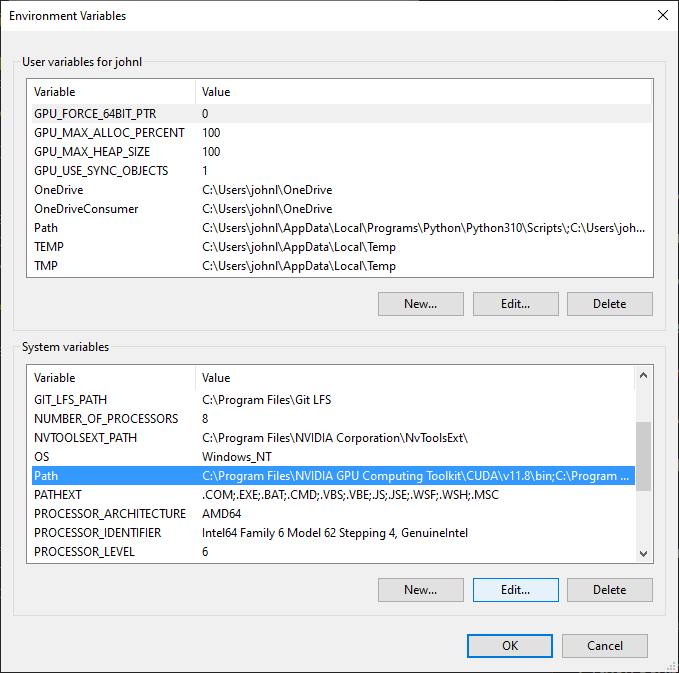
Note: A faster way to get to the Advanced System Settings dialog would be to type SystemPropertiesAdvanced into the search bar on the taskbar (if you have it enabled) Or you can click the Start Menu button and paste or type SystemPropertiesAdvanced
Install CUDA 12.1
Download CUDA 12.1 for Windows.
Start installation by double-clicking on the file. When presented with Installation Options, choose Custom (Advanced).
Again, we just want the Runtime libraries (select Development if you plan on compiling your own version of certain packages etc.)
It will be installed in
C:\Program Files\NVIDIA GPU Computing Toolkit\CUDA\v12.1
Install cuDNN for 12.1
Extract cudnn-windows-x86_64–8.9.6.50_cuda12-archive.zip (you will need an NVIDIA account) to a folder.
Inside that extracted folder You will find bin, include, and lib\x64 directories.
From these directories, copy or move inside them to their respective CUDA Toolkit directories, typically located at :
C:\Program Files\NVIDIA GPU Computing Toolkit\CUDA\v12.1\bin
C:\Program Files\NVIDIA GPU Computing Toolkit\CUDA\v12.1\include
C:\Program Files\NVIDIA GPU Computing Toolkit\CUDA\v12.1\lib\x64
Switching CUDA Versions
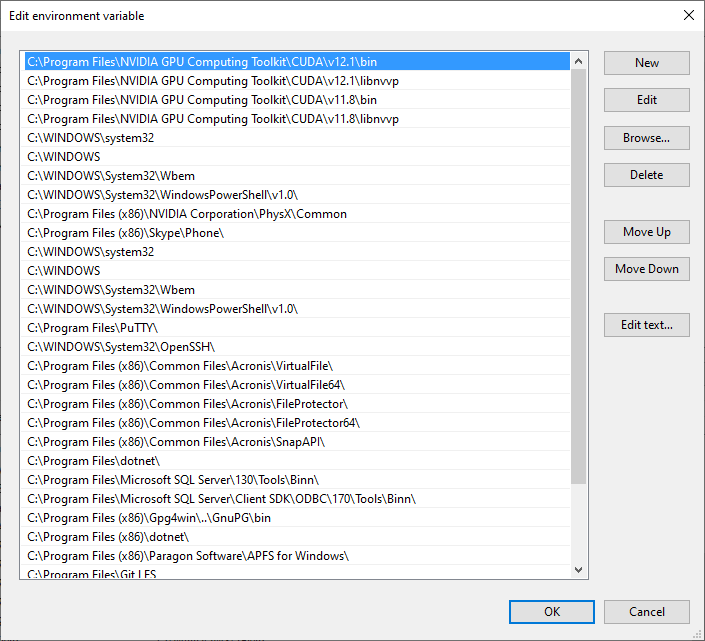
You will notice entries for (the libnvvp entries aren’t important for now):
C:\Program Files\NVIDIA GPU Computing Toolkit\CUDA\v11.8\bin
C:\Program Files\NVIDIA GPU Computing Toolkit\CUDA\v12.1\bin
If you open up a command prompt and type nvcc --version you will see that it will report that 12.1 is the current active version. This is normal since it was the most recently installed version.
Windows doesn’t have a built-in equivalent to Linux’s update-alternatives. But changing between them is very simple. From the environment variable list, to make 11.8 the active version just simply move its entry above 12.1 so that it takes priority. Once you have done this you can use nvcc --version again to check.


