
Managing File Uploads in React with Ant Design

In a recent project, I had to create a form component for a React app, and one of the form items needed to allow the user to upload a file. Ant Design’s Upload component makes this process extremely easy with most of the frontend file management you need built into it.
Upload is not dependent on Ant Design’s Form component. You can use it within modals or just by itself. For my case, I was advised by a colleague that the Form component might be better than a modal with inputs because I would have to rely less on local state. I have to say the Form component is pretty robust.
I’ll get more into how I used the Form Component in a moment, but while the Form component is robust, all you need for the Upload component to work in your React app is to install the ant design dependency and import Upload from it. After installing the dependency, include these two lines at the top of your component:
import "antd/dist/antd.css";import {Upload} from "antd";If you’re planning on loading the styles with Webpack, check out this StackOverflow question and answer. For more information on getting started with Ant Design, click here. Once everything is imported, we can start using it.
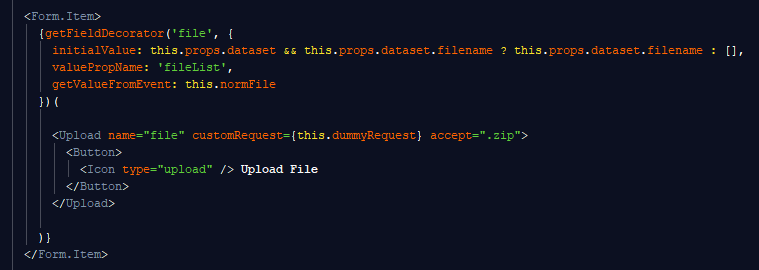
The Form.Item component allows us to use props provided by the Form component to better handle the form’s input. One of the props it provides is getFieldDecorator.
getFieldDecorator allows for two-way binding for our form. This enables us to manage input without using local state. By wrapping our Upload component in getFieldDecorator, we can pass parameters to our input for improved form handling. As you can see in the picture above, we are using it to pass an initialValue parameter (synonymous with a default value) as well as a valuePropName parameter (used to differentiate data in the form items). The last parameter I’m passing to getFieldDecorator is getValueFromEvent.
This is a parameter that takes an argument as a function that can be used to analyze the data in the event that is fired when the user uploads a file. We’ll use it to determine what information is being passed to our Upload component and manipulate it according to our needs (like limiting the number of files that can be uploaded at once). There are other parameters you can use in getFieldDecorator such as rules (i.e. making an input required, adding a message if the input hasn’t been filled, assign the data type that is acceptable, etc), as well as other form input validators and custom functions.
Now, back to the Upload component.
The Upload component has properties similar to an HTML input element with type “file”, such as name and accept. In my case, are only accepting zip files.
In an Upload component, you usually need to have an action. The action includes the uploading URL, allowing us to see where your file will be sent. Since I’m passing the file along with the other data in the form to a specific endpoint in our database, the action is not needed. In order to get around the action requirement, I’m implementing customRequest.
This function does nothing.
Seriously. It’s just there as an action placeholder so I don’t get an upload error. This is my customRequest, aptly named dummyRequest.
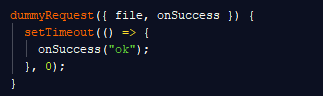
That’s it. It’s job is just to trick the Upload component into thinking an action is included. customRequest can be used for more than tricking Upload components, but for our case that trickery is the only use we need from it.

Now our file’s data can be passed to the Form without throwing an action error.
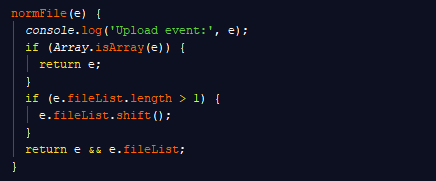
Remember our getValueFromEvent prop and the function we passed it? This is where we can see not only the fileList (array of selected file objects) but the currently selected file’s data. Here’s what it looks like when we log it to our console:

As you can see, the first value is an object — the file currently being uploaded. This object contains a few attributes.
The first attribute we’ll look at is originalFileObj, which is the actual file object containing the file’s data. Some of the attributes in this object are pretty straightforward, such as file name, file type, the size (represented in bytes), as well as modification information. The other less than obvious attributes, uid and webkitRelativePath won’t concern us very much right now. But if you’re interested, check out the File section of the MDN web docs.
Some of the other attributes in the first value of our event object are also found in originalFileObj, but here are a few that aren’t:
Percent: The percentage of the upload’s completion.
Status: Whether or not the file is uploading or finished.
Response: The response we get back from the upload request.
Error: If there was an error during the upload.
Another way you can see the file data is if you use the beforeUpload prop. This prop is a hook function that is executed before the file is uploaded. This is good if you plan on using component state rather than the Form’s data binding. Here’s an example of a beforeUpload function:

If you log this data, you’ll see this:

This object is similar to the first value in the upload event captured by our normFile function, but does not include status, response, error or percent. These are attributes found in the event.
Remember: An event typically contains more information than the input data captured by the event. To put it into perspective, in order to get the result of the typing a letter into an HTML text input box, you’d need to use event.target.value. This is because the event itself contains a lot more than just the input data. You can learn more about the event interface here.
You still with me?

Now, back to our event object in normFile.
The second value in our event object is the fileList. This object contains an array of file objects. These file objects represent the files that have been uploaded and belong to the Upload component. fileList is the prop name utilized by the Upload component to differentiate the data.
All of this is the data captured in the event (change) in file selection for the form’s data. While it’s not used here, you can also use an onChange event handler with the Upload component.
The normFile function serves another important function beyond being able to inspect the data found in the upload event. See below.
The whole purpose of the file upload is for a user to be able to upload a file containing data pertinent to the object instance being created by the Form submission. This allows the user to instantiate an object with initial data, rather than creating an object with empty attributes, only to have to add the data from the file later manually. Depending on the amount of data, there’s no telling how much time this could save.
What does this have to do with normFile? Well, if the dataset is meant to be modeled from the data from one source, by allowing the user to upload more than one file at a time could result in combined, duplicated, or just plain incorrect data. Imagine trying to make things easy on yourself by uploading a file rather than relying on data entry, but you accidentally (or intentionally) end up selecting more than the file you need to. Now you’re stuck with a useless jumbled file monstrosity.

OK I’m being dramatic. In reality this could be handled by the endpoint by just throwing back a general error or some argument error if the file list is too long. There are also genuine use cases for uploading multiple files at once (think email attachments, Instagram posts with multiple pictures, etc.). But for my case, it would just create conflicts, so it needs to be addressed.
To address it, we could use error handling from the endpoint and leave it up to the user to try to re-upload the correct file. Or, we could limit the length of the file list to just one file before the data is submitted. It operates the same way as making an input required. This way if data is needed, or needs to meet a specific requirement, it can be handled ahead of time, rather than having the endpoint throw an error saying “Hey, dummy, you need to do this...”.

In the normFile function, we can check the length of fileList, and if it’s greater than one, we can just do fileList.shift() to remove the item at the first index. You could also just write fileList[1] to get just the most recently uploaded file. Why do we want to omit the file at the first index? Well, let’s look at the fileList after trying to upload a second file.

As you can see, we have two objects. But look at the statuses and the responses for each of them. The object at the first index of fileList has a status of “done”, and a response of “ok”. The second object has a status of “uploading” and the response is undefined. What does this tell us?
The object at the first index is the previous file. It’s already been uploading (hence the status of “done”) and there’s actually a response (meaning the request was resolved and returned a response to indicate so). Our second object literally says it’s still “uploading” meaning it’s in the process. And the response? Well, there is none. Because the request is in progress.
Depending on your preference, you can choose to remove the most recently added file and just default to the previous one. But this would require some kind of notification so the user knows “hey, you tried to upload a file but you can’t upload more than one, so we defaulted to the earlier one.” But what if the user knows they uploaded an incorrect file and want to simply re-upload a new one? They could remove the previous file that was uploaded. Or, we could make it a little easier. When they upload a new file, it just overwrites the old one. That’s what I decided to do here, which is why I’m removing the file object at the first index (shift) of the array.

Now you can handle file uploads efficiently and effectively. With the file object captured, you can send this information to wherever you’re storing your data.
Upgrade your free Medium membership to a paid one here and for just $5/month you’ll receive unlimited, ad-free, stories from thousands of writers on a wide variety of publications. This is an affiliate link and a portion of your membership helps me be rewarded for the content I create. Thank you!


