
CODEX
Making an RTS game #1: Placing buildings (Unity/C#)
Let’s make a RTS game using the famous Unity game engine!
TOC | Tutorial #2: Adding a very basic UI ➡️
📕 Get the ebook and bonus material on Gumroad! 🚀 Find the code of this tutorial series on my Github!
Today, I start a series of video game programming tutorials on how to create a RTS game using Unity. This well-known, high-performance game engine is amazing and really allows you to create incredible stuff; the best part is that, in my opinion, the free version already has enough features for us to make most of the projects we want. Even if it takes a bit of time to get used to the software interface, the inspector and all the component-based logic, I find it is still a super fun and intuitive way to create games once you get the hang of it!

Disclaimer: This article does not go through all the Unity fundamentals. If you are not used this framework yet and want to learn some basics, check out their great tutorials!
Real-time strategy (RTS) video games are those games where you control packs of units, create buildings and collect resources to build a little town or city. They often have an aerial orthographic camera and you act as a somewhat omniscient superior being that can macro/micro-manage their units all over the map. Contrary to “turn-based strategy games” where each player takes a turn at playing and the others have to wait until you (or the AI) finishes the turn, RTS forces the players to play altogether in a seamless and continuous way. Great exemples of this genre are the Warcraft/Starcraft series by Blizzard, the Caesar series by Impressions Games or the Empire Earth series by Stainless Steel Studios and Mad Doc Software.
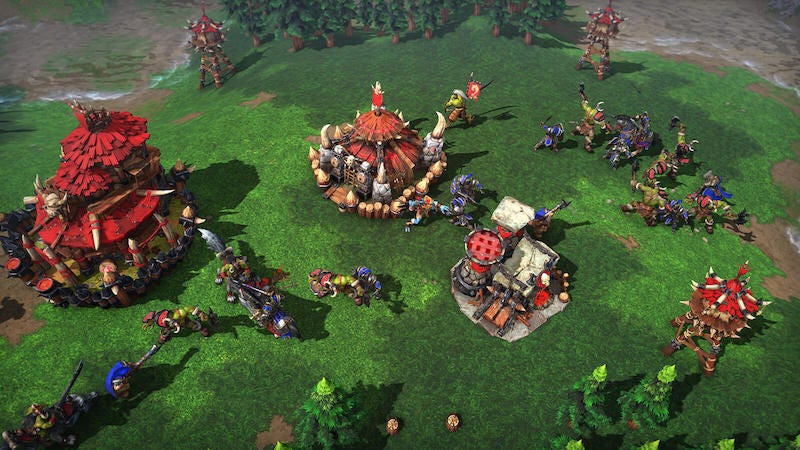
Note: besides having exquisite gameplays on their own, what I’ve always loved about those games is that they are often shipped with a game editor that lets you create, configure and then play with your own maps and scenarios. To be honest, those “in-between” tools that hide some of the complexity but still give you the freedom to give life to your crazy stories are partly what lead me to program video games with more evolved tool! ;)
For the first tutorial in this series, let’s start with one of the core mechanics of a RTS game: building placement. This is the logic that lets you:
- pick a building type to build
- prepare where you want to place it (while checking for/showing invalid placement)
- actually place it on the ground so that it is “fixed” and cannot be moved anymore
- (optionally stay in “placement” mode so you can create another building of the same type)
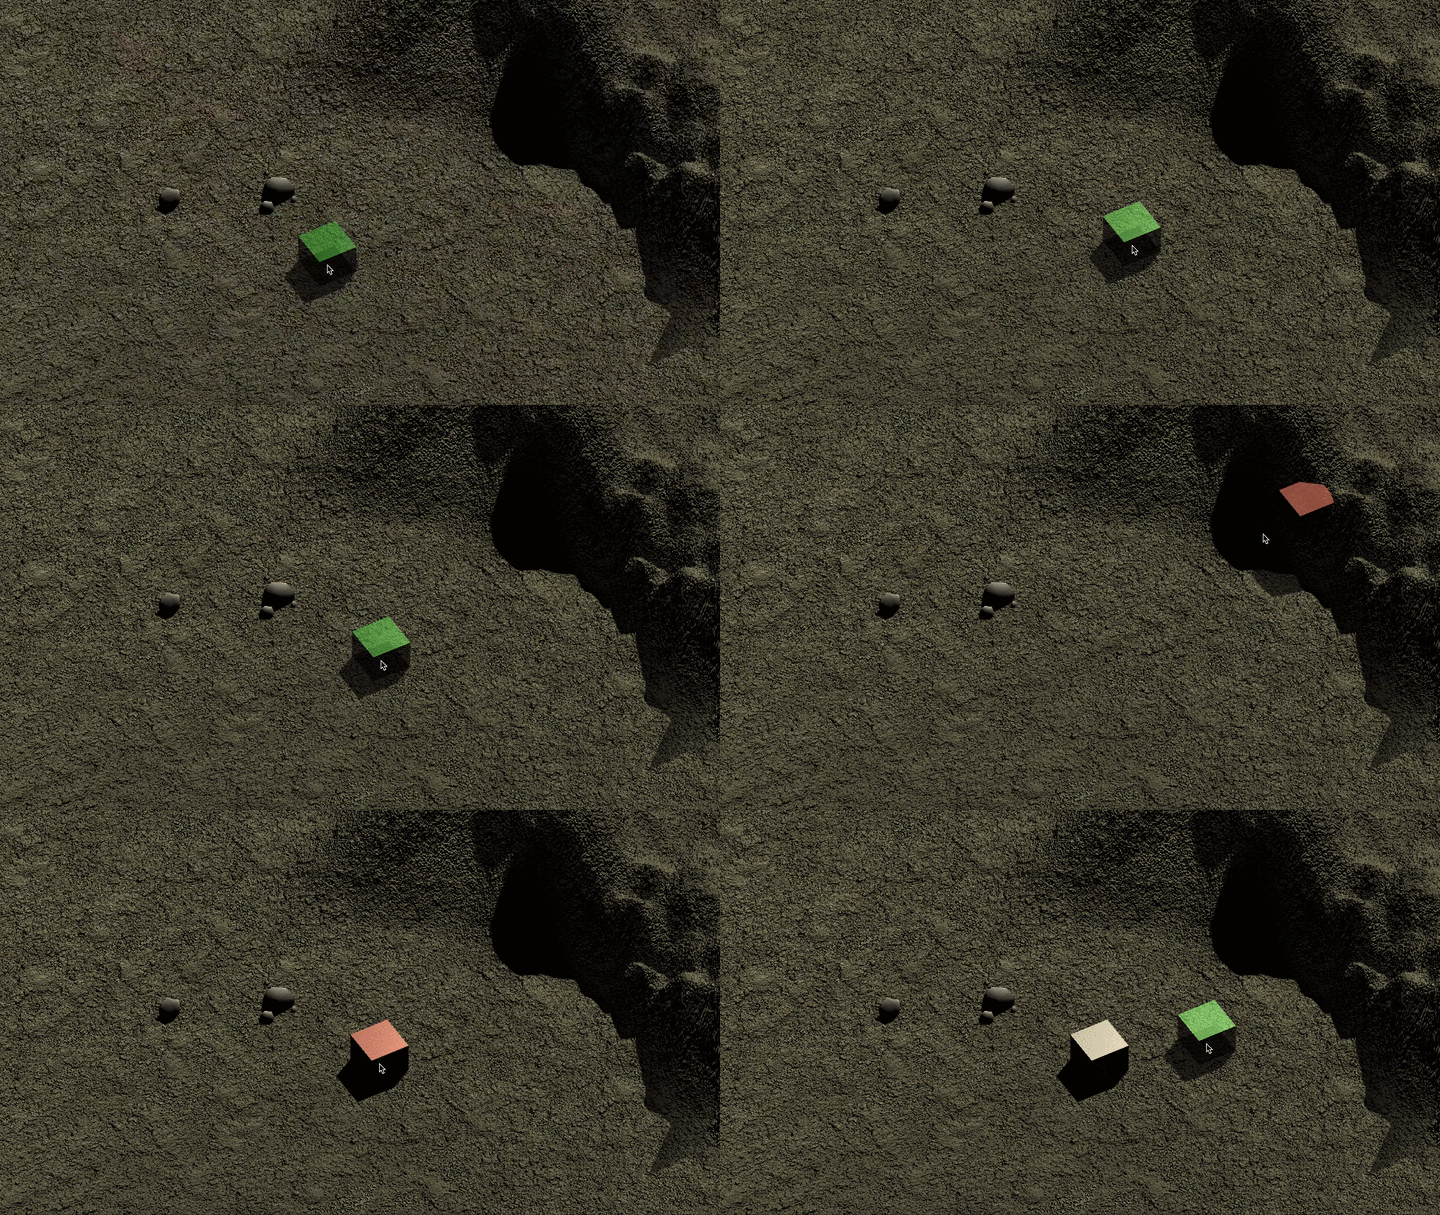
In this article, we will skip the first step and consider that we already selected the building type we want — we will see how to create the UI and buttons required to pick the type in a later episode. Here’s a quick peek at what we’ll have at the end of this tutorial:
Preparing some prefabs
At this early stage in our project, we don’t yet have game assets (like building or character models, sounds and musics, nice images and icons…). We’ll start off by using Unity’s primitives such as cubes, spheres, blank images, etc. We can however leverage the system of prefabs to easily prepare the game objects we want to instantiate in our scene as we play along.
Prefabs are a feature of Unity that let us prepare a game object with all of its mesh(es), components, scripts and other unique properties so that, when you need to add this object to your scene, it is already all configured properly. For example, imagine a complex character model with a script to control the movement, an animator to control the run and jump animations, an audio source to cast sound effects whenever you switch your weapon and some physics collider to interact with the environment when moving. If you had to reconfigure all of this every time you added the character to a scene (say when you change of game level and reload a new scene), it would be quite painful. Instead, you can configure everything once and then “instantiate” the prefab.
The other nice thing with prefabs is that all instances of the same prefab are kept in sync: whenever you modify something on the prefab itself, all instances will automatically reflect the change.
For our RTS game, let’s start simple. We will create two prefabs:
- a “Building” prefab: it’s a simple cube that represents our most basic building type
- a “Rock” prefab: this small object will be part of the world and block you from placing a building on top of it — you can use another cube (I will take a small 3D model I made for a previous game)
On both of these prefabs, we will have BoxCollider components to compute physics and collisions.
“Building” prefab
To create this prefab, first add a new “empty object” to the scene. Then, create a “cube” primitive and add it as a child of this empty object. Now, create a new folder in your project called “Resources”; it needs to be named exactly like this so we can load things from it in the code using Resources.Load(). Inside this directory, create another folder called "Prefabs", and another called “Buildings” inside of it. Finally, drag your new game object into this folder to create a new prefab from it. You can then click on "Open Prefab" to edit the prefab directly.
Here are the hierarchy, visualisation and properties for the “Building” prefab:
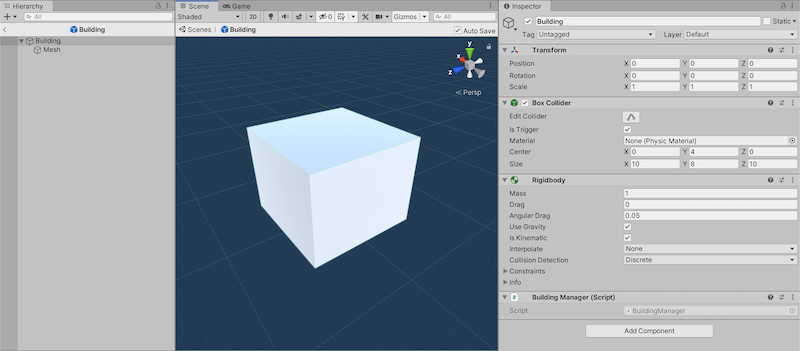
- We have a child object called “Mesh” (this is important because we will reference it in the code later on) that is the actual display of the object, our cube
- We have a
BoxColliderthat matches the extents of our cube primitive; it has the "Is Trigger" flag turned on to prevent the colliders from blocking each other and to just send signals when a collision occurs - The prefab also has a
Rigidbodycomponent in "kinematic" mode: this will allow us to catch the collisions with the other objects without gravity truly affecting the building - And finally, we have a custom script on the prefab, the
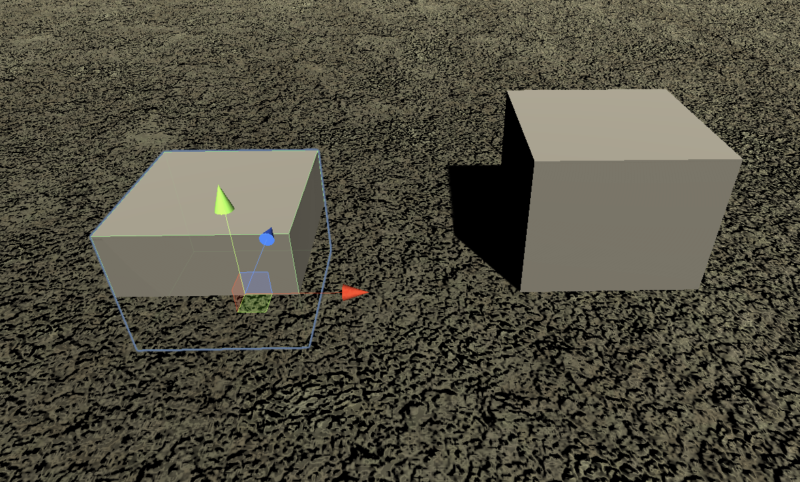
BuildingManagerscript: we will gradually add things to it in the upcoming sections so for now, just create a new C# file calledBuildingManager.csand add it to the prefab - When placing the “Mesh” child, make sure to move it half-way on the Y-axis: by having the “empty object” parent, we can set our prefab anchor point to not be in the middle of the object but at the center of the bottom face; this way, when we place the building on the ground, it will be actually on the ground instead of half-burried in it!
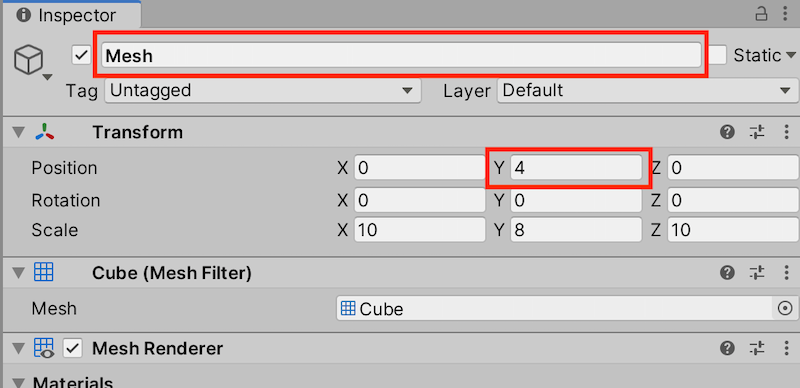
This picture shows a half-burried version on the left and the correct version on the right:
“Rock” prefab
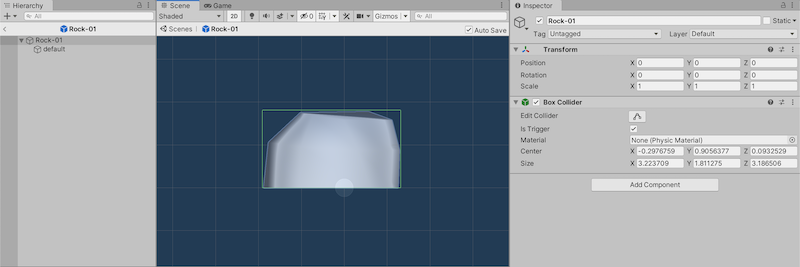
This one is simpler. We directly import our asset, or create a cube, and the hierarchy doesn’t really matter. The important thing is to add a BoxCollider on the prefab with the "Is Trigger" flag on:
Creating some reference building data
It’s time to really start coding! The first thing we want to do is to have a list of all available building types. So let’s define a class to represent some abstract building data (a building type). It doesn’t need to inherit from the MonoBehaviour class because it just holds some data:
- The class has only 2 fields: the unique code of the building (that will be used to get the proper prefab and perhaps other specific data in the future) and the amount of healthpoints the instances of this reference will have when created
- We use getters-only to better encapsulate the code: rather than exposing the variables directly from the class, we use private variables and create accessors to get them so that no one can update their value but the class itself
Now, we can create a globally accessible variable with a list of reference building data — today, we’ll just define it manually but ultimately we should load those references from a more easily modifiable data file. To centralise those global variables and make them easy to get, we’ll create a new C# file: Globals.cs. And this file will contain static variables or functions so they can be called without instantiating the script.
Creating building instances
We’ve defined our “abstract” data class. Be careful: it is not truly abstract from the C# point of view because we actually instantiate it to have our list of available buildings; what I mean is that we won’t directly represent this data on the screen but instead feed it to our real building instances — the ones that we place on the ground when dragging our mouse and clicking.
Those instances are handled by another class, Building:
We create a new Building instance using a BuildingData reference so it has all the required metadata. The instance also has a game object and transform associated with it, because it is an actual object in the scene. This game object is loaded from our "Resources" folder, it's the prefab we created before. Also note that we have more complex accessors that in our previous BuildingData class:
- for the
_currentHealthfield, we have both a getter and a setter (HP), because we might want a quick way to update the value from outside the class - the
DataIndexaccessor doesn't correspond to any private field in the class, it is a "computed" property that gives us the index of the abstract building type data instance in the global list
In addition to those accessors and the constructor, we have a custom function to set the position of the game object in the scene, SetPosition().
Moving a “phantom” building with the mouse
In RTS games, it is quite common to have a “phantom” visualisation of the building you want to place before actually placing it on the terrain. This way, you can better prepare this placement and check that the building placement is valid. This “phantom” follows your mouse while sticking the soon-to-be-placed building to the ground.
To do this, we will use Unity’s physics raycast system: this allows us to cast a ray from the camera to the ground based on our mouse position; and therefore get the exact point in the 3D world on the ground that our mouse is pointing to.
Setting a layer on the terrain for optimized raycasting
To begin with, let’s apply a specific layer to our terrain — thanks to this layer, we will be able to check only the collisions with the ground when casting our ray (otherwise we would potentially get hits for all colliders on the way). The first step is to create and add the layer to our terrain in the Unity inspector:
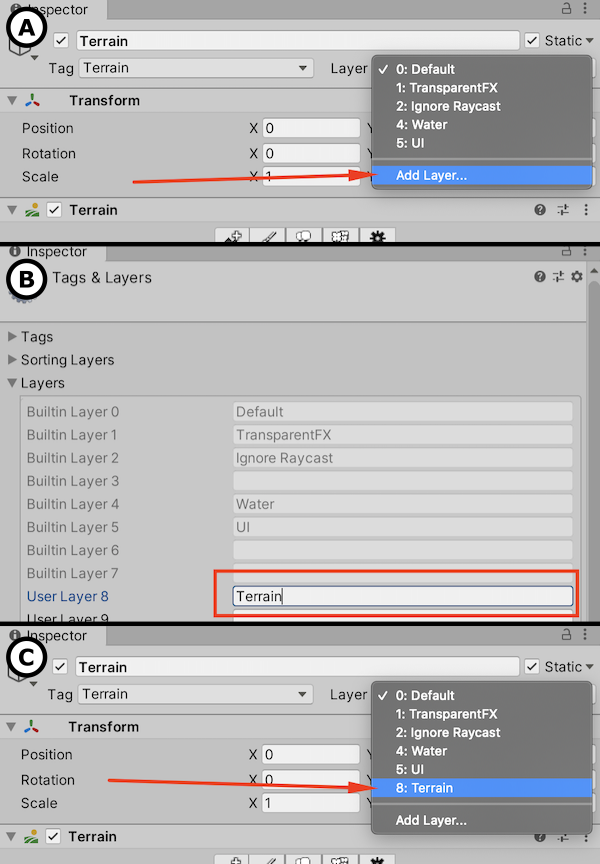
Then, we can define this layer as a global variable in our Globals.cs file (we simply use the index of the newly created layer, 8 — Unity uses bitmasks for the layer masks):
Creating the BuildingPlacer.cs script and doing the raycast
Let’s create a new C# file called BuildingPlacer.cs . Since it doesn't correspond to any particular game object but is somewhat global to the scene, we will:
- create a new “empty game object” in the scene
- name it “GAME” to show it has scripts that are global managers of the game state
- add the
BuildingPlacerscript to it
Then, we’ll add this code to the BuildingPlacer script:
We use the _placedBuilding variable to know which Building instance (if any) is currently dangling at the end of our mouse pointer. Now, we can actually do the raycast:
Note: we will be implementing the CheckValidPlacement() method and HasValidPlacement property on the Building class very soon - for now, the code will not compile!
Very soon, we’ll have our “phantom” building follow the mouse and even climbing mountains! (And we’ll be able to press the
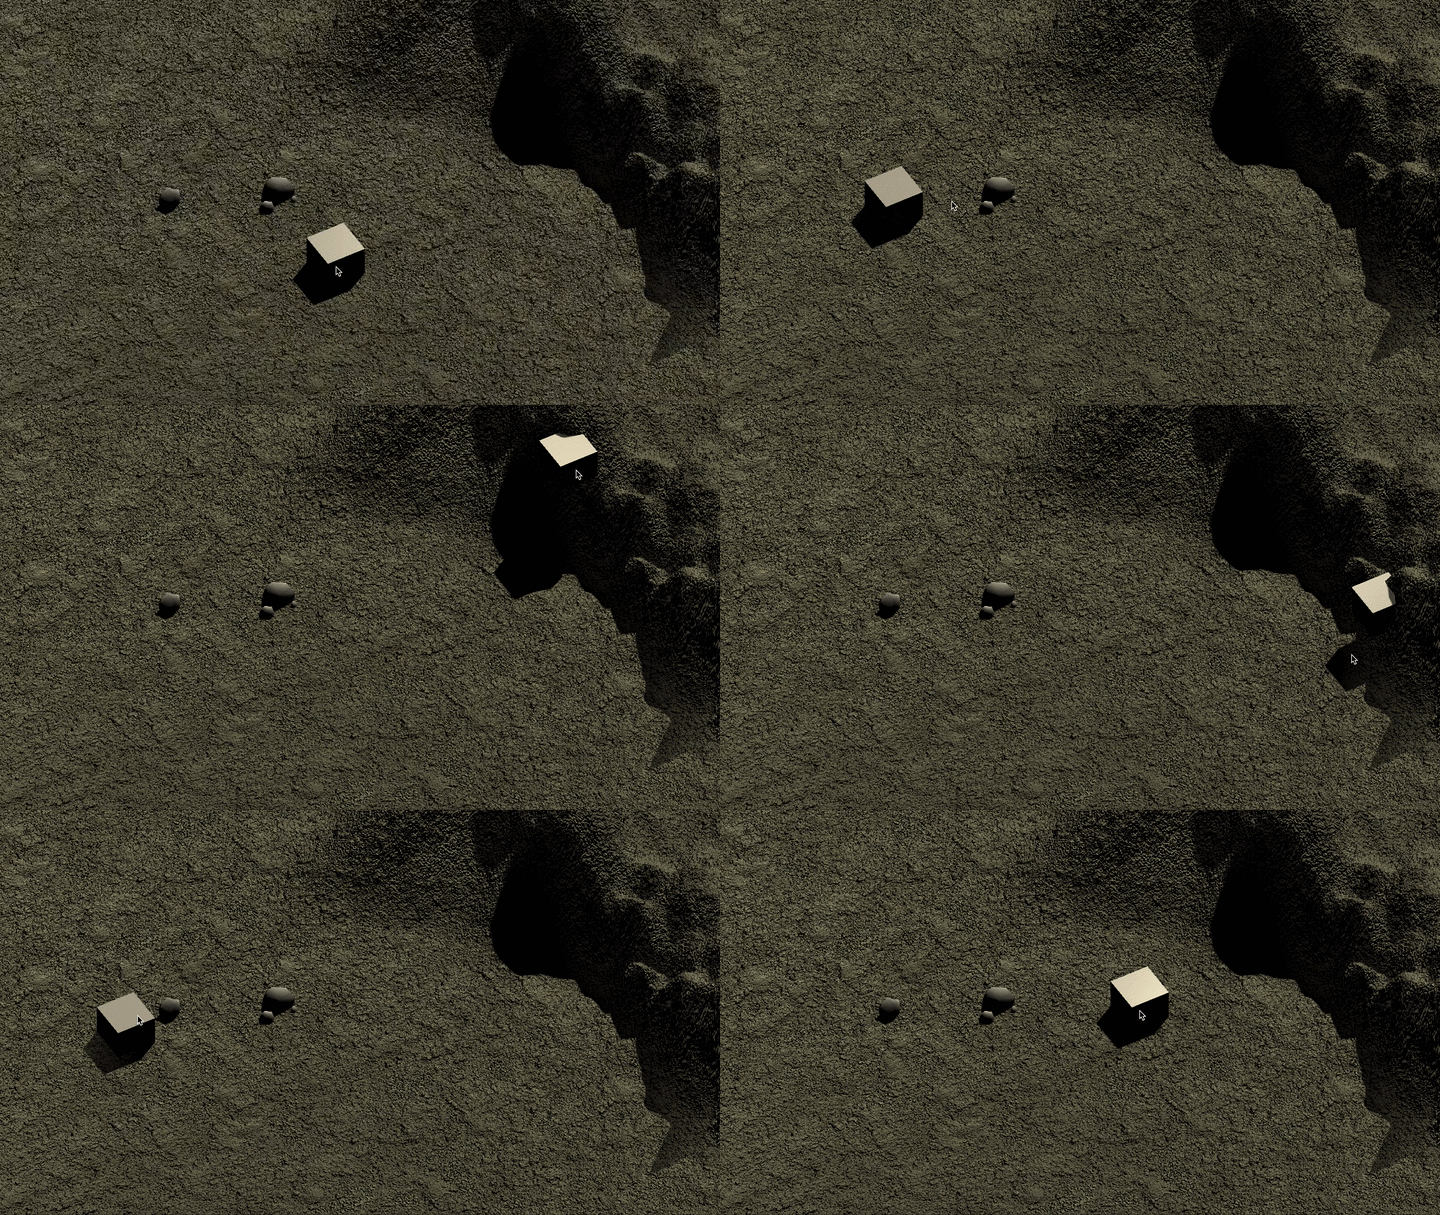
All that is left is to really place the building (which means making it stick to the click position instead of the mouse, and take a new “phantom” building to replace it)! To do this, we will:
- use an enum to represent the possible placement states,
BuildingPlacement - initialise the placement to be “valid” at the beginning (while in “phantom” mode)
- change it when placing the building
Let’s add two methods to the Building and the BuildingPlacer classes — and fix our _PreparePlacedBuilding() method so it doesn’t “erase” the previous building!
Note: when we place the building, we need to deactivate its “Is Trigger” flag because we want other objects to collide with it, now that is solid on the ground.
Checking the “phantom” building placement
Changing the building’s visual in case of valid/invalid placement
Before adding all the placement checks, we’ll put in place some logic to update the building instance materials and clearly show if it is placed or if it is a “phantom” with either valid or invalid placement. Indeed, a build instance can be in either one of those 3 states:
- “valid”: when the building has not been placed yet and is in “phantom” mode, if all placement checks are okay, then the “phantom” building should be displayed as a somewhat green transparent shape
- “invalid”: still in “phantom” mode but some placement check does not pass — then the building should use a red transparent material
- “fixed”: after really placing the building, we need to restore its original material(s) that are set on the building’s prefab (with our basic cube, it’s Unity’s default material)
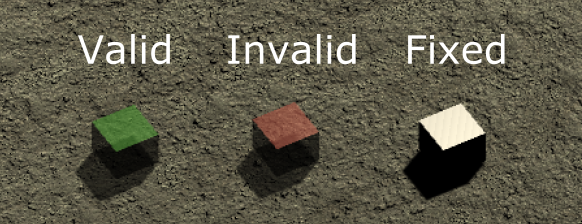
So we simply need to add the “invalid” state to our previous BuildingPlacement enum possible values, and we need to define the two new materials “Valid” and “Invalid” in the “Resources” directory, in a “Materials” subfolder. Here is the “Valid” material, for example (using the transparent rendering mode and with an Albedo that has a non-1 alpha):
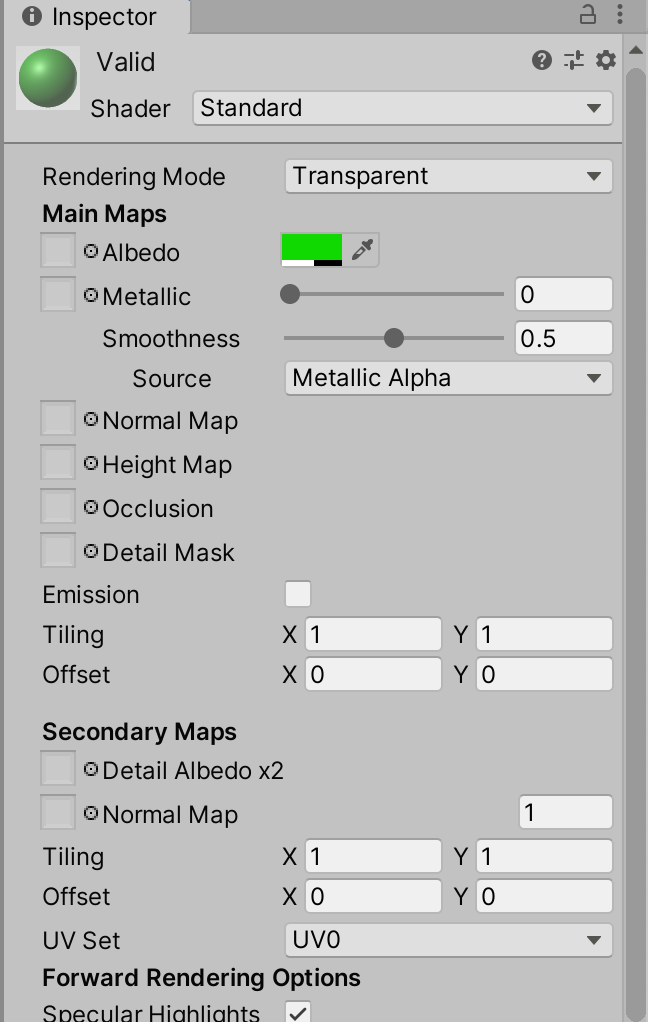
We know we need to remember the prefab’s material(s) so we can restore them. We also need a field to store the current placement state of the object. So, let’s add these fields to the Building class and initialise them in the constructor:
The next step is to actually update the materials of the mesh depending on the placement state. To do this we add a SetMaterials() method to our Building class (and we call it in the constructor and the Place() method):
Note: here, we used an override of the SetMaterials() function to handle the case we pass no parameters in.
Avoiding collisions with other buildings or doodads
In games, “doodads” are all the little objects that bring life to the world, induce collisions and can’t usually be interacted with: trees, rocks, walls… Here, let’s say we have our little rocks on the ground and that we can’t place a building if it collides with a rock. To check for this collision, we’ll use the box colliders we added to our prefabs and the Unity built-in functions OnTriggerEnter() and OnTriggerExit(). This is done in the BuildingManager class:
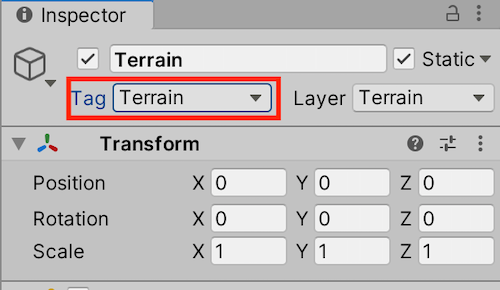
Note that we need to ignore the terrain when checking for collisions; we use a “Terrain” tag on our terrain object to handle this distinction.
We need to call our Initialize() function when we select our building type so that the newly created Building instance can link its data into its BuildingManager script (remember we put this script on the "Building" prefab so it is automatically present on every new instance of the prefab):
Forbidding placement on too steep terrain
Finally, we don’t want the player to be able to place buildings on steep slopes, mountain sides… To avoid this, we will simply extend our HasValidPlacement() function. We'll use raycasts as we did before: the idea is to project a ray from each of the 4 bottom corners of the "phantom" building box collider and check that it does meet the terrain at a relatively close distance (see the comments in the code for more details):
Conclusion
Pfiou, we’ve managed to program one of our core RTS mechanics and we can now place buildings on the ground, check for invalid placement and update both the building state and its display as needed! Next time, we will add a basic UI management system so we can click on a button to select the building type we want to place.
I hope you like this series and that you’ll be interested in the next episodes! :)
To read more of my content, and articles from many other great writers from Medium, consider becoming a member! Your membership fee directly supports the writers you read.
TOC | Tutorial #2: Adding a very basic UI ➡️
📕 Get the ebook and bonus material on Gumroad! 🚀 Find the code of this tutorial series on my Github!
If you liked this article, you can find more blog posts about tech, AI and programming on my website :)


