
EDUCATION | STEM | DIY | CREATIVITY | BIOLOGY
Make an Earthworm Habitat and Observe Wormy Stuff
A simple, sneakily educational DIY for kids and grownups too!
Taking care of a small flock of chickens keeps me very busy, but I still find time to write and illustrate fiction stories about them for children in the upper elementary grades. They also make good read-alouds for younger children.
Recently my chickens and I decided to revise our newsletter format to encourage reading. Each week, our newsletter will share a chapter from a published book along with fun activities. We are starting with one of our latest books titled PeeP! which begins when Gracie and Bessie were hatchlings.
Here is a fun activity that my chickens think you might enjoy even if you aren’t a child or a chicken. Just so you know, we tried to do it together, but they ate the earthworms before we even got started. If you do this, please do not eat the earthworms!
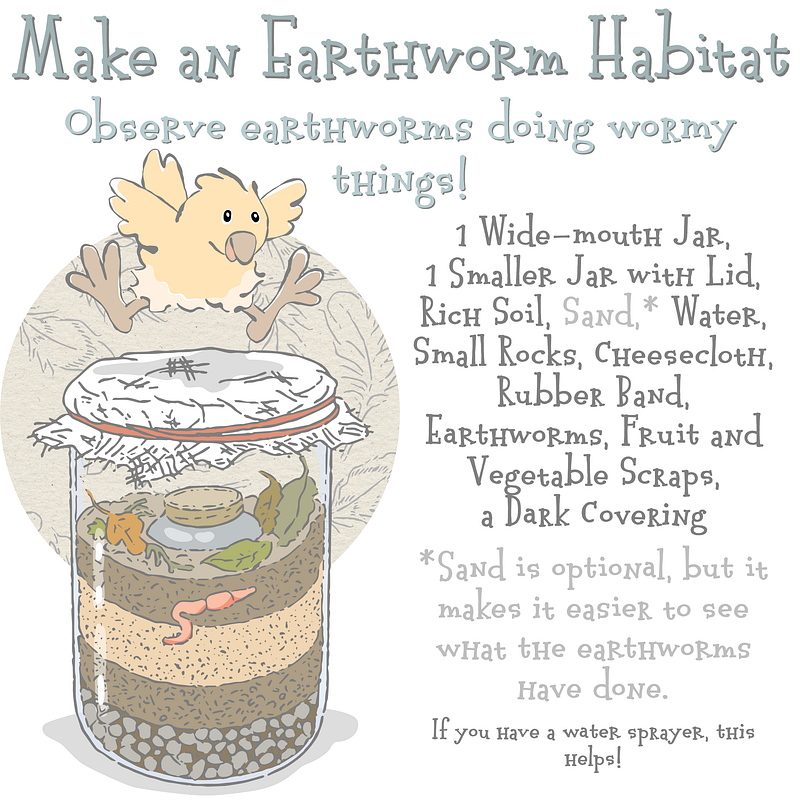
Steps for making an earthworm habitat
Step 1: Put a 1-inch layer of rocks in the bottom of the large jar. This will help with drainage. Earthworms need moisture, but too much is not good for them.
Step 2: Fill the small jar with water and tighten the lid. Place this inside the larger jar on top of the rocks. This encourages the earthworms to dig around the outside so you can see them better.
Step 3: Fill around the small jar with soil. You can use a recycled spray bottle to add moisture to the soil, but be sure to rinse it very carefully. Earthworms do not like cleaning chemicals! Always remember that earthworms must have moist soil. (Not too dry. Not too wet. Just right!) Layer soil with the sand like a sandwich. Make several layers for a double or triple decker sandwich! (You don’t have to use sand, but it does make it easier to watch the earthworms while they do their work. Eventually the layer of sand will get mixed in with the layers of soil by the earthworms!)
Step 4: Add your earthworms to the last layer of soil. Be gentle and cover them lightly with soil. Do it sort of like you are tucking them into bed for the night!
Step 5: Add some fruit and vegetable scraps or soft decaying leaves. Your earthworms will help turn them into more soil!
Step 6: Secure the top with the cheesecloth and the rubber band. This protects against spilling but still lets air in.
Steps for maintaining an earthworm habitat
Step 7: Keep the earthworm habitat in a cool place and cover it. Earthworms like being in a dark place, and they don’t like being in a warm place. You can make a covering with construction paper or a brown paper bag to keep it dark inside.
Step 8: Check on your earthworms each day. Mist or lightly spray inside your earthworm habitat so it doesn’t dry out.Earthworms like soil that is not too wet and not too dry. You can use a recycled spray bottle for this, but make sure you rinse it out really well. Earthworms do not like cleaning chemicals!
The Most Important Step: Be sure to return the earthworms (and soil) to their natural home once you have spent some time studying them. Your earthworms will appreciate it! Then they can get back to their most important job which is helping our soil to grow our food.
If you’re interested in more activities like this and the stories that go with them, just visit the link below.
Our newsletter is published every Friday morning at 9:20 AM (Eastern). If you’re interested in subscribing, there’s a simple form. We are not trying to build a huge email list for marketing. We would rather have readers who enjoy and share what we have to offer in a format that is safe, secure, easy to share, and has no high-pressure-sales pitches.
Consider all of this a gift from one very sweet little chicken’s heart.
Will I be able to keep my promise to have the word “chicken” at least once in every Medium story? Find out by subscribing to Medium today as a reader or writer — or both!


