
Machine Learning Model Deployment on Heroku Using Flask
Machine Learning Platform as a Service

A few weeks back I wrote a post about deploying a machine learning model using Spark and it's a great way to deploy ML models if you want to do predictions in a batch and not real-time.
But if you want predictions in real-time, then this solution is not ideal, because…
- It will take a couple of seconds to make predictions and it won’t be real-time.
- There will be manual deployment with some downtime.
- There is no UI to test the solution.
Deploying a machine learning model as a service can solve most of these problems, and predictions will be real-time. But there will be issues like scalability, monitoring, and downtime of service. Though there are many cloud providers to resolve these issues and provide 24*7 support. Still, if you are a small company or just starting in AI/ML and don’t want to spend more time handling cloud deployments or DevOps tasks and want a quick deployment option, then deploying your machine learning model on Heroku using Flask will address all your issues.
Heroku using Flask
Heroku is a Platform-as-a-Service tool by Salesforce. Heroku is backed by AWS and all Heroku applications/services are hosted on AWS. AWS provides the infrastructure and handles all the load-balancing, resource utilization, networking, logging, and monitoring and Heroku acts as a middle-man to provide a scalable, automated rapid deployment platform with all cloud capabilities. Using Flask will provide UI to test and it can be integrated with enterprise-level applications.
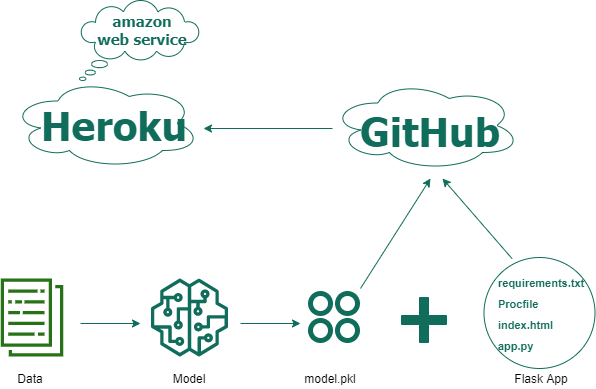
Steps for deployment on Heroku using Flask-
Deployment on Heroku using Flask has 7 steps from creating a machine-learning model to deployment. These steps are the same for all machine learning models and you can deploy any ML model on Heroku using these steps.
- Create an ML Model and save (pickle) it
- Create Flask files for UI and python main file (app.py) that can unpickle the machine learning model from step 1 and do predictions
- Create requirements.txt to setup the Flask web app with all python dependencies
- Create Procfile to initiate Flask app command
- Commit files from Steps 1, 2, 3 & 4 in the GitHub repo
- Create an account/Login on Heroku, create an app, connect with the GitHub repo, and select the branch
- Select manual deploy (or enable Automatic deploys) on Heroku
And it's done!!
You can check the logs in the Heroku dashboard or use Heroku CLI. At the end of logs, it will give the URL to access the deployed application on UI. The URL will have syntax like- https://app-name.herokuapp.com/
Deep Dive
Now let's see the actual code implementation (in python) for the above 7 steps.
In Step 1, we create an ML model and persist it in a pickle file.
Here gbc in line 3, is a Gradient Boosting Classifier model trained for income prediction. If you want to see how I created this gradient-boosting prediction model please refer GitHub link.
In Step 2, we will create flask files — index.html and app.py.
index.html, is a flask UI file for providing inputs (or features) to the model.
app.py, is a python main file that unpickles the gradient boosting model from Step 1, renders the flask UI page index.html, and makes predictions based on input from UI.
In Step 3, we will create requirements.txt to add all of the dependencies for the flask app.
In Step 4, we will create Procfile to specify the commands that are executed by the Heroku app on startup.
In Step 5, we will add all the files from Steps 1–4 to a GitHub repo. You can find the Github repo for Income Prediction here.
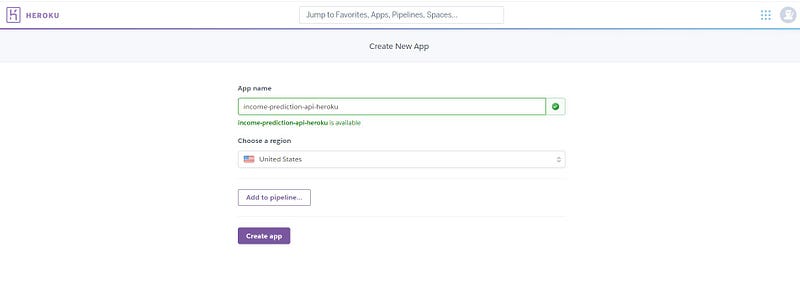
In Step 6, we will log in on Heroku and create a new app, here it’s- income-prediction-api-heroku.
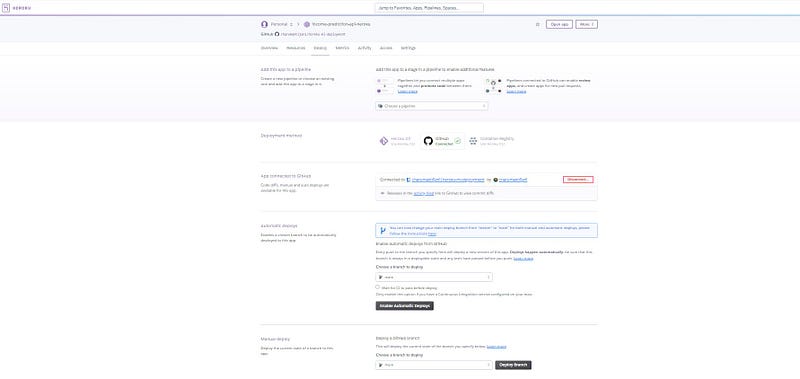
Next, we will connect the GitHub repo created in step 5 to the Heroku app and select a branch.
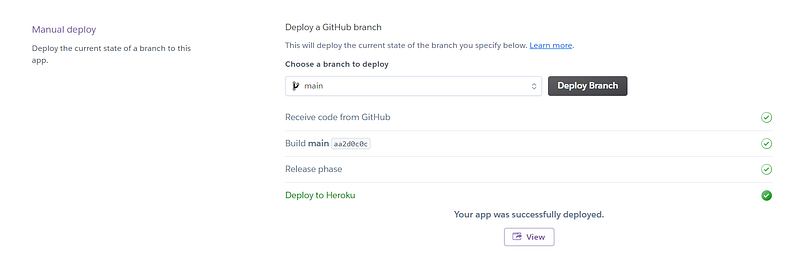
Finally in Step 7, select manual (or automatic) deploy and you can see the build logs scrolling. Once the application is deployed, you will get the application URL in logs and it will show the success message.
Click on View, it will take you to the Flask UI page from Step 2.
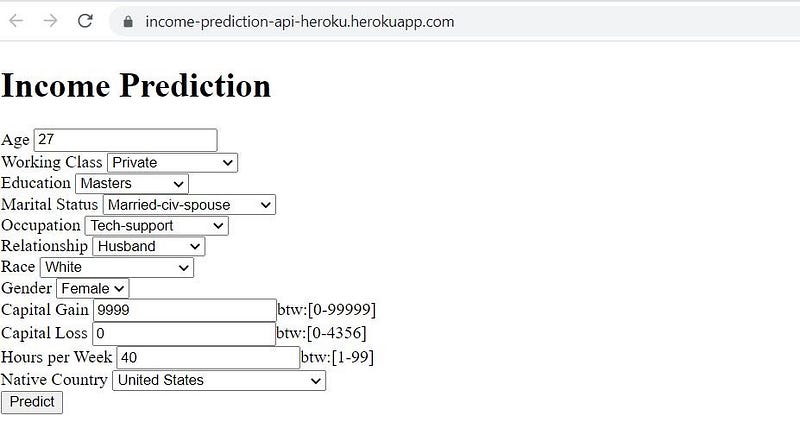
Once you fill in all the fields and click Predict, it will give the final prediction results.

Heroku Logs
You can view the Heroku application deployment logs in heroku-cli. Once you download the cli, open the command prompt and login into Heroku.
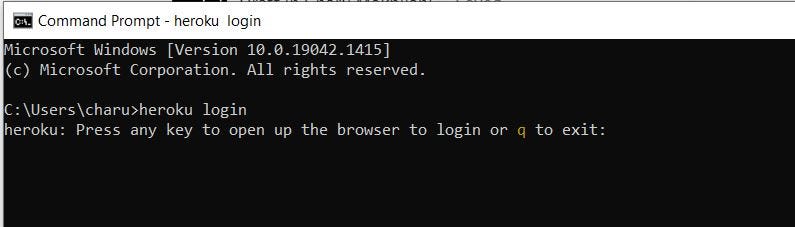
Once login, you can view the deployment logs using the command-
heroku logs -app

You can see all the build libraries loaded and application deployment steps in the logs. These logs are more useful for debugging if you have any errors/failures during deployment.
And that’s it! Using these simple steps, any machine learning model can be deployed on Heroku to get real-time predictions.
Limitations
- Cost- Heroku per hour pricing is much costlier than AWS/Azure. So if you are using multiple large-scale applications on Heroku, it will definitely be a costlier affair.
- Limited Geographic Regions- Heroku supports limited geographical regions compared to AWS/Azure.
- Manual scalability- Heroku doesn’t provide automatic scaling of web apps but allows manual horizontal and vertical scaling.
- Deployment linked with Git- Heroku deployment is linked with Git which is a restriction if you are using some other version control tool.
Conclusion
Productionizing ML models using Heroku is an excellent choice if you are deploying a small/medium scale application, don’t worry about auto-scaling, and want to focus only on building the ML apps instead of infrastructure.
Though deployment using Heroku will cost more; the same cost can be saved by lesser resources to build/monitor the on-prem/cloud infrastructure and do DevOps tasks. Heroku is beginner-friendly and you can create a server and deploy the application in seconds. Being backed by AWS, Heroku provides all the cloud platform features like- scaling, logging, monitoring, configuration, and health check. Also, you get 24*7 operational support along with no/minimal downtime.
To access the complete code for real-time prediction using Heroku, please refer GitHub link.
If you want to learn more about model deployment strategies, please refer-
Thanks for the read. If you like the story please like, share, and follow for more such content. As always, please reach out for any questions/comments/feedback.
Github: https://github.com/charumakhijani LinkedIn: https://www.linkedin.com/in/charumakhijani/


