LVM:Step-by-Step Guide to Extend an LVM Partition on Linux

Let’s say we have a server with a 1 TB storage drive, and everything’s running smoothly in production. You’re living the dream, enjoying your server’s sweet performance. But suddenly… DING! You get an alert: “You’re running out of space!” 😱
Panic sets in. All those logs, files, and databases have been eating up space like a ravenous monster, and now you’re left staring at the dreaded “Disk Full” warning. What do you do? Do you buy a new server? Maybe rent out some cloud storage? Start deleting stuff like a madman?
This is where LVM (Logical Volume Manager) swoops in like a hero in a cape. 🦸♂️
The LVM Solution
Imagine your server’s hard drive as a house. Right now, you’ve got one room (your 1 TB drive), and it’s filled to the brim with data, logs, and backups. But instead of knocking down walls or buying a new house, LVM is like having a magical, expandable mansion! 🏰✨
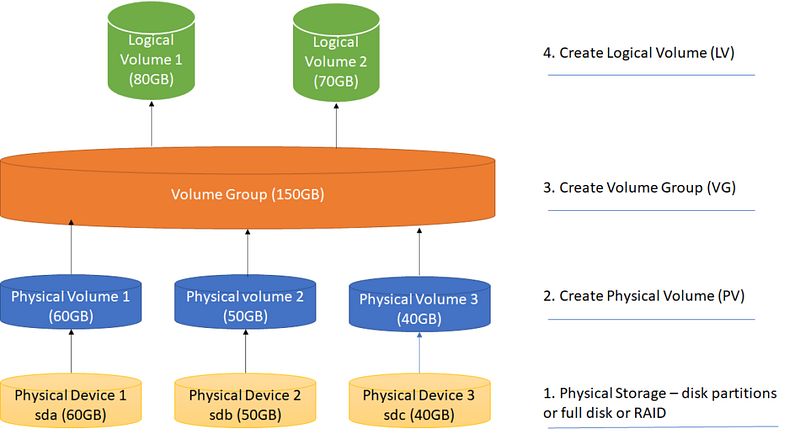
LVM lets you:
- Add More Space: With LVM, you don’t need to throw out old data or buy a whole new hard drive. Just slap on another drive (or more) and LVM will combine it all into one giant, spacious house (volume). So, you can go from 1 TB to 2 TB or even 10 TB without sweating! 🏡 ➡️ 🏢
- Flexible Room Layout: Instead of being stuck with fixed partitions, LVM allows you to resize rooms on the fly. One room is too small, and another has too much free space? No worries! Just shift the walls and redistribute the space. 🎮 It’s like turning your cozy little office into a massive living room without moving houses.
- Snapshots: Before you start messing around with your server, LVM can take a snapshot of your entire system. Think of it like a “save point” in a video game. If something goes wrong while you’re expanding or tinkering, just restore the snapshot, and you’re back in business, as if nothing ever happened! 💾🕹️
Why is LVM Essential?
Let’s break it down:
- Without LVM, you’d have to manually manage fixed-size partitions like it’s the 90s. Adding a new drive means it sits there awkwardly, separate from your main storage, like a spare bedroom no one uses. 🛌
- With LVM, you can combine multiple drives into one big storage pool. It doesn’t matter if you add 500 GB here, 2 TB there — LVM makes it look like one huge, expandable chunk of space! It’s like turning a bunch of tiny Lego blocks into one massive Lego city. 🏙️🧱
- Reallocate on the fly: Did one of your partitions fill up too quickly? No need to panic! With LVM, you can shrink one volume and expand another without ever needing to restart your server. It’s like rearranging rooms in your house without moving a single piece of furniture. 🛋️↔️📦
In Short:
LVM is like hiring the best home renovation team for your computer storage. 🛠️ They knock down walls, build new rooms, expand your space, and give you the flexibility to live large (digitally). Without LVM, you’d be stuck living in tiny, unchangeable spaces. But with LVM, your storage world becomes one big, adaptable dream house — ready to grow, shrink, or remodel whenever you want!
It’s your storage playground, and LVM gives you the keys! 🏠🔑
For More about LVM 👇
Prerequisites
- Ensure you have administrative privileges on your system.
- Check that you have unallocated space in your volume group (VG) or physical volume (PV).
1. Check Current Logical Volumes
First, check your existing logical volumes and their sizes.
lvdisplay

# Output
--- Logical volume ---
  LV Path                /dev/drive/newspace
  LV Name                newspace
  VG Name                drive
  LV UUID                rVqdFv-y0fY-Prs4-vtS1-KZE4-Lve0-B7paRh
  LV Write Access        read/write
  LV Creation host, time  Server.example.COM, 2020-10-13 18:46:57 +0530
  LV Status              available
  open                 0
  LV Size                <7.00 TiB
  Current LE             1835005
  Segments               3
  Allocation             inherit
  Read ahead sectors     auto
  - currently set to     8192
  Block device           253:2
2. Check Volume Group Status
Make sure your volume group has enough free space to extend the logical volume.
 vgdisplay

# Output

--- Volume group ---
  VG Name               drive          # Vg_name
  System ID
  Format                lvm2           # lvm format
  Metadata Areas        3
  Metadata Sequence No  6
  VG Access             read/write
  VG Status             resizable
  MAX LV                0
  Cur LV                1               # Current lvgroups
  Open LV               0
  Max PV                0
  Cur PV                3
  Act PV                3
  VG Size               <7.00 TiB       # Total VG Size
  PE Size               4.00 MiB        # Total free Size
  Total PE              1835005
  Alloc PE / Size       1835005 / <7.00 TiB
  Free PE / Size       0 / 0            # Free Size
  VG UUID               p9j6m7-x0xn-fdet5-SlGQ-42sq-cyXr-mAvIRT
Look for Free PE / Size in the output. If it shows 0, you will need to add a new physical volume.
3. Add Physical Volume (if needed)
If there’s no free space available in the volume group, you need to add a new physical volume. Assuming you have a new disk /dev/sdb, run:
# Create a new physical volume
pvcreate /dev/sdb1

# Extend the Volumegroup with Physical volume
vgextend <vg_name> /dev/sdb

# Vg name : drive
vgextend drive /dev/sdb1
Replace <vg_name> with the name of your volume group.
4. Extend the Logical Volume
Now, extend your logical volume to the desired size. For example, to extend the logical volume named newspace to 7 TB:
# Extend the Logical volume into 7T
# Vg name : drive   and   lv name : newspace

lvextend -L 7T /dev/drive/newspace
Alternatively, if you want to use all available space:
# Use Full space from Volume group
lvextend -l +100%FREE /dev/drive/newspace
5. Resize the Filesystem
After extending the logical volume, resize the filesystem to utilize the new space. If your filesystem is XFS:
xfs_growfs /mnt/new_live
If it’s ext4:
resize2fs /dev/drive/newspace
6. Verify the Changes
Check the logical volume size and filesystem to ensure the changes have been applied successfully.
lvdisplay /dev/drive/newspace

df -h /mnt/new_live
Conclusion
You’ve successfully extended your LVM partition! Make sure to back up important data regularly, especially when making changes to partitions and filesystems.
✅✅feel free to connect with us.
LinkedIn: https://www.linkedin.com/in/karthick-dkk/
Follow my Medium Account (To get valuable information)
For more updates: subscribe to this medium account.
Follow for more: ✌️