
Lightning-Fast Search with MeiliSearch and Elixir in Record Time

In this story, you will learn how to implement lightning-fast search functionality in your Elixir Phoenix web application using MeiliSearch.
Let’s start!
What is MeiliSearch?
MeiliSearch is an open-source search engine built using Rust, designed to offer high performance and ease of use.
MeiliSearch has features such as typo tolerance, faceted search, and multi-language support.
I personally love MeiliSearch, it is insanely simple, very fast and simply fun to use.
MeiliSearch also has many SDKs and an easy-to-use REST API which lets us use it even easier.
What we are building in this story
In this story, you will learn how to use Elixir, Phoenix and MeiliSearch to build a blazing-fast movie search engine.
We will also be using the newly released version of Phoenix, Phoenix 1.7, which comes with many new improvements.
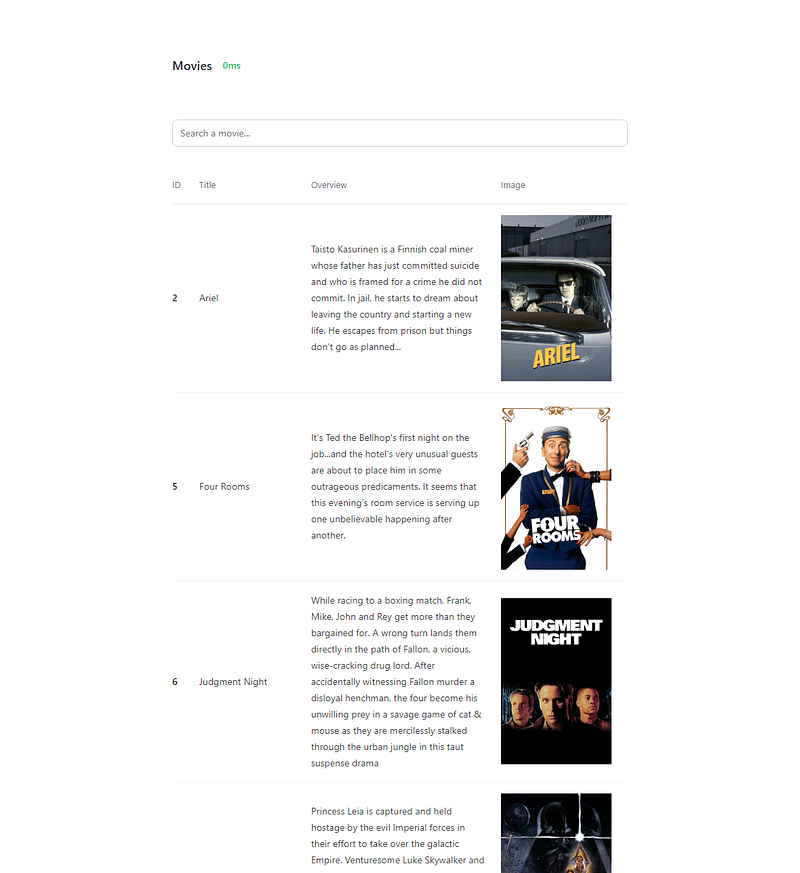
The end result will look like this.
You can find the entire project here.
Anyways, enough talking. Time to code!
Coding our project
Time to code, everyone!
I will be explaining all the steps so that you understand everything, and as I said, feel free to check out the GitHub repository if you are stuck at some point to see what the complete implementation looks like.
Creating a MeiliSearch instance using Docker
Creating a MeiliSearch instance using Docker is very simple. It takes only two commands to get started!
To create a MeiliSearch instance using Docker, you will need to run the following commands:
Pulling the image
docker pull getmeili/meilisearch:v1.0
Running the image
docker run -it --name meilisearch -p 7700:7700 \
-e MEILI_ENV=development \
-v $HOME/docker/volumes/meili_data:/meili_data \
getmeili/meilisearch:v1.0
Loading the movie dataset to MeiliSearch
Now that we have a MeiliSearch instance running, we just have to insert our movie dataset in it.
You can find the dataset here.
Download the dataset and then run the following command to insert it in MeiliSearch.
curl -X POST 'http://localhost:7700/indexes/movies/documents?primaryKey=id' \
-H 'Content-Type: application/json' \
--data-binary @data/movies.json
As you can see, we specify the primaryKey as id, since that's what we have in our dataset and the whole thing takes a single API request.
MeiliSearch’s REST API is asynchronous by default. This means that when you send a request to MeiliSearch, it will return a response immediately, even if the request is not yet complete.
We can check the status of the upload using this command.
curl -X GET 'http://localhost:7700/tasks/0'
This will give you a response like this.
{
  "uid": 0,
  "indexUid": "movies",
  "status": "succeeded",
  "type": "documentAdditionOrUpdate",
  "canceledBy": null,
  "details": {
    "receivedDocuments": 31944,
    "indexedDocuments": 31944
  },
  "error": null,
  "duration": "PT17.265502149S",
  "enqueuedAt": "2023-03-05T07:52:40.725678886Z",
  "startedAt": "2023-03-05T07:52:40.728976213Z",
  "finishedAt": "2023-03-05T07:52:57.994478362Z"
}
Yup, looks good!
If you visit localhost:7700, you can use the MeiliSearch UI to further explore the data.
Phoenix web application
Alright, it is time to start coding the web application.
First of all, run the following command to install the latest version of Phoenix.
mix archive.install hex phx_new
After that, we can create a new Phoenix 1.7 project.
mix phx.new movies --no-ecto
We used the --no-ecto flag because we don’t need a database for this project.
Cleaning up unnecessary files
This step is pretty much optional and way too boring for me to write about it.
Basically, you can delete all the files related to page_html, since we will be using LiveView, and you can also clean up lib/movies_web/components/layouts/app.html.heex since we don’t really need a navigation bar for our application.
This is what my layout looks like.
<main class="px-4 py-20 sm:px-6 lg:px-8">
  <div class="mx-auto max-w-2xl">
    <.flash_group flash={@flash} />
    <%= @inner_content %>
  </div>
</main>
You can see what the entire project looks like on GitHub.
Coding the web application
From now on, I won’t be explaining every step in detail since I already did that in an older story of mine. Feel free to check that story if you don’t already know Phoenix LiveView basics.
Alright, let’s go.
Creating our LiveView page
Let’s create a lib/movies_web/live folder, and two new files in it. index.ex and index.html.heex.
This is how the index.html.heex file should look like.
<.header>
  <div class="flex space-x-4 self-center items-center">
    <h1>
      Movies
    </h1>

    <h1 class="text-sm text-green-500">
      <%= @processing_time %>ms
    </h1>
  </div>
</.header>

<br />

<.simple_form for={@form} phx-change="search">
  <.input name="search" value="" placeholder="Search a movie..." />
</.simple_form>


<div id="infinite-scroll" class="flex flex-col space-y-8 items-center" phx-hook="InfiniteScroll">
  <.table id="results" rows={@results}>
    <:col :let={result} label="ID"><%= result["id"] %></:col>
    <:col :let={result} label="Title"><%= result["title"] %></:col>
    <:col :let={result} label="Overview"><p class="w-64"><%= result["overview"] %></p></:col>
    <:col :let={result} label="Image"><img class="h-full" src={result["poster"]} /></:col>
  </.table>
</div>
As you can see, we just have a simple page with a header, a search bar, and a table where we display our results.
Here you can also see the core components we got with Phoenix 1.7, providing us with the header, simple_form, input, table and col, which lets us build our application easier and faster.
And now the index.ex file. I will use GitHub Gists for Elixir files since Medium doesn’t have syntax highlighting for Elixir yet.
You can see that we are simply making a search request when we get a search event, and then updating our socket with the data.
We also have a load event for the infinite scroll behaviour, which I will teach you how to code in a moment.
MovieItem context
But first, we have to create the search and load_more functions in our MovieItem context so that we can actually get some data.
HTTPoison
Before that, though, we have to install the HTTPoison library which we will use to make the HTTP requests.
Simply open your mix.exs file and add the following line in the deps function.
{:httpoison, "~> 2.0"}This is how your entire deps function should look like.
Now run the following command to fetch all the dependencies.
mix deps.get
And start your development server again.
mix phx.server
Alright, let’s code the context now.
Context
Create a movie_item.ex file at lib/movies to start.
This is how the file should look like. We are simply making HTTP requests, extracting the hits and the processing time, and returning it to our map to use in our LiveView.
The search function simply makes a search request and returns the response.
The load_more function also has an offset, which we pass as length(socket.assigns.results), which makes it so that we always have a correct offset.
The default amount of items you get per search in MeiliSearch is 20. This means, for example, if we have 100 items loaded already, the next load will fetch the next 20 items, making it 120 in total.
That was easy, wasn’t it?
The last few steps are to write some JavaScript to create the infinite scroll behaviour and add our LiveView page to our routes.
Infinite scroll
This is a simple one.
Create a pagination folder in the assets/js folder, and create a new file called infinite_scroll.js in that folder.
This is how the content of the file should look like.
const scrollAt = () => {
  let scrollTop = document.documentElement.scrollTop || document.body.scrollTop;

  let scrollHeight =
    document.documentElement.scrollHeight || document.body.scrollHeight;

  let clientHeight = document.documentElement.clientHeight;

  return (scrollTop / (scrollHeight - clientHeight)) * 100;
};

const InfiniteScroll = {
  page() {
    return this.el.dataset.page;
  },
  mounted() {
    this.pending = this.page();

    window.addEventListener("scroll", (_) => {
      if (this.pending == this.page() && scrollAt() > 90) {
        this.pending = this.page() + 1;

        this.pushEvent("load", {});
      }
    });
  },
  reconnected() {
    this.pending = this.page();
  },
  updated() {
    this.pending = this.page();
  },
};

export default InfiniteScroll;
Very simple stuff, this is how we code Phoenix hooks, by the way. These functions are necessary. Although in most cases you might only need the mounted function and not use the rest.
Here we simply check the scrolling progress of the page, and if it is over 90%, we push the load event, which as you might remember, we handled in our LiveView.
Remember?
@impl true
def handle_event("load", _, socket) do
...
In that function, for example, we just fetched more data and added it on top of the previous results.
Now we have to add some code in our app.js file in the assets/js folder, so that our application recognizes our JavaScript hook.
import "phoenix_html";
// Establish Phoenix Socket and LiveView configuration.
import { Socket } from "phoenix";
import { LiveSocket } from "phoenix_live_view";
import topbar from "../vendor/topbar";
import InfiniteScroll from "./pagination/infinite_scroll";

let Hooks = {};

Hooks.InfiniteScroll = InfiniteScroll;

let csrfToken = document
  .querySelector("meta[name='csrf-token']")
  .getAttribute("content");

let liveSocket = new LiveSocket("/live", Socket, {
  params: { _csrf_token: csrfToken },
  hooks: Hooks,
});

// Show progress bar on live navigation and form submits
topbar.config({ barColors: { 0: "#29d" }, shadowColor: "rgba(0, 0, 0, .3)" });

window.addEventListener("phx:page-loading-start", (_info) => topbar.show(300));
window.addEventListener("phx:page-loading-stop", (_info) => topbar.hide());

// connect if there are any LiveViews on the page
liveSocket.connect();

// expose liveSocket on window for web console debug logs and latency simulation:
// >> liveSocket.enableDebug()
// >> liveSocket.enableLatencySim(1000)  // enabled for duration of browser session
// >> liveSocket.disableLatencySim()
window.liveSocket = liveSocket;
As you can see, we just imported our hook, added it to our Hooks, and then loaded them in our liveSocket.
Routing
The last thing we have to do is add our LiveView to our routes.
Open the router.ex file in lib/movies_web, and add the following code.
scope "/", MoviesWeb do
  pipe_through(:browser)

  live("/", MovieItemLive.Index, :index)
end
You should be replacing the default root page there since we deleted it earlier in this story.
In the end, your router.ex file should look like this.
Looks good!
We are done!
Feel free to visit http://localhost:4000 to play around with the project!
As you can see, the average response takes less than a few milliseconds, which is simply incredible.
Final Thoughts
That’s it!
You now know how to use MeiliSearch with Elixir to create blazing-fast search engines!
Feel free to let me know what you think about this story, and if you have any questions about this topic!
And that’s it. Thanks for reading this story!
If you liked the story, make sure to clap to it! And feel free to ask me anything you want.
Follow me on Twitter:
Support me on Patreon:


