
Let’s Create Tensors like NumPy Arrays
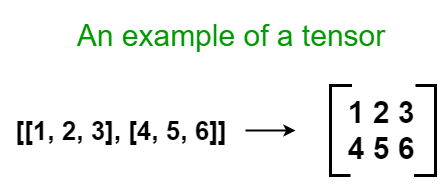
Tensors are nothing but matrix representations of multi-dimensional arrays
Every long journey starts with a simple step. Like that, this is the first step of a long journey — Deep Learning and Neural Networks. TensorFlow, which Google develops, is a deep learning library specially created for deep learning tasks. But it is not limited to deep learning tasks, it can also be used for general machine learning. It has both high-level and low-level APIs. The high-level API can be used to build complex deep learning models with a few lines of code. The low-level API allows you to get more customization on your tasks.
A great way to getting started with a new library is to examine its data structures. Like that, we’ll get started with TensorFlow 2 by examining its main data structure — Tensor. The word “Tensor” is a technical term used in deep learning. Therefore, tensors are nothing but matrix representations of multi-dimensional arrays.
Using TensorFlow 2 for the first time
Let’s set up the programming environment so that you can use TensorFlow on your own computers.
Installation
According to the TensorFlow installation documentation, the TensorFlow 2 library provides CPU and GPU support in a single package via pip installation. Previously, you had to install two separate packages to get both CPU and GPU support. But, with the latest version, you don’t have to! However, TensorFlow includes GPU support only for NVIDIA CUDA-enabled graphics cards. According to NVIDIA, almost all the NVIDIA graphics cards manufactured after 2008 are CUDA-enabled!
The easiest way to install TensorFlow 2 is using the pip package.
pip install tensorflowTest your installation using:
import tensorflow as tfIf you don’t get any error message, you’re all set.
The easiest way to use TensorFlow is using it through Google Colab. You don’t even need to install TensorFlow there. However, you need to have an internet connection. After signing in to your Googe account, click on this link to create a new notebook. After that, go to Edit tab, select Notebook settings and then choose GPU as the hardware accelerator. This will enable you to run TensorFlow with GPU support!
Import convention
We use the following import convention to import TensorFlow into your workplace:
import tensorflow as tfWhen you import TensorFlow in this way, the functions such as constant() can be imported as:
tf.constant()There are mainly two functions to create tensors
In TensorFlow, tensors can be created using the following two functions:
- constant(): If you create a tensor using this function, the tensor cannot be changed or modified in the same programming session. So, it is a constant tensor.
- Variable(): If you create a tensor using this function, the tensor can be changed or modified in the same programming session. So, it is a variable tensor.
We provide array-like objects as the input for the above functions.
Main attributes of a tensor
The following are the main attributes of a tensor:
- Rank: The rank is the number of dimensions (axes) of a tensor. It can be accessed with the tf.rank() function.
- Shape: The shape can be accessed with the shape attribute of a tensor object. It returns a tuple that represents the number of elements in each dimension.
- Data type: This describes the type of data in a tensor. It can be accessed with the dtype attribute of a tensor object.
Types of tensors
Tensors can be multi-dimensional, meaning that they can have any number of dimensions (axes). It is hard to imagine the format of a higher dimensional tensor. For our convenience, we categorize tensors into 4 main categories:
- Scalar (also known as 0D Tensor): As the name suggests, this is just a number without any dimension (zero-dimensional).
- Vector (also known as 1D Tensor): This is a one-dimensional array of numbers.
- Matrix (also known as 2D Tensor): Most of us are familiar with this. This is a two-dimensional array that contains a collection of vectors.
- 3D Matrix (also known as 3D Tensor): It is hard to imagine this format. However, when we are working with image data, 3D matrices are often used. This is a collection of matrices.
Now, we create these types of tensors using the TensorFlow library and see the relevant NumPy equivalent too.
Creating a Scalar (0D Tensor)
Using TensorFlow:
import tensorflow as tfa = tf.Variable(10)
print(a)
print("\nRank:", tf.rank(a))
print("Shape:", a.shape)
print("Data type:", a.dtype)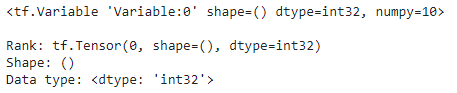
The NumPy equivalent is:
import numpy as npb = np.array(10)
print(b)
print("\nRank:", b.ndim)
print("Shape:", b.shape)
print("Data type:", b.dtype)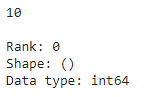
Creating a Vector (1D Tensor)
Using TensorFlow:
import tensorflow as tfa = tf.Variable([2, 2.1, 3.0])
print(a)
print("\nRank:", tf.rank(a))
print("Shape:", a.shape)
print("Data type:", a.dtype)
The NumPy equivalent is:
import numpy as npb = np.array([2, 2.1, 3.0])
print(b)
print("\nRank:", b.ndim)
print("Shape:", b.shape)
print("Data type:", b.dtype)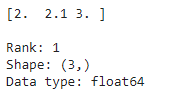
Creating a Matrix (2D Tensor)
Using TensorFlow:
import tensorflow as tfa = tf.Variable([[1, 2, 3],
[4, 5, 6]])print(a)
print("\nRank:", tf.rank(a))
print("Shape:", a.shape)
print("Data type:", a.dtype)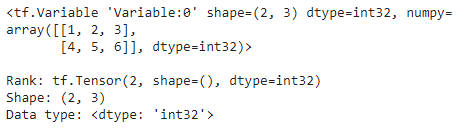
The NumPy equivalent is:
import numpy as npb = np.array([[1, 2, 3],
[4, 5, 6]])print(b)
print("\nRank:", b.ndim)
print("Shape:", b.shape)
print("Data type:", b.dtype)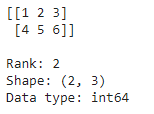
Creating a 3D Matrix (3D Tensor)
Using TensorFlow:
import tensorflow as tfa = tf.Variable([[[1, 1, 1],
[1, 1, 1]],
[[2, 2, 2],
[2, 2, 2]]])print(a)
print("\nRank:", tf.rank(a))
print("Shape:", a.shape)
print("Data type:", a.dtype)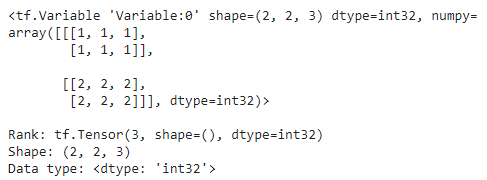
The NumPy equivalent is:
import numpy as npb = np.array([[[1, 1, 1],
[1, 1, 1]],
[[2, 2, 2],
[2, 2, 2]]])print(b)
print("\nRank:", b.ndim)
print("Shape:", b.shape)
print("Data type:", b.dtype)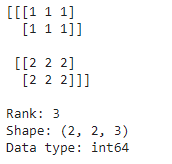
The importance of the data type
Tensors and NumPy arrays are quite similar in appearance. However, by default, TensorFlow uses 32-bit data values when creating tensors. This is because TensorFlow was designed to increase the performance of deep learning models. 32-bit data values run faster and use less computational resources. In contrast, NumPy uses 64-bit data values when creating arrays.
Switching between the two
If you have a tensor, you can easily convert it to an equivalent NumPy array and vice versa.
Creating a NumPy array from a tensor
For this, we can use the np.array() function. The input is a tensor.
import numpy as np
import tensorflow as tf
a = tf.Variable([[1, 2, 3],
[4, 5, 6]])b = np.array(a)
print(type(a))
print(type(b))
Creating a tensor from a NumPy array
For this, we can use the tf.Variable() function. The input is a NumPy array.
import numpy as np
import tensorflow as tf
a = np.array([[1, 2, 3],
[4, 5, 6]])b = tf.Variable(a, dtype=tf.float32)
print(type(a))
print(type(b))
Because the default data value in NumPy is 64-bit, we have to set dtype=tf.float32 when creating a tensor from a NumPy array.
Summary
We’ve just made the first step towards a long journey — Deep Learning and Neural Networks. First, we’ve set up the programming environment and then discussed the main data structure in TensorFlow. Now, you’re familiar with tensors.
The promise to deliver 0% plagiarism content
Yes, the above content has 0% plagiarism! Before publishing, I’ve checked this using Grammarly.
Writing unique contents that add value for readers in both context and appearance is my own responsibility. To ensure the uniqueness, I made this content with 0% plagiarism.
And also see how I maintain the quality of my contents by visiting:
Until next time, happy learning to everyone! Meanwhile, you can read my other posts at:
https://rukshanpramoditha.medium.com
Special credit goes to Sharon McCutcheon on Unsplash, who provides me with the cover image for this post. The written content, code samples, other images included in this post are copyrighted by the author.
Rukshan Pramoditha, 2021–06–23


