
Learning to make drones ‘see’ with artificial intelligence

When I initially got the itch to purchase a ‘beginner’ level drone a few months back, I didn’t really know why I wanted it.
I didn’t want to pay big bucks because odds were I’d lose it, crash it or simply not appreciate it so I bought a sub $100 DJI ‘Tello’ drone (this one if you’re interested). I figured it’d be amusing for a while. A neat diversion to buzz around the backyard on a sunny day. It was a tiny little thing, with its four wee propellers and demure front-facing camera.
But when I learned that this unassuming flying machine could be interfaced to using Python and the djitellopy library, I suddenly became way more interested. A drone I could program? That has a camera?
Oh yes, this is much more my speed. I felt an AI/ML experiment coming on and decided there and then that I was going to set myself the weekend goal to see if I could leverage machine learning to get this drone to perform near real-time object recognition.
In other words, teach the drone to see.
The Setup
It might seem counterintuitive to show you the end result at the beginning, but I think giving you an architecture overview first provides useful end-to-end context.
From there we can walk through each component, and the what/how/why of it coming into the picture. If you stick around until the end you’ll hopefully see a drone that can perform in-flight object recognition as it whizzes around the place.
So, what did I end up building? Let’s take a look:
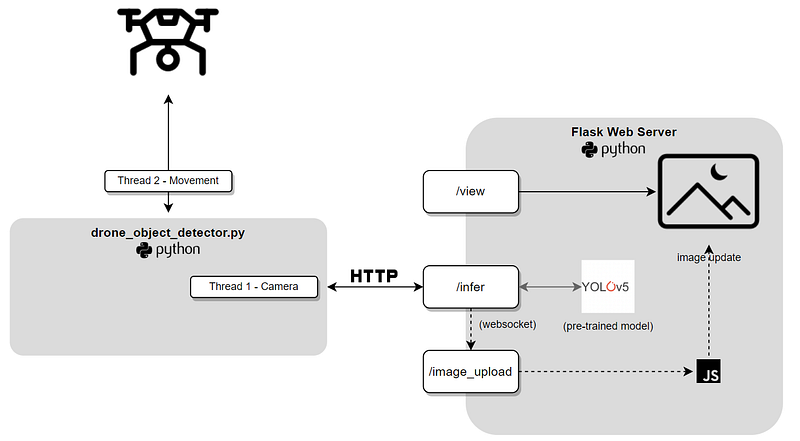
As you can see, there are two main components in our solution, our drone_object_detector.py, and our Flask web server. At its core, we’re going to execute the drone_object_detector.py script on the Tello drone while it’s in-flight. This will continually take images using the drones (admittedly quite rough) front-facing camera. These images will be sent to our flask web server, which will perform object detection on the images, then display them in a crude HTML window for us to view.
Our technology stack looks like this:
- Python for the drone commands and flask web server.
- Several Python packages, including cv2 for image manipulation, pytorch for interacting with the YOLO model and
djitellopyfor controlling our drone. - RESTful communication between the drone and the web server.
- JavaScript and WebSockets to provide a continually updating ‘feed’ of video images to our web server without the need to refresh the page.
- A pre-trained YOLOv5 model to detect objects in the image feed.*
YOLO stands for You Only Look Once, a family of object detection models which are popular due to their speed and accuracy. It’s probably one of the most popular computer vision/object detection model families around. It gets its name from its single-stage detection approach, which is designed to detect objects in real-time and with high accuracy.
Unlike two-stage detection models, that first obtain regions of interest and then classify these regions, YOLO processes the entire image in a single pass, making it faster and more efficient.
For our experiment, we’re using the smallest of the YOLO pre-trained models:

Now that we’ve become familiar with the YOLO model being used in our experiment, let’s take a look at things from the drone’s perspective first.
drone_object_detector.py
import cv2
import base64
import requests
import json
import logging
import time
import sys
from threading import Thread
from contextlib import contextmanager
from djitellopy import Tello

# logging configuration
logging.basicConfig(level=logging.DEBUG, format='(%(threadName)-10s) %(message)s')

@contextmanager
def tello_connection():
    tello = Tello()
    tello.connect()
    tello.streamon()
    try:
        yield tello
    finally:
        tello.streamoff()
        tello.end()

def move_drone(tello):
    tello.takeoff()
    time.sleep(2)
    tello.move_forward(20)
    time.sleep(2)
    for _ in range(4):
        tello.rotate_clockwise(90)
        wait_for_ok(tello)
        time.sleep(2)
    tello.move_back(100)
    time.sleep(2)
    wait_for_ok(tello)
    tello.land()

# Wait for the 'ok' response from a move command
def wait_for_ok(tello):
    while True:
        response = tello.get_frame_read().get_bounding_box()
        if response:
            # Move command completed, 'ok' received
            break
        time.sleep(0.1)  # Sleep for a short interval to avoid busy loop

def convert_to_base64(frame):
    retval, buffer = cv2.imencode('.jpg', frame)
    encoded_data = base64.b64encode(buffer)
    return encoded_data.decode('utf-8')

def post_base64_image_to_api(image):
    url = "http://127.0.0.1:5000/infer"
    headers = {'Content-Type': 'application/json'}
    data = json.dumps(image)
    response = requests.post(url, headers=headers, data=data)
    print(response)

class CameraThread(Thread):
    def __init__(self, thread_id, name, delay, counter, tello):
        super().__init__()
        self.thread_id = thread_id
        self.name = name
        self.delay = delay
        self.counter = counter
        self.tello = tello

    def run(self):
        while self.counter:
            try:
                frame = self.tello.get_frame_read().frame
                encoded_data = convert_to_base64(frame)
                post_base64_image_to_api({'binary': "data:image/jpeg;base64," + encoded_data})
                time.sleep(self.delay)
                self.counter -= 1
            except Exception as e:
                print(e)

def main():
    with tello_connection() as tello:
        camera_thread = CameraThread(1, "camera_thread", 0.2, 400, tello)
        camera_thread.daemon = True
        movement_thread = Thread(target=move_drone, args=(tello,))

        camera_thread.start()
        movement_thread.start()

        camera_thread.join()
        movement_thread.join()

        logging.info("Drone landed OK")
        sys.exit()

if __name__ == '__main__':
    main()
Let’s have a look at some of the key points of our script. First things first, you’ll notice there’s no object detection happening here. As per our diagram, all our inference is going to happen on our Flask server running on a separate machine (my laptop in this case). The responsibility of the drone is simply to follow a programmed flight path and capture some juicy, juicy images.
To that end, we need to use threading so the drone can ‘walk and chew gum at the same time’ (or in this case, fly and take snapshots). In our main function, we create two threads. The first is the camera thread. It’s basically responsible for grabbing a frame from the drone camera every 200ms, encoding that image to base64, then posting that data to the /infer endpoint (more on that later).
The other thread is the movement thread. This just puts the drone through a series of pre-programmed flight movements, the idea being that some movement and rotation will capture enough things to show the object detection working.
We’ve used a @contextmanager just to handle the startup and ‘tear down’ operations of the drone, it’ll handle those as part of the ‘with’ code block (think IDisposable if you’re a .NET developer).
So far, so good. Now what about our web server?
The backend
Because we’re using Flask — which seperates backend code from front end HTM templates — we’ll need to look at both the python app as well as the HTML template it will utilise as the ‘front end’.
from flask import Flask, request, render_template
from PIL import Image
import numpy as np
import torch
import cv2
import base64
from flask_socketio import SocketIO, emit
import eventlet
from io import BytesIO
import warnings
warnings.filterwarnings("ignore", message="torch.distributed.reduce_op is deprecated")

# cooperatively yield
eventlet.monkey_patch()

# load our pretrained model
model = torch.hub.load('ultralytics/yolov5', 'yolov5s', pretrained=True)  # force_reload = recache latest code
model.eval()

# initialize our Flask application and websockets
app = Flask(__name__)
app.config['SECRET_KEY']='your_secret'
socketio = SocketIO(app, async_mode='eventlet')

# This is our viewing page
@app.route('/view')
def view():
    print("view")
    return render_template('view.html')

@socketio.on('connect')
def test_connect():
    emit('my response', {'data': 'Connected'})

@socketio.on('disconnect')
def test_disconnect():
    print('Client disconnected')

# This is our inference endpoint. Send our base64 image here and we'll return the inference
@app.route('/infer', methods=['POST'])
def post():
    if request.method == 'POST':
        try:
            print("-> request received")
            encoded_data = request.get_json()
            base64_string = encoded_data['binary'].split(',')
            print(base64_string[0])
            np_array = np.frombuffer(base64.b64decode(base64_string[1]), np.uint8)
            img = cv2.imdecode(np_array, cv2.IMREAD_COLOR)
            imgs = []
            imgs.append(img)
            results = model(imgs, size=640)
            results.imgs = imgs
            print(results)
            results.render()

            buffered = BytesIO()
            img_base64 = Image.fromarray(results.imgs[0])
            img_base64.save(buffered, format="JPEG")
            encoded_data['binary'] = "data:image/jpeg;base64," + base64.b64encode(buffered.getvalue()).decode('utf-8')
            socketio.emit('send-image',encoded_data)
            return results.pandas().xyxy[0].to_json(orient="records")
        except Exception as e:
            print(e)
            return "failed inference"

@app.route('/test', methods=['GET'])
def get():
    if request.method == 'GET':
        # do something
        return 'GET'
Our Flask server creates 3 main endpoints after loading a pre-trained yolov5 model and starting our WebSocket server. The first is a /test endpoint, just used so that I can make a call to http://127.0.0.1:5000/test which will tell me the server is up and running.
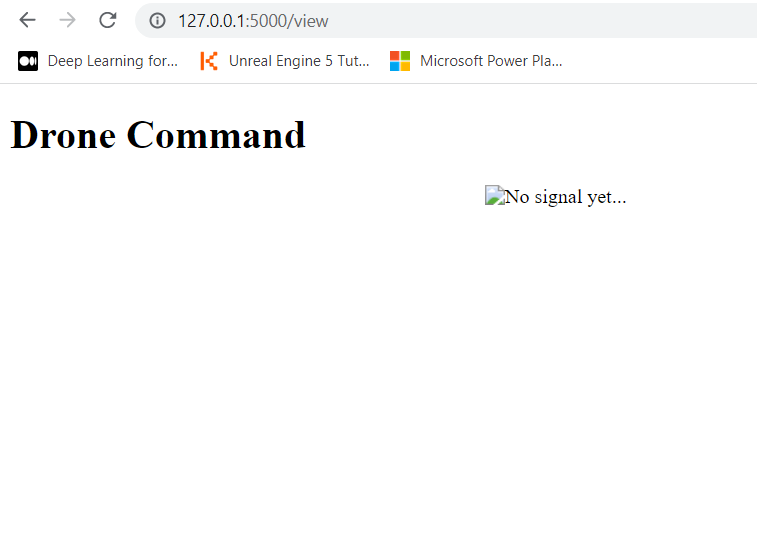
Next is the /view endpoint. This is where we’ll be able to watch what the drone is ‘seeing’ frame-by-frame. It’s a very simple endpoint that’ll return our view.html template (more on that shortly).
Lastly, and most importantly — is the /infer endpoint. This is where most of the magic happens. While the /view endpoint serves an HTML page like the below:
The /infer endpoint is set up as a REST API. If you look back at our drone python code, you’ll see for each image frame captured, we actually post it to our flask server here:
def post_base64_image_to_api(image):
    url = "http://127.0.0.1:5000/infer"
    headers = {'Content-Type': 'application/json'}
    data = json.dumps(image)
    response = requests.post(url, headers=headers, data=data)
Once the image arrives at the /infer endpoint, we convert the base64-encoded image string into a NumPy array and then decode it using OpenCV (cv2.imdecode). This conversion is necessary because YOLO expects the input images to be in a specific format — a NumPy array representing the image pixels.
YOLO then detects objects in the image, draws bounding boxes around anything found then uses websockets to submit that image to our websocket server so we can show it on our /view page:
socketio.emit('send-image',encoded_data)To see how this part works, we have to take a look at our view.html template:
<!DOCTYPE html>
<script src="https://cdnjs.cloudflare.com/ajax/libs/jquery/3.5.1/jquery.min.js" integrity="sha512-bLT0Qm9VnAYZDflyKcBaQ2gg0hSYNQrJ8RilYldYQ1FxQYoCLtUjuuRuZo+fjqhx/qtq/1itJ0C2ejDxltZVFg==" crossorigin="anonymous"></script>
<script src="https://cdnjs.cloudflare.com/ajax/libs/socket.io/3.0.4/socket.io.js" integrity="sha512-aMGMvNYu8Ue4G+fHa359jcPb1u+ytAF+P2SCb+PxrjCdO3n3ZTxJ30zuH39rimUggmTwmh2u7wvQsDTHESnmfQ==" crossorigin="anonymous"></script>
<html lang="en">
    <style>
    .center {
        display: block;
        margin-left: auto;
        margin-right: auto;
        width: 50%;
      }
    </style>
<head>
    <meta charset="UTF-8">
    <title>James Matsons Drone Object Detector</title>
</head>
<body>
    <h1>Drone Command</h1>
    <div id="message-container">
        <img src="" class="center" alt="No signal yet..." width="500" height="600" id="img-container">
    </div>
    <script>
        var socket = io.connect('http://' + document.domain + ':' + location.port);
        socket.on('connect',
          function() {
             console.log('client connected OK')
          });
      </script>
    <script>
        function createImageMessageDOM(data) {
            console.log(data)
            var img = document.createElement("img");
            img.src = data.binary;
            img.style.width = '100%';
            return img;
        }
    </script>
    <script>
        function appendImageMessage(data) {
            var imgContainer = document.getElementById('img-container');
            imgContainer.src = data.binary;
        }
    </script>
    <script>
        socket.on("send-image", function(data){
            appendImageMessage(data)
        })
    </script>
</body>
</html>
As you can see, our HTML page is super light in terms of style, but the script sections have plenty of substance. You can see we’re listening for the ‘send-image’ socket event (which will come from our /infer endpoint). When we receive that event along with the binary image data, we’ll grab our img-container element and render the image src as our binary image. With the entire process of drone/picture/infer/display happening every 400ms, we end up with a great live feed of what the drone is seeing along with real-time object detection via our model. Awesome!
So first, let’s start our Flask server up just to test that it’s working.

With our virtual environment active, we’ve started the flask server and can see that our YOLOv5 pre-trained model is up and running. We can actually test this ahead of flying the drone by simply sending a base64 encoded image to the /infer endpoint from Postman. Let’s do that.
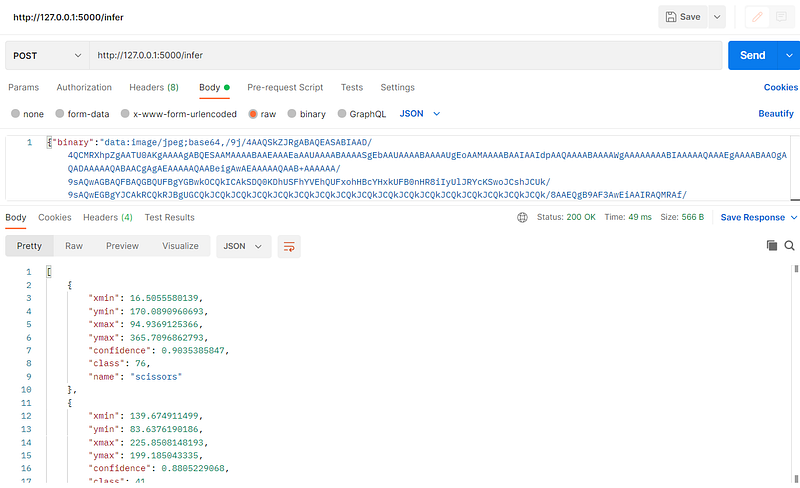
As you can see, we’ve hit the /infer post endpoint with our base64 encoded image, and the response tells us we’ve detected some scissors with a 90% confidence. Let’s check our view page:
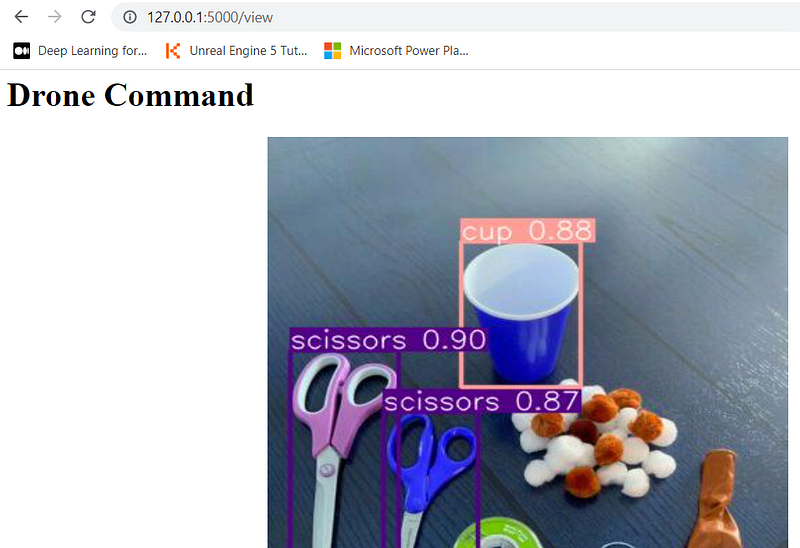
Excellent! Scissors and cups detected. This is looking good.
Flight time!
So the last part of this whole experiment is to fire up our drone via our Python code and have it do a bit of a maiden voyage to see if it can detect a few common household things. Below is a short video of the final product.
Now admittedly, it was a little difficult for me to get a video of the drone flying as well as it capturing/detecting objects in the video below, but I think you’ll be able to make it out as having detected potplants and a few other things successfully. Some obvious tweaks could be made, such as a better setup of objects and a more accurate pre-trained model (YoloV5s only recognizes about 80 common objects).
But it’s still a very promising start and was a super exciting project to get up and running for the cost of a $99 drone and some time on the weekend. As always, feel free to reach out with questions and comments, and I hope this has inspired you to see how you can combine a drone, Python, and simple object detection machine learning!