
Learn How to Use Handy Cloud Functions in Python with a Practical Example
Let’s simplify our application with modern serverless services

Cloud functions in the Google Cloud Platform (GCP) is a serverless function as a service (FaaS) framework. Cloud functions can automatically run backend code in response to events triggered by HTTP requests or events emitted from your cloud infrastructure and services. Cloud functions have the following benefits:
- Serverless — no need to manage the underlying infrastructure and runtime for the functions, everything is handled by the cloud platform.
- Automatic — the service is automatically scaled based on the usage, with integrated monitoring, logging, and debugging capability.
- Cost friendly — you only pay when the function is used, not when it’s idle.
There are two types of cloud functions in GCP, namely HTTP functions and event-driven functions. The latter can be further divided into background functions and cloud event functions depending on the runtime (programming language) they are written in.
In this article, we will introduce HTTP functions and background event-driven functions and demonstrate a simple but useful use case for them. We will first set up an HTTP function to send messages to a Slack channel with an incoming webhook. Then we will set up an event-driven function to call the HTTP function to send some message to Slack when any file is deleted in a specified Google storage bucket.
Before creating the HTTP function, let’s first create a Slack incoming webhook that can be used to send messages to a Slack channel from any application. You need to have a Slack account in order to do this. Go ahead to Slack and create an account and a workspace if you don’t have them yet. After you have created your Slack account and a workspace. It is fairly straightforward to create an incoming webhook for Slack and can be finished in a couple of minutes. You don’t need to bother with the advanced formatting and security settings for now. The final incoming webhook should be something like “https://hooks.slack.com/services/T00000000/B00000000/XXXXXXXXXXXXXXXXXXXXXXXX”. Keep a note of this link as it will be used later. Actually, you can send requests to this link directly, for example:
Note that you should use the webhook URL you just created, this one is just a demo. Instead of sending requests to this webhook directly, with a cloud function, we can have the code and logic centralized as a microservice. We can then call the cloud function from different places which can reduce code redundancy and make the code easier to maintain, as we will see soon.
Now let’s create an HTTP function for the Slack webhook. HTTP functions are invoked by standard HTTP requests. Common HTTP request methods like GET, PUT, POST, and DELETE are supported.
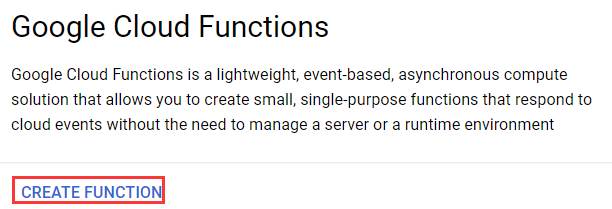
Go to the console page for Cloud Functions and have the API enabled. Besides, you need to have Cloud Build enabled as well. This is because under the hood Cloud Build builds the code into a container image which is then used by Cloud Functions to execute the function defined in the code. When everything is set up, click “CREATE FUNCTION” to create a new cloud function.
In the window opened, fill in the following information:
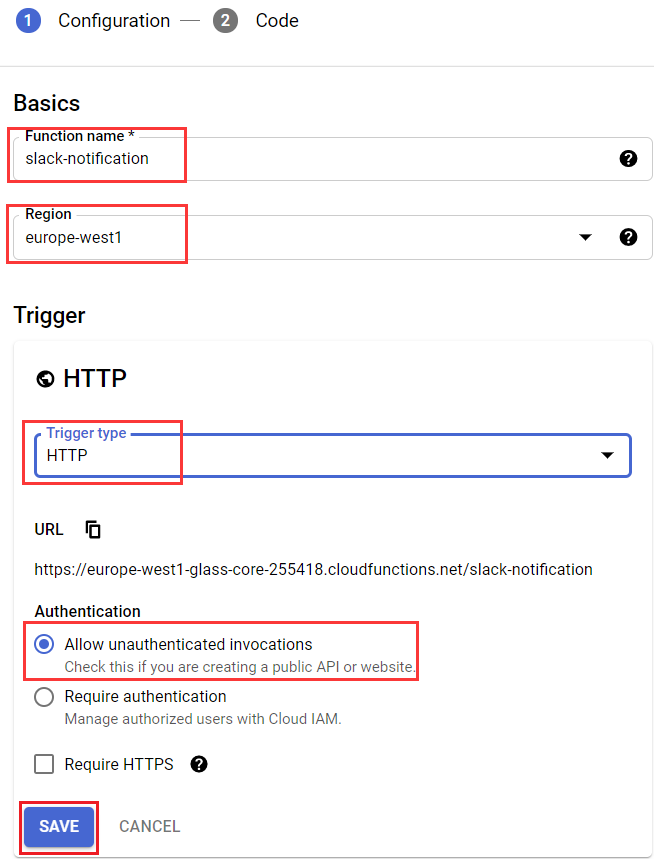
- Function Name — The name of the function, can be different from the actual name of the function inside your code. It must be unique in a project.
- Region — The region of the cloud function, choose the one that is closest to you.
- Trigger type — Since this is an HTTP function, leave it as HTTP which is the default type. Later we will choose a different type for the event-driven function.
- Authentication — Whether or not to require authentication for your cloud function. Here for simplicity, we allow unauthenticated invocations. If you need fine-grained control over your cloud functions, you can check this article for setting up JWT tokens for your cloud functions.
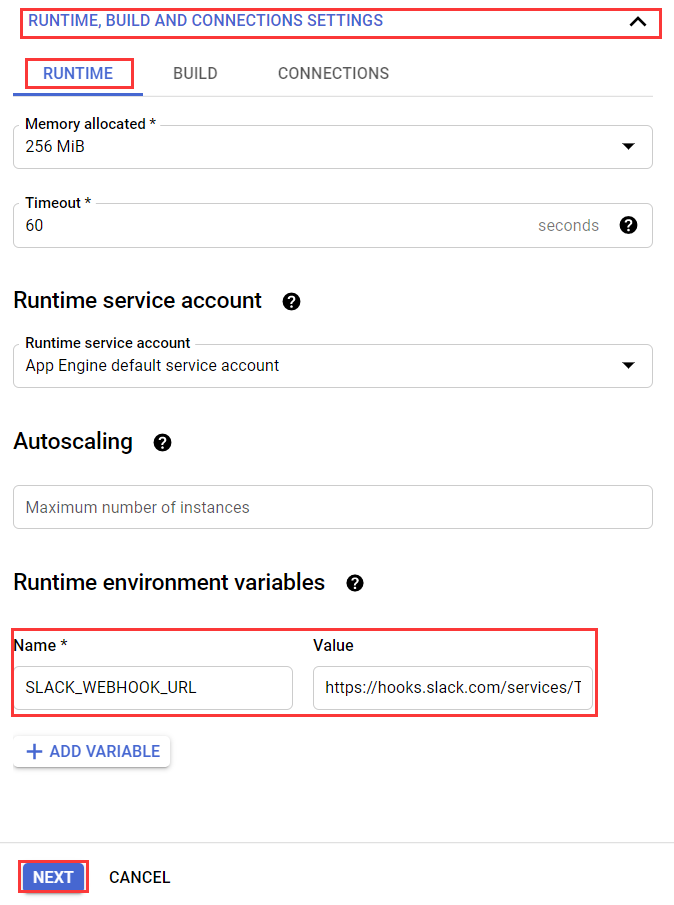
Before hitting “Next” to go to the next step, we need to set up an environment variable for the cloud function. We should not expose the Slack webhook URL in the code because it contains the API key. Let’s create an environment variable for it which can then be referenced in the code:
Now we can go to the “Next” step and write the code for our cloud function.
Let’s first demonstrate what the code will look like and explain the key concepts afterward.
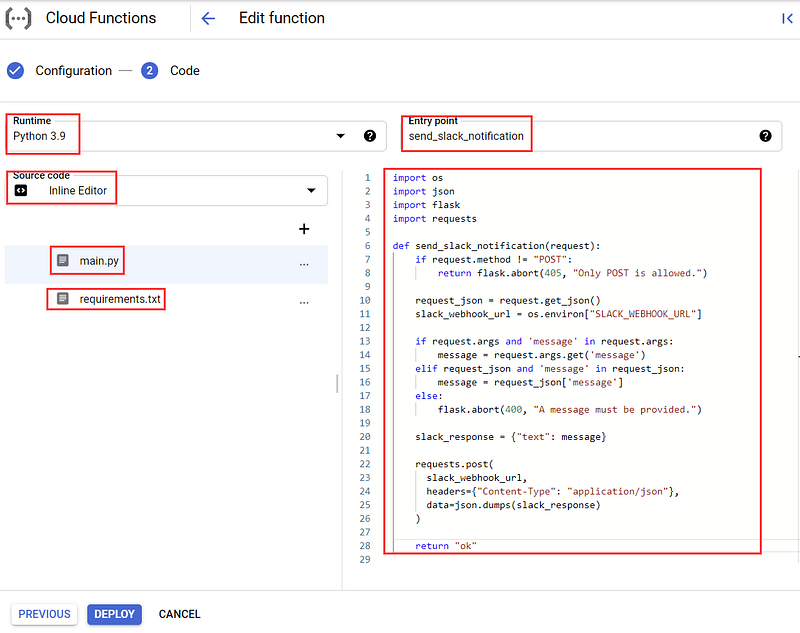
- Runtime —Specifies the environment for the cloud function, here we just choose the programming language that the code is written in.
- Source code —Specifies how the code should be written, we can either write the code directly with an inline editor or upload the code from a ZIP file. For simple cases like this one, the inline editor would suffice. If you want to version control the code for your cloud function, you may want to choose “Cloud Source repository”.
- main.py — Cloud Functions looks for deployable functions defined in
main.pyby default. This is just some regular python code making use of the Flask library to handle HTTP requests. You don’t need to be an expert on Flask to use HTTP cloud functions as we won't use complex Flask-specific features in most cloud functions. All the logic of the cloud function is defined inmain.py. There should be a runnable entry-point function which issend_slack_notificationin this example. The name of this function should be specified in the “Entry point” input box. - Entry point —the entry point function defined in
main.py. - requirements.txt — the metadata file which specifies all the third-party libraries required by the cloud function. In this example, we only need to specify the
requestslibrary (addrequests==2.26.0) because the Flask library has already been provided by the Python runtime.
Now the function is deployable. Let’s hit “DEPLOY” and get it deployed. The deployment process will take some time because, under the hood, Cloud Build has to be called to build a docker image for the cloud function with all the third-party libraries installed. After it’s deployed, you can see a summary of it like this:

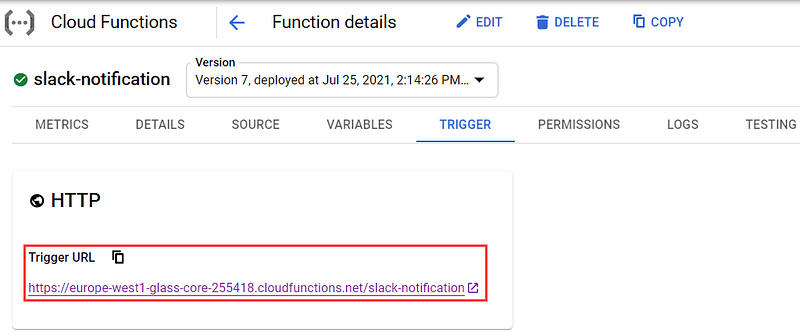
You can click on the name of the cloud function “slack-notification” to see all the settings for it. Importantly, you can click the “TRIGGER” tab to see the Trigger URL to which you can send HTTP requests.
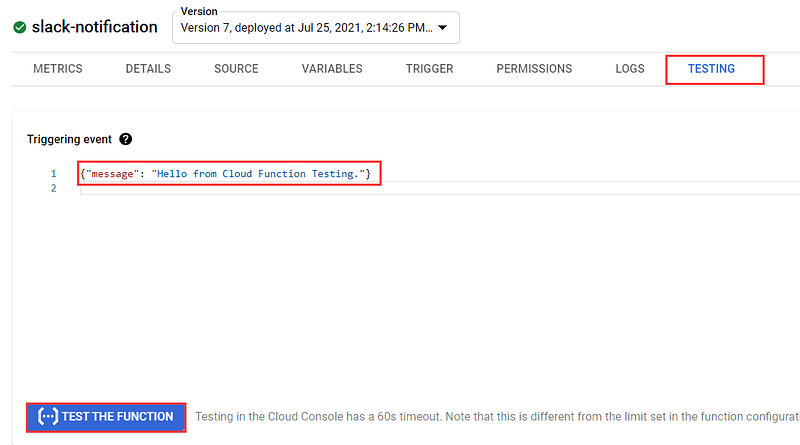
Besides, you can send test HTTP requests in the “TESTING” tab. You can specify some data in the format expected by your cloud function. In this case, we should have a message key in the JSON request body.
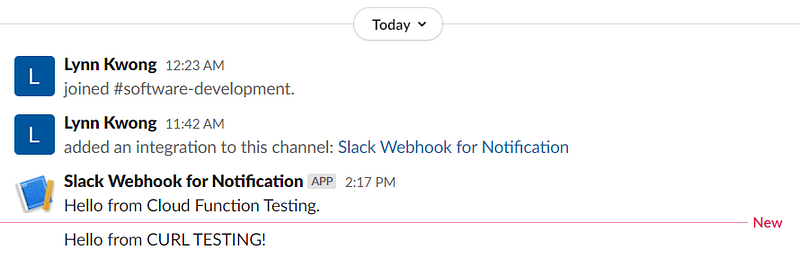
You can also send requests to the Trigger URL with the CURL command or from inside your applications:
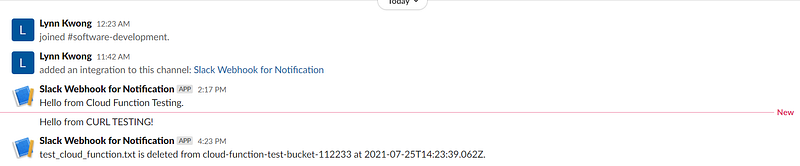
When the requests are successfully made, you can see the messages in Slack:
If something is wrong, you can check the logs in the “LOGS” tab to see the debugging and error information.
We have created an HTTP function to send messages to a Slack channel. Now let’s create an event-driven function to use this HTTP function to send some message to Slack whenever a file is deleted from a Google storage bucket.
On the Cloud Functions console page, Click “CREATE FUNCTION” to create a new cloud function:

Then we can create an event-driven function with the following settings:
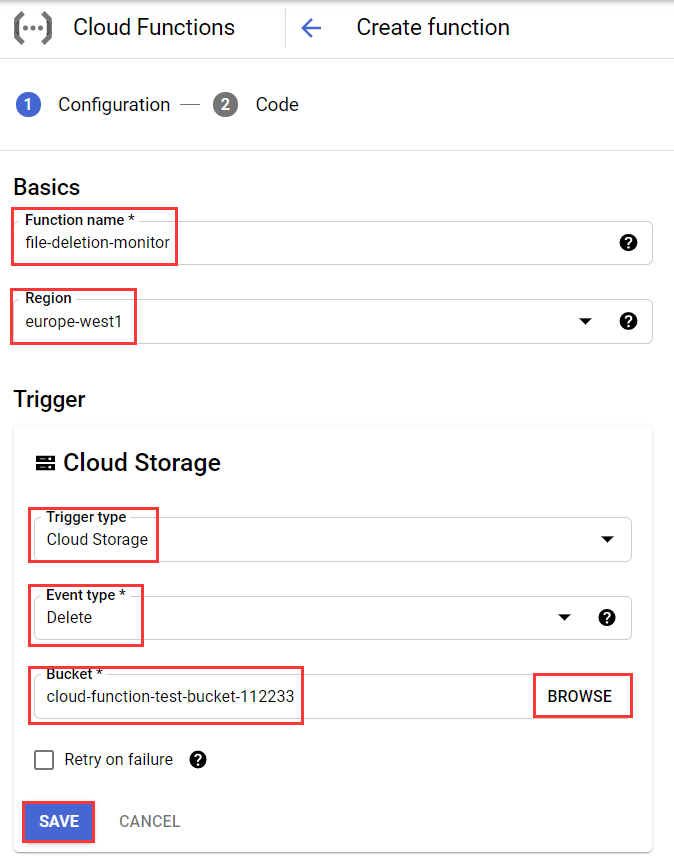
- Function name — Again the function name should be unique and indicative of what it’s doing.
- Region — Select a region closest to you.
- Trigger type — Choose “Cloud Storage”, which means the created cloud function will handle events from a Google Cloud storage bucket.
- Event type — Choose “Delete”, which means whenever a file is deleted, the function will be triggered. You can check more about Google Cloud storage triggers at this link.
- Bucket — Specify the Google storage bucket to monitor. You can click “BROWSE” to create a new bucket or select an existing one. If you want to use
gsutilor Python to handle your storage buckets and objects, this article can be helpful.
Let’s create an environment variable for the HTTP cloud function for sending notifications to Slack.
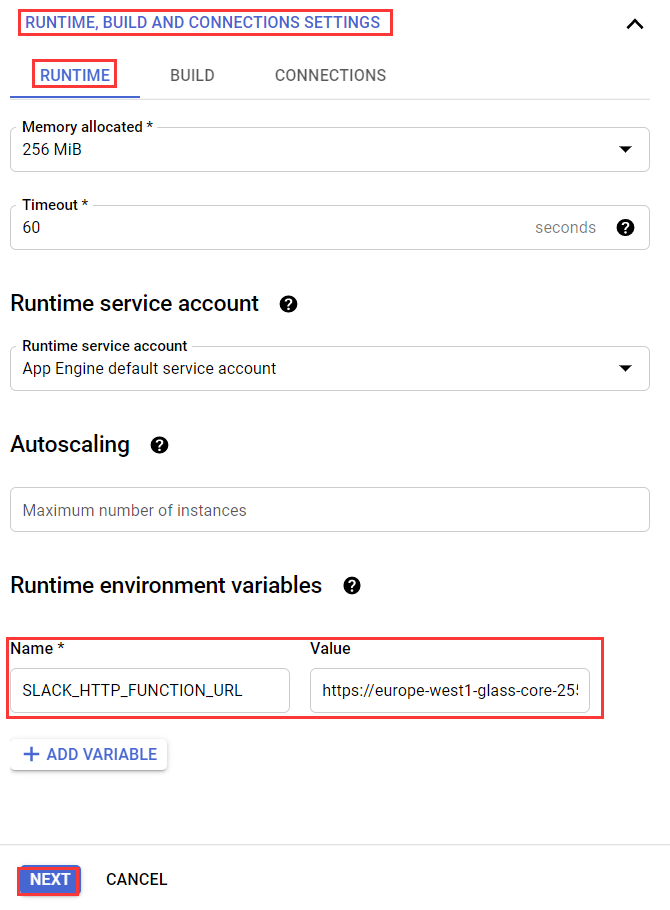
The value for the environment variable SLACK_HTTP_FUNCTION_URL should be the Trigger URL of the HTTP function you just created.
Now let’s write the code for the event-driven function:
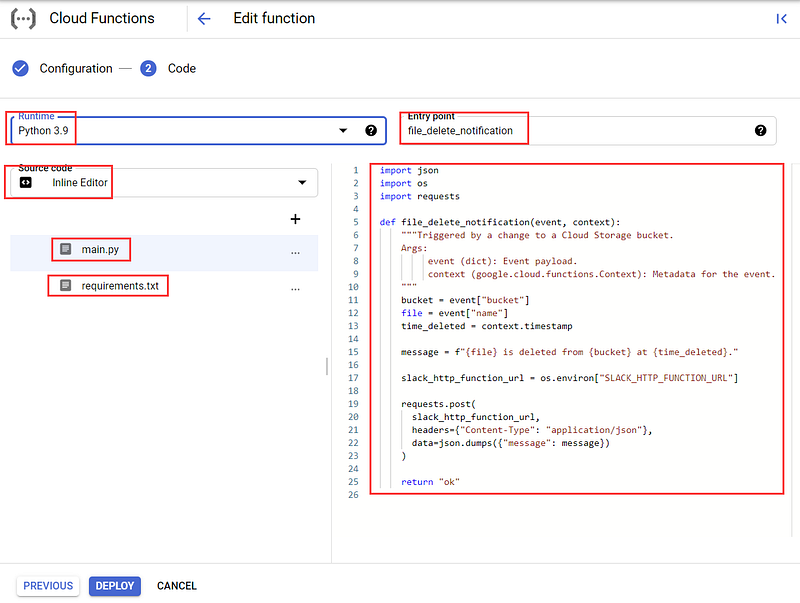
Everything is the same except the content of
However, unlike HTTP Cloud Functions, event-driven cloud functions do not have a public URL and cannot be triggered by HTTP requests. Instead, they can only be triggered by some events within your Cloud project, which are the deletion events in the specified Cloud storage bucket in this example.
You can read more about storage event types and storage object resource representations and customize the message according to your needs.
In order to test this cloud function, you can upload a file to your selected Cloud storage bucket and then delete it. In Slack, we shall see the message shown in the selected channel which proves that the HTTP function is successfully called by the event-driven function. You can check the logs of both cloud functions to see the details.
In this article, we have briefly introduced the concept of Cloud Functions of the Google Cloud Platform (GCP) and different types of cloud functions. An example is created for the HTTP function and event-driven function, respectively. With these simple examples, you shall have a clearer picture of what the cloud functions in GCP are and how to use them in your work.
Related articles:


