
Learn how to create your own Dapp with Angular 9 — Part II.
In this six-part article, we will cover how to create a Dapp with Angular. In Part I, which served as an introduction we covered general information regarding developing the dapp benefits and classification. Using Angular, Angular architecture, benefits. You should start there.
In this part, we will be covering creating an Angular Dapp — prerequisites, and creating an Angular skeleton app.
Creating an Angular Dapp
In this section, you will be creating an actual dapp that will connect to the Ethereum network and transfer funds from one account to another. This is often the core feature of any dapp out there. For instance, you can build a dapp that sells products, provides services, or pays users to take quizzes, and all these types would need to have a mechanism in place to transfer coins/tokens. In this section of this article, you will be creating a dapp utilizing Angular.
In terms of environment and deployment, you will be using the Truffle web framework, as it offers benefits for quickly creating a smart contract.
Truffle is able to do more than just help compile your smart contract; it does everything you need to inject your smart contract into a web app and can run the test suite. You are also going to utilize MetaMask again to get a secure blockchain account in the browser.
Lastly, you will use and run Ganache to create a local blockchain RPC server to test and develop against.
Prerequisites
Angular needs Node and npm manager. To confirm you have npm installed and the correct version run npm with the v flag.
node -v
npm -v
In case you do not have npm and node, just run the following command:
brew install nodeGive npm ownership for your user so you won’t need to use sudo to install libraries.
> sudo chown -R $USER:$GROUP ~/.npm
> sudo chown -R $USER:$GROUP ~/.config
It’s recommended that you upgrade npm to ensure you are using the latest version; at the time of writing, it’s 6.13.4.
> [sudo] npm install -g npmThe result will be + npm@[version]
Angular CLI
Next, you need to install the Angular command-line interface (CLI). For Angular CLI, it’s recommended (but not required) to install Angular CLI with sudo and allow-root and ensure Angular CLI will have the correct privileges. You will be installing version 9.0.0-rc.7, which is the latest stable release version of Angular.
sudo npm install -g @angular/cli@9.0.0-rc.7This should results in the following output: + @angular/cli@9.0.0-rc.7
You could also install the latest version of Angular but your example code may break, with newer versions of Angular.
sudo npm install -g @angular/cliTo verify installation went well, run the version flag, and you should see version 9.0.0-rc.7; Figure 1 shows the expected output.
ng version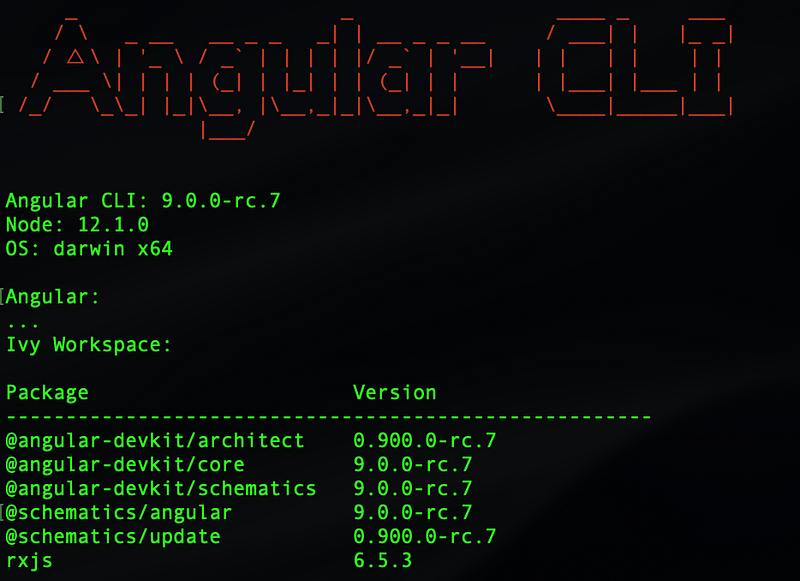
Create an Angular Project
Now that you have the main tools and libraries installed, you can proceed and create your project from scratch by downloading other needed libraries, test libraries, and build scripts, as well as make your own folder structure; however, to expedite this process, you can use the Angular seed project that includes a skeleton project to quickly bootstrap your project.
Using the Angular seed project can help you start development quickly and efficiently, following Angular’s best practices. There are pros and cons of using boilerplate skeleton code. You can decide on your own if you want to use this skeleton for future projects, but for this demo app, it is ideal.
There are many ways you can create your project using the Angular seed skeleton. I will be showing you two options here: using the Angular CLI and using WebStorm.
The ng new command will run a script that will create your app. You can run the CLI new command and give the name ethdapp as your app name.
cd ~/desktop
ng new ethdapp
You can answer as following to the installation wizard;
Would you like to add Angular routing? (y/N) y Which stylesheet format would you like to use? CSS
Notice that I added routing here and decided to use CSS for styles. Once the installation is complete, it will output all the files that are created.
CREATE ethdapp/README.md (1029 bytes)
CREATE ethdapp/.editorconfig (246 bytes)
CREATE ethdapp/.gitignore (631 bytes)
CREATE ethdapp/angular.json (3575 bytes)
...
...
...
CREATE ethdapp/e2e/src/app.po.ts (262 bytes)
✔ Packages installed successfully.
Successfully initialized git.
Change directories to the newly created folder and confirm you have the initial files and directories.
cd ethdappRunning the following command will analyze your package.json config file with recommendations:
ng updateYou can run the following command to follow the recommendations:
ng update --allNext, install Bower globally. Bower is a package manager that is used often with Angular. At the time of writing, it’s at version 1.8.8.
npm install -g bower@latest
bower -v
1.8.8
Let’s do a walk-through of what was created in a workspace and the starter project files (see Figure 2).
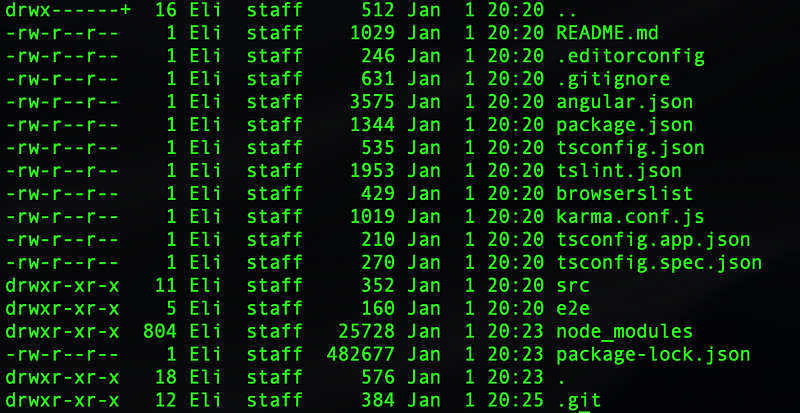
— A new workspace: This is the root folder named ethdapp.
— e2e folder: This contains an end-to-end test project, located here: ethdapp/e2e. The testing folder includes the Jasmin library’s JSON configuration file.
— src folder: This is your project folder, which includes all the files of your project.
Instead of src you will find;
• An initial skeleton app project, located here: ethdapp/src/app • The assets folder with the entry file index.html • Other configuration files
— .gitignore: Here you list any files and folders that you would like to ignore it when you upload your project to Git.
— angular.json: This is your project configuration file and includes information about your project.
— package.json: This is the npm manager configuration file and includes all the libraries you will be using in your project.
— README.MD: This is documentation about your project; this will be the “home page” document of your project and the first file developers will read to get instructions on how to get the project running.
— tsconfig.json: This is the TypeScript config file.
— tslint.json: This is the Lint config file used to set your best-practice formatting, spacing, and the like.
Serve the Application
To see your actual dapps, you will be using the ng serve command, which builds the app, starts the development server, watches the source files, and rebuilds the app as you make changes to those files. The — open flag opens the app in a browser on port 4200 here: http://localhost:4200/. Run the ng serve command with the open flag.
ng serve --openYou should see the dapp running in your browser, as shown in Figure 3.
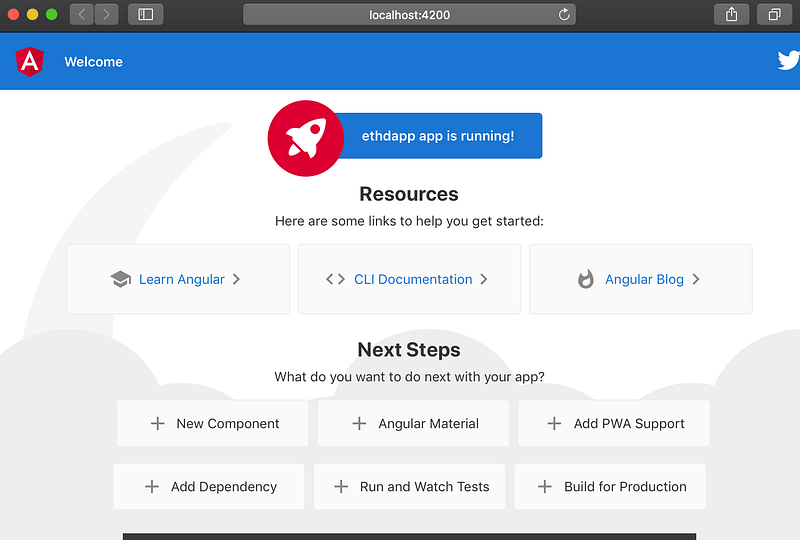
The skeleton app includes links to a tour, documentation, and an Angular blog. By going through the resources and the CLI documentation, you can get a good understanding of how Angular works, and bookmarking the Angular blog can give you updates on future releases and announcements.
To stop the application from serving, press Command+C in Terminal.
Angular Project with WebStorm
Another option for firing up the Angular seed project is utilizing the WebStorm IDE. WebStorm allows you to either import the seed project you created or create a new seed project.
To import the ethdapp project you created with the Angular CLI ng new command, open WebStorm, select File ➤ Open, and navigate to the ethdapp directory. That’s it; WebStorm will automatically import the project.
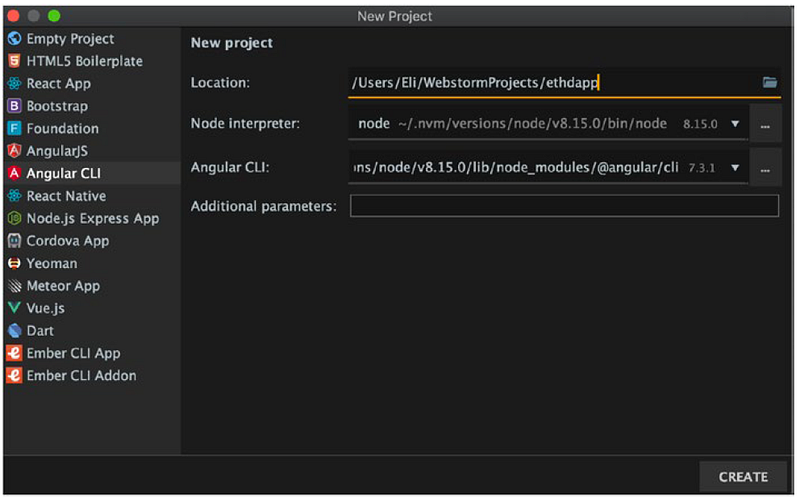
Alternatively, to start a new Angular seed project in WebStorm, select File ➤ New ➤ Project from the top menu. Next, select Angular CLI and name your project ethdapp. Use the drop-down menu to select the version of the Angular CLI, as shown in Figure 4.
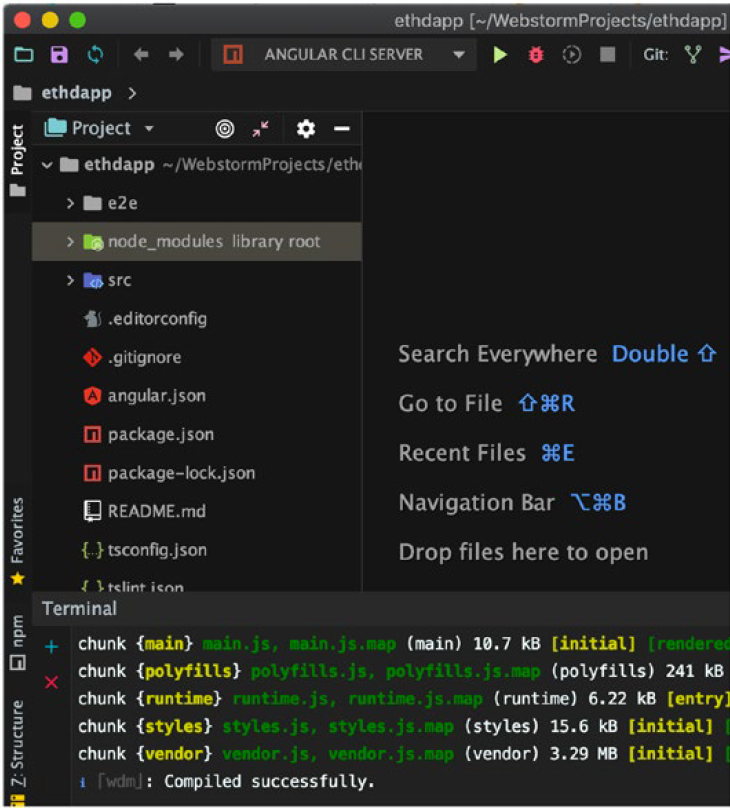
Now that the project is created, you can run the same command, utilizing the Terminal tab in the bottom menu of WebStorm, as shown in Figure 5.
ng serve –open
When you download your steps, make sure you run npm install because I stripped out the node module to decrease the size of the project.
npm installNote I excluded node_modules, which holds all the project’s dependencies, from the project. It’s common not to include it with a project because of its size; you can install it with the npm install command.
Ensure No Mismatch with Angular CLI Version
You can create your Angular seed project either with WebStorm or through the ng command, and you need to check that there is no mismatch of the global Angular CLI with the local project Angular CLI. This can happen when setting files pointing to a previous version, or you may have used Angular in the past with an older version. What happens is that your local project Angular shows an older version than the global Angular installed on your computer.
To ensure this is not the case, run any ng command, and if this issue exists, you will see the following error message:
ngYour global Angular CLI version ([version]) is greater than your local version ([version]). The local Angular CLI version is used.
If you continue with these settings, you will be running a lower version instead of 9.x. To fix this, what you need to do is uninstall the Angular CLI from your dev environment and then install version 9.x.
npm uninstall — save-dev angular-cli
npm install — save-dev @angular/cli@9.0.0-rc.7
Notice that you use the — save-dev flag so the new version will be saved in your package.json project file. Now if you run the version command again, you should see the correct version with no warning messages.
ng --versionThis should now output: Angular CLI: 9.0.0-rc.7
Now that you have ensured you are running the correct version of Angular CLI, you are ready to continue development and make changes to the seed starter app.
Angular Components
An Angular best practice is to use a Model View Controller (MVC)–style architecture. Angular supports coding with a separation of concerns just like any other mature framework.
The Angular MVC includes the following three elements:
— Model: This contains the application’s data and Angular data binding, which allows the reflection of data.
Note reflection in relation to data binding, elements bound to data and any data change are automatically reflected. For instance, you bind price change to multiple view elements and once the price change data is updated all the view elements are updated automatically.
— View: This contains the HTML or a template and directives.
— Controller: This is the glue holding the model and the view together. The controller takes the data, applies business logic, and sends the results to the view.
As you probably recall, Angular’s welcome page opened when you were running the serve command. The welcome component is the application shell. The shell is controlled by an Angular component named AppComponent.
Components are the fundamental building blocks of an Angular application. They display data on the screen, listen for user input, and take action based on that input.
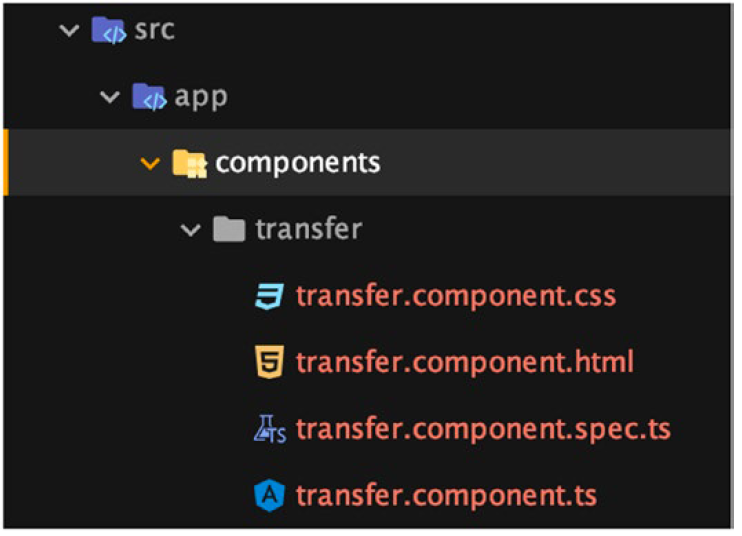
You will be creating a component called transfer that you will be utilizing to transfer coins to another address. To create the transfer component, run the ng generate component command.
ng g c components/transfer
Notice that you used the shortcuts g and c that stand for “generate” and “component,” respectively, but you can also use the full name instead of the abbreviation.
The ng command generated the four following files for you:
— transfer.component.css: Component’s specific CSS styles
— transfer.component.html: Component template, written in HTML
— transfer.component.spec.ts: Testing file
— transfer.component.ts: Component class code, written in TypeScript
These four files together act as the implementation of the transfer component. You can see the folder structure in Figure 6.
An application’s structure is usually created with a header, a footer, and a navigation menu so you can navigate to different partial views. Using this architecture of header and footer components can help you create different views and split the page view into separate files. Think of each piece as a stand-alone reusable UI module. Angular Seed promotes this type of architecture and comes with the welcome component already created. Let’s create a start component, a header, and footer components.
ng g c components/start
ng g c components/header
ng g c components/footer
You can see in the output that each component generated the following files:
CREATE src/app/components/[component-name]/[component-name].
component.css
CREATE src/app/components/[component-name]/[component-name].
component.htmlCREATE src/
app/components/[component-name]/[component-name].
component.spec.tsCREATE src/app/components/[component-name]/[component-name].
component.tsIn addition to these files, you can open ethdapp/src/app/app.module. ts and notice that the app.module.ts file was modified every time you created a component. The app.module.ts file is one of the most important files in Angular; it’s the app controller written in TypeScript. The controller is a global file that will tie your components together, so every component you want to use in your app needs to be defined in that file. If you did not use the ng script, you will need to modify app.module.ts yourself to link to the new component.
Since you used the CLI, these imports are included automatically for you:
import { TransferComponent } from './components/transfer/transfer.component';
import { StartComponent } from './components/start/start.component';
import { HeaderComponent } from './components/header/header.component';
import { FooterComponent } from './components/footer/footer.component';
Routing Module
Another important file and good practice to create is an app-routing module. This file acts as a controller to instruct Angular how to navigate to different views in your app.
Normally to generate a route for your app, you do not need to manually do so, since, during the creation of your app, you decided to create the routing file called app-routing.
In Angular version 9.0.0, the app-routing is added automatically for you but if you need to create the app-routing file, you can run the following the module command;
ng generate module app-routing --flat --module=appYou will have the following files:
src/app/app-routing.module.ts
src/app/app.module.ts
Notice that this time in your command you are using the full name generate module instead of just the first letters of g and m. Both options work the same way.
The initial code for src/app/app-routing.module.ts shown, below;
import { NgModule } from '@angular/core';
import { Routes, RouterModule } from '@angular/router';


const routes: Routes = [];

@NgModule({
  imports: [RouterModule.forRoot(routes)],
  exports: [RouterModule]
})
export class AppRoutingModule { }
The initial code includes an import statement to the Angular code and module tag. Next, replace the pre-populated code of app-routing. module.ts file with the code in Code Listing 1.
Code Listing 1. app-routing Code to Route Views
import { NgModule } from '@angular/core';
import { CommonModule } from '@angular/common';
import { RouterModule, Routes } from '@angular/router';
import { StartComponent } from './components/start/start.component';
import { TransferComponent } from './components/transfer/transfer.component';


const routes: Routes = [
  { path: '', redirectTo: '/start', pathMatch: 'full' },
  { path: 'start', component: StartComponent },
  { path: 'transfer', component: TransferComponent }
];

@NgModule({
  imports: [RouterModule.forRoot(routes), CommonModule],
  exports: [RouterModule]
})
export class AppRoutingModule { }
In Code Listing 1, you imported the view components you will be using; these are start and transfer. They will act as web pages on a web site or partial views on a mobile app. The route tells your app what view to match with what keyword, and lastly you set import statements to tell Angular who can access this module.
Now that the routing is set, you can get the footer, header, and body of the page to display. All you have to do is open
src/app/app.component.html and update from the welcome page’s HTML code to the following three lines:
<app-header></app-header>
<router-outlet></router-outlet>
<app-footer></app-footer>
To test the changes you made to your application, you don’t need to publish your app again or run any scripts; just save the files. Run the same serve command you ran before in Terminal if you stopped the app.
ng serveThe serve script includes scripts to watch for changes in files and update your app automatically, so all you have to do when you make a change to your files is go back to the browser. Most of the time you won’t even need to refresh your web page; the changes will be there automatically. Navigate to http://localhost:4200 to see the changes.
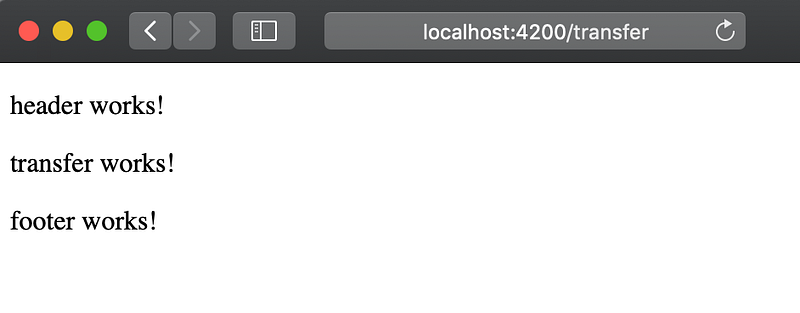
If you would like to go directly to the transfer page, all you have to do is add the keyword you selected at the end of the URL as you set up the routing mechanism: http://localhost:4200/transfer. See Figure 7.
Let’s recap!
In this article, we covered creating an Angular Dapp — we installed the prerequisites and created our Angular skeleton app, as well as examined the created files. We created the app in the command line and imported it to WebStorm IDE (option step). Additionally, we created our header, footer and start component and ensured the router is set correctly.
Where to go from here
Continue following our articles as in the next articles we will be covering the following;
- Part III — Styling Angular — including custom components
- Part IV — Creating a smart contract with Truffle
- Part V — Integrating the smart contract with the dapp
- Part VI — Linking and connecting your dapp to the Ethereum network
To learn more about what’s possible with Blockchain as well as develop your own project check The Blockchain Developer.


