
Learn Google Ads & Analytics in 10 Minutes

If you’re a marketer or just someone trying to build your business or website you know that SEO takes time, patience, and effort before you begin to see results. So what if you need results fast?
Well, that’s when you turn to Google Adwords. It takes less than an hour to set it up and the best thing is its results-based. In other words, if you don’t have results, clicks, leads, or sales. You don’t pay. Simple as that.
But that’s not the only benefit…
When people go to Google, they’re looking for something specific. That means they have intent. They’re actively looking for something to buy. They’re literally telling you what they want to buy by typing out words around your products and services.
That’s why Google AdWords is so powerful (and profitable). There’s no better form of SEM (search engine marketing) out there.
Say someone was to search pizza, if you weren’t a well-known brand, no matter how good your pizza was, it’d be pretty hard to outrank Dominoes. But with Google ads, you can quickly jump up to that top spot on Google.
AdWords also gives you a little extra bonus, too. It can help you reveal the ‘money-making’ keywords in your industry. So just by spending a few bucks, you will discover which keywords convert the best so you can take them back to your content and SEO strategy.
The Adwords marketplace works as an auction. People bid money for clicks. But, the highest bid doesn’t always win. Google combines the money factor with a quality factor (which we’ll dive into shortly), in order to create the best experience for the user.
Quality ads + solid bid = win!
Step #1: Establish Account Goals
What are you using AdWords for? Lead generation? E-commerce? Brand building? How you structure your account and the features you take advantage of will hinge on your response.
To learn more about establishing realistic goals for your AdWords account, check out these resources:
- 5 Questions AdWords Advertisers Should Ask Themselves Every Quarter
- 3 Ways a Small Business Can Compete with the Big Guys in PPC
Step #2: Determine the Audience
If you’ve already done some research for SEO you should have some kind of idea of what your buyer personas are. If not, ask these questions: What do your ideal customers do? Where do they do it? When are they actively searching? On what device? This resource helped me find mine.
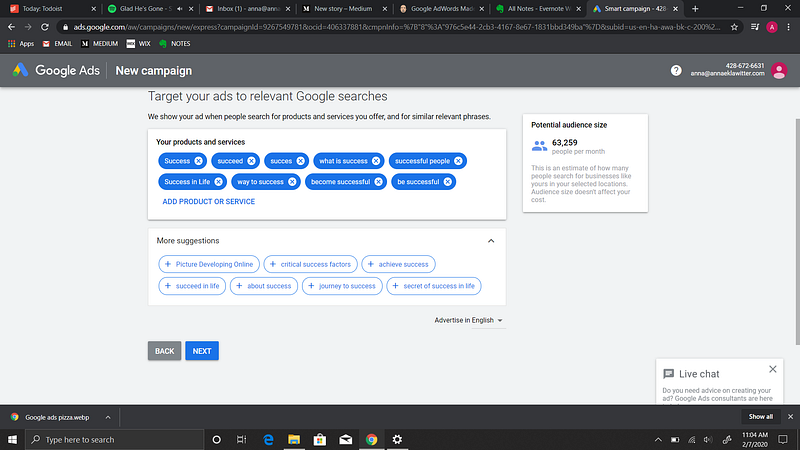
Step #3: Conduct Keyword Research
By bidding on keywords relevant to your business, you can place your ads in the search results when people are searching for what you offer. Keyword tools can help you discover cost, competition, and volume for search terms at every stage of your sales funnel. This is how I targeted my keywords:
To learn more about conducting keyword research, check out these resources:
- WordStream’s Free Keyword Tool
- How to find negative keywords
- 5 Keyword Search Tools Everyone Should Be Using
- 5 Brilliant Competitive Advertising Strategies to Outsmart Your Competition
- Commercial Intent: How to Find Your Most Valuable Keywords
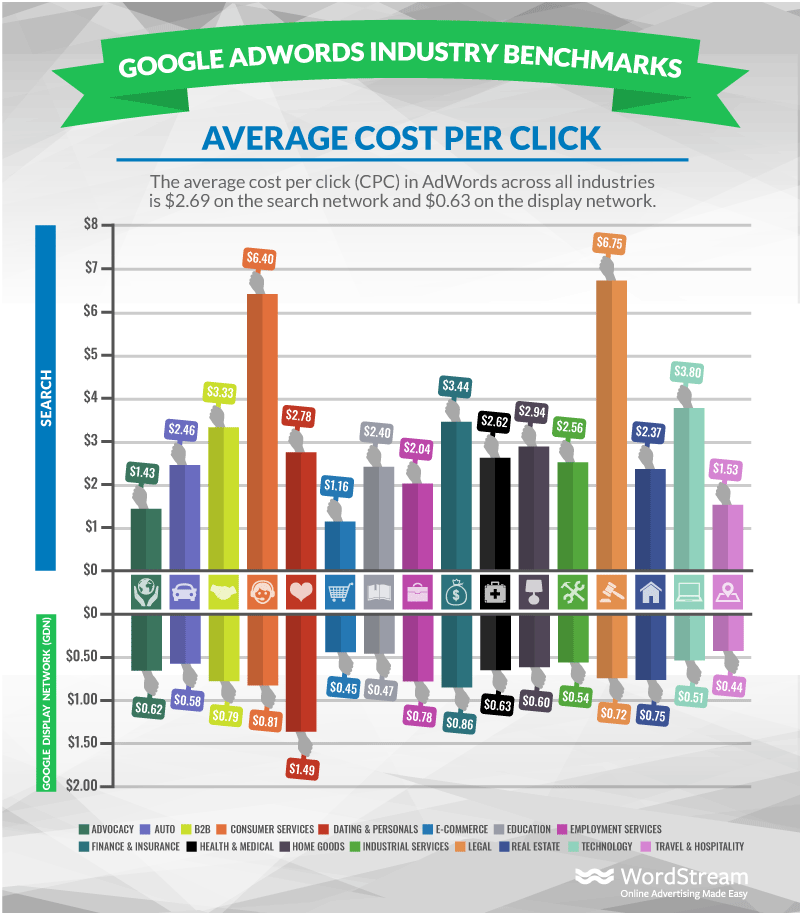
Step #4: Set Budget & Bids
You’ve determined which keywords to bid on: time for some math! If the average CPC (Cost Per Click) looks too high, get granular: volume will decrease, but so will cost! Make sure to spend most of your AdWords budget on keywords that convert at a high rate! But leave room for testing and brand-building, too.
Step #5: Write Compelling Ad Copy
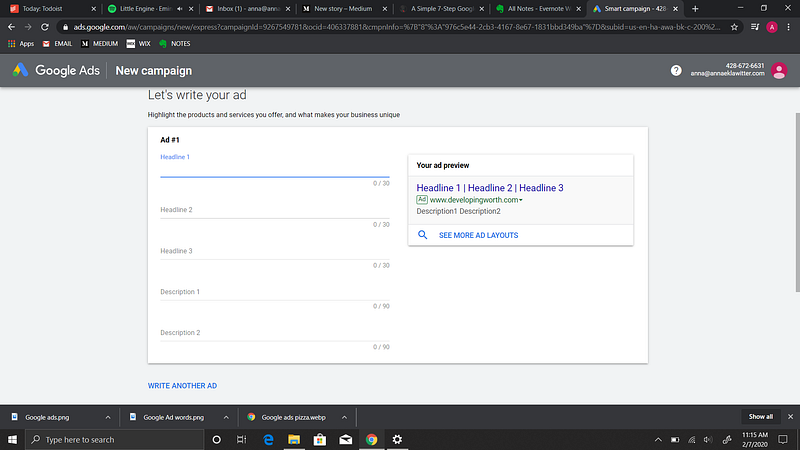
Your headline should be attention-getting (but not misleading), relevant, and clear. Every headline has the same single objective: make them read the next line.
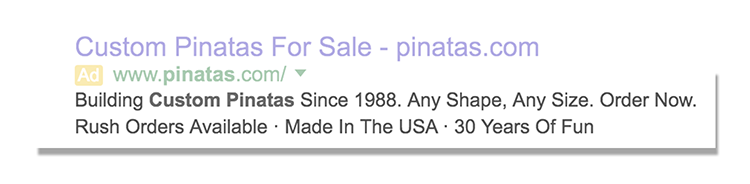
Create headlines with the actual searches in mind. It’s tempting to use an umbrella term like “A wide selection of ink toner” for all ink toner products, but you’re missing out on a feature that plays in your favor.
Google often bolds the words in a headline that match what the user searched. If the user searches HP cyan refill, a better headline is “Cyan refills for HP printers.”
Tip: Consider dynamic keyword insertion. It automatically drops the exact keyword into your headline, and it’s best used in your highly-specific ads for products or services that you offer.
When the ad on a “print your own t-shirts” search tells them that they can indeed print their own t-shirts, you can expect a qualified visitor clicking through to your site.
Ad Body
Be enticing and clear about what you can do for the reader. You have 2 lines (of 35 characters each) to describe your offer.
Your ad body copy is your shot at getting someone to understand what you offer and then click through to learn more or to take advantage of that offer. Anything vague or mysterious can only waste your money on clicks from high bounce rate visitors.
When you are setting up your account, be prepared with ad variations for different keyword groups. This might be a product line or different services. For example, your ads for “print your own t-shirts” would be different from your ads for “custom kids t-shirts” since the reader has a specific product in mind.
Google Analytics is a free web analytics service that allows you to analyze in-depth detail about the visitors on your website. It provides valuable insights that can help you to shape the success strategy of your business, so after you’re pulling in new visitors through your ads use Google Analytics to learn more about those new visitors.
Here’s a tutorial of Google Analytics to get started.
After signing into your Google account, you can then create an account with your own name and website data.
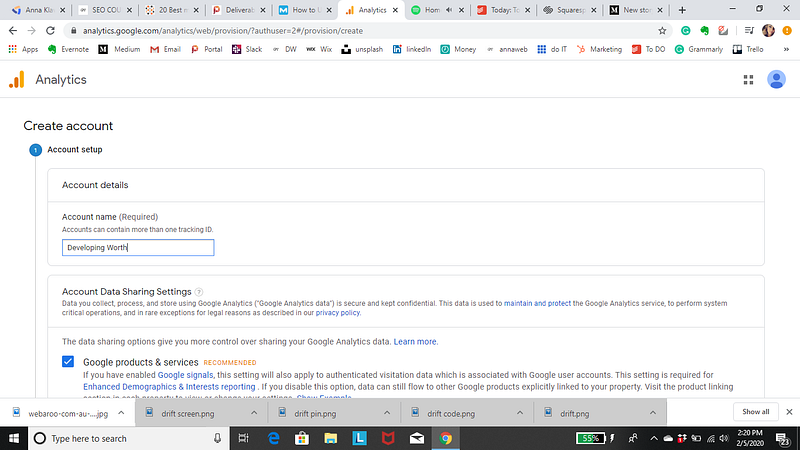
There are no right or wrong ways to set up your Google Analytics account — it’s just a matter of how you want to organize your sites. You can always rename your accounts or properties down the road. Note that you can’t move a property (website) from one Google Analytics account to another — you would have to set up a new property under the new account and lose the historical data you collected from the original property.
Set up Site Search

Setting up site searches will help you know what your visitors are looking for when they are checking out your website. Go to the Admin tab, where you will see three columns: Account Property, and View. Go to the View column and click on the View Settings. Here you will see Site Search Settings, where you will need to set Site search Tracking to on.
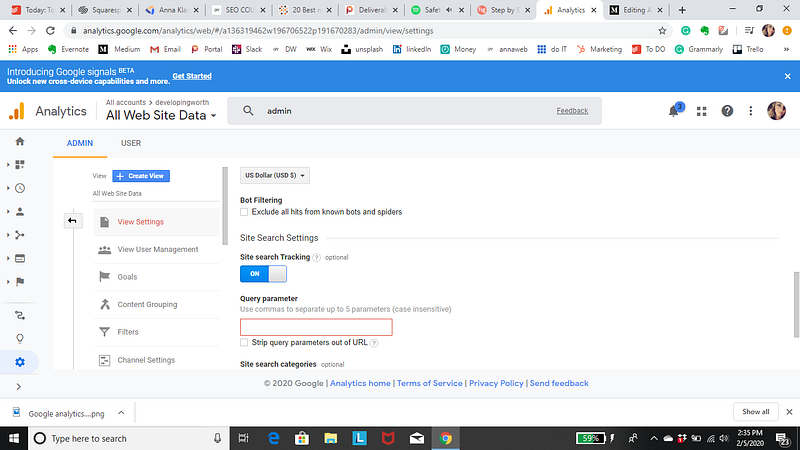
After that, you will be provided with the Query Parameter box, where you will need to enter your site’s search query parameter. (The box outlined in red.)
The query parameter is usually “s” or “q”, but you can check yours by running a search on your website. No matter what you search for in your site’s search box, you will see your query parameter in your URL placed right before your query. For instance, if you search for the word “mobile” on Google, the URL for your search result will look like this:
http://google.com/?hl=en&q=mobile…
Therefore, your query parameter will be “q” (right before “=mobile”).
After that, just click on the Save button and Google Analytics will be able to track every single search made on your website.
Set up goals
You will want to configure a small (but very useful) setting on your website’s profile on Google Analytics. Setting up your goals. Google Analytics needs this in order to track the important activity on your website. For instance, if you have an e-commerce website, you should have a confirmation page for your customers on which they will land after they have completed a purchase. Or, if you use a contact information form to generate your leads, you should create a “Thank You” page for your website visitors to land upon after they have subscribed to your email list, for instance.
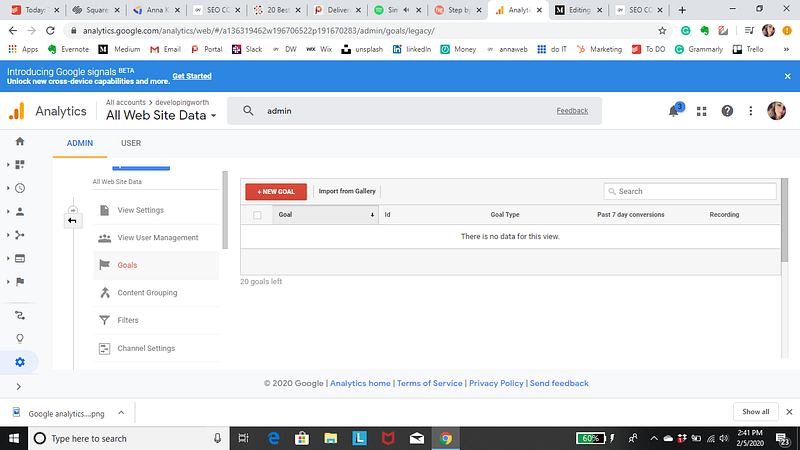
You can find Goal Setting by clicking on the Admin link at the top of your Google Analytics and then clicking on Goals under your website’s View column.
1. Home Tab
On this tab, you will be provided with important data regarding your sessions, average session duration, bounce rate, and goal conversion rate for each and every one of the websites you may have.
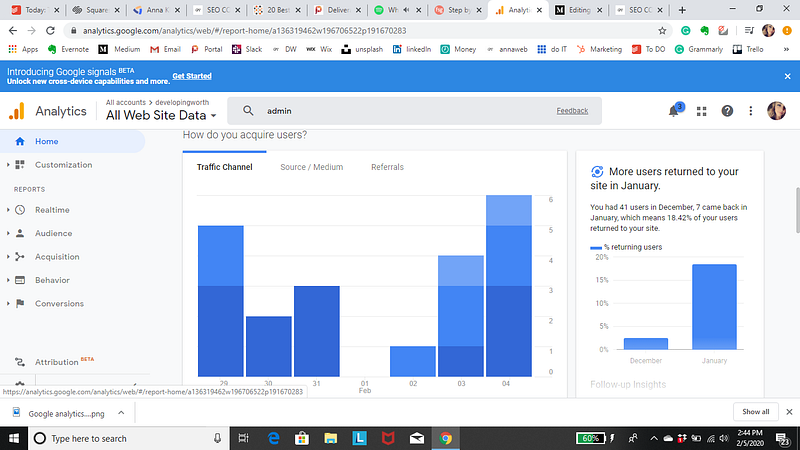
Reporting Tab
If you have one website under your account, Google Analytics will take you straight to the Audience Overview report under the Reporting tab every time you log into your account. The Reporting tab in Google Analytics provides you with dashboards and important reports that can give you an insight into how your website is actually performing so that you can know where and how to make improvements.
Link Google Ads to your Analytics account
I recommend linking your Ads and Analytics accounts to gain more insight into your ad performance.
By connecting your Ads and Analytics accounts, you’ll get access to metrics such as how long visitors stay on your site after clicking your ads, and you’ll also see how likely paid visitors are to complete your various analytics goals.
To link Google Ads to Analytics, log into your Google Analytics account, and go to Admin > Google Ads Linking (see screenshot below).
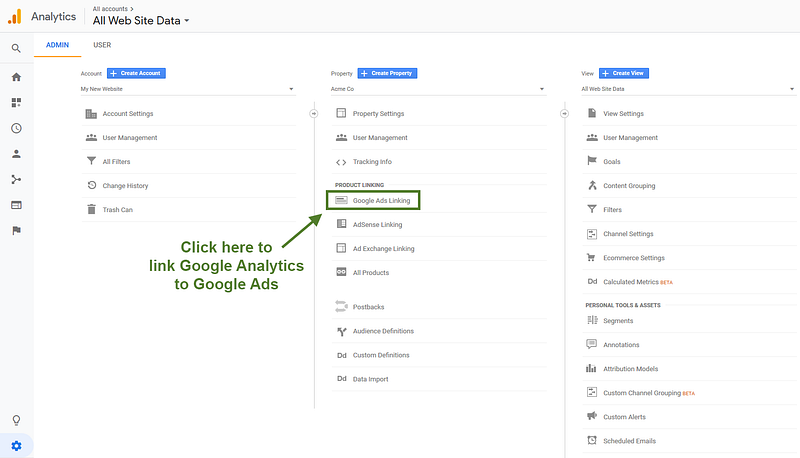
Simply follow the directions to complete the link between the two accounts. Now, you’ll have access to more in-depth user behavior data for your Google Ads campaigns.
Reviewing SEO Traffic Reports
Search Engine Optimization reports can help you understand how people are reaching your site through Google’s search results.
The three types of SEO reports are:
- Queries reports show which Google search queries resulted in the most impressions for your website. You can also see how many impressions resulted in clicks, giving you your organic search clickthrough rate.
- Landing Pages reports show which specific pages of your site were most likely to appear in Google’s search results. This data can help you identify which webpages are ranked well in Google and which ones are more likely to attract visitors.
- Geographical Summaries reports provide general SEO metrics from different countries, which may not be useful for small businesses with mostly local clients.
The metrics in these reports are for Google’s organic search results only. Traffic from advertising, email marketing, social media, or even other search engines like Yahoo or Bing is not included in the SEO reports.
To generate your SEO traffic reports, go to Acquisition > Search Engine Optimization > Queries and select an appropriate date range. It’s important to note that these reports can only pull data from the past 90 days. Then click the Landing pages report or the Geographical report links.
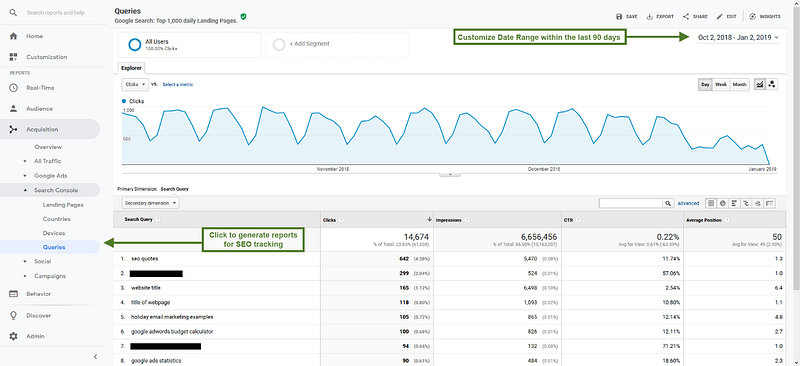
Advanced Tip: Use the search bar above the table to find specific keywords or landing pages. Then click the “advanced” link to the right of the search bar to help you view more meaningful stats with less clutter. For example, you can limit the report to show landing pages that are getting clicks and are ranked greater than 10 in Google. Those are pages you could likely edit to get on the first page of Google and significantly increase your traffic very quickly.
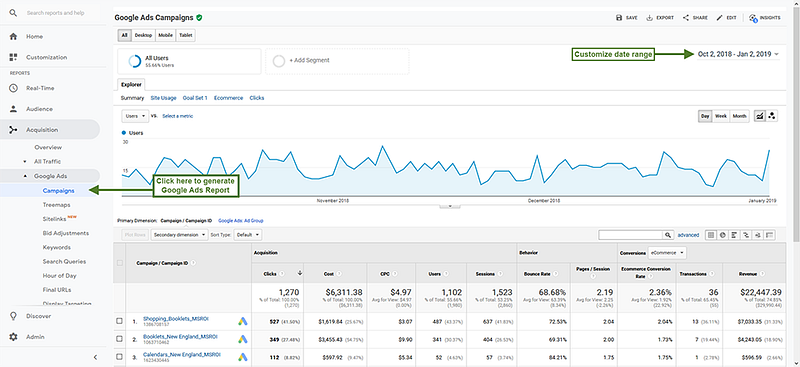
Review Google Ads Traffic reports
I recommend you check your Google Ads Traffic reports in Analytics in addition to using the reports within Google Ads. These reports are loaded with information that sheds light on your visitors’ behavior after clicking on your ads.
By default, your Google Ads report in Google Analytics shows both your ad clicks and your bounce rate (how often people leave your site after viewing just one page), which can help identify which of your ad campaigns are most effective.
Further, you can use Google Ads reports to see how users behaved once arriving on your site. Where does your paid traffic click after landing on your website? How long is your paid traffic staying on your site before leaving?
To generate a Google Ads Traffic report, go to Acquisition > Google Ads > Campaigns and select the appropriate date range.
Google Analytics is useful for a number of things when trying to market and promote your brand. Google Ads combined with the knowledge you learn from Google Analytics can do wonders for your business in more advanced ways.