
Open CV Basics in 10 Minutes
Wait!! Stop Searching You have found the best article to learn open cv very quickly. Just be with me and prepare your Device as needed. Nice to see I have someone like you on the journey.
Open CV
Open cv is the most popular library in computer vision. It is originally written in C and C++. It’s now available in python also. It is originally developed by intel. The library is a cross-platform open-source library. It is free to use. Open cv library is a highly optimized library with its main focus on real-time applications.
The Open cv Library is a combination of more than 2500 optimized algorithms. which can be used to detect and recognize different faces, identifying objects in images or in realtime, classifying different human actions using videos and webcam, tracking camera movements, tracking moving objects like car, humans, etc., counting objects in realtime, stitch images together to produce a high-resolution image, find similar images from an image database, remove red eyes from images taken using flash and increasing the quality of image, follow eye movements, tracking faces, etc
It has around 47 thousand active users community and an estimated number of downloads exceeding 18 million. Many big companies like google, amazon, Tesla, Microsoft, Honda, etc. use Open cv to make their products better and more AI-driven.
Prerequisite
Before starting with the code, we need to install open cv on our device. If you are Pro In programming and know every IDE, then go for Pycharm and install OpenCV-python from its package manager in the settings.
If you are a beginner or intermediate programmer or just want to follow the blog, then we are going to use vs code for the blog.
Just Go to the Visual Studio Code Website and Download the Latest Version according to your os for you.
Now we will create a virtual environment in which we are going to install open cv. Open your Terminal and target to Desktop using cd. create a folder using mkdir named as opencvThen run below command.
python -m venv envNow activate the environment using env\scripts\activate you will see that before C:\Users\username\Desktop\opencv There is your env in small braces (env) will appear. Now Just Install OpenCV using pip.
pip install opencv-pythonWe are going to cover 7 topics in this blog
- Reading, writing, and Showing an image
- Reading Video and Integration with the webcam
- Resizing and Cropping Images
- Basic image filters using functions
- Drawing Different Shapes
- Writing Text On Images
- Detect and Crop Faces
Reading, writing, and Showing an image
To read an image using open cv, we have a function as imread(), for showing an image, we have a function imshow(), and for writing, we have a function as imwrite(). Let’s see the syntax of each one.
imread():
img = cv2.imread("PATH_TO_IMAGE.jpg/png")Example
img = imread("images/dog0.jpg")imshow():
cv2.imshow("WINDOW NAME",IMG_VAR)Example
imshow("Dog Image",img)imwrite():
cv2.imwrite(FILENAME, IMAGE)
filename: A string representing the file name. The filename must include image format like .jpg, .png, etc.
image: It is the image that is to be saved.
Example
cv2.imwrite('images/img',img)Reading Video and Integration with the webcam
Reading a video file is much similar to reading an image file in OpenCV. The difference is here we use cv2.videocapture. Syntax
video = cv2.VideoCapture("FILEPATH.mp4")Example
video = cv2.VideoCapture("video/dog/dog.mp4")A Video is a collection of many frames joint together. Each frame is an image. To see a video using OpenCV, we just need to show each frame of the video using a while loop.
while True:
   success , img = cap.read()
   cv2.imshow("Video",img)
   if cv2.waitKey(1) & 0xff==ord('q'):##key 'q' will break the loop
       break
To integrate with the webcam, we need to pass the port value of the webcam instead of the path to video. If you are using a laptop and don’t have any external webcam connected then simply pass 0, and if you have any external webcam connected, then pass one.
cap = cv2.VideoCapture(0)
cap.set(3,640)  ## Frame width
cap.set(4,480)  ## Frame Height
cap.set(10,100) ## Brightness
while True:
   success, img = cap.read()
   cv2.imshow("Video",img)
   if cv2.waitKey(1) & 0xff == ord('q'):
        break
Resizing and Cropping Images
Resizing is a process of changing the shape of an image. In Opencv, we can resize the shape of images using the resize function.
Syntax
cv2.resize(IMG,(WIDTH,HEIGHT))
IMG: image which we want to resize
WIDTH: new width of the resize image
HEIGHT: new height of the resize image
Example
cv2.resize(img,(224,224))To Resize an image first, we need to know the shape of the image. we can find the shape of any image using shape Then according to image shape, we can increase the size or decrease the size of the image. Let’s see it by example.
import cv2
img = cv2.imread("images/img0.jpg") ##Choose any image
print(img.shape)
imgResize = cv2.resize(img,(224,224)) ##Decrease size
imgResize2 = cv2.resize(img,(1024,1024)) ##Increase size
cv2.imshow("Image",img)
cv2.imshow("Image Resize",imgResize)
cv2.imshow("Image Increase size",imgResize2)
print(imgResize.shape)
cv2.waitKey(0)
If you don’t want to hardcode the width and height, you can also use the shape and then increase the width and height using indexing.
import cv2
img = cv2.imread("images/img0.jpg") ##Choose any image
print(img.shape)
shape = img.shape
imgResize = cv2.resize(img,(shape[0]//2,shape[1]//2))##Decrease size
imgResize2 = cv2.resize(img,(shape[0]*2,shape[1]*2)) ##Increase size
cv2.imshow("Image",img)
cv2.imshow("Image Resize",imgResize)
cv2.imshow("Image Increase size",imgResize2)
print(imgResize.shape)
cv2.waitKey(0)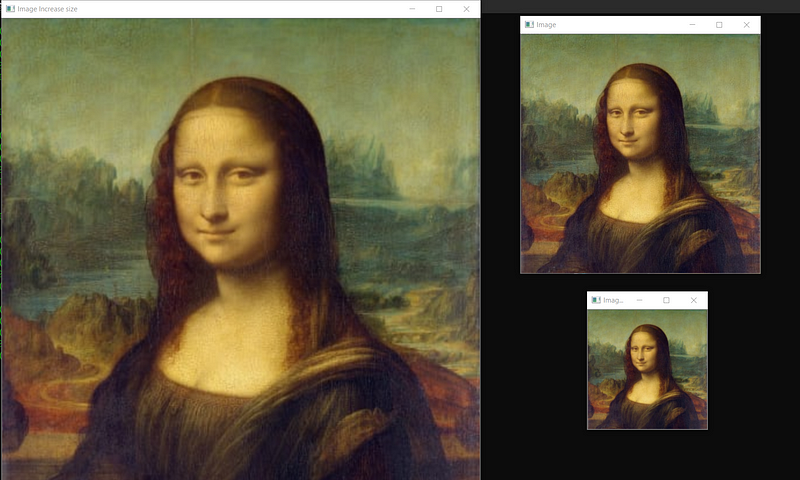
Cropping Image
Cropping is the process of fetching a part of the image. In open cv, we can perform cropping by defining the cropped rectangle coordinates. Syntax
imgCropped = img[y1:y2, x1:x2](x1,y1): top-left vertex
(x2,y2): bottom-right vertexExample
imgCropped = img[0:100,200:200]Using the Crop method, let’s try to fetch the face of Monalisa from the image.
import cv2
img = cv2.imread("images/img0.jpg")
imgCropped = img[50:250,120:330]
cv2.imshow("Image cropped",imgCropped)
cv2.imshow("Image",img)
cv2.waitKey(0)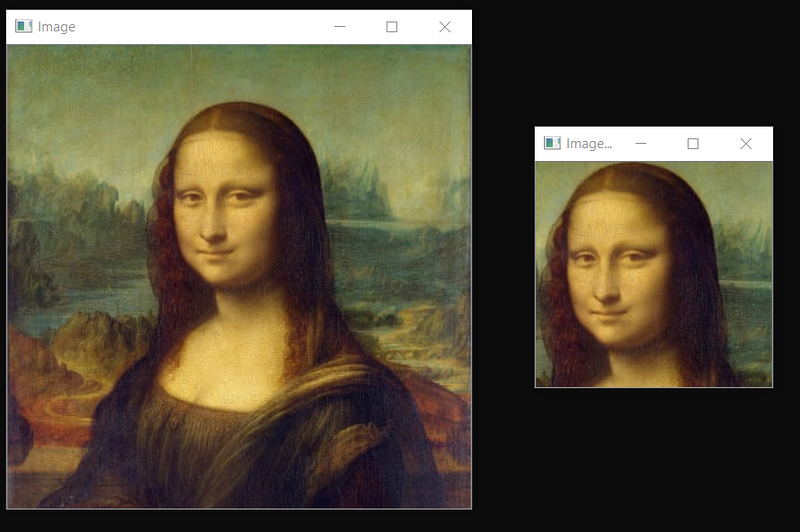
You can also use paint to find the correct coordinate for (x1,y1),(x2,y2).
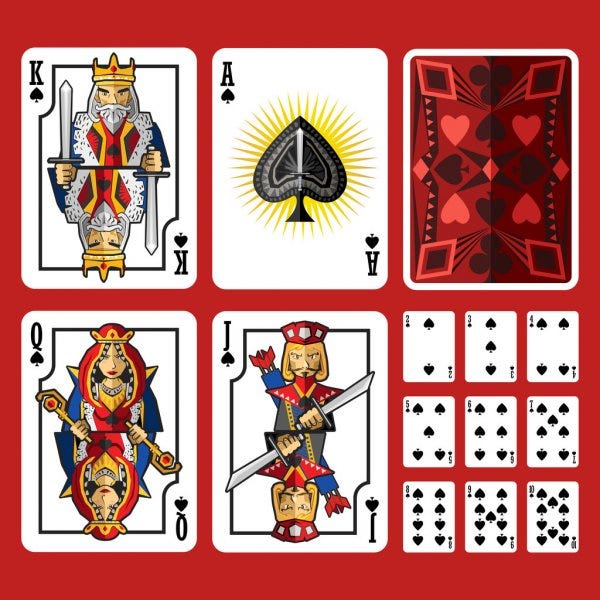
Right Click on the image and save it; try to fetch the King card From the image.
Hint: Use paint to find the correct coordinates and, in the end, use resize to increase the size of the cropped image.
“Try to Do It yourself Before Going for the solution.”
👉SOLUTION
Basic image filters using functions
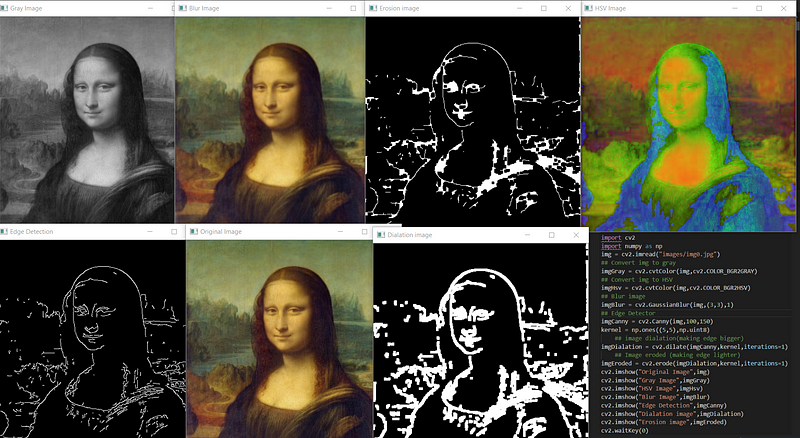
There are many basic filters we can use on our images, like converting our image into grayscale, blur image, and more. Let’s see the important ones one by one.
Img to gray
To convert an image into grayscale, we can use a function cvtColor and here we pass cv2.COLOR_BGR2GRAY as a parameter.
Syntax
imgGray = cv2.cvtColor(IMG,cv2.CODE)
IMG: Original image
CODE: Conversion code for Gray(COLOR_BGR2GRAY)
Example imgGray = cv2.cvtColor(img,cv2.COLOR_BGR2GRAY)
Img to HSV
To convert an image into HSV, we can use a function cvtColor , and here we pass cv2.COLOR_BGR2HSV as a parameter. It is mostly used in object tracking.
Syntax
imgGray = cv2.cvtColor(IMG,cv2.CODE)
IMG: Original image
CODE: Conversion code for Gray(COLOR_BGR2HSV)
Example imgHsv = cv2.cvtColor(img,cv2.COLOR_BGR2HSV)
Blur Image
Blur is used to remove extra noise from the image, also called smoothing. It is the process of applying a low pass filter to an image. To use Blur in Opencv, we have a function, GaussianBlur. Syntax
imgBlur = cv2.GaussianBlur(img,(sigmaX,sigmaY),kernalSize)kernalsize − A Size object representing the size of the kernel.
sigmaX − A variable representing the Gaussian kernel standard deviation in X direction.
sigmaY - same as sigmaXExmaple
imgBlur = cv2.GaussianBlur(img,(3,3),0)Edge Detection
In Open cv, we use a canny edge detector to detect edges in images. There are also different edge detectors, but the most famous one is the canny edge detector. The canny edge detector is an edge detection operator that uses a multi-stage algorithm to detect a wide range of edges in an image. It was developed by John F. Canny in the year1986. Syntax
imgCanny = cv2.Canny(img,threshold1,threshold2)threshold1,threshold2:Different values of threshold different for every imagesExample
imgCanny = cv2.Canny(img,100,150)Dilation
Dilation is used to increase the size of the edges in the images. First, we define a kernel matrix size of odd numbers(5,5). Then using the kernel, we perform Dilation on the image. We apply dilation on the output image of the Canny edge detector. Syntax
kernel = np.ones((5,5),np.uint8) ## DEFINING KERNEL OF 5x5
imgDialation = cv2.dilate(imgCanny,kernel,iterations=1) ##DIALATION
Erosion
Erosion is just the opposite of dilation. It is used to decrease the size of the edges in the images. First, we define a kernel matrix size of odd numbers(5,5). Then using the kernel, we perform Erosion on the image. We apply erosion on the output image of the Canny edge detector.
kernel = np.ones((5,5),np.uint8) ## DEFINING KERNEL OF 5x5
imgDialation = cv2.erode(imgCanny,kernel,iterations=1) ##EROSION
Now, Apply all the basic functions on the Monalisa image in the same program.
Drawing Different Shapes
We can Draw Different Shapes Using Open Cv Like Rectangle, Circle, Line, etc.
Rectangle:
To Draw a rectangle on to images, we use the function rectangle. In the function, we pass the width, height, X, Y, Color in RGB, Thickness as parameters. Syntax
cv2.rectangle(img,(w,h),(x,y),(R,G,B),THICKNESS)
w: width
h: height
x: distance from x axis
y: distance from y axis
R,G,B: color in RGB form (255,255,0)
THICKNESS: thickness of rectangel(integer)
Example
cv2.rectangle(img,(100,300),(200,300),(255,0,255),2)Circle:
To draw a circle, we use cv2.circle. We pass x,y, radius size, color in RGB form, Thickness as parameters. Syntax
cv2.circle(img,(x,y),radius,(R,G,B),THICKNESS)
x: distance from x axis
y: distance from y axis
radius: size of radius(integer)
R,G,B: color in RGB form (255,255,0)
THICKNESS: thickness of rectangel(integer)
Example
cv2.circle(img,(200,130),90,(255,255,0),2)Line:
To draw a line we use cv2.line, pass start point(x1,y1), end point(x2,y2), color in RGB form, Thickness as parametes. Syntax
cv2.line(img,(x1,y1),(x2,y2),(R,G,B),THICKNESS)x1,y1: start point of line (integer)
x2,y2: end point of line (integer)
R,G,B: color in RGB form (255,255,0)
THICKNESS: thickness of rectangel(integer)Example
cv2.line(img,(110,260),(300,260),(0,255,0),3)Writing Text On Images
In open cv, we have a function cv2.puttext to write text on an image at a particular position. It takes image, text, x,y, color, font, font scale, thickness as input. Syntax
cv2.putText(img,text,(x,y),FONT,FONT_SCALE,(R,G,B),THICKNESS)
img: image to put text on
text: text to put on image
X: text distance from X axis
Y: text distance from Y axis
FONT: Type of FONT (ALL FONT TYPES)
FONT_SCALE: Scale of Font(Integer)
R,G,B: color in RGB form (255,255,0)
THICKNESS: thickness of rectangel(integer)
Example
cv2.putText(img,"HELLO",(120,250),cv2.FONT_HERSHEY_COMPLEX,1,(255,255,255),2)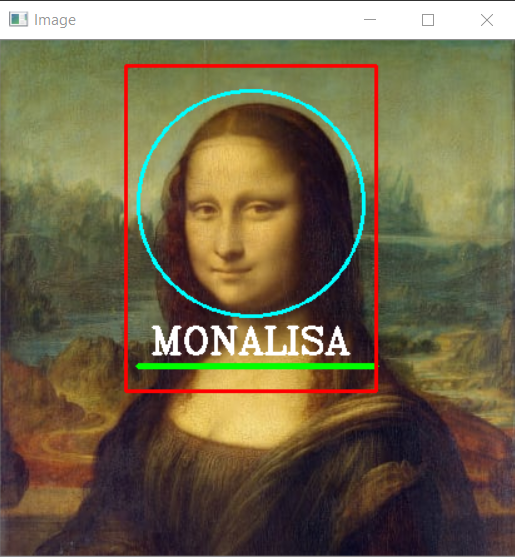
Download the Monalisa Image from here.
Task: Use Shapes and Text to create a frame for Monalisa's face shown in the image on the left. Hint: Start with a circle, then rectangle, then put text according to circle and rectangle, and in the last place the line according to text.
“Try to Do It yourself Before Going for the solution.”
👉SOLUTION
Detect and Crop Faces
Face Detection is very useful when creating a face recognition system. In open cv, we have many pre-trained haar cascades classifiers available that can be used for different purposes. Check out the whole list of classifiers on OpenCV GitHub.
To detect faces in open cv, we use haarcascade_frontalface_default.xml Classifier. It will return us four coordinates(w,h,x,y) of the image. Using these coordinates, we are going to draw a rectangle on the face, and then using the same coordinates, we are going to crop the face. Now using imwrite, we will save the cropped image in the directory.
import cv2
# Load the cascade
face_cascade = cv2.CascadeClassifier('haarcascade_frontalface_default.xml')
# Read the input image
img = cv2.imread('images/img0.jpg')# Convert into grayscale
gray = cv2.cvtColor(img, cv2.COLOR_BGR2GRAY)# Detect faces
faces = face_cascade.detectMultiScale(gray, 1.3, 4)# Draw rectangle around the faces
for (x, y, w, h) in faces:
cv2.rectangle(img, (x, y), (x+w, y+h), (255, 0, 0), 2)
# Cropping Face
crop_face = img[y:y + h, x:x + w]
#Saving Cropped Face
cv2.imwrite(str(w) + str(h) + '_faces.jpg', crop_face)
cv2.imshow('img', img)
cv2.imshow("imgcropped",crop_face)
cv2.waitKey()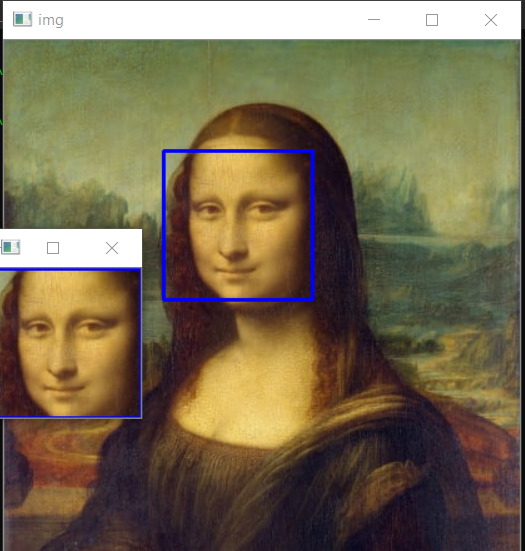
Thanks For Reading😀
References
[1] https://opencv.org/about/ [2] https://pypi.org/project/opencv-python/ [3] https://www.murtazahassan.com/