
Kubernetes — Probes (Liveness, Readiness, and Startup) Overview
Introduction to Types of Probes and Configure Health Checks using Probes in Kubernetes.
TL;DR:
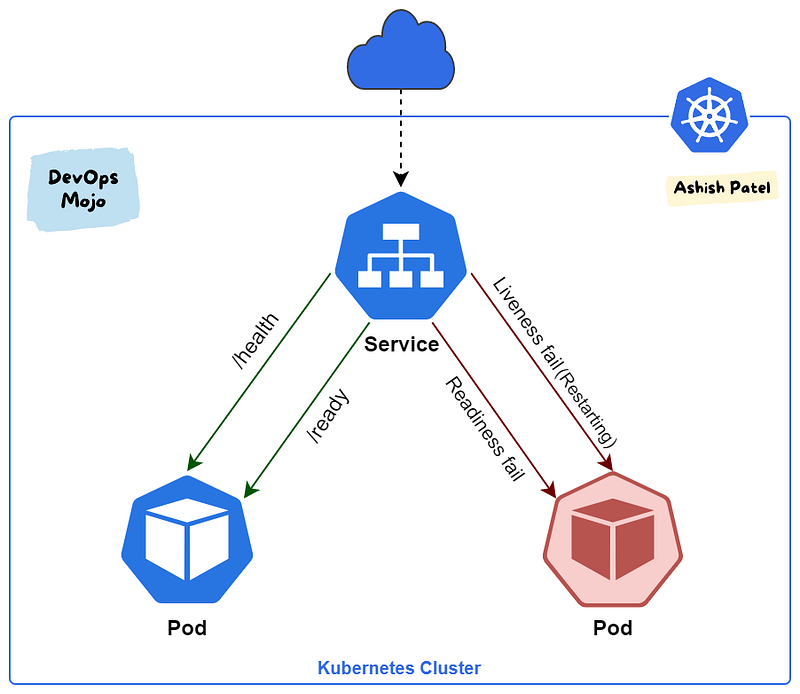
Kubernetes provides probes (health checks) to monitor and act on the state of Pods (Containers) and to make sure only healthy Pods serve traffic. With help of Probes, we can control when a pod should be deemed started, ready for service, or live to serve traffic.
Probes are used to detect:
- Containers that haven’t started yet and can’t serve traffic.
- Containers that are overwhelmed and can’t serve additional traffic.
- Containers that are completely dead and not serving any traffic.
Types of Probes
Kubernetes gives you three types of health checks probes:
- Liveness
- Readiness
- Startup
Liveness Probe
- Liveness probes let Kubernetes know whether your app (running in a container inside Pod) is healthy.
- Indicates whether the container is running.
- If app is healthy, Kubernetes will not interfere with pod functioning. If app is unhealthy, Pod will be marked as unhealthy. If a Pod fails health-checks continuously, the Kubernetes terminates the pod and starts a new one.
- Liveness probes could catch a deadlock, where an application is running, but unable to make progress. Restarting a container in such a state can help to make the application more available despite bugs.
- Kubelet uses liveness probes to know when to restart a container. If the liveness probe fails, the kubelet kills the container, and the container is subjected to its restart policy.
- Configure a health check that periodically checks if your application is still alive. Containers can be restarted if the check fails.
- Kubelet will periodically send a GET request to the Pod and expect a response; if the Pod responds between 200–399 then the kubelet considers that Pod is healthy; otherwise, the Pod will be marked as unhealthy.
Use Cases
- Use Liveness Probe to remove unhealthy pods.
- If you’d like your container to be killed and restarted if a probe fails, then specify a liveness probe, and specify a
restartPolicyof Always or OnFailure. - Use a liveness probe for a container that can fail with no possible recovery.
- If your container cannot crash by itself when there is an unexpected error occur, then use liveness probes. Using liveness probes can overcome some of the bugs the process might have.
Recommendation
The recommended way to implement the liveness probe is for application to expose a /health HTTP endpoint. When receiving a request on this endpoint, the application should send a “200 OK” response if it is considered healthy. Healthy means the following:
- Application is running.
- Its main dependencies are met (e.g. app can access database).
Readiness Probe
- Readiness probes let Kubernetes know when your app (running in a container inside Pod) is ready to serve traffic.
- Indicates whether the container is ready to respond to requests.
- Kubernetes makes sure the readiness probe passes before allowing a service to send traffic to the pod.
- Unlike a liveness probe, a readiness probe doesn’t kill the container. If the readiness probe fails, Kubernetes simply hides the container’s Pod from corresponding Services, so that no traffic is redirected to it.
- Liveness probes do not wait for readiness probes to succeed. If you want to wait before executing a liveness probe you should use
initialDelaySecondsorstartupProbe. - A side-effect of using Readiness Probes is that they can increase the time it takes to update Deployments.
Use Cases
- Use Readiness Probe to detect partial unavailability.
- If you’d like to start sending traffic to a Pod only when a probe succeeds, specify a readiness probe.
- If you want your container to be able to take itself down for maintenance, you can specify a readiness probe that checks an endpoint specific to readiness that is different from the liveness probe.
Recommendation
The recommended way to implement the readiness probe is for your application to expose a /ready HTTP endpoint. When it receives a request on this endpoint, the application should send a “200 OK” response if it is ready to receive traffic. Ready to receive traffic means the following:
- Application is healthy.
- Any potential initialization steps are completed.
- Any valid request sent to the application doesn’t result in an error.
Startup Probe
- Startup probes let Kubernetes know whether your app (running in a container inside Pod) has properly started.
- Indicates whether the application within the container is started.
- Startup probe has higher priority over the two other probe types. Until the Startup Probe succeeds, all the other Probes are disabled.
- Startup probes are useful in situations where your app can take a long time to start, or could occasionally fail on startup.
- Rather than set a long liveness interval, you can configure a separate configuration for probing the container as it starts up, allowing a time longer than the liveness interval would allow.
Use Cases
- Use Startup Probe for applications that take longer to start.
- When your app needs additional time to startup, you can use the Startup Probe to delay the Liveness and Readiness Probe.
- If your container needs to work on loading large data, configuration files, or migrations during startup, you can use a startup probe.
Probes Key Points
- While Liveness probe detects failures in an app that are resolved by terminating the Pod (i.e. restarting the app), Readiness Probe detects conditions where the app may be temporarily unavailable.
- Liveness probe passes when the app itself is healthy, but the readiness probe additionally checks that each required back-end service is available. This helps you avoid directing traffic to Pods that can only respond with error messages.
- By combining liveness and readiness probes, you can instruct Kubernetes to automatically restart pods or remove them from backend groups. If your app has a strict dependency on back-end services, you can implement both liveness and readiness probes.
- By default, the probe will stop if the application is not ready after three attempts. In case of a liveness probe, it will restart the container. In the case of a readiness probe, it will mark pods as unhealthy.
- In many applications, the
/healthand/readyendpoints are merged into a single/healthendpoint because there is no real difference between their healthy and ready states.
Ways to check Pods/Containers’ health using Probes
Kubelet can check a Pods’ health in three ways. Each probe must define exactly one of these mechanisms:
HTTP
- We define a Port number along with the URL. Kubernetes pings this path, and if it gets an HTTP response in the 200 or 300 range, it marks the app as healthy. Otherwise, it is marked as unhealthy.
- HTTP probes are the most common type of custom probe.
- Even if your app isn’t an HTTP server, you can create a lightweight HTTP server inside your app to respond to the liveness probe.
TCP
- Kubernetes tries to establish a TCP connection on the specified port. If it can establish a connection, the container is considered healthy; if it can’t it is considered unhealthy.
- TCP probes come in handy if you have a scenario where HTTP probes or Command probes don’t work well.
- For example, a gRPC or FTP service is a prime candidate for this type of probe.
Command
- Kubernetes runs a command inside the container. If the command returns with exit code 0, then the container is marked as healthy. Otherwise, it is marked unhealthy.
- This type of probe is useful when you can’t or don’t want to run an HTTP server, but can run a command that can check whether or not your app is healthy.
Probe Parameters
Probes have a number of fields that can be used to more precisely control the behavior of liveness and readiness checks.
initialDelaySeconds: Number of seconds after the container has started before probes are initiated. (default: 0, minimum: 0)periodSeconds: How often to perform the probe (i.e. frequency). (default: 10, minimum: 1)timeoutSeconds: Number of seconds after which the probe times out. (default: 1, minimum: 1)successThreshold: Minimum consecutive successes for the probe to be considered successful after failure. (default: 1, minimum: 1)failureThreshold: How many failed results were received to transition from a healthy to a failure state. (default: 3, minimum: 1)
Example
Summary
Implementing health checks using probes gives Kubernetes services a solid foundation, better reliability, and higher uptime.
View more from DevOps Mojo
- Top useful and most popular DevOps Tools
- Terraform Best Practices
- Kubernetes Ingress Overview
- Kubernetes Architecture Overview
- Kubernetes Service Types Overview
Happy Learning!!!


