
Keycloak Cluster Setup with UDP for Distributed Caching in Minikube (Kubernetes)
Step-by-step guide on how to start a cluster of three Keycloak instances using UDP for distributed caching in Minikube
In this tutorial, we will delve into the process of running a Keycloak cluster locally with three instances for distributed caching. This setup can be particularly beneficial if you are looking to secure your application with Keycloak and test the complete solution locally during the development phase.
In a few words, Keycloak is an open-source IAM tool that offers robust user identity management, authentication, and authorization features for applications.
The three Keycloak instances will run inside Minikube, a lightweight tool for running a single-node Kubernetes cluster locally for development and testing purposes. The instances will use Postgres to store their data.
Keycloak’s current distributed cache implementation relies on Infinispan, an open-source, distributed, in-memory key-value data store. Infinispan is designed to be highly scalable, available, and fault-tolerant.
When starting Keycloak in development mode using the “start-dev” command, the distributed caches are disabled by default. However, we can enable them by adding the “KC_CACHE” environment variable with the value “ispn” (short for Infinispan).
Fortunately, the default Keycloak cache configuration utilizes a UDP transport stack, enabling instance discovery through IP multicast transport based on UDP. This default behavior simplifies the configuration and setup process.
Let’s get started!
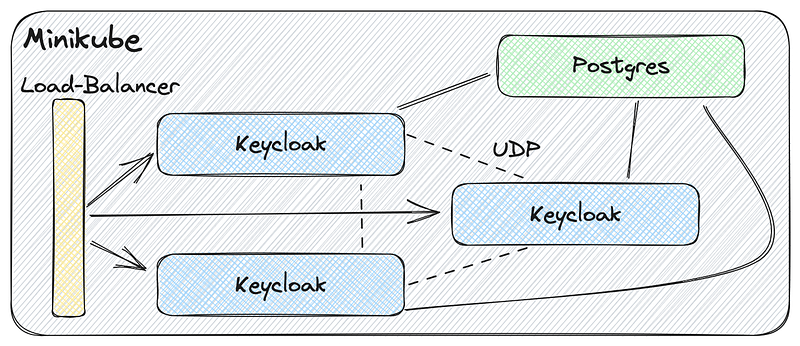
Project Diagram
The visual representation of our desired project outcome.
Additional Readings
Prerequisites
To follow along with this guide, please ensure that you have the Docker, Minikube, Kubectl and VirtualBox installed on your machine.
Create Project Folder
Navigate to your workspace folder, and let’s create a new folder for our project. We will name it minikube-keycloak-cluster.
Creating YAML Deployment Files
Inside the minikube-keycloak-cluster folder, we will now create the deployment YAML file for both Postgres and Keycloak.
Create PostgreSQL YAML Deployment file
Let’s begin by creating the Postgres YAML file. Create a file named postgres.yaml and include the following content:
apiVersion: v1
kind: Service
metadata:
  name: postgres
  labels:
    app: postgres
spec:
  type: ClusterIP
  ports:
    - port: 5432
  selector:
    app: postgres
---
apiVersion: apps/v1
kind: Deployment
metadata:
  name: postgres
  labels:
    app: postgres
spec:
  replicas: 1
  selector:
    matchLabels:
      app: postgres
  template:
    metadata:
      labels:
        app: postgres
    spec:
      containers:
        - name: postgres
          image: postgres:15.3
          ports:
            - containerPort: 5432
          env:
            - name: POSTGRES_DB
              value: keycloak
            - name: POSTGRES_USER
              value: keycloak
            - name: POSTGRES_PASSWORD
              value: keycloak
This YAML file sets up a postgres service and deployment. The service makes the database accessible within the cluster via ClusterIP, and the deployment ensures that the specified PostgreSQL image is run within a pod with the given configuration.
Create Keycloak YAML Deployment file
Now, we move on to creating the Keycloak deployment YAML file, which will be named keycloak.yaml. The contents of the file are given below:
apiVersion: v1
kind: Service
metadata:
  name: keycloak
  labels:
    app: keycloak
spec:
  type: LoadBalancer
  ports:
    - name: http
      port: 8080
      targetPort: 8080
  selector:
    app: keycloak
---
apiVersion: apps/v1
kind: Deployment
metadata:
  name: keycloak
  labels:
    app: keycloak
spec:
  replicas: 3
  selector:
    matchLabels:
      app: keycloak
  template:
    metadata:
      labels:
        app: keycloak
    spec:
      containers:
        - name: keycloak
          image: quay.io/keycloak/keycloak:22.0.1
          args: ["start-dev"]
          env:
            - name: KEYCLOAK_ADMIN
              value: "admin"
            - name: KEYCLOAK_ADMIN_PASSWORD
              value: "admin"
            - name: KC_PROXY
              value: "edge"
            - name: KC_DB
              value: postgres
            - name: KC_DB_URL_HOST
              value: "postgres"
            - name: KC_DB_USERNAME
              value: "keycloak"
            - name: KC_DB_PASSWORD
              value: "keycloak"
            - name: KC_DB_URL_DATABASE
              value: "keycloak"
            - name: KC_CACHE
              value: "ispn"
            - name: KC_LOG_LEVEL
              value: "INFO,org.infinispan:DEBUG,org.jgroups:DEBUG"
          ports:
            - name: http
              containerPort: 8080
          readinessProbe:
            httpGet:
              path: /realms/master
              port: 8080
This YAML file sets up a keycloak service and deployment. The service is a LoadBalancer, exposing the port 8080 for external access. The deployment ensures that Keycloak is run with specific environment variable settings and readiness checks.
Start Environment
In a terminal, make sure you are in the minikube-keycloak-cluster folder.
Start Minikube
Run the following command to start Minikube:
minikube start --memory=8192 --cpus=2 --vm-driver=virtualbox
Create dev namespace
Once Minikube is up and running, let’s create a namespace called dev. For it, run the command below:
kubectl create namespace dev
To delete the
devnamespace, run:kubectl delete namespace dev
Deploy Postgres
Let’s deploy Postgres by running the following command:
kubectl -n dev apply -f postgres.yaml
To delete the
postgresdeployment, run:kubectl -n dev delete -f postgres.yaml
Deploy Keycloak
Now, let’s deploy Keycloak by running the command below:
kubectl -n dev apply -f keycloak.yaml
To delete the
keycloakdeployment, run:kubectl -n dev delete -f keycloak.yaml
Watching Deployment
We can watch the Postgres and Keycloak deployments by running the following command:
kubectl -n dev get pods --watch
To stop watching, press:
Ctrl+C
Please be patient as the Postgres and Keycloak Docker images will be pulled before we can proceed further. This may take a few minutes.
After a few minutes, both Postgres instance and the three Keycloak instances should be up and running. To confirm this, you can use the following command:
kubectl -n dev get pods
You should see something like:
NAME                        READY   STATUS    RESTARTS   AGE
keycloak-7dffd779d6-hvdwk   1/1     Running   0          6m29s
keycloak-7dffd779d6-sd6bl   1/1     Running   0          6m29s
keycloak-7dffd779d6-zbhzv   1/1     Running   0          6m29s
postgres-74ff79f9f7-95w4v   1/1     Running   0          6m36s
Get Keycloak Load-Balancer Host And Port
In a terminal, run the following command:
KEYCLOAK_HOST_PORT=$(minikube ip):$(kubectl get services --namespace dev keycloak -o go-template='{{(index .spec.ports 0).nodePort}}')
echo $KEYCLOAK_HOST_PORT
The host corresponds to the Minikube IP address, while the port is a number allocated by Minikube for the Keycloak Load-Balancer.
Demonstration
To verify the functionality of our Keycloak cluster, follow these steps:
- Open three separate browsers (e.g., Chrome, Safari, and Firefox) or use different browser profiles (e.g., Chrome, Incognito Chrome, and Firefox);
- In each browser, access http://$KEYCLOAK_HOST_PORT/admin/. Please, replace
$KEYCLOAK_HOST_PORTwith the value obtained in the previous section, “Get Keycloak Load-Balancer Host And Port”. - Use “admin” as both the username and password to log in to Keycloak;
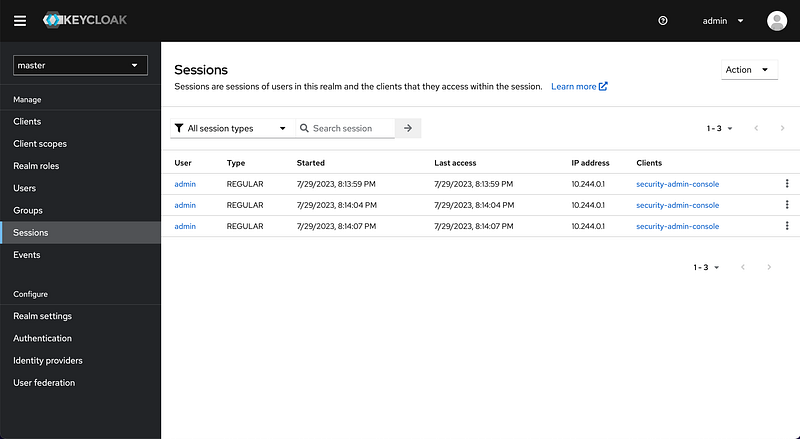
- Once logged in, choose one of the browsers. Click on “Sessions” in the left-side menu. You should observe that the “admin” user has three active sessions;
5. Proceed to sign out of Keycloak in one of the browsers;
6. Check the session count for the “admin” user again. It should now be reduced to two.
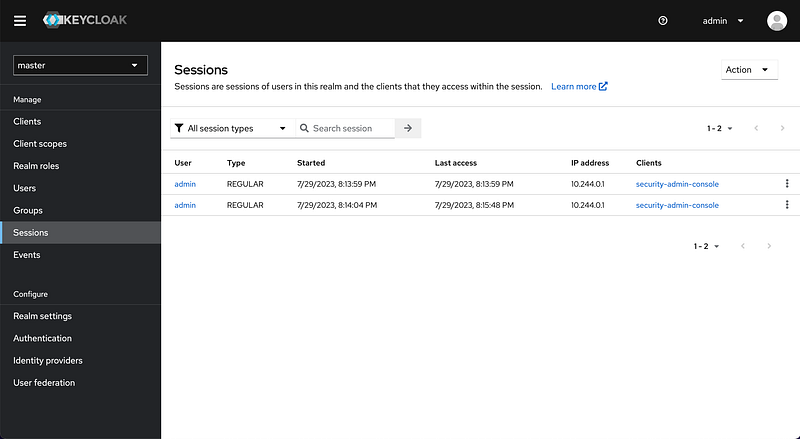
By following these steps, you can test the functionality of the Keycloak cluster and observe the session management behavior for the “admin” user.
Shutdown
In a terminal, run the following command to delete completely Minikube:
minikube delete
Conclusion
In this tutorial, we demonstrated the process of setting up a Keycloak cluster with three instances for distributed caching inside Minikube. The cluster utilizes Infinispan for distributed caching, ensuring scalability and fault tolerance. For this setup, we utilized the official Keycloak Docker image and employed the UDP discovery protocol.
Support and Engagement
If you enjoyed this article and would like to show your support, please consider taking the following actions:
- 👏 Engage by clapping, highlighting, and replying to my story. I’ll be happy to answer any of your questions;
- 🌐 Share my story on Social Media;
- 🔔 Follow me on: Medium | LinkedIn | Twitter;
- ✉️ Subscribe to my newsletter, so you don’t miss out on my latest posts.


