
Jupyter Notebook 101: Everything You Need To Know
Learn To Build Amazing Notebooks That You Can Share Proudly

Jupyter Notebook is a web-based computing platform that allows developers to code, visualize, share and embed multimedia with explanatory text inside a single document. It is a famous tool for showcasing your work because You can see both the code and the results in the same file.
It is very famous among data scientists because you can get a better understanding of the data by executing each line of code separately. Jupyter Notebook allows its users to download the notebook in various file formats like PDF, HTML, Python, Markdown, or an. ipynb file.
There Are Two Essential Parts of a Jupyter Notebook — Markdown Cell and Code Cells.
1. Markdown Cell
A Markdown Cell represents your work by providing enough explanation to readers about the code block below them. Markdown Writing Is an essential skill for every data scientist. It displays text which is formatted using a markup language. By Default All The Cells Will Be Code Cells. To Convert a Code Cell Into a Markdown Cell Just Press ESC to enter in command mode and then press m to convert it into a markdown.
2. Code Cell
A Code Cell allows you to Create, Update, Read, Edit, and Delete Code With full syntax highlighting and tab completion. The Default Kernal of Jupyter Notebook is Ipython That Runs Python Code. When a Code Cell executes the code inside it, the flow goes to the kernel (IPython default) that runs the code. To Execute a Code Cell You Can Use Keyboard Keys Combination SHIFT+ENTER
To Install Jupyter Notebook Inside a python environment just run the command pip install jupyter and to open the web client-server just type jupyter notebook
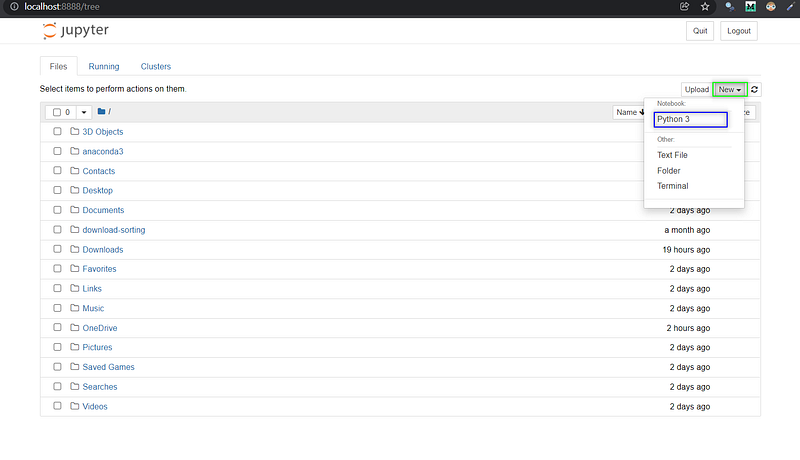
After Running The Command A Web Page Will Open On Your Default Browser That is The Homepage of Jupyter Notebook. Simply click on New select python3 to create a notebook.
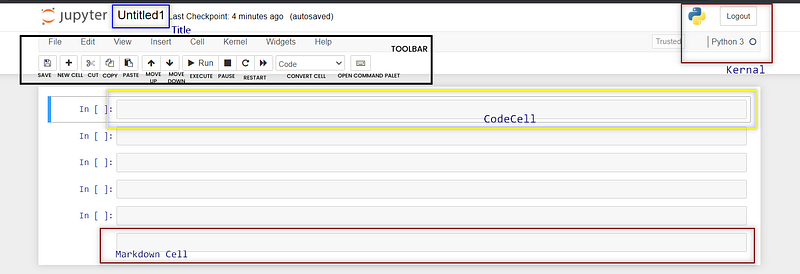
The Blue Rectangle In Above Picture Shows The Title that can be renamed by clicking on it. The yellow rectangle shows a code cell that can be changed into a markdown cell-like maroon color box using the command or with the dropdown. In the Top Right Corner, You Can Confirm The Kernal. Below The Title There is a Toolbar using which you can perform multiple tasks like saving the file, creating a new cell, converting the code cell into markdown, etc.
Now, That You Have a Brief Idea About Jupyter Notebook. Let’s Know Some of the tricks and hacks that are helpful for you.
𝚃͟𝙰͟𝙱͟𝙻͟𝙴͟ ͟𝙾͟𝙵͟ ͟𝙲͟𝙾͟𝙽͟𝚃͟𝙴͟𝙽͟𝚃͟𝚂͟
1. ᴍᴀʀᴋᴅᴏᴡɴ ᴄᴇʟʟ ɢᴜɪᴅᴇ
   1.1 ᴏʀɢᴀɴɪᴢɪɴɢ ᴛᴇxᴛ
     1.1.1 ᴛᴇxᴛ ʟᴇᴠᴇʟꜱ
     1.1.2 ᴛᴇxᴛ ᴇᴍᴘʜᴀꜱɪꜱ
     1.1.3 ᴘᴀʀᴀɢʀᴀᴘʜ ʙʀᴇᴀᴋᴇʀꜱ
     1.1.4 ʙʟᴀᴄᴋQᴜᴏᴛᴇꜱ
     1.1.5 ʜɪɢʜʟɪɢʜᴛɪɴɢ & ᴄᴏᴅᴇʙʟᴏᴄᴋꜱ
   1.2 ᴀᴅᴅɪɴɢ ᴄᴜꜱᴛᴏᴍ ᴄꜱꜱ
     1.2.1 ᴛᴇxᴛ ᴄᴏʟᴏʀ
     1.2.2 ᴛᴇxᴛ ʙᴀᴄᴋɢʀᴏᴜɴᴅ ᴄᴏʟᴏʀ
     1.2.3 ꜰᴏɴᴛ ꜰᴀᴍɪʟʏ
     1.2.4 ꜰᴏɴᴛ ꜱɪᴢᴇ & ᴡᴇɪɢʜᴛ
     1.2.5 ᴄᴏʟᴏʀᴇᴅ ɴᴏᴛᴇ ʙᴏxᴇꜱ
   1.3 ᴄʀᴇᴀᴛɪɴɢ ᴛᴀʙʟᴇꜱ
   1.4 ʜʏᴘᴇʀʟɪɴᴋꜱ
   1.5 ɪᴍᴀɢᴇꜱ
1.6 ɴᴀᴠɪɢᴀᴛɪᴏɴꜱ (ᴛᴀʙʟᴇ ᴏꜰ ᴄᴏɴᴛᴇɴᴛ)2. ᴄᴏᴅᴇ ᴄᴇʟʟ ᴛɪᴘꜱ
2.1 ʀᴜɴɴɪɴɢ ꜱʜᴇʟʟ ᴄᴏᴍᴍᴀɴᴅꜱ ɪɴꜱɪᴅᴇ ᴛʜᴇ ɴᴏᴛᴇʙᴏᴏᴋ
2.2 ᴍᴇᴀꜱᴜʀɪɴɢ ᴄᴇʟʟ ᴇxᴇᴄᴜᴛɪᴏɴ ᴛɪᴍᴇ
2.3 ᴠɪᴇᴡɪɴɢ & ʟɪɴᴋɪɴɢ ᴅᴏᴄᴜᴍᴇɴᴛᴀᴛɪᴏɴ
2.4 ᴀʟᴀʀᴍ ꜰᴏʀ ꜱʜᴇʟʟ ᴇxᴇᴄᴜᴛɪᴏɴ
2.5 ʜɪᴅᴇ ᴀɴɴᴏʏɪɴɢ ᴏᴜᴛᴘᴜᴛ
2.6 ꜱʜᴏᴡ ᴍᴜʟᴛɪᴘʟᴇ ᴏᴜᴛᴘᴜᴛꜱ
2.7 ɴᴏᴛᴇʙᴏᴏᴋ ᴡɪᴅᴛʜ
2.8 ᴇᴍʙᴇᴅᴅɪɴɢ ᴠɪᴅᴇᴏꜱ3. ɪᴍᴘᴏʀᴛᴀɴᴛ ᴋᴇʏʙᴏᴀʀᴅ ꜱʜᴏʀᴛᴄᴜᴛꜱ
4. ᴇxᴛᴇɴꜱɪᴏɴꜱ & ᴛʜᴇᴍᴇꜱ1. Markdown Cell Guide
Markdown Cells Display Text that is used to understand the code flow and thought process of the developer. The Text Written Inside Should Be Clear and Properly Organized.
These Cells Are Similar To Comments in any programming language with some extra powers. Like, Adding images, Changing Font Size, Font Family, Dividing Text into different levels, breaking paragraphs, giving text color, adding links, etc. Let’s See Each One By One.
1.1. ᴏʀɢᴀɴɪᴢɪɴɢ ᴛᴇxᴛ
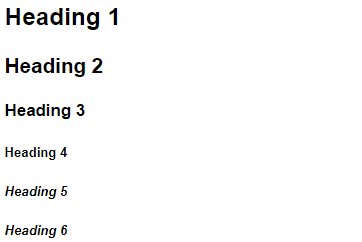
1.1.1 ᴛᴇxᴛ ʟᴇᴠᴇʟꜱ
You Can Divide The Text Into Different Levels Using # , Where a Single # means an h1 heading.
Markdown Syntax
# Heading 1
## Heading 2
### Heading 3
#### Heading 4
##### Heading 5
###### Heading 6
Jupyter Notebook Rendered Output
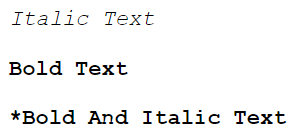
1.1.2 ᴛᴇxᴛ ᴇᴍᴘʜᴀꜱɪꜱ
You Can Change The Emphasis Of You Text Using Repetitions Of * Or _
Markdown Syntax
*Italic Text*
**Bold Text**
***Bold And Italic Text**
Jupyter Notebook Rendered Output
1.1.3 ᴘᴀʀᴀɢʀᴀᴘʜ ʙʀᴇᴀᴋᴇʀꜱ
Paragraph Breakers Can Be Added Using Three *** Or --- Or ___
Markdown Syntax
***
---
____
Jupyter Notebook Rendered Output

1.1.4 ʙʟᴏᴄᴋQᴜᴏᴛᴇꜱ
To Add A Bloackquote Inside Your Notebook Simply Use >. You Can Also Set Level Of Blockquotes Up To 6 By Repeating The Symbol >
Markdown Syntax
>

>>>>
Jupyter Notebook Rendered Output

1.1.5 ʜɪɢʜʟɪɢʜᴛɪɴɢ & ᴄᴏᴅᴇʙʟᴏᴄᴋꜱ
Although We Have Separate Code Cells In Our Notebook But Still There Are Chances Where You Write Code In Markdown Cell. To Highlight The Code You Can Use Three ``` With Programming Language Name Like ```Python


Check More Supported Widgets With Code Here.
1.2 ᴀᴅᴅɪɴɢ ᴄᴜꜱᴛᴏᴍ ᴄꜱꜱ
You Can Make Your Notebook More Fancy And Colorful By Adding A Little Touch Of Inline CSS. To Add Some Pick An HTML Tag (Span, Div Or P) And Apply Inline Css Using Style Attribute. Let's See Some Of The Important And Useful Css Properties That You Will Ever Use.
1.2.1 ᴛᴇxᴛ ᴄᴏʟᴏʀ
To Change The Text Color Of Markdown Text You Need To Use A Little Bit Of CSS.
Markdown Syntax
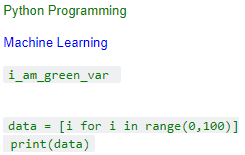
<span style='color:green'> Python Programming</span><span style='color:Blue'> Machine Learning </span>## Changing Code Text Color
<code style="color:green;">i_am_green_var </code><code style="color:YOUR_COLOR_CHOICE;">
data = [i for i in range(0,100)]
print(data)
</code>Jupyter Notebook Rendered Output
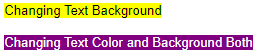
1.2.2 ᴛᴇxᴛ ʙᴀᴄᴋɢʀᴏᴜɴᴅ ᴄᴏʟᴏʀ
To Change The Text Background You Can Use The Background Property Of Text.
<span style='background:yellow'> Changing Text Background </span><span style='background :purple; color:white' > Changing Text Color and Background Both </span>Jupyter Notebook Rendered Output
1.2.3 ꜰᴏɴᴛ ꜰᴀᴍɪʟʏ
To Change The Font Family The Css Property Is Font-Family. You Can Check The Complete List Of Font-Families Supported here.
<span style='font-family:Georgia'> It is Georgia font </span><span style='font-family:Verdana'> It is Verdana font </span>
1.2.4 ꜰᴏɴᴛ ꜱɪᴢᴇ ᴀɴᴅ ᴡᴇɪɢʜᴛ
To Change The Font Size And Weight The Css Property Is Font-Size And Font-Weight. Font-Weight Ranges From 100 (Thin) To 900 (Bolder).
<span style='font-size:36x; '> I am Big </span>

<span style='font-weight:500; '> I am Bolder </span>
1.2.5 ᴄᴏʟᴏʀᴇᴅ ɴᴏᴛᴇ ʙᴏxᴇꜱ
A Colored Note Boxes Is An Kind Of Message Box That Is Used To Display Some Sort Of Message With Predefined Styles. These Are Used To Get The User Attention Towards The Message Inside Them. There Are Mainly Four Type Of Alert Boxes-Alert-Info, Alert-Success, Alert-Danger, Alert-Warning.
<div class="alert alert-block alert-danger">
<b>Danger:</b> This is an example of danger colored box.</div>
<div class="alert alert-block alert-success">
<b>Success:</b> This is an example of success colored box.</div>
You Can Possibly Apply Much More CSS To Your Notebook Take a Look At Other Properties Here.
1.3 ᴄʀᴇᴀᴛɪɴɢ ᴛᴀʙʟᴇꜱ
There Are Two Methods To Create Tables Inside Jupyter Notebook. First One Is By Using | As A Table Divide. The Second One Is With The Help Of
:-: For Centered, :- For Left Centered And — For Right Centered Table.
Syntax For || SN | Column A | Column B | Column C |
| :---: | :---: | :---: | :---: |
| 0 | 10 | 11 | 100 |
| 1 | 22.5 | 23 | 23.5 |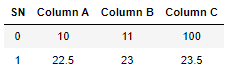
Syntax For <table><table>
<tr>
<th> SN </th>
<th> Column A </th>
<th> Column B </th>
<th> Column C </th>
</tr>
<tr>
<td>0</td>
<td>10</td>
<td>11</td>
<td>100</td>
</tr>
<tr>
<td>1</td>
<td>22.5</td>
<td>23</td>
<td>23.5</td>
</tr>
</table>1.4 ʜʏᴘᴇʀʟɪɴᴋꜱ
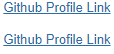
A Hyperlink Is An Clickalbe Piece Of Text That Targets To A Different Page On The Web When Clicked. To Create A Hyperlink Inside A Jupyter Notebook You Can Use [ALTER TEXT](URL) Or ALTER TEXT Tag.
[Github Profile Link](https://github.com/Abhayparashar31)

<a href="https://github.com/Abhayparashar31">Github Profile Link</a>
Jupyter Notebook Rendered Output
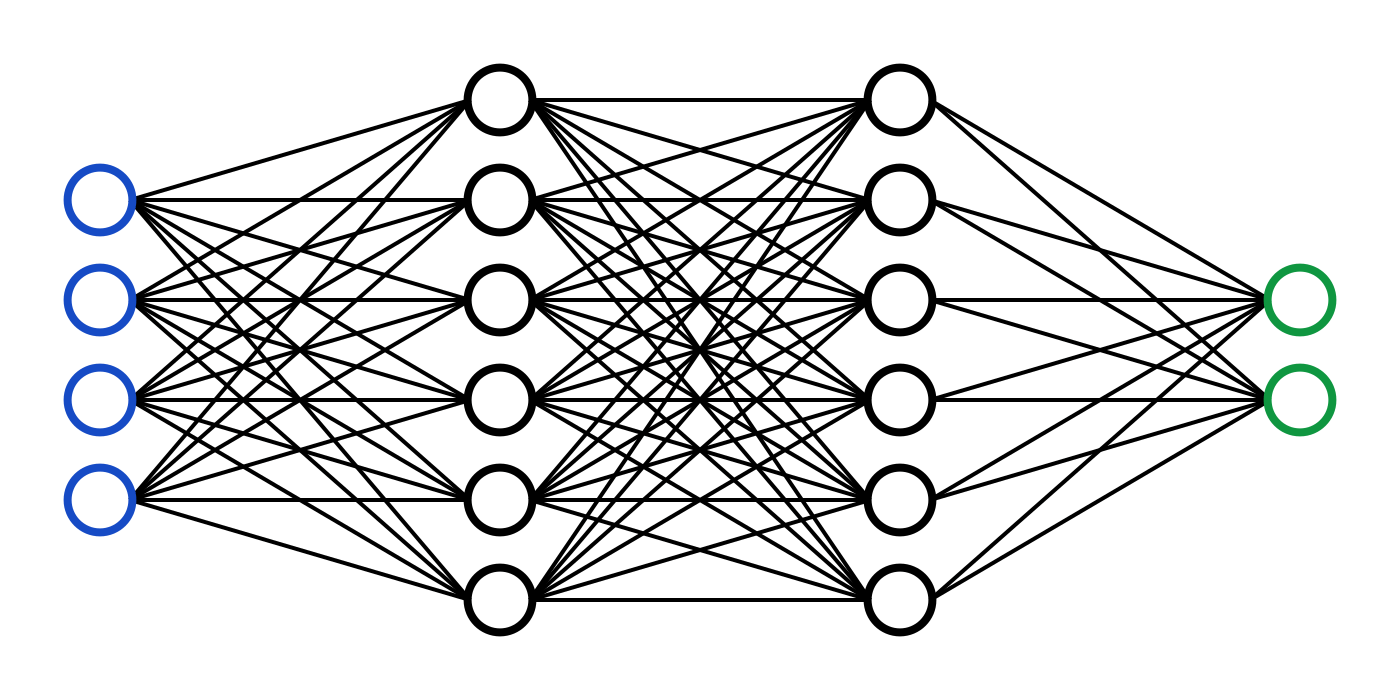
1.5 ɪᴍᴀɢᴇꜱ
You Can Embedded Images On Your Notebook From External Sources With The Help Of HTML Tags. To Insert An Image Locally You Can Just Drag And Drop That Image On The Cell.
▶ Syntax For External Image Insertion
<img src='https://victorzhou.com/media/nn-series/network.png' height="400" width="400"/>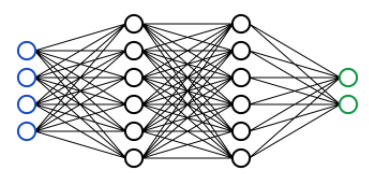
1.6 ɴᴀᴠɪɢᴀᴛɪᴏɴ ʟɪɴᴋꜱ (ᴛᴀʙʟᴇ ᴏꜰ ᴄᴏɴᴛᴇɴᴛꜱ)
Navigation Is An Part Of a Document Whose Purpose Is To Provide Navigation Links, Either Within The Current Document Or To Other Documents. These Are Very Helpful In Creating Table Of Contents For Your Notebooks. User Click On The Navigation Link And It Directs User To A Part Of Notebook Where Target Cell Is Present.
Navigation Cell:-
<a Href="#Top">LINK TO TOP </a>
     Or
[LINK TO TOP](#Top)

Target Cell:-
<span id='top' > SOME TEXT </span>
Become a Genuine Medium Member With The Cost of One Pizza. It’s Just 5$ a month and 50$ a year(15% Saving). You Can Use My Referral Link To Become One. “Don't Just Read, Support The Writer Too”
2. ᴄᴏᴅᴇ ᴄᴇʟʟ ᴛɪᴘꜱ
Code Cells Are Used To Write And Execute Code. There Are Two Parts Of It The Code Cell And Output It Generate. These Code Cells Tricks Will Make Your Life Easier With Both Of Them.
2.1 ʀᴜɴɴɪɴɢ ꜱʜᴇʟʟ ᴄᴏᴍᴍᴀɴᴅꜱ ɪɴꜱɪᴅᴇ ᴛʜᴇ ɴᴏᴛᴇʙᴏᴏᴋ
There Are Still Many Developers Who Keep Go Back To Their Terminal For Installing Packages While Working. There Is No Need For That, You Can Install-Package Inside The Notebook Itself With The Help Of !
!pip install fabulous2.2 ᴍᴇᴀꜱᴜʀɪɴɢ ᴄᴇʟʟ ᴇxᴇᴄᴜᴛɪᴏɴ ᴛɪᴍᴇ
It Is Very Important To Measure The Cell Execution Time To Provide the Best Performance. A Good Example Of Code Will Take Less Execution Time. You Can Measure It With The Help Of Magic Command %%Time
%%time

data = [i for i in range(0,1000000) if i%3==0 ]
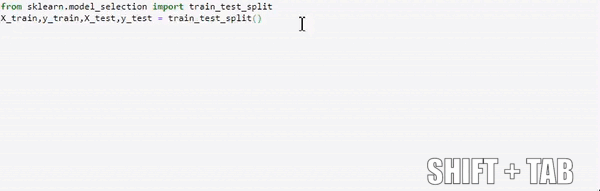
2.3 ᴠɪᴇᴡɪɴɢ & ʟɪɴᴋɪɴɢ ᴅᴏᴄᴜᴍᴇɴᴛᴀᴛɪᴏɴ
You Can View The Documentation Of An Function Using Key Combination SHITFT+TAB.
Linking Documentation is easier than you thought. You Can Just Leave a ? before your function and whenever someone runs it the documentation will appear.
2.4 ᴀʟᴀʀᴍ ꜰᴏʀ ᴄᴇʟʟ ᴇxᴇᴄᴜᴛɪᴏɴ
A Simple To Simple Computer Vision Model With Several Layers Takes At Least 10–15 Minutes To Train. Watching It Train Is Not A Satisfying Thing To Watch. This Cell Script Will Beep An Alarm Whenever The Cell Execution Is Complete. Just Put This Script At The End Of Your Cell.
## YOUR CODE HERE
import winsound
duration = 5000   ## Means 5 Second
freq = 3600
winsound.Beep(freq, duration)
2.5 ʜɪᴅᴇ ᴀɴɴᴏʏɪɴɢ ᴏᴜᴛᴘᴜᴛ
One Of The Biggest Problem With Jupyter Notebook Is That It Shows A Lots Of Annoying Output Like Memory Exceed Warning, Matplotlib ID, Etc. There Is A Simple Solution To This All We Need To Do Is To Import Warnings And Then We Can Ignore Them Easily.
import warnings
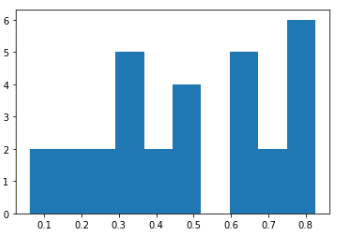
warnings.filterwarnings('ignore')To remove that annoying Information from our visualizations just put ;after the plotting function
import matplotlib.pyplot as plt
import numpy as np
%matplotlib inline
x = np.random.rand(30)
plt.hist(x)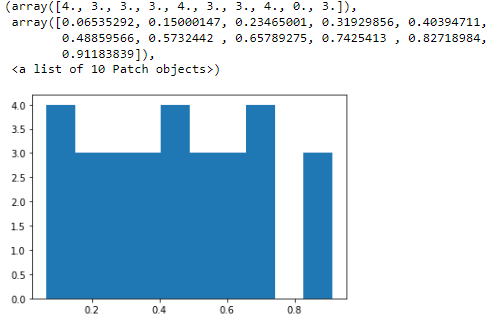
2.6 ꜱʜᴏᴡ ᴍᴜʟᴛɪᴘʟᴇ ᴏᴜᴛᴘᴜᴛꜱ
By Default Jupyter Notebook Only Shows The Last Variable Output. To Make It Show Multiple Outputs We Need To Take Use Of Interactive Shell.
from IPython.core.interactiveshell import InteractiveShell
InteractiveShell.ast_node_interactivity = "all"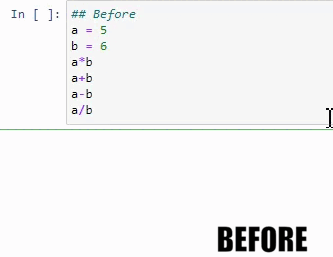
2.7 ɴᴏᴛᴇʙᴏᴏᴋ ᴡɪᴅᴛʜ
By Default Jupyter Notebook Comes With Margin On Both The Sides. To Decrease The Margin You Can Change The Width Of It Using The Below Script.
from IPython.core.display import display, HTML
display(HTML("<style>.container { width:90% !important; }</style>"))
2.8 ᴇᴍʙᴇᴅᴅɪɴɢ ᴠɪᴅᴇᴏꜱ
To Embed A Video On Your Jupyter Notebook You Need To Copy The Of The Video Instead Of URL.
You Can Find The Youtube Iframe Link In The Share > Embed.
from IPython.display import HTML
HTML('<iframe>_URL_OF_THE_VIDEO')
3. ɪᴍᴘᴏʀᴛᴀɴᴛ ᴋᴇʏʙᴏᴀʀᴅ ꜱʜᴏʀᴛᴄᴜᴛꜱ
KEYBOARD SHORTCUTS         USE
ESC + M                  Convert a Code Cell Into Markdown
ESC + B                  Insert a Code Cell Below
ESC + A                  Insert a Code Cell Above
SHIFT + ENTER            Run Current Cell
ESC + 1                  change cell to heading 1
ESC + 2                  change cell to heading 2
ESC + 3                  change cell to heading 3
ESC + 4                  change cell to heading 4
ESC + 5                  change cell to heading 5
ESC + 6                  change cell to heading 6
ESC + I                  Interrupt the kernel
ESC + 0                  Restart the kernel
Shift + Space            Scroll notebook up
Space                    Scroll notebook down
Tab                      Code completion or Indent
Shift + Tab              Tooltip
Ctrl-]                   Indent
Ctrl-[                   Dedent
Ctrl-/                   Comment
Ctrl-D                   Delete whole line
Esc                      Enter command mode
To Access All The Keyboard Shotcuts Just Press
H
4. ᴇxᴛᴇɴꜱɪᴏɴꜱ & ᴛʜᴇᴍᴇꜱ
Although You Can Make Your Jupyter Notebook Much Better And Beautiful With Guides And Tricks I Have Given Above. To Make It Even Better You Can Add Some Extensions And Themes To Your Notebooks.
Changing Theme
Step 1: Install Jupyter Themes
# Install Jupyterthemes
Pip Install Jupyterthemes

# Upgrade To Latest Version
Pip Install --Upgrade Jupyterthemes
Step 2: Apply an Available Theme. Run The Command !Jt -L To Check All The Available Themes. You Can Check All The Available Commands In The Github Repo. Apply A Theme Using Command !Jt -T THEME_NAME For Example !Jt -T Monokai. Shutdown The Notebook And Restart To See The Effects. You Can Customize The Font, Toolbar, Width, Height, Margin, Etc.
Jupyter_contrib_nbextensions Extension
The Jupyter_contrib_nbextensions Package Is A Famous Extension. Contains A Collection Of Community-Contributed Unofficial Extensions That Add Functionality To The Jupyter Notebook. These Extensions Are Mostly Written In Javascript And Will Be Loaded Locally In Your Browser.
To Install It Just Run The Command Pip Install Jupyter_contrib_nbextensions On Your Anaconda Prompt Environment. It Will Takes Hardly 20-30second Depending Upon Your Internet Speed. After The Installation Gets Complete. Run The Command Jupyter Contrib Nbextension Install And Then Open Your Jupyter Notebook.
You Will See A New Tab Gets Added To List Names Nbextensions. By Clicking On It You Will See Many Useful Extensions.
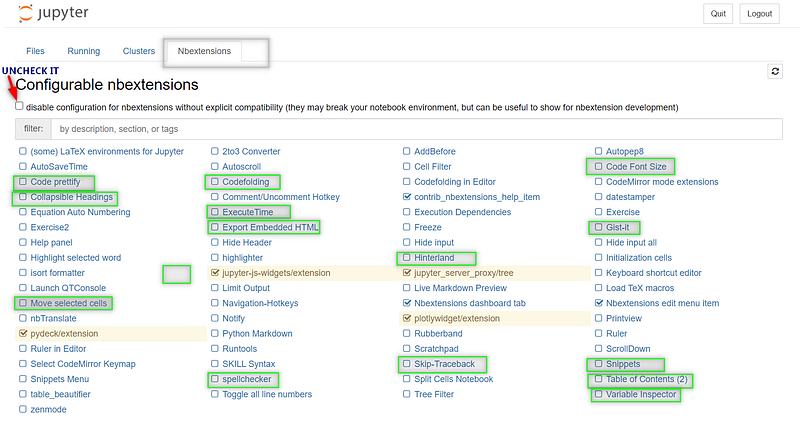
You Can Enable Any Extension By Checking The Checkbox And It Will Gets Added To The Notebook Toolbar.
Bonus: Convert Jupyter Notebook To Slideshow
Step 1: Click On View > Cell Toolbar > Slideshow To Convert Each Cell Into An Slide.
Step 2: Give Proper Slide Type To Each Cell By Choosing Between Slide, Sub Slide, Fragment, Skip And Notes
Step 3: Export It As Reveal.Js Slides By Navigating File > Download As > Reveal.Js Slides
Step 4: Open The Downloaded HTML To See The Slides In Action.
Note: All The Images Used In This Article Are Created By The Author or Given Proper Attribution.
References
[1]. Jupyter Notebook Examples At readthedocs
I Will Keep Updating The Article Whenever I found Something Useful, You Can Access The Associated Notebook On My Github Repository.
Thanks For Reading Till Here, If You Like My Content and Want To Support Me The Best Way is —
- Follow Me On Medium.
- Connect With Me On LinkedIn.
- Become a Medium Member With The Cost of One Pizza Using My Referral Link. a small part of your membership fee will go to me.
- Subscribe To My Email List To Never Miss An Article From Me.


