
JavaScript Module(4) — Webpack (Module Bundler)

前幾篇介紹 RequireJS 的專長是非同步載入模組(AMD Loader),而CommonJS因為本來就設定在後端使用,所以也就被設計成同步方式載入模組,所以若是整合的bundle檔案太大,直接採用CommonJS管理前端模組也是有存在缺點的,所以最好有兩者兼具的辦法。
最好的辦法應該趨向如下:
- 每次都會載入的檔案 — 使用Bundler (如 Browserify)
- 需要才會載入的檔案 — 使用AMD loader (如 RequireJS, Curl)
那有沒有更方便的工具可以一次完成兩種工作呢?
YES!! Webpack is the new kid on the block.
對應到 Webpack 的功能就是
- 每次都會載入的檔案 — Bundler
- 需要才會載入的檔案 — Chunk (Code Splitting)
關於特殊功能- "Code Splitting" 分拆程式碼,在EX2有詳細範例。
使用過Browerify的人,安裝Webpack後執行下列兩行指令會得到相同的結果:
browserify main.js > bundle.jswebpack main.js bundle.js如果您已認知這一點,可以略過EX1不看。
本篇共有以下範例,請斟酌參考。
Ex1 : A Very Simple CommonJS Module Ex2 : CommonJS Module + AMD Module Ex 2a : CommonJS-style Load AMD Module Ex 2b : Load CommonJS Module Asynchronous Ex 2c : Split app and vendor code Ex 2d : Library and Externals Ex3 : UMD Module Ex4a : Non-Module JS file(Shimming Modules) -1 Ex4b : Non-Module JS file(Shimming Modules) -2
— — — — — — — — — — — — — — — — — — — — — — — — — — — — — —
Ex1 : A Very Simple CommonJS Module
這個範例說明了 webpack 取代了 Browserify 的工作。
- 首先一定要安裝 webpack 套件。請在任一資料夾打開進入 Git Bash 後, 使用 npm 安裝。

指令:
npm install webpack -g-g : 全域安裝broserify這個npm套件。接下來的檔案與 以下這篇的第一個範例 Ex 1 : A Very Simple CommonJS Module 最簡單的模組 一模一樣。
2. 撰寫一個最簡單的 module
module.exports = XXXX是 CommonJS 模組定義的方法,只匯出必要的 Object。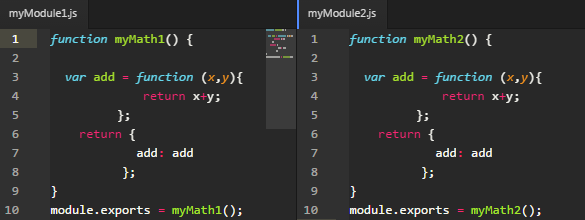
3. 撰寫主要程式進入點JS檔案
require('./XXXXX')是 CommonJS 匯入模組的方法。
4. 使用Webpack 整合所有必要模組檔案。
webpack main.js > bundle.js自動靜態分析所有require的檔案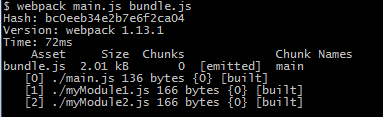
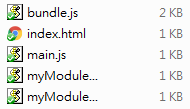
5. 在網頁 index.html 載入 bundle.js
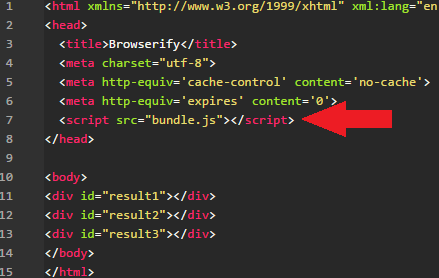
接這打開網頁,F12進入Console,可以看到add()後的結果。最簡單的Browserify範例就這麼完成了。
大家一定很好奇bundle.js到底裝了什麼? 跟Browserify轉出來的會是一樣嗎?
左邊是 Browserify 轉出來的 bundle.js 右邊是 Webpack 轉出來的 bundle.js
顯然 Webpack 的原始碼較為簡單,在require function內建立一個module物件之後,然後帶下去給原來的module。

— — — — — — — — — — — — — — — — — — — — — — — — — — — — — —
討論:
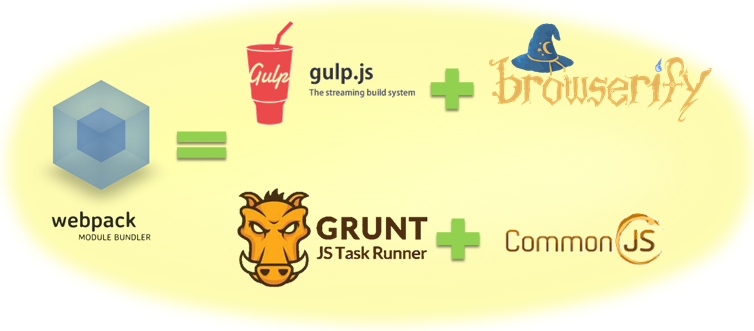
你以為Webpack 只是單單取代Browerify嗎? 不! 他是集大成。
Webpack 也有專屬的設定檔來應付各種複雜的形況:
設定檔比較:
- Browserify: 直接用package.json
- Webpack: webpack.config.js
- Gulp : gulpfile.js
且 Webpack 不只是 Module Bundler 同時也是 Task runner
Webpack 可支援的"Module定義"種類很多,如 CommonJS、AMD(RequireJS)、ES6(ES2015) 這些都支援。
各模組大致語法如下:
1. script-tags (without a module system)
<script type="text/javascript" src="src/myModule.js" charset="utf-8"></script>
<script type="text/javascript" src="src/main.js" charset="utf-8"></script>
2. CommonJS is used by Node.js
//myModule.js
module.exports = function(){ };
//main.js
require('./myModule.js');3. AMD is used by RequireJS
//myModule.js
define(function (myModule) { … });
//main.js
require(['./myModule'], function (myModule) {}4. ECMAScript 6 modules
//myModule.js
export function hello() { …}
module "localModule" {...}
//main.js
import { hello } from 'myModule';— — — — — — — — — — — — — — — — — — — — — — — — — — — — — —
Ex2 : CommonJS Module + AMD Module
在 Ex1 已經示範了Webpack如何打包CommonJS模組,那麼AMD模組又是怎麼樣打包呢?
在開始範例之前,webpack 指令後面的參數是可以放在設定檔去設定的。
webpack main.js > bundle.js 等同
webpack.config.js
--------------------------------------------------------------------module.exports = {
entry: {
app: "./main.js"
},
output: {
filename: "bundle.js"
}
}如此一來,以後打包只要輸入 webpack 就行了。
接下來的檔案與JavaScript Module (2) — Browserify (CommonJS Bundler)這篇的第二個範例 Ex 2 : A CommonJS Module depends on jQuery (Bundle) 來開始做修改。
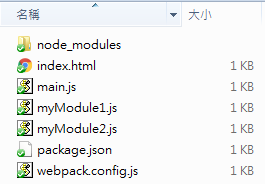
我們應該會有這些檔案
- 修改myModule2.js為AMD模組。
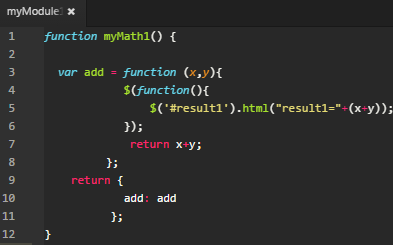
*myModule1.js為CommonJS模組。另外在module.exports時改寫成factory 的形式。
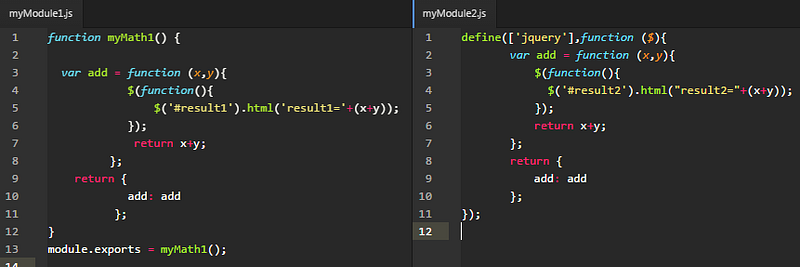
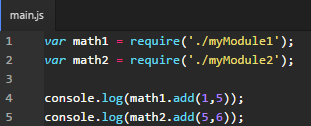
2. main.js修改myModule2的載入方式,改為AMD定義語法載入。
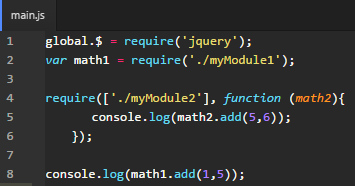
3. 使用Webpack 整合所有必要模組檔案。
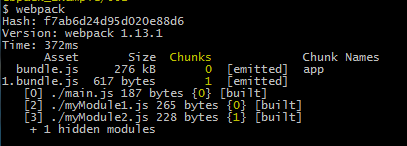
可以看到打包好的檔案為 bundle.js 與 1.bundle.js 。
可以看到,打包好的檔案不是只有一個。合理的推斷就是webpack把AMD模組分離出去成為1.bundle.js。而從Chunks欄位(上圖黃色字部分)可以對應什麼js檔案會被打包在哪一個Chunk。
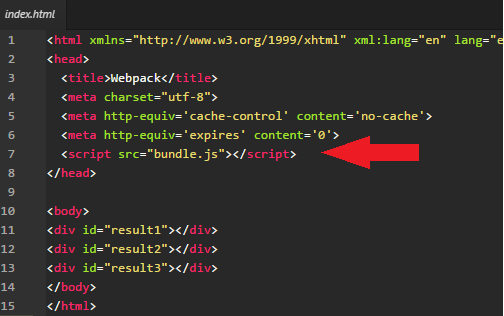
5. 在網頁 index.html 載入 bundle.js
接這打開網頁,可以看到add()後的結果。
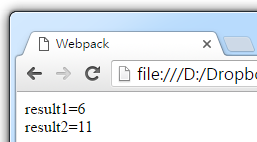
F12進入Console
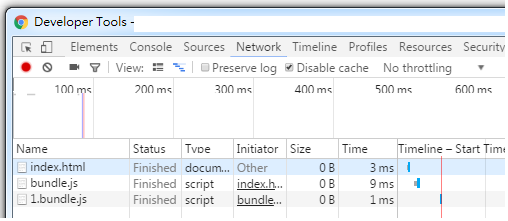
1.bundle.js 是在 bundle.js 之後載入的。 如此也就說明了Webpack有容乃大,既能支援同步方式(CommonJS)也能支援非同步(AMD)方式載入模組。
詳細解說:
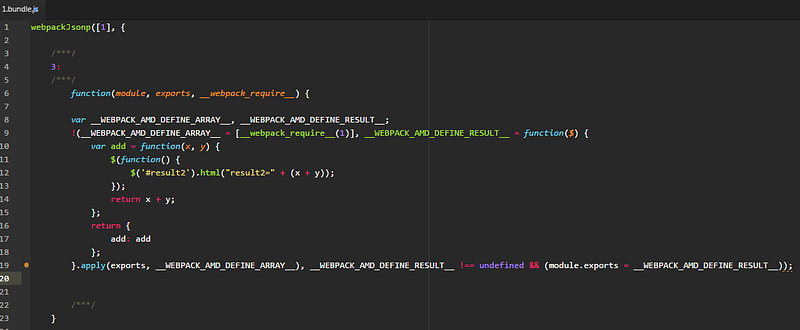
這個範例其實就是啟用了 Webpack 的 “Code Splitting” 分拆程式碼功能。
“Code Splitting” 分拆程式碼功能能把你的code依據語法把部分模組分離成區塊”chunks”檔案而不只是bundle,最後執行階段時會依照需求讀取部分區塊,這也就是Webpack非同步載入模組的實現。
這篇範例中, bundle.js 是在看到require之後(如下)才下載 1.bundle.js。 而1.bundle.js 就是 myModule2.js 經過webpack 打包過後的內容。
★ AMD 非同步方式載入 AMD 模組:
require(['./myModule2'], function (math2){
    console.log(math2.add(5,6));
  });
— — — — — — — — — — — — — — — — — — — — — — — — — — — — — —
Ex 2a : CommonJS-style Load AMD Module
如果改成
★ CommonJS 同步方式載入 AMD 模組:
var math2 = require('./myModule2');- 也就是 main.js改成如下
2. 使用Webpack 整合所有必要模組檔案。
可以看到 不再有 1.bundle.js 而是全部打包成 bundle.js。
結論:
也就是說 Webpack 自動參考 語法 而判斷哪些模組是要被非同步載入,那些模組是同步載入。
★ AMD 非同步方式載入 AMD 模組:
require(['./myModule2'], function (math2){
    console.log(math2.add(5,6));
  });
★ CommonJS 同步方式載入 AMD 模組:
var math2 = require('./myModule2');除此之外,
Webpack更還定義了 ★ AMD 非同步方式載入 CommonJS 模組,真的很妙!
— — — — — — — — — — — — — — — — — — — — — — — — — — — — — —
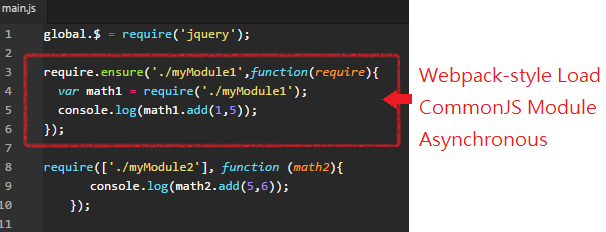
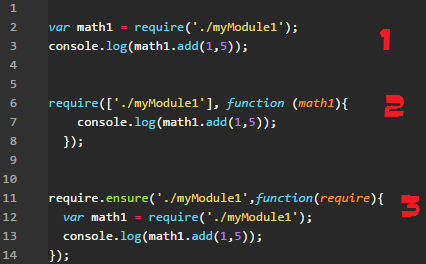
Ex 2b : Load CommonJS Module Asynchronous
★ CommonJS 同步方式載入 CommonJS 模組:
var math1 = require('./myModule1');★ Webpack定義之非同步方式(require.ensure)載入 CommonJS 模組:
require.ensure('./myModule1',function(require){
  var math1 = require('./myModule1');
  console.log(math1.add(1,5));
});- 也就是 main.js改成如下
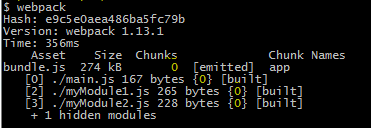
2. 使用Webpack 整合所有必要模組檔案。
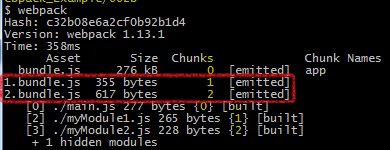
可以看到 myModule1.js 和 myModule2.js 被個別打包成 1.bundle.js與2.bundle.js。
F12進入Console
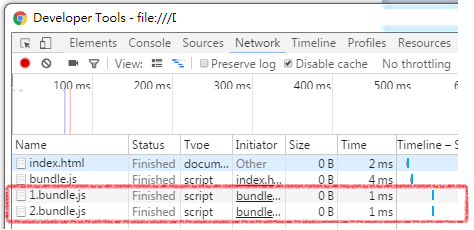
1.bundle.js 與 2.bundle.js 都是在 bundle.js 之後載入的。
Webpack 給了開發者很大的彈性,不管 CommonJS 或是 AMD 定義的模組都可以使用 同步 或 非同步方式載入模組,而這個分拆程式碼功能稱為 "Code Splitting”。 https://webpack.github.io/docs/code-splitting.html
— — — — — — — — — — — — — — — — — — — — — — — — — — — — — —
● — 接著我要們把 jQuery 踢出去。
Ex 2c : Split app and vendor code (CommonsChunkPlugin)
因為會用到Webpack Plugin(外掛),所以要把webpack安裝在專案目錄內。
npm install webpack --save-dev--save-dev : 代表專案開發時與webpack相依。如果沒有使用 --save-dev 這個參數,不會更新 package.json,npm只會單純地把套件安裝進去node_moudels資料夾裡。CommonsChunkPlugin 通常用作來將共同部分提取出來為一支共用JS檔案或是 建立 VENDOR 區塊之用(也稱第三方區塊),目的是為了將更新頻率較低的檔案從主要專案內部程式碼提取出來,可防止程式碼快取失效的太頻繁,進而增加使用者體驗。
- 接續 Ex2b 的檔案,修改webpack.config.js
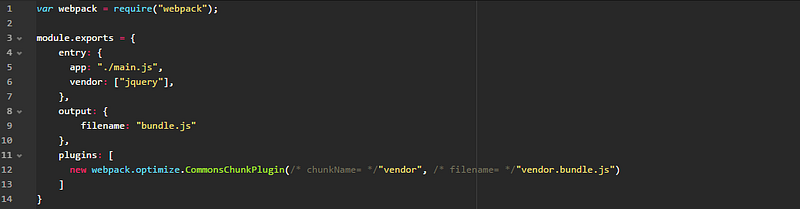
這裡必須設定 plugin 與 vendor 檔案來源。 CommonsChunkPlugin 就是會用到的外掛,意旨生成一個共用包。
例如各個模組都會用到的第三方套件或其他共用模組,會使用CommonsChunkPlugin 打包起來,打包起來的檔案最先使用<script>同步載入。
vendor: ["jquery"] 可以不只一個,它可以很多個套件。如 vendor: [“jquery”, “underscore”, …]
var webpack = require("webpack");module.exports = {
entry: {
app: "./main.js",
vendor: ["jquery"],
},
output: {
filename: "bundle.js"
},
plugins: [
new webpack.optimize.CommonsChunkPlugin("vendor", "vendor.bundle.js")
]
}entry多了一個vendor的欄位設定,然後再用vendor包裝成vendor.bundle.js
2. 使用Webpack 整合所有必要模組檔案。
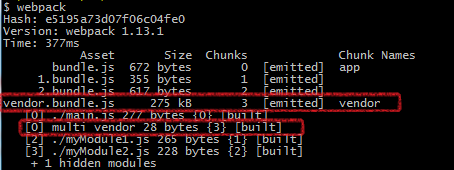
可以看到 jQuery 已經被打包成 vendor.bundle.js
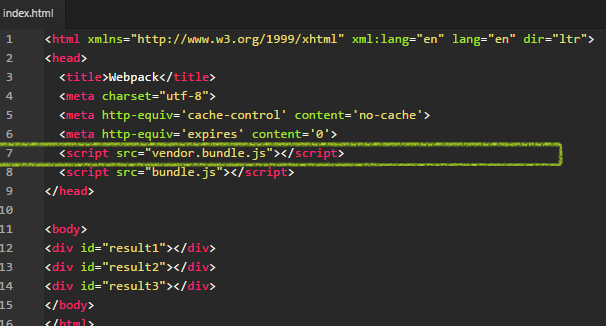
3. 不是這樣就好囉!! 因為 是踢出去,所以要另寫<script>載入。
修改index.html 增加 這裡請注意它的載入順序等於script的先後。這裡要把踢出去的放在bundle.js前面。
F12進入Console
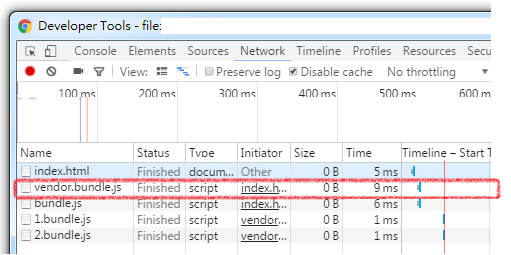
可以看到 vendor.bundle.js 是同步方式載入的。(因為是
— — — — — — — — — — — — — — — — — — — — — — — — — — — — — —
Ex 2d : Library and Externals
使用Split app and vendor code的方式可以把多個第3方js檔合併再一起,但是卻需要使用到CommonsChunkPlugin。
Webpack還提供另一種方法讓 “ 模組內可使用第3方js檔案 ”。
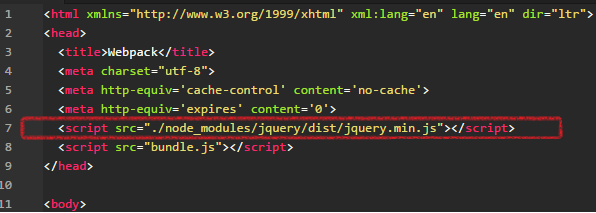
- 首先我們從Ex2b範例中修改 index.html檔案。jquery就使用一般script-tag 方法載入。
2. 為了證明可以使用第3方js檔案,我們把jquery相依性移到各模組裡面。
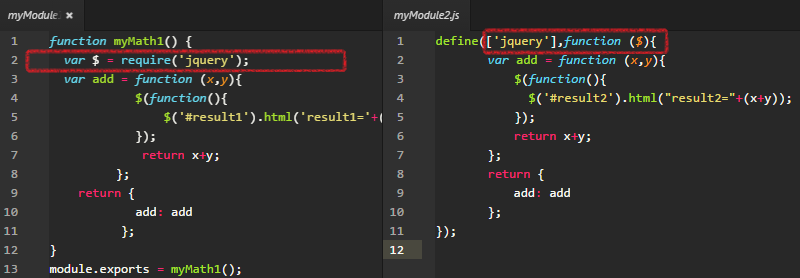
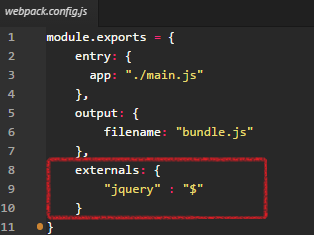
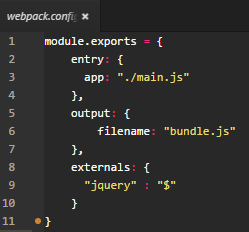
3. 接下來最重要的就是要修改 webpack.config.js ,多加一個 externals 設定,為 "jquery":"$" ,前面的jquery只是暫時給他一個名稱,之後各模組必須用這個名稱載入jquery模組 (當然也不是真的這時候才載入,是script-tag時就已經載入模組),而webpack的邏輯就是把後面的"$" 這個變數,回傳給module.exports,也就是module.exports = $;
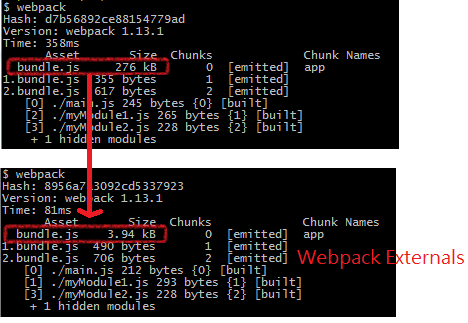
4.使用Webpack 整合所有必要模組檔案。
可以看到 bundle.js的size已經從276kB 降到 3.94kB,因為 jquery 已被Webpack當成externals 外部檔案方式載入,所以也不需要再打包進去。
— — — — — — — — — — — — — — — — — — — — — — — — — — — — — —
Ex3 : UMD Module
先前的範例已經針對Webpack如何使用CommonJS 與 AMD ,那麼UMD呢?對於UMD模組來說。
UMD說 「我是變色龍,既是 CommonJS也是 AMD,我是隨環境而變的。」
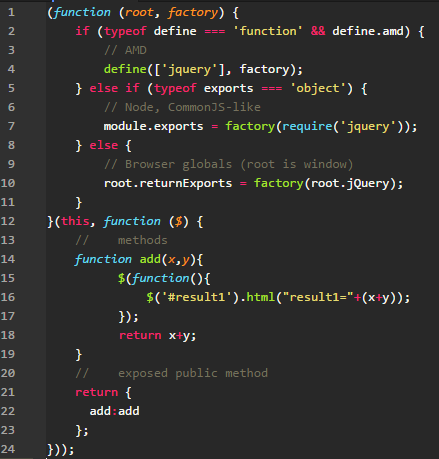
(從UMD的寫法來看,因為加了很多判斷,所以可以隨環境而變。)
但是
Webpack 也說 : 「朕要你當AMD你就是AMD,要你是CommonJS你就是CommonJS」。
以上這句只是笑笑,說的看似很對,但不是那麼準確。
Webpack 應該說 : 「朕要你當Asynchronous你就是Asynchronous,要你是 Synchronous你就是 Synchronous」。
原因在於AMD的精神就是非同步載入模組。CommonJS的精神就是同步載入模組。而經過之前的範例,我們知道 Webpack 可以根據寫法不同而包裝成同步或非同步。
★1. 同步方式載入 UMD 、AMD、CommonJS 模組:
var math1 = require('./myModule1');
console.log(math1.add(1,5));
★2. 非同步方式載入 UMD 、AMD 模組:
require(['./myModul1'], function (math1){
    console.log(math1.add(1,5));
  });
★3. 非同步方式載入 UMD、CommonJS 模組:
require.ensure('./myModule1',function(require){
  var math1 = require('./myModule1');
  console.log(math1.add(1,5));
});- 根據需要撰寫main.js
2. 使用Webpack 整合所有必要模組檔案。
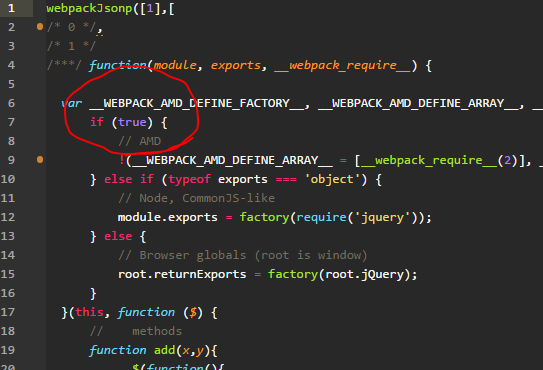
打開bundle.js來看,Webpack 很聰明地把
if (typeof define === 'function' && define.amd) {擅自替換成
if (true) {可見 Webpack 故意強制滿足了AMD的條件,但是沒有真的去定義 define 這個物件,這麼做有個好處,不會像 RequireJS 一樣,一但載入後就無法再使用
Webpack 只能說 : 「朕要你當AMD你就是AMD,要你是CommonJS你還是 AMD…….XD」。
— — — — — — — — — — — — — — — — — — — — — — — — — — — — — —
Ex4a : Non-Module JS file (Shimming Modules)-1
最後兩個範例,是讓非模組化的JS檔案也能讓Webpack打包。一共有兩種Shim的設定方法。一個是在require動手腳,另一個是在Webpack.config.js這邊動手腳。
因為會用到exports-loader,所以要把exports-loader安裝在專案目錄內。
npm install exports-loader --save-dev--save-dev : 代表專案開發時與webpack相依。exports-loader通常用來將模組內的變數導出,等同於CommonJS的 module.exports = xxx 或是 AMD中的 return xxx。
- 首先準備一個非模組化的JS檔
2. Webpack.config.js 檔案依舊。
3. 在main.js 使用 exports 的寫法導出變數

exports?myMath1 代表要導出myModule1.js裡的 myMath1變數給 main.js裡的 var myMath1 這個變數。
! 是webpack的語法串接器,!./myModule1.js 代表要require這個js檔案。
4. 使用Webpack 整合所有必要模組檔案。
— — — — — — — — — — — — — — — — — — — — — — — — — — — — — —
Ex4a : Non-Module JS file (Shimming Modules)-2
另外一種Shim的設定方法是在Webpack.config.js這邊動手腳。
因為會用到exports-loader,所以要把exports-loader安裝在專案目錄內。
npm install exports-loader --save-dev--save-dev : 代表專案開發時與webpack相依。exports-loader通常用來將模組內的變數導出,等同於CommonJS的 module.exports = xxx 或是 AMD中的 return xxx。
- 首先準備一個非模組化的JS檔
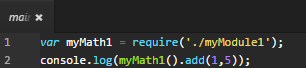
2. 在main.js 的require用法依舊。
3. 在Webpack.config.js使用exports-loader
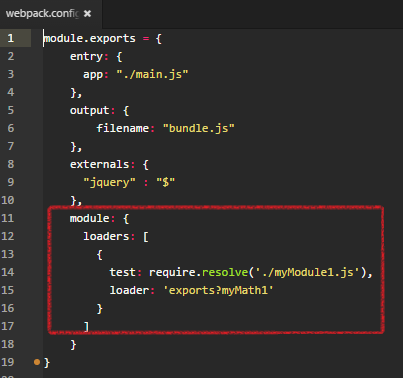
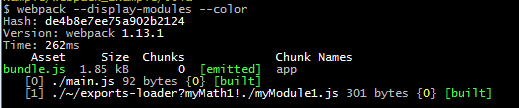
exports?myMath1 代表要使用exports-loader,並且導出myMath1變數。 而require.resolve 帶的參數要與 main.js裡的 require所帶的參數要一致。 代表 在require('./myModule1.js)時,會自動帶入loader,而變成
require("exports?myMath1!./myModule1.js");4. 使用Webpack 整合所有必要模組檔案。
更多 Shimming modules 請參考官網 : http://webpack.github.io/docs/shimming-modules.html
— — — — — — — — — — — — — — — — — — — — — — — — — — — — — —
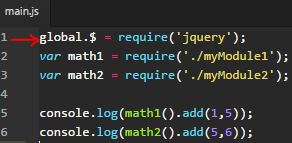
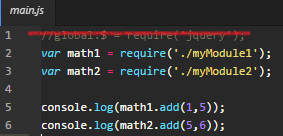
關於 global.$ = require(‘jquery’) 的替代:
jQuery的$在很多第三方模組都會用到,如bootstrap,由於之前的範例想減少學習難度,故沒有用其他的寫法,在webpack裡 ,提供了幾種方法讓所有模組能參考到$這個global變數。
1. 使用 expose-loader
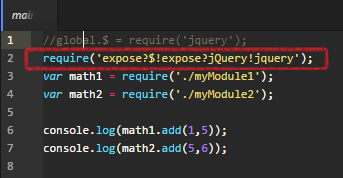
直接替換成 require(‘expose?$!expose?jQuery!jqury) ,代表把jQuery與$都暴露成global變數。
2. 使用 ProvidePlugin
這個與expose直接暴露成global變數不同,使用 ProvidePlugin 可使模組內的變數讓 "所有的模組" 都能參考到模組內的變數。
也因此這樣所以main.js不用任何require('jquery’)的方法。
取而代之的是在webpack.config.js設定要使用到的模組與
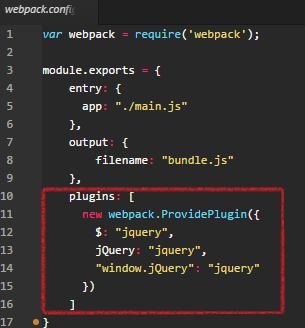
var webpack = require('webpack');module.exports = {
entry: {
app: "./main.js"
},
output: {
filename: "bundle.js"
},
plugins: [
new webpack.ProvidePlugin({
$: "jquery",
jQuery: "jquery",
"window.jQuery": "jquery"
})
]
}Webpack就自動的幫我們把jQuery模組包裝在bundle.js之中。
文篇到這裡,有了很多範例,但也只是Webpack其中的幾項功能,Webpack功能強大,可替換多種工具。
- 對CommonJS、AMD、UMD、ES6、React JSX 的語法相容性。
- 對js、css、image、json等的檔案都支援打包。
- 支援串聯式(!)模組loader與plugin機制,方便對CoffeeScript等的支援。
- 可將所有程式碼分割成不同的chunk,可按需要才載入,降低讀取檔案的大小,也降低網頁初始化的時間。
- 支援 SourceUrls 與 SourceMaps 。
- 使用非同步IO與多層Buffer,使得Webpack編譯較迅速。
Refer: