
Introduction to Github Actions
Automate your build and test pipeline
Github Actions, to quote the official documentation, “is a continuous integration and continuous delivery (CI/CD) platform that allows you to automate your build, test, and deployment pipeline”. In other words, it is a powerful tool to automatise repetitive and useful tasks for your repository, such as unit testing, formatting checks, and more. Basically any professional software project will employ this platform or a similar one, most commonly to automatise testing and protecting the main branch against wrong, untested code pushes.
In this post, we’ll introduce Github Actions, and in the next ones, build onto this to show how to create Python and C++ repositories following professional industry practises.
How do Github Actions Work?
Let’s use an image from the official docs for visualisation:
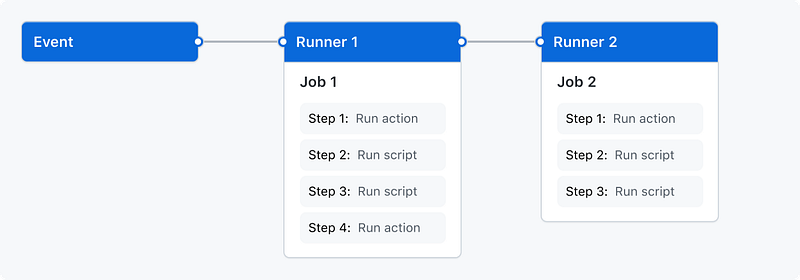
The overall concept not shown in this diagram is a workflow: this contains a list of jobs to run. It is triggered by an event, e.g. a pull request (PR) to the main branch. Each job of the workflow is then run in its own virtual machine, in a runner. A job can have several steps, each are either bash scripts, or actions. An action is a complex task which is used frequently, and which was written by Github or someone else (such as checking out a repository). If any of the scripts, actions, … fail, it will fail the full workflow (and usually prevent merging the PR to main).
Sample Workflow
Let’s dive into a sample workflow to apply these concepts in practice, and demonstrate core concepts and syntax. Workflows must be placed in the .github/workflows folder in your repository. In this, let’s create a sample_workflow.yml file.
We first define the name of the workflow:
name: Sample WorkflowThen, we define two events for which this workflow is run:
on:
  pull_request:
    branches: [main]
  push:
    branches: [main]
Here, we are saying to start this workflow for all PRs pointing to main, and any pushes to main — i.e. when this workflow is merged eventually.
Next, we define one job sample_job in this workflow:
jobs:
  sample_job:
    runs-on: ubuntu-20.04
The attribute runs-on describes the platform to run this workflow on in the virtual machine, here we pick Ubuntu 20.
Then, we define several steps inside that job. The first will checkout the current state of the repository in the runner:
steps:
  - name: Checkout repo
    uses: actions/checkout@v3
Here we see a first example of an action, namely checkout@v3, which checks out our repository for us.
Following this, we use another action to setup Python:
- name: Set up Python 3.10.0
  uses: actions/setup-python@v3
  with:
    python-version: "3.10.0"
We observe that via the with keyword we specify additional attributes, in our case the right Python version.
To conclude, we add two steps show-casing the usage of bash scripts, printing a few lines to the terminal:
- name: Echo 1
  run: echo "Echo 1"

- name: Echo 2
  run: |
    echo "Echo 2a"
    echo "Echo 2b"
The pipe element in a step (|) denotes multi-line commands, and lets us run several commands over multiple lines in one step.
That defines your first workflow!
For completeness here is the full file:
name: Sample Workflow

on:
  pull_request:
    branches: [main]
  push:
    branches: [main]
jobs:
  sample_job:
    runs-on: ubuntu-20.04
    steps:
      - name: Checkout repo
        uses: actions/checkout@v3
      - name: Set up Python 3.10.0
        uses: actions/setup-python@v3
        with:
          python-version: "3.10.0"
      - name: Echo 1
        run: echo "Echo 1"
      - name: Echo 2
        run: |
          echo "Echo 2a"
          echo "Echo 2b"
You can also find this workflow in this sample repository.
Using our Workflow
There are two ways this workflow is run / we can trigger it to run: the first one is the one we designed in the workflow itself, namely raising a PR to main or merging a commit to main.
If you raise a PR, Github will automatically run our workflow, and notify you of the result. If you go to the PR, you will find a section “Checks”, looking something like this:
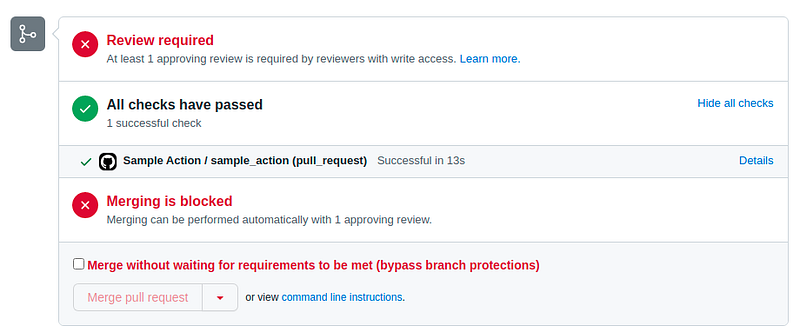
This shows us, that our workflow / check has passed successfully.
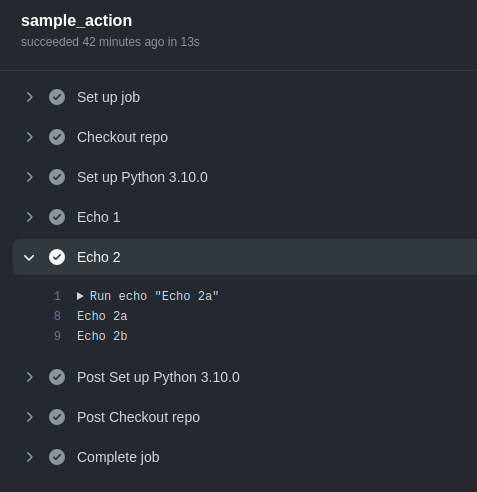
When clicking on the workflow, we see additional details, in particular outputs of every step — and we see that all our steps were run as intended, and e.g. we get the expected prints:
To manually trigger an action, select “Actions” from the main menu of your repository:

In the resulting view you will find an overview of ran workflows in the past — and when clicking on a desired workflow, you can re-run it. This is e.g. useful to unblock a broken / stuck CI (maybe there was an issue, a runner died, or similar, …) — or if you just want to run and test a workflow yourself.
This concludes this introduction about Github Actions. I hope this post provided some useful information for your own projects — stay tuned for Part 2, where we show how to setup a Python repository from scratch up to “industry standards”!
Level Up Coding
Thanks for being a part of our community! Before you go:
- 👏 Clap for the story and follow the author 👉
- 📰 View more content in the Level Up Coding publication
- 🔔 Follow us: Twitter | LinkedIn | Newsletter
🚀👉 Join the Level Up talent collective and find an amazing job


