Introduction to ControlNet for Stable Diffusion
Better control for text-to-image generation
This tutorial covers a step-by-step guide on text-to-image generation with ControlNet conditioning using the HuggingFace’s diffusers package.
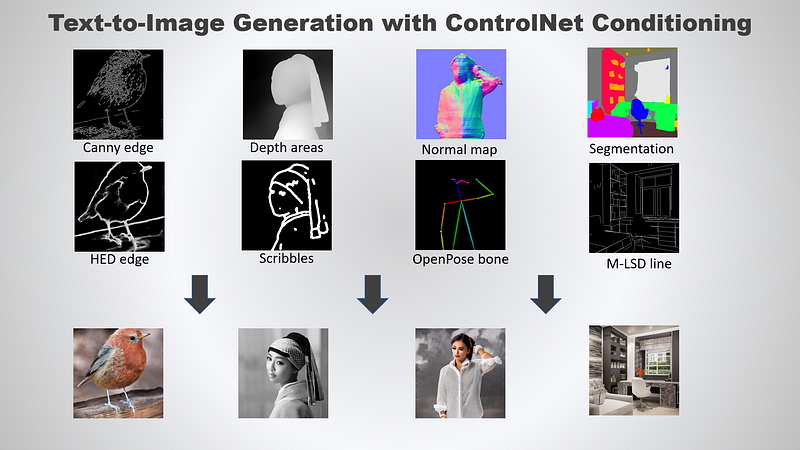
ControlNet is a neural network structure to control diffusion models by adding extra conditions. It provides a way to augment Stable Diffusion with conditional inputs such as scribbles, edge maps, segmentation maps, pose key points, etc during text-to-image generation. As a result, the generated image will be a lot closer to the input image, which is a big improvement over traditional methods such as image-to-image generation.
In addition, a ControlNet model can be trained with small datasets on consumer GPU. Then, the model can be augmented with any pre-trained Stable Diffusion models for text-to-image generation.
The initial release of ControNet came with the following checkpoints:
Canny edge — A monochrome image with white edges on a black background.Depth/Shallow areas — A grayscale image with black representing deep areas and white representing shallow areas.Normalmap — A normal mapped image.Semantic segmentationmap — An ADE20K’s segmentation protocol image.HED edge — A monochrome image with white soft edges on a black background.Scribbles — A hand-drawn monochrome image with white outlines on a black background.OpenPose bone (pose keypoints) — A OpenPose bone image.M-LSD line — A monochrome image composed only of white straight lines on a black background.
Let’s proceed to the next section for the setup and installation.
Setup
It is highly recommended to create a new virtual environment before the package installation.
diffusers
Activate the virtual environment and run the following command to install the stable version of diffusers module:
pip install diffusers
ControlNet requires
diffusers>=0.14.0
For the latest version of diffusers package, install it as follows:
pip install git+https://github.com/huggingface/diffusers
accelerate
You can install the accelerate module as follows:
pip install accelerateThis tutorial contains a few code snippets that relies on accelerate>=0.17.0, which has yet to be released on PyPi at the time of this writing. Install the latest version as follows:
pip install git+https://github.com/huggingface/accelerateopencv-python
Note that the pre-conditioning processor and dependencies are different depending on the ControlNet used for image generation. For simplicity, this tutorial will cover the canny edge processor, which is dependent on the opencv-python package.
opencv-python comes with 4 different packages. The official documentation recommends the opencv-contrib-python package but inference can be done using any of the following packages:
opencv-python— main packageopencv-contrib-python— full package (comes with contrib/extra modules)opencv-python-headless— main package without GUIopencv-contrib-python-headless— full package without GUI
Install it via the following command (replace the package name based on your preferences):
pip install opencv-contrib-python
controlnet-aux
On the other hand, the OpenPose processor requires the controlnet-aux package. Run the following command to install it:
pip install controlnet-auxxformers (optional)
The xformers package provides significant boost to inference speed. The latest version comes with pip wheels support for PyTorch 1.13.1.
Pip install (win/linux)
For those with torch==1.13.1, simply run the following command to install xformers:
pip install -U xformersConda (linux)
For conda users, the installation supports either torch==1.12.1 or torch==1.13.1
conda install xformers
Building from source
For the other use cases, consider building xformers directly from source:
# (Optional) Makes the build much faster
pip install ninja
# Set TORCH_CUDA_ARCH_LIST if running and building on different GPU types
pip install -v -U git+https://github.com/facebookresearch/xformers.git@main#egg=xformers
# (this can take dozens of minutes)
Implementation
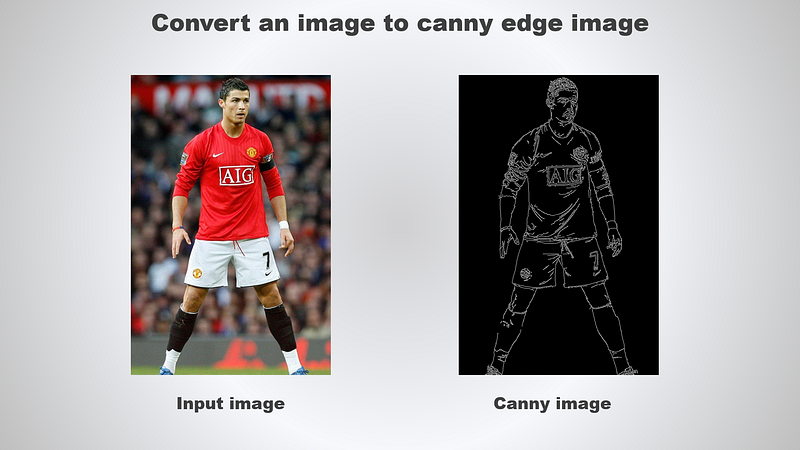
Let’s explore how to utilize the canny edge ControlNet for image generation. It requires a canny edge image as input.
Canny
Create a new file called canny_inference.py and add the following import statements:
import cv2
import numpy as np
from PIL import Image
Then, continue by adding the following code snippets to create a canny edge image from an existing image
import cv2
import numpy as np
from PIL import Image

image = Image.open('input.png')
image = np.array(image)

low_threshold = 100
high_threshold = 200

image = cv2.Canny(image, low_threshold, high_threshold)
image = image[:, :, None]
image = np.concatenate([image, image, image], axis=2)
canny_image = Image.fromarray(image)
canny_image.save('canny.png')
Save the file and run the following command to convert an image to canny edge image:
python canny_inference.pyHave a look at the following example:
The next step is to perform inference using the canny image as conditional input. Modify the import statement as follows:
import cv2
+import torch
import numpy as np
from PIL import Image
+from diffusers import StableDiffusionControlNetPipeline, ControlNetModel, DPMSolverMultistepScheduler
Update the code by initializing the ControlNet and Stable Diffusion pipelines:
...

canny_image = Image.fromarray(image)
# canny_image.save('canny.png')

# for deterministic generation
generator = torch.Generator(device='cuda').manual_seed(12345)
controlnet = ControlNetModel.from_pretrained(
    "lllyasviel/sd-controlnet-canny",
    torch_dtype=torch.float16
)
pipe = StableDiffusionControlNetPipeline.from_pretrained(
    "runwayml/stable-diffusion-v1-5",
    controlnet=controlnet,
    torch_dtype=torch.float16
)
# change the scheduler
pipe.scheduler = DPMSolverMultistepScheduler.from_config(pipe.scheduler.config)
# enable xformers (optional), requires xformers installation
pipe.enable_xformers_memory_efficient_attention()
# cpu offload for memory saving, requires accelerate>=0.17.0
pipe.enable_model_cpu_offload()
Run inference and save the generated image:
...
# cpu offload for memory saving, requires accelerate>=0.17.0
pipe.enable_model_cpu_offload()
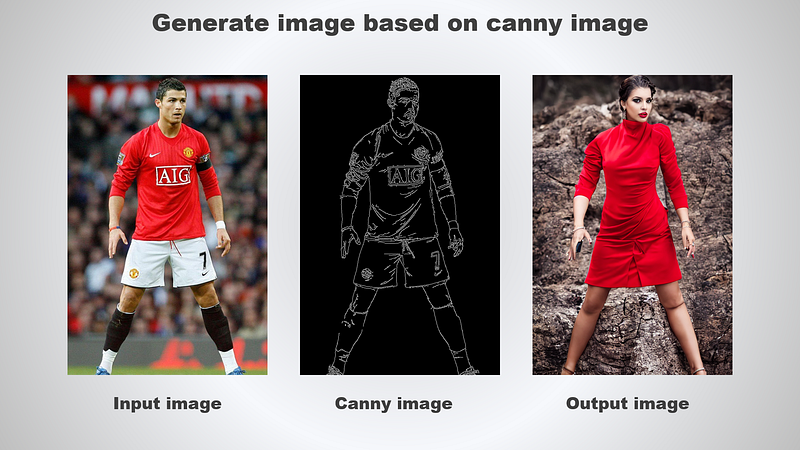
image = pipe(
"a beautiful lady, celebrity, red dress, dslr, colour photo, realistic, high quality",
negative_prompt="cropped, out of frame, worst quality, low quality, jpeg artifacts, ugly, blurry, bad anatomy, bad proportions",
num_inference_steps=20,
generator=generator,
image=canny_image,
controlnet_conditioning_scale=0.5
).images[0]
image.save('output.png')The StableDiffusionControlNetPipeline accepts the following parameter:
controlnet_conditioning_scale— The outputs of the controlnet are multiplied bycontrolnet_conditioning_scalebefore they are added to the residual in the original unet. Defaults to 1.0 and accepts any value between 0.0–1.0.
Run the script and you should get the following output:
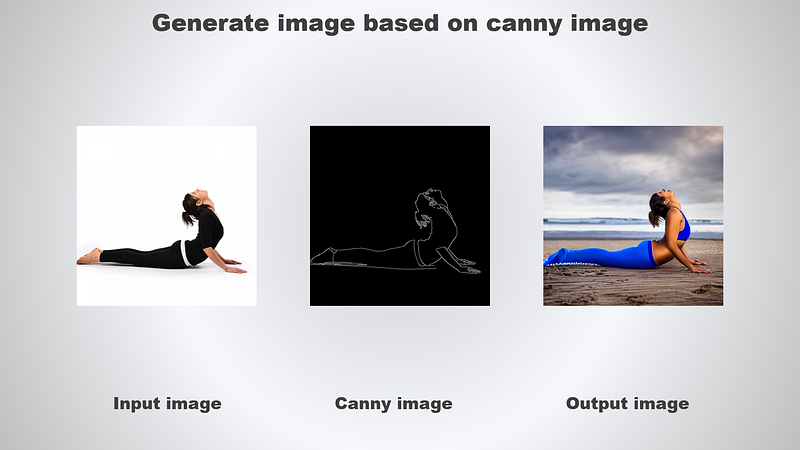
Let’s rerun the script again with a different input image and settings:
...

image = pipe(
-   "a beautiful lady, celebrity, red dress, dslr, colour photo, realistic, high quality",
+   "a beautiful lady wearing blue yoga pants working out on beach, realistic, high quality",
    negative_prompt="cropped, out of frame, worst quality, low quality, jpeg artifacts, ugly, blurry, bad anatomy, bad proportions",
    num_inference_steps=20,
    generator=generator,
    image=canny_image,
-   controlnet_conditioning_scale=0.5
+   controlnet_conditioning_scale=1.0
).images[0]
image.save('tmp/output.png')
The output is as follows:
OpenPose
Let’s try using OpenPose bone image as conditional input instead. Have a look at the following image as reference on how it should look like:
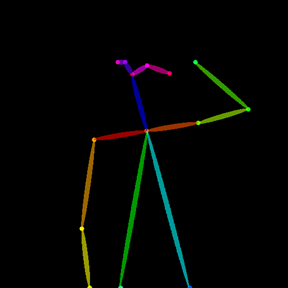
The controlnet-aux module provides support to convert an image to OpenPose bone image. Create a new Python file called pose_inference.py and add the following import:
import torch
from PIL import Image
from controlnet_aux import OpenposeDetector
from diffusers import StableDiffusionControlNetPipeline, ControlNetModel, DPMSolverMultistepScheduler
Continue by adding the following code snippets:
...

image = Image.open('input.png')
openpose = OpenposeDetector.from_pretrained('lllyasviel/ControlNet')
pose_image = openpose(image)
pose_image.save('pose.png')
Save the file and run the following command to convert an image to a OpenPose bone image:
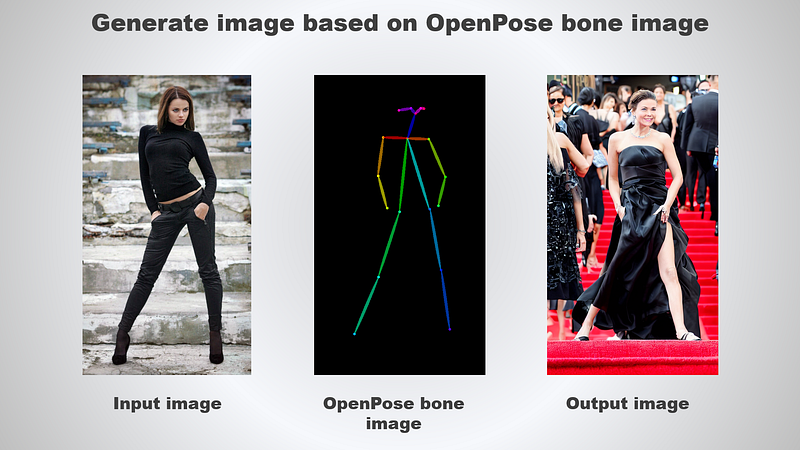
python pose_inference.pyHave a look at the following example for reference:

Complete the script by appending the following lines of code:
...

# for deterministic generation
generator = torch.Generator(device='cuda').manual_seed(12345)
controlnet = ControlNetModel.from_pretrained(
    "lllyasviel/sd-controlnet-openpose",
    torch_dtype=torch.float16
)
pipe = StableDiffusionControlNetPipeline.from_pretrained(
    "runwayml/stable-diffusion-v1-5",
    controlnet=controlnet,
    torch_dtype=torch.float16
)
# change the scheduler
pipe.scheduler = DPMSolverMultistepScheduler.from_config(pipe.scheduler.config)
# enable xformers (optional), requires xformers installation
pipe.enable_xformers_memory_efficient_attention()
# cpu offload for memory saving, requires accelerate>=0.17.0
pipe.enable_model_cpu_offload()

# cpu offload for memory saving, requires accelerate>=0.17.0
pipe.enable_model_cpu_offload()

image = pipe(
    "a beautiful hollywood actress wearing black dress attending award winning event, red carpet stairs at background",
    negative_prompt="cropped, out of frame, worst quality, low quality, jpeg artifacts, ugly, blurry, bad anatomy, bad proportions",
    num_inference_steps=20,
    generator=generator,
    image=pose_image,
    controlnet_conditioning_scale=1.0
).images[0]
image.save('output.png')
Run the script and the output is as follows:
ControlNet is an extremely powerful neural network structure to control diffusion models by adding extra conditions.
At the time of this writing, the support for Multi-ControlNet is still in active development by the open-source community.
The new feature provides a way to use multiple ControlNets and adding the outputs together for image generation, allowing better control on the whole image. Simply pass in
import torch
from diffusers import StableDiffusionControlNetPipeline, ControlNetModel

controlnet_canny = ControlNetModel.from_pretrained("lllyasviel/sd-controlnet-canny",
                                                   torch_dtype=torch.float16).to("cuda")
controlnet_pose = ControlNetModel.from_pretrained("lllyasviel/sd-controlnet-openpose",
                                                   torch_dtype=torch.float16).to("cuda")

pipe = StableDiffusionControlNetPipeline.from_pretrained(
 "runwayml/stable-diffusion-v1-5", torch_dtype=torch.float16,
 controlnet=[
  controlnet_pose,
  controlnet_canny
 ],
).to("cuda")

image = pipe(prompt='...',
             image=[pose_image, canny_image],
        ).images[0]
image.save("output.png")
When using multiple ControlNet(s), you can control the scale factor by passing in a list of float as input argument to controlnet_conditioning_scale as follows:
controlnet_conditioning_scale=[1.0, 0.5]Conclusion
Let’s recap the learning points for today.
This article started off with a brief introduction on ControlNet and a list of supported models.
Then, it moved on to setup and installation step via pip install.
Subsequently, it covered on using opencv-python to get a canny edge image. The output is then used as conditional input for text-to-image generation.
Besides that, this tutorial also explained on using OpenPose bone image as conditional input instead. The controlnet-aux module comes in handy to convert an image to OpenPose image.
Thanks for reading this piece. Have a great day ahead!