

Introducing AutoGen
Enabling LLM-powered agents to cooperate
In my latest article, we’ve introduced the concept of Agents as a type of LLM application that are powered with a set of external tools or plug-ins that allow them to “do stuff”. In ther words, agents can be seen as AI systems that, given a user’s query, are able to interact with the surrounding ecosystem to the extent to which we allow them to. The perimeter of the ecosystem is delimited by the tools we provide the agents with, for example the possibility of searching the web, rather than the ability to write files within you File System.
Recently, Microsoft released a new project about agents called AutoGen, which is bringing agents’ ability to the next level.
What is AutoGen?
AutoGen is a framework to develop LLM-powered applications using multiple agents that are able to communicate and orchestrate among each others. You can literally think about it as a think tank full of experts, each one with a different domain of knowledge, yet all of them extremely capable in advanced reasoning, working together to solve a complex, multidisciplinary task: the mathematical expert might come up with an algorithmic model to represent and solve the issue, then socialize it with the geopolitical expert, who will notice how the model doesn’t take into account possible diplomatic implications of this resolution. Finally, the two of them might turn towards the philanthropic expert and assess together whether this resolution might represent any kind of discrimination.
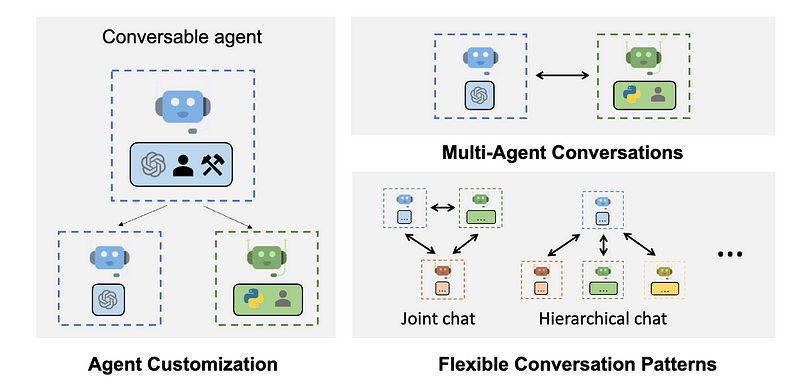
AutoGen aims at replicating scenarios similar to the one described above. The GitHub repo comes with a series of pre-configured agents with specific expertise that you can initialize to let them cooperate among each others. For example, the UserProxyAgent is configured so that it can automatically execute code (you can see the source code here: autogen/autogen/agentchat/user_proxy_agent.py at main · microsoft/autogen (github.com)).
As stated in the original paper, the idea behind the multi-agentic approach finds evidence into three main elements:
- LLMs are very good at receiving and elaborating feedback. Henceforth, a conversation among agents encourages the generation of feedback (from both agents and human) to better tailor the reasoning behind the execution of the plan.
- LLMs are, by definition, adaptable to a variety of tasks, given a proper configuration (in terms of prompt engineering, tools etc.). This implies that we can have many agents, each one properly configured to be very good in a given domain.
- When it comes to complex tasks, LLMs has proven to perform better if they are prompted to split them into sub-tasks. A mutli-agentic approach can enable this partitioning and integration in an effective manner.
The combination of these three elements makes this project promising and ambitious in paving the way towards new framework of LLMs orchestration.
Getting started with AutoGen
To start using AutoGen, you first need to install it via pip install autogen in your local environment. Alternatively, you can start experimenting with AutoGen initializing a GitHub Codespaces directly from this repo.
Then, you need initialize an LLM to use and save its secrets variables into a json file. In my case, I’m going to use Azure OpenAI GPT-4 model. My json file is named OAI_CONFIG_LIST and it looks like the following (if you are using the Codespaces, make sure to change the OAI_CONFIG_LIST_sample file within the Codespaces to OAI_CONFIG_LIST with your own secrets):
[
    {
        "model": "gpt-4",
        "api_key": "your_api_key",
        "api_base": "your_api_base",
        "api_type": "azure",
        "api_version": "2023-07-01-preview"
    }
]
It will be used by the autogen package to call the model.
Let’s start with a simple example using two agents: the UserProxyAgent and the AssistantAgent. They both come with pre-built system messages, and they work well together since the AssistantAgent is not configured to execute code, so that it can leverage the UserProxyAgent to do so.
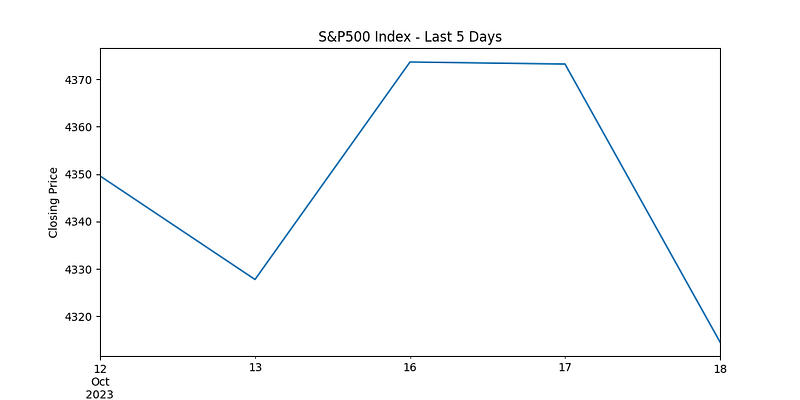
Let’s initialize both the agents with our LLM and then ask to plot the chart of the S&P500 index in the last 5 days (asked on October 19th):
from autogen import AssistantAgent, UserProxyAgent, config_list_from_json

config_list = config_list_from_json(env_or_file="OAI_CONFIG_LIST")
assistant = AssistantAgent("assistant", llm_config={"config_list": config_list})
user_proxy = UserProxyAgent("user_proxy", human_input_mode='ALWAYS', code_execution_config={"work_dir": "coding"})
user_proxy.initiate_chat(assistant, message="Generate a plot of the S&P500 index in the last 5 days and save it in the coding folder.")
While running the code, you will be asked to confirm the execution of some actinos, since the .
This is the first change of messages the two agents produced:
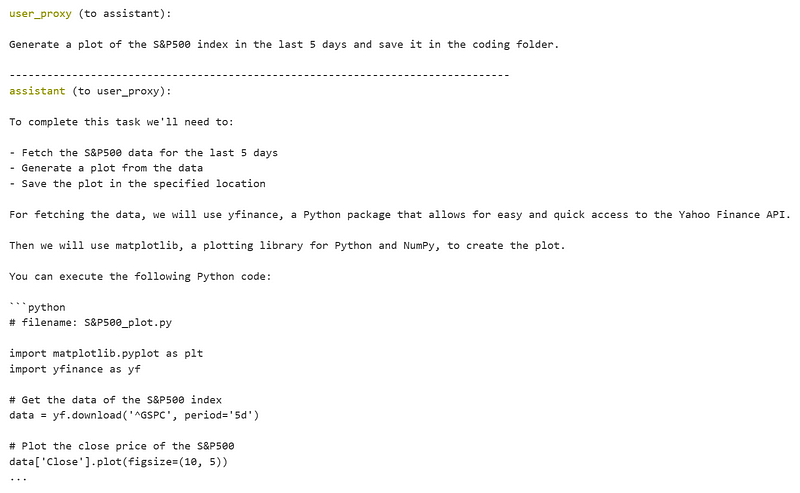
As you can see, the UserProxyAgent is asking the asssistant the plan to address the user’s query, then the AssistantAgent is providing the code. Another interesting section of the conversation rose when the UserProxyAgent was not able to manage the file due to the special character ‘&’.
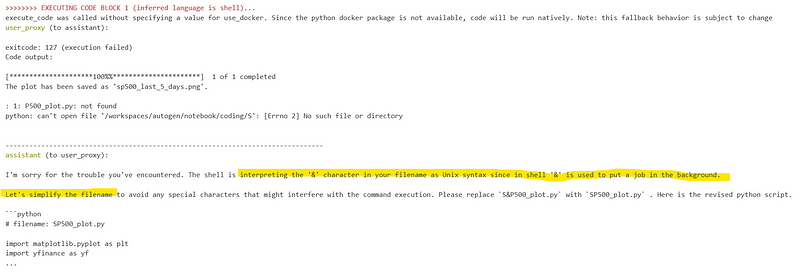
Once understood the error, the assistant tried to bypass it by changing the name.
Plus, you will see a new folder called “coding” where the UserProxyAgent will create and execute the code.
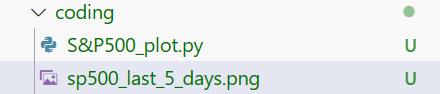
Once the conversation between the 2 agents is done, you will be able to see the final plot in the coding folder:
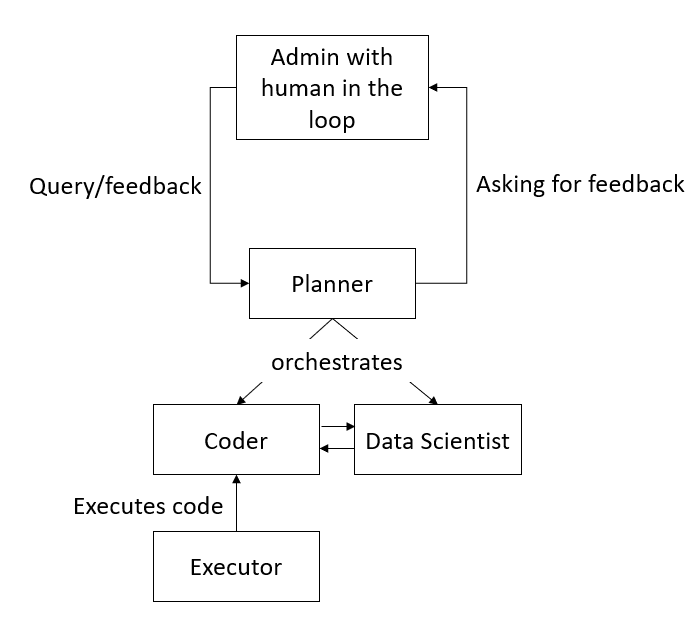
Let’s now jump towards a more complex scenario. I want to navigate through some research papers about computer vision to generate a comparison tables among the state of the art models, with the goal of implementing it within the healthcare industry. To so so, I will leverage the class of AutoGen called GroupChain, which allows multiple agents to address and execute a plan, each one with a specific expertise (you can find the definition of the GroupChat class here).
My group chat will encompass the following agents:
- A user proxy to let the group chat interact with human
- A coder that can solve tasks writing code
- A data scientist that knows how to evaluate and deal with computer vision models
- A planner to generate an execution plan involving both the coder and the data scientist
- An executor to execute the code of the coder
Below you can find the code to do so:
llm_config = {
    "seed": 42,  # change the seed for different trials
    "temperature": 0,
    "config_list": config_list,
    "request_timeout": 120,
}
user_proxy = autogen.UserProxyAgent(
   name="User_proxy",
   system_message="A human admin.",
   code_execution_config={"last_n_messages": 2, "work_dir": "groupchat"},
   human_input_mode="TERMINATE"
)
coder = autogen.AssistantAgent(
    name="Coder",
    system_message="You follow an approved plan. You write python/shell code to solve tasks and extract information from arxiv. Wrap the code in a code block that specifies the script type. The user can't modify your code. So do not suggest incomplete code which requires others to modify. Don't use a code block if it's not intended to be executed by the executor. Don't include multiple code blocks in one response. Do not ask others to copy and paste the result. Check the execution result returned by the executor. If the result indicates there is an error, fix the error and output the code again. Suggest the full code instead of partial code or code changes. If the error can't be fixed or if the task is not solved even after the code is executed successfully, analyze the problem, revisit your assumption, collect additional info you need, and think of a different approach to try.",
    llm_config=llm_config,
)
data_scientist = autogen.AssistantAgent(
    name="data_scientist",
    system_message="Expert in assessing Machine Learning models.",
    llm_config=llm_config,
)
planner = autogen.AssistantAgent(
    name="Planner",
    system_message='''Planner. Suggest a plan. Revise the plan based on feedback from admin, until admin approval.
The plan may involve a coder who can write code and a data_scientist who doesn't write code.
Explain the plan first. Be clear which step is performed by a coder, and which step is performed by a data_scientist.
''',
    llm_config=llm_config,
)
executor = autogen.UserProxyAgent(
   name="executor",
   system_message="Execute code produced by the coder in the groupchat folder.",
   code_execution_config={"last_n_messages": 2, "work_dir": "groupchat"}
)
groupchat = autogen.GroupChat(agents=[user_proxy, coder, data_scientist, planner, executor], messages=[], max_round=12)
manager = autogen.GroupChatManager(groupchat=groupchat, llm_config=llm_config)
Let’s initialize our group chat:
user_proxy.initiate_chat(manager, message="Find information about computer vision models on arxiv and generate a comparison tables in markdown of the three most performing models. Make sure to highlight also concrete applications in the medical industry.")Below I’ll report some of the most interesting reasoning steps:
- The first activity was performed by the Planner, that created the plan and asked human for confirmation:
Planner (to chat_manager):

Plan:

1. Data Scientist: The data scientist will start by conducting a literature review on arXiv to identify the top three performing computer vision models. They will focus on the models' performance metrics, the datasets they were trained on, and their overall effectiveness.

2. Data Scientist: After identifying the top three models, the data scientist will then research the specific applications of these models in the medical industry. They will look for case studies, research papers, and any other relevant sources that highlight how these models have been used in medical applications.

3. Coder: Once the data scientist has gathered all the necessary information, the coder will then take this information and generate a comparison table in markdown. The table will include details about each model, their performance metrics, and their applications in the medical industry.

4. Data Scientist: The data scientist will review the markdown table to ensure all the information is accurate and well-presented. They will provide feedback to the coder if any revisions are needed.

5. Coder: The coder will make any necessary revisions based on the feedback from the data scientist.

6. Data Scientist: Finally, the data scientist will approve the final version of the markdown table.

Does this plan meet your requirements?- The Coder generated the code to retrieve the required information:
Coder (to chat_manager):

Great! Let's start by searching for the top three performing computer vision models on arXiv. We will use the arXiv API to search for papers related to computer vision models. We will then parse the results to extract the relevant information. Here is the Python code to do this:

```python
import arxiv
import pandas as pd

# Search for papers related to computer vision models
search = arxiv.Search(
  query = "computer vision model",
  max_results = 100,
  sort_by = arxiv.SortCriterion.Relevance
)

# Initialize lists to store paper details
titles = []
summaries = []
authors = []
links = []

# Loop through the papers and extract details
for result in search.get():
  titles.append(result.title)
  summaries.append(result.summary)
  authors.append(result.authors)
  links.append(result.entry_id)

# Create a DataFrame from the lists
df = pd.DataFrame({
  'Title': titles,
  'Summary': summaries,
  'Authors': authors,
  'Link': links
})

# Display the DataFrame
print(df)
```- The Executor tried to run the code, but it received an error due to the lack of the arxiv package:
executor (to chat_manager):

exitcode: 1 (execution failed)
Code output:
Traceback (most recent call last):
  File "", line 1, in <module>
    import arxiv
ModuleNotFoundError: No module named 'arxiv'- The Coder received this feedback and incorporated it into its script:
Coder (to chat_manager):

It seems like the Python environment where the code is being executed does not have the 'arxiv' module installed. Unfortunately, I can't install packages in the current environment.

However, you can execute the above code in your local environment. Make sure to install the 'arxiv' module before running the code. You can install it using pip:

```shell
pip install arxiv
```

After running the code, you will get a DataFrame with the titles, summaries, authors, and links of the top 100 most relevant papers related to computer vision models. You can then manually review these papers to identify the top three performing models.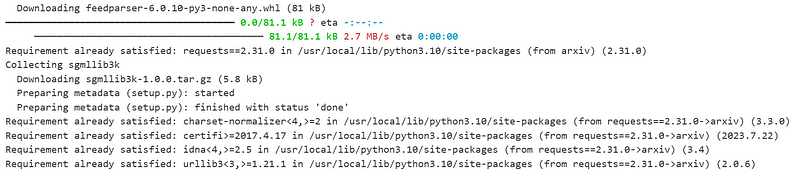
- Finally, once the package has been installed by the Executor, the final output was generated by the cooperation of the Data Scientist and the Coder:
data_scientist (to chat_manager):

Based on the revised plan, I have conducted a literature review on arXiv and identified the top three performing computer vision models. Here are the details:

1. **Model 1: EfficientNet**
   - Performance Metrics: Top-1 accuracy of 84.4% on ImageNet
   - Dataset: ImageNet
   - Medical Application: Used for detecting diseases in medical imaging. For example, it has been used for detecting COVID-19 in chest X-ray images.

2. **Model 2: YOLOv4**
   - Performance Metrics: 43.5% AP (Average Precision) on MS COCO dataset
   - Dataset: MS COCO
   - Medical Application: Used for object detection tasks in medical imaging. For example, it has been used for detecting cancer cells in histopathological images.

3. **Model 3: Mask R-CNN**
   - Performance Metrics: 39.8% AP on MS COCO dataset
   - Dataset: MS COCO
   - Medical Application: Used for instance segmentation tasks in medical imaging. For example, it has been used for segmenting different organs in CT scans.

Please note that the performance metrics are based on the results reported in the original papers and may vary when the models are trained on different datasets or under different conditions.

Now, the coder can generate a comparison table in markdown based on this information.

--------------------------------------------------------------------------------
Coder (to chat_manager):

Based on the information provided by the data scientist, here is the comparison table in markdown:

```markdown
| Model | Performance Metrics | Dataset | Medical Application |
|-------|---------------------|---------|---------------------|
| EfficientNet | Top-1 accuracy of 84.4% on ImageNet | ImageNet | Used for detecting diseases in medical imaging. For example, it has been used for detecting COVID-19 in chest X-ray images. |
| YOLOv4 | 43.5% AP (Average Precision) on MS COCO dataset | MS COCO | Used for object detection tasks in medical imaging. For example, it has been used for detecting cancer cells in histopathological images. |
| Mask R-CNN | 39.8% AP on MS COCO dataset | MS COCO | Used for instance segmentation tasks in medical imaging. For example, it has been used for segmenting different organs in CT scans. |
```

This table includes details about each model, their performance metrics, and their applications in the medical industry.
As you can see, there were several iterations among the agents, also including human feedback.
Conclusion
AutoGen is a powerful framework that paves the way towards a new approach in building LLM-powered applications. It is still at an experimental stage, yet the idea behind as well as first results are promising.
In AutoGen GitHub repository, you can already try several notebooks that address diverse scenarios, including code generation, execution and debugging, multi-agent collaboration and external tools (such as web search or Retrieval Augmented Generation from local Vector DBs). You can start experimenting on your own in an easy way, requiring only an LLM API to power your agents with.


