avatarDmitry Yarygin

Free AI web copilot to create summaries, insights and extended knowledge, download it at here

12709

Abstract

ector-class">.selenium</span> TestNG (unit testing framework): org<span class="hljs-selector-class">.testng</span> Maven SureFire (easy test plan execution): org<span class="hljs-selector-class">.apache</span><span class="hljs-selector-class">.maven</span>.plugins</pre></div><p id="e9da">A couple more things to note:</p><figure id="0579"><img src="https://cdn-images-1.readmedium.com/v2/resize:fit:800/1*rzxatEUX17cH5sFW-t0SNQ.png"><figcaption>Appearance of downloaded libraries in IDEA</figcaption></figure><ol><li>After adding those libraries make sure to press the button on the right side to download those libraries (the one with the “M” symbol). You should see it starts downloading those libraries</li><li>Make sure to check the latest versions of those libraries to avoid any problems further down the road. Here is a link to <a href="https://mvnrepository.com/artifact/org.seleniumhq.selenium/selenium-java">Maven repository</a> for Selenium. You can easily search necessary library and add the proper version to your project</li></ol><p id="39c4">We are ready to start writing the code. However, let’s first draft it out and then proceed.</p><h1 id="f2b8">Drafting up the code</h1><p id="62e4">Typically, most of the WebDriver tutorials describe the sequence of commands that we need to execute. Let’s follow this pattern for a moment and outline what actions we are performing here for our test:</p><div id="df83"><pre><span class="hljs-keyword">System</span>.setProperty(<span class="hljs-string">"webdriver.chrome.driver"</span>, <span class="hljs-string">"chromedriver"</span>);</pre></div><div id="88b1"><pre>WebDriver driver <span class="hljs-operator">=</span> new ChromeDriver()<span class="hljs-comment">;</span></pre></div><div id="914a"><pre><span class="hljs-selector-tag">driver</span><span class="hljs-selector-class">.get</span>(<span class="hljs-attribute">https</span>:<span class="hljs-comment">//formy-project.herokuapp.com/form);</span> driver.<span class="hljs-built_in">findElement</span>(By.<span class="hljs-built_in">id</span>(<span class="hljs-string">"first-name"</span>)).<span class="hljs-built_in">sendKeys</span>(<span class="hljs-string">"First Name"</span>); driver.<span class="hljs-built_in">findElement</span>(By.<span class="hljs-built_in">id</span>(<span class="hljs-string">"last-name"</span>)).<span class="hljs-built_in">sendKeys</span>(<span class="hljs-string">"Last Name"</span>); driver.<span class="hljs-built_in">findElement</span>(By.<span class="hljs-built_in">xpath</span>(<span class="hljs-string">"//a[contains(text(),'Submit')]"</span>)).<span class="hljs-built_in">click</span>(); driver.<span class="hljs-built_in">close</span>();</pre></div><p id="4998">That’s it!<i> </i>Seven lines of code to have a working solution for automating a web form. To clarify, the first line shows the location to a chromedriver (since we are executing this script on Chrome) and the second line creates an instance of WebDriver that we work with later on.</p><p id="fc33">The next lines are easy to analyze since we just load the page and performing actions with <i>locators</i>. This code will work and perform the necessary actions (except the assertion part that we discuss later on).</p><p id="6e3e">However, what is the problem with this code? The problem is that it’s nowhere near how it would be used in the real environment and the reasons for that are:</p><ol><li>It’s not reusable and brings repetitive code if we decide to use it in other places</li><li>It’s hard to maintain (imaging changing locators for each line if we call those locators multiple times)</li><li>Eventually it will be hard to read and understand once more tests are added</li></ol><p id="cfab">Let’s get back to our project and plan the project structure.</p><h1 id="e9b6">Creating the project structure</h1><p id="28a3">We are going to use a PageObject approach as a basis to design our tests. Essentially, in terms of <i>Java Classes</i> it means that we will create a class for each website page and outline locators and methods to perform actions to this class. Also, there would be one “parent” class that we will be inheriting our objects (pages) from.</p><figure id="c2aa"><img src="https://cdn-images-1.readmedium.com/v2/resize:fit:800/1*INi0_aK1P9zW6pY9QTKGlw.png"><figcaption>Project structure of Automated test</figcaption></figure><p id="934c">Additionally, we would need a class that wires up all classes together and has the variables to store our configuration settings.</p><p id="1cff">Here is how our project structure would look like:</p><div id="4903"><pre><span class="hljs-attribute">PageObject</span></pre></div><div id="06fa"><pre><span class="hljs-attribute">TestPlan</span></pre></div><div id="a833"><pre><span class="hljs-attribute">Utils</span></pre></div><div id="e954"><pre><span class="hljs-attribute">WebForm</span></pre></div><p id="29c7">Let’s go ahead and create those four classes in our project. Go ahead and open “<b>[project]\src\test\”</b> and right click on “<b>test</b>” folder. Select “<b>New -> Java Class</b>” and create those classes accordingly.</p><h1 id="6964">Writing code for Test Classes</h1><p id="c9a9">Let’s first write the code for the PageObject class. Here is how it will look like:</p><div id="44cc"><pre><span class="hljs-comment">// All Test Pages are inheriting from this class</span>

<span class="hljs-keyword">import</span> org.openqa.selenium.WebDriver; <span class="hljs-keyword">import</span> org.openqa.selenium.support.PageFactory;

<span class="hljs-keyword">public</span> <span class="hljs-keyword">class</span> <span class="hljs-title class_">PageObject</span> { <span class="hljs-keyword">protected</span> WebDriver driver;

<span class="hljs-keyword">public</span> PageObject(WebDriver driver){
    <span class="hljs-keyword">this</span>.driver = driver;
    PageFactory.initElements(driver, <span class="hljs-keyword">this</span>);
}

}</pre></div><p id="99a0">What is this code for? Well, it simplifies unnecessary code that we would have duplicated in each of our pages otherwise. We are using a <i>PageFactory</i> approach here that extends the <i>PageObject</i> model. As the name suggests, <i>Page<b>Factory</b> </i>allows us to create test pages with the same mechanism behind it. This way, we don’t need to write WebDriver initialization code for each of our pages.</p><p id="1e16">Next, we need to work on our Utils class. This is where we will add information about the parameters of our tests and “<i>helper</i>” methods to avoid a repeatable code.</p><div id="0f12"><pre><span class="hljs-comment">// Configuration class for Form Automation project</span>

<span class="hljs-keyword">public</span> <span class="hljs-title class_"><span class="hljs-keyword">class</span> <span class="hljs-title">Utils</span> </span>{ <span class="hljs-keyword">final</span> <span class="hljs-keyword">static</span> <span class="hljs-keyword">String</span> BASE_URL = <span class="hljs-string">"https://formy-project.herokuapp.com/form"</span>; <span class="hljs-keyword">final</span> <span class="hljs-keyword">static</span> <span class="hljs-keyword">String</span> CHROME_DRIVER_LOCATION = <span class="hljs-string">"chromedriver"</span>; }</pre></div><p id="f4c4">It should be easy to understand what this code does. We are simply creating two variables for us to integrate those later:</p><p id="880e"><b>BASE_URL:</b> Defines a URL that we will work on</p><p id="8c45"><b>CHROME_DRIVER_LOCATION: </b>Path to a chromedriver</p><p id="464a">Why do we need <i>chromedriver</i>? So, we already have a WebDriver, but that’s not enough for our tests to function. We also need to download a binary of chromedriver, so that our tests will work properly on a specific browser and platform.</p><figure id="576b"><img src="https://cdn-images-1.readmedium.com/v2/resize:fit:800/1*Ugj80JPoGZv3MzcWIgOkhQ.png"><figcaption>Location of WebDriver in our project</figcaption></figure><p id="4f77">In this case, it’s Chrome. Please <a href="https://chromedriver.chromium.org/downloads">download the binary</a> from the official website for your platform and place it in the location that you have specified in <b>CHROME_DRIVER_LOCATION</b>. For simplicity, in this example, I just copied it in the root project directory.</p><figure id="ebe0"><img src="https://cdn-images-1.readmedium.com/v2/resize:fit:800/1*VHqh877TsoSlgT6C7AFnRQ.png"><figcaption>Downloading a ChromeDriver from the official website</figcaption></figure><p id="2bd2"><b><i>Important:</i></b> Please make sure that your browser version and platform matches the version of the <i>chromedriver</i>. If those are mismatching then your tests will not work.</p><p id="5f6a">We are ready to work on our <b>WebForm</b> class which is going to have <i>locators</i> and <i>methods</i> for working with our specific page.</p><div id="4f00"><pre><span class="hljs-regexp">//</span> Page URL: https:<span class="hljs-regexp">//</span>formy-project.herokuapp.com/form</pre></div><div id="fa3a"><pre><span class="hljs-keyword">import</span> org.openqa.selenium.WebDriver; <span class="hljs-keyword">import</span> org.openqa.selenium.WebElement; <span class="hljs-keyword">import</span> org.openqa.selenium.support.FindBy;

<span class="hljs-keyword">public</span> <span class="hljs-keyword">class</span> <span class="hljs-title class_">WebForm</span> <span class="hljs-keyword">extends</span> <span class="hljs-title class_">PageObject</span>{

<span class="hljs-keyword">private</span> <span class="hljs-keyword">final</span> <span class="hljs-type">String</span> <span class="hljs-variable">FIRST_NAME</span> <span class="hljs-operator">=</span> <span class="hljs-string">"First Name"</span>;
<span class="hljs-keyword">private</span> <span class="hljs-keyword">final</span> <span class="hljs-type">String</span> <span class="hljs-variable">LAST_NAME</span> <span class="hljs-operator">=</span> <span class="hljs-string">"Last Name"</span>;

<span class="hljs-meta">@FindBy(id = "first-name")</span>
<span class="hljs-keyword">private</span> WebElement first_name;

<span class="hljs-meta">@FindBy(id = "last-name")</span>
<span class="hljs-keyword">private</span> WebElement last_name;

<span class="hljs-meta">@FindBy(xpath = "//a[contains(text(),'Submit')]")</span>
<span class="hljs-keyword">private</span> WebElement submit_button;

<span class="hljs-keyword">public</span> <span class="hljs-title function_">WebForm</span><span class="hljs-params">(WebDriver driver)</span> {
    <span class="hljs-built_in">super</span>(driver);
}

<span class="hljs-keyword">public</span> <span class="hljs-keyword">void</span> <span class="hljs-title function_">enterFirstName</span><span class="hljs-params">()</span>{
    <span class="hljs-built_in">this</span>.first_name.sendKeys(FIRST_NAME);
}

<span class="hljs-keyword">public</span> <span class="hljs-keyword">void</span> <span class="hljs-title function_">enterLastName</span><span class="hljs-params">()</span>{
    <span class="hljs-built_in">this</span>.last_name.sendKeys(LAST_NAME);
}

<span class="hljs-keyword">public</span> <span class="hljs-keyword">void</span> <span class="hljs-title function_">pressSubmitButton</span><span class="hljs-params">()</span>{
    <span class="hljs-built_in">this</span>.submit_button.click();
}

}</pre></div><p id="b4a7">Can you see the direction our code is going here? We are breaking up our code in multiple easily reusable blocks. The main benefit here is that our code becomes much more maintainable.</p><p id="f182">Now we have a <b>PageObject</b> skeleton, <b>Utils </b>class and locators and methods in <b>WebForm</b> class. The next step is to writing up the code to connect everything together. Let’s write our <b>TestPlan</b> class:</p><div id="369c"><pre><span class="hljs-keyword">import</span> org.<span class="hljs-property">openqa</span>.<span class="hljs-property">selenium</span>.<span class="hljs-property">WebDriver</span>; <span class="hljs-keyword">import</span> org.<span class="hljs-property">openqa</span>.<span class="hljs-property">selenium</span>.<span class="hljs-property">chrome</span>.<span class="hljs-property">ChromeDriver</span>; <span class="hljs-keyword">import</span> org.<span class="hljs-property">testng</span>.<span class="hljs-property">annotations</span>.<span class="hljs-property">AfterSuite</span>; <span class="hljs-keyword">import</span> org.<span class="hljs-property">testng</span>.<span class="hljs-property">annotations</span>.<span class="hljs-property">BeforeSuite</span>; <span class="hljs-keyword">import</sp

Options

an> org.<span class="hljs-property">testng</span>.<span class="hljs-property">annotations</span>.<span class="hljs-property">Test</span>;

<span class="hljs-keyword">public</span> <span class="hljs-keyword">class</span> <span class="hljs-title class_">TestPlan</span> { <span class="hljs-keyword">private</span> <span class="hljs-keyword">static</span> final <span class="hljs-title class_">WebDriver</span> driver = <span class="hljs-keyword">new</span> <span class="hljs-title class_">ChromeDriver</span>();

<span class="hljs-meta">@BeforeSuite</span>
<span class="hljs-keyword">public</span> <span class="hljs-keyword">static</span> <span class="hljs-built_in">void</span> <span class="hljs-title function_">main</span>(<span class="hljs-params"><span class="hljs-built_in">String</span>[] args</span>) {
    <span class="hljs-comment">// ChromeDriver location set up in Utils class</span>
        <span class="hljs-title class_">System</span>.<span class="hljs-title function_">setProperty</span>(<span class="hljs-string">"webdriver.chrome.driver"</span>, <span class="hljs-title class_">Utils</span>.<span class="hljs-property">CHROME_DRIVER_LOCATION</span>);
}

<span class="hljs-meta">@Test</span>(testName = <span class="hljs-string">"Submit a WebForm"</span>)
<span class="hljs-keyword">public</span> <span class="hljs-keyword">static</span> <span class="hljs-built_in">void</span> <span class="hljs-title function_">submitForm</span>(<span class="hljs-params"></span>){
    driver.<span class="hljs-title function_">get</span>(<span class="hljs-title class_">Utils</span>.<span class="hljs-property">BASE_URL</span>);
    <span class="hljs-title class_">WebForm</span> webForm = <span class="hljs-keyword">new</span> <span class="hljs-title class_">WebForm</span>(driver);
    webForm.<span class="hljs-title function_">enterFirstName</span>();
    webForm.<span class="hljs-title function_">enterLastName</span>();
    webForm.<span class="hljs-title function_">pressSubmitButton</span>();
}

<span class="hljs-meta">@AfterSuite</span>
<span class="hljs-keyword">public</span> <span class="hljs-keyword">static</span> <span class="hljs-built_in">void</span> <span class="hljs-title function_">cleanUp</span>(<span class="hljs-params"></span>){
    driver.<span class="hljs-title function_">manage</span>().<span class="hljs-title function_">deleteAllCookies</span>();
    driver.<span class="hljs-title function_">close</span>();
}

}</pre></div><p id="a1fc">Could you see how our code works now? Here is what we perform here:</p><ol><li>We are creating a new <b>ChromeDriver</b> instance to use in multiple methods</li><li>We are setting up the <i>chromedriver</i> property to set up the chromedriver location</li><li>We are using <b>BeforeSuite</b>, <b>AfterSuite</b>, and <b>Test</b> annotations to structure our tests. Those are annotations of the TestNG framework and allow us to mark each test as a set of executable blocks</li><li>We are creating a new method to perform a code submission in ”<b>submitForm()</b>” method</li><li>Afterward, we are loading a URL specified in <b>Utils.BASE_URL </b>which is our configuration class. If we decide to change a URL, we can just modify it there and it will be applied to our tests</li><li>Next, we create an instance of <b>WebForm</b> class. This is where we perform methods with our WebForm as we outlined in the class itself. If needed, you can scroll up and see those methods described there. Now it looks like a defined set of instructions that is easy to modify if necessary</li><li>After we are done with everything, we clear the cookies and close the instance of the <b>driver</b>. That’s it, our test is ready</li></ol><figure id="75e3"><img src="https://cdn-images-1.readmedium.com/v2/resize:fit:800/1*MDwfCeTOkA4MzCAgxrujgQ.png"><figcaption>The core of our test</figcaption></figure><p id="f33e">Here comes the most interesting part: executing our test. Hover over the green “play” button on the left and press “<b>Run Test</b>”. This button allows executing individual tests marked with a “<b>Test</b>” annotation.</p><p id="6b0f">The Chrome browser should start and perform our test. After it finished, we should see a result at the bottom left:</p><figure id="8efd"><img src="https://cdn-images-1.readmedium.com/v2/resize:fit:800/1*ZQ6zvmc8zD-pyjNLNkMSMQ.png"><figcaption>Test Execution results from TestNG module</figcaption></figure><p id="c3ab">As we can see here it shows that those tests have passed and execution time on the right side. We have made our test code easier now, but we should also discuss a couple more things: <i>Locators</i> and <i>Test</i> <i>Validation</i>.</p><h1 id="29f9">Web page Locators</h1><p id="f7fd">We are using three locators in our application. Those are specified in <b>WebForm</b> class since it belongs to this page:</p><div id="d4e7"><pre><span class="hljs-regexp">//</span> Page URL: https:<span class="hljs-regexp">//</span>formy-project.herokuapp.com/form</pre></div><div id="1ce0"><pre><span class="hljs-variable">@FindBy</span>(id = <span class="hljs-string">"first-name"</span>)

<span class="hljs-variable">@FindBy</span>(id = <span class="hljs-string">"last-name"</span>)

<span class="hljs-variable">@FindBy</span>(xpath = <span class="hljs-string">"//a[contains(text(),'Submit')]"</span>)</pre></div><p id="0f5a">As we discussed earlier, we are using <b>ID</b> and <b>Xpath</b> types of locators here. ID is a more preferable way of identifying the elements on the HTML page, but IDs are not always assigned to objects and in those cases, we need to be more creative in terms of locating the element. Let’s talk about locating an element for a “First Name” field.</p><p id="e05d">We should go to <a href="https://formy-project.herokuapp.com/form">this</a> URL in Chrome, right-click and select the “Inspect” option to see this dialog at the bottom.</p><figure id="29e2"><img src="https://cdn-images-1.readmedium.com/v2/resize:fit:800/1*3214tWEy4vtTOBDbYLZnXA.png"><figcaption>Inspecting an element in Chrome</figcaption></figure><p id="5e7d">We can see that this field will be highlighted with a “first-name” specified as an ID locator. This way, we can identify our <i>unique element name</i>.</p><p id="7e38">As you can also see, if you right-click on this field you will have a “Copy” option there which has another locator available which is “<b>XPath</b>”. You can use either absolute (full) or relative XPath. If you take a look at it, the full XPath for a “first name” field will look like this:</p><div id="383a"><pre>/<span class="hljs-selector-tag">html</span>/<span class="hljs-selector-tag">body</span>/<span class="hljs-selector-tag">div</span>/<span class="hljs-selector-tag">form</span>/<span class="hljs-selector-tag">div</span>/<span class="hljs-selector-tag">div</span><span class="hljs-selector-attr">[1]</span>/<span class="hljs-selector-tag">input</span></pre></div><p id="adae">As you can see, it indicated the full path to an element in the HTML markup structure. The main problem with using the full XPath is that if something changes on that page (e.g button is shifted to another place) our code will not operate anymore.</p><p id="ea54">That’s why for our “<b>Submit</b>” button automation case we are using relative XPath structure:</p><div id="8498"><pre>//<span class="hljs-keyword">a</span>[<span class="hljs-keyword">contains</span>(<span class="hljs-keyword">text</span>(),<span class="hljs-string">'Submit'</span>)]</pre></div><figure id="f8b5"><img src="https://cdn-images-1.readmedium.com/v2/resize:fit:800/1*Wr07CjopyQ83rwVPgfxzkA.png"><figcaption>Selenium IDE tool to record/playback test scenarios</figcaption></figure><p id="199b">In this scenario, we only rely on the identifier text which is “Submit”. It still might stop working in case the button get renamed, but at least there is a bit less room for an error.</p><p id="7ad9">Ideally, it should be something unique that never or rarely changes. You don’t want to be re-write your test code every week, right?</p><p id="5599">Here is one more tool for you to explore which is called <a href="https://www.selenium.dev/selenium-ide/"><b>Selenium IDE</b></a>. It’s a Chrome browser extension. It allows you to “record” your interactions with any website and then play it back easily. It also shows any locators it used and you can adjust it accordingly.</p><p id="757a">You can also export those Selenium IDE actions to actual code. The only problem is that it will not be very maintainable, so it’s mainly useful for drafting up your tests.</p><h1 id="2ffe">Test Validation</h1><p id="97a6">We have our tests executing and everything passes. Is our goal achieved? It depends on the goal, of course. If our job was to only verify that buttons appear and we can click on those — then we achieved this goal.</p><p id="4882">However, what if we also want to make sure that the <b>success</b> <b>message</b> is displayed. How we handle the scenario, then?</p><p id="bfd9">Let’s open our WebForm class and add a new locator there and a variable to store it:</p><div id="4541"><pre><span class="hljs-meta">@FindBy(xpath = "//div[contains(text(),'The form was successfully submitted!')]")</span> <span class="hljs-keyword">private</span> WebElement alertSuccess;</pre></div><p id="14dd">Great, we are checking if such text exists our page is loaded. Next, let’s add a corresponding method in the same class, like we did before:</p><div id="8ac5"><pre><span class="hljs-function"><span class="hljs-keyword">public</span> <span class="hljs-keyword">void</span> <span class="hljs-title">verifyAlertSuccess</span>()</span>{ <span class="hljs-keyword">this</span>.alertSuccess.isDisplayed(); }</pre></div><p id="7b92">We have all the verification logic in place now and we are ready to use this method in our TestPlan class, so our<i> final test</i> will look like this now:</p><div id="0e6a"><pre>@Test(testName = <span class="hljs-string">"Submit a WebForm"</span>) <span class="hljs-function"><span class="hljs-keyword">public</span> <span class="hljs-keyword">static</span> <span class="hljs-keyword">void</span> <span class="hljs-title">submitForm</span>()</span>{ driver.<span class="hljs-keyword">get</span>(Utils.BASE_URL); WebForm webForm = <span class="hljs-keyword">new</span> WebForm(driver); webForm.enterFirstName(); webForm.enterLastName(); webForm.pressSubmitButton(); driver.manage().timeouts().implicitlyWait(<span class="hljs-number">5</span>, TimeUnit.SECONDS); webForm.verifyAlertSuccess(); }</pre></div><p id="3b06">As you can see, nothing complicated there. I should clarify the timeouts() method that we are using here. Timeouts are necessary part of the test automation. There are multiple timeout methods available, but in this case we are using a simple <b>ImplicitWait</b> approach. It allows us to wait a specified amount of time before our test “gives up” waiting for an element to appear.</p><figure id="c60c"><img src="https://cdn-images-1.readmedium.com/v2/resize:fit:800/1*XiDcphfp6TBH0xrBhi2UFg.png"><figcaption>Our WebForm test passed</figcaption></figure><p id="f351">We can press the green “<i>play</i>” button again and our test will run once again. This time, it will also check that the specified message appeared. If some other message appears then the test will fail.</p><h1 id="893e">Conclusion</h1><p id="bdf1">I hope that this article was useful for you and you have discovered the basics of <b>WebDriver</b> + <b>ChromeDriver</b> testing. We also talked about the importance of using a <i>PageObject/PageFactory</i> model to build complex test solutions.</p><p id="1ac5">We will be discussing more topics in the future, such as:</p><ol><li>Parametrizing our tests. Sometimes we need to set specific parameters for our tests depending on the requirements. That’s where parametrization comes handy</li><li>Using <a href="https://maven.apache.org/surefire/maven-surefire-plugin/">Maven SureFire</a> for setting up our test execution sequence through XML</li><li>Taking screenshots of failed test scenarios. It’s always a good idea to have evidence of failed tests to know the point when those fail. Screenshots give us immediate visual feedback on what has happened</li><li>Using report creation tools such as <a href="http://allure.qatools.ru/">Allure</a> to generate meaningful reports</li><li>Learning more about TestNG assertions. Assertions are a powerful Unit-testing tool that QA Engineers should be able to use</li></ol><p id="205a">Thank you for reading and stay tuned for more Web-testing related articles. Happy testing!</p></article></body>

IntelliJ IDEA: Selenium WebDriver automated web tests with Page Objects in 15 minutes

Photo by Christopher Gower on Unsplash

When I was starting out as a Test Engineer I was overwhelmed with the amount of terminology that you are getting exposed to as a beginner.

Initially, it all seems fun, but once you are getting to the automation part this is where the things might get “scary”. At some point, you even feel like “Is it for me? Can I handle all that?”. Those worries go away with confidence once you start passionately working on your code and see it performing the “fun” stuff.

Many resources sell courses that cost a considerable amount of hard-earned cash. I have nothing against those courses, but in reality, everything is available free or almost free online.

The main problem is to get started quickly without going too much into the details (to avoid losing motivation) and have it all as a single article so that it is easy to digest. Also, it’s a good idea to show how to create test cases as a maintainable structure rather than just a sequence of commands.

For the purpose of this article the environment that we are going to use will be:

IDE: IntelliJ IDEA
Programming language: Java
Browser and OS: Chrome on Mac
Automation Tool: WebDriver + chromedriver

This article has you covered for all those points. Basic knowledge of Java and OOP concepts would be helpful to understand the logic of our tests.

There is also a video tutorial available that you can follow along with this article.

Shall we start?

The Basics

Selenium WebDriver is a tool to automate the execution of manual Web-Browser workflows. It might be either a simple form that you are tired of filling out multiple times or a complex system that verifies hundreds of Web pages.

The idea here is that we are loading a specific webpage(s), performing actions with it, and comparing if results were those that we expected or not. Of course, there are some variations in terms of setting up the environment depending on which platform do we use (e.g Windows, Mac, or Linux).

The typical syntax looks like this:

Getting a URL: driver.get(“[website url]”)
Finding an element: driver.findElement(By.id(“login”))
Sending a key: [element].sendKeys(“[Keys to send]”)
Performing a click: [element].click()

Our plan of action on a webpage comes down to this scenario most of the time:

  1. Load a webpage (specific section of the website)
  2. Find an element that we want to perform an action on. There are multiple ways to identify an element on a webpage. Those element identifiers are called “locators”. We are going to be examining “XPath” and “id” locators in this article
  3. Perform an action with it. Most of the time it involves sending a specific key sequence and/or clicking the element
  4. Validate the state. This is where the power of Unit-testing frameworks (e.g TestNG, JUnit) comes handy. We are making sure that the actual result matches the expected result

Our project for Test Automation
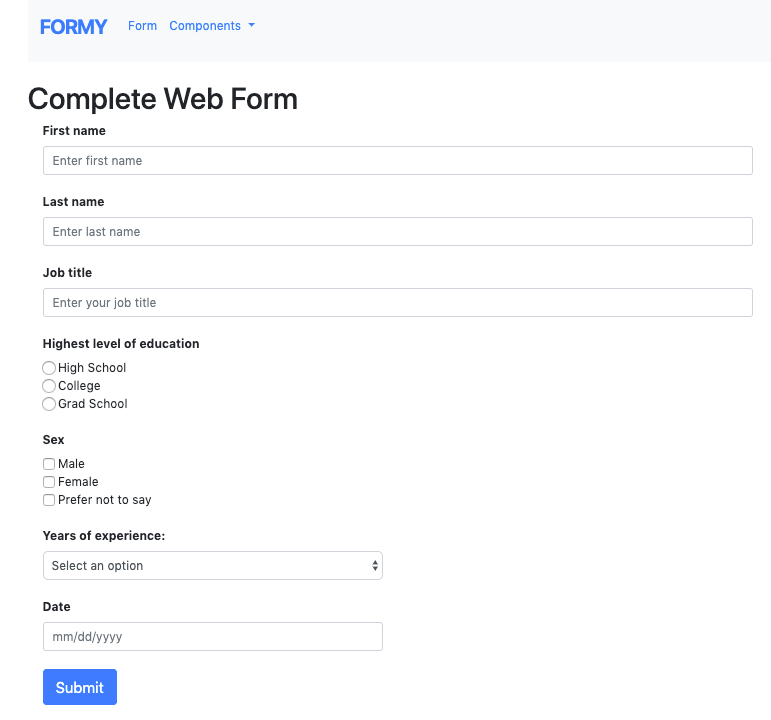
Automating Web Form from formy-project.herokuapp.com/form

We will be automating a simple Web form by typing first and last name and clicking the submit button.

The outlined script would look like this:

  1. Type username
  2. Type password
  3. Press a “Submit” button
  4. Verify that the form was successfully submitting by validating the confirmation message

Setting up the project

Everything seems to be clear so far? Alright, then let’s set up the project and our environment.

First, we need to download and install IntelliJ IDEA. You can download it from here. Follow the installation instructions depending on your platform, it should be easy to install. You might also need to update your Java to the latest version.

Once we have it all installed on our local system, let’s open up the application and create a new project.

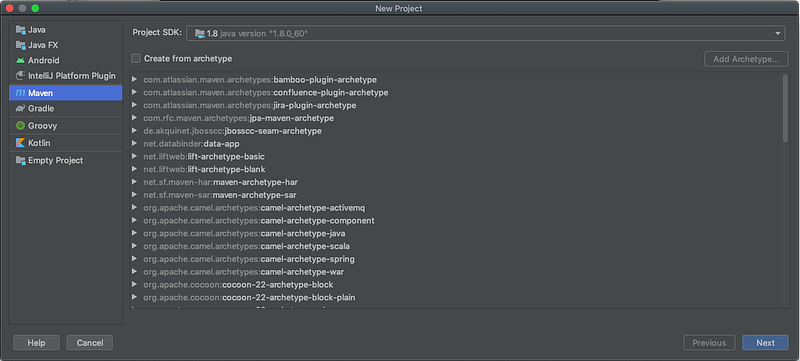
  1. Press “Create a new project
  2. Select “Maven” on the left side and press “Next
Choosing “Maven” during the IntelliJ IDEA project creation

3. Pick any name for the project (e.g “Form Automation”) and press “Finish” to create this project

And after a few moments, we should have a template that we can work with. You might have a question about Maven

Maven is a build automation tool, used primarily for Java projects. We will be using it to add additional libraries to our project
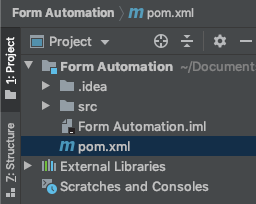
Location of pom.xml file in our project structure

After we create our project and open pom.xml file it will look similar to this:

<?xml version="1.0" encoding="UTF-8"?>
<project xmlns="http://maven.apache.org/POM/4.0.0"
         xmlns:xsi="http://www.w3.org/2001/XMLSchema-instance"
         xsi:schemaLocation="http://maven.apache.org/POM/4.0.0 http://maven.apache.org/xsd/maven-4.0.0.xsd">
    <modelVersion>4.0.0</modelVersion>

    <groupId>org.example</groupId>
    <artifactId>Form Automation</artifactId>
    <version>1.0-SNAPSHOT</version>
</project>

Now we can use this file to add additional libraries that we can use to automate our application.

Here are the lines (highlighted in bold) that we should add to our project, so we are able to automate our Web application:

<?xml version="1.0" encoding="UTF-8"?>
<project xmlns="http://maven.apache.org/POM/4.0.0"
         xmlns:xsi="http://www.w3.org/2001/XMLSchema-instance"
         xsi:schemaLocation="http://maven.apache.org/POM/4.0.0 http://maven.apache.org/xsd/maven-4.0.0.xsd">
    <modelVersion>4.0.0</modelVersion>
    <groupId>org.nomadicdmitry</groupId>
    <artifactId>Form Automation</artifactId>
    <version>1.0-SNAPSHOT</version>
    <dependencies>
        <dependency>
        <groupId>org.seleniumhq.selenium</groupId>
        <artifactId>selenium-server</artifactId>
        <version>3.141.59</version>
    </dependency>
    <dependency>
        <groupId>org.testng</groupId>
        <artifactId>testng</artifactId>
        <version>7.1.0</version>
        <scope>test</scope>
    </dependency>
    <dependency>
        <groupId>org.apache.maven.plugins</groupId>
        <artifactId>maven-surefire-plugin</artifactId>
        <version>3.0.0-M4</version>
    </dependency>
    </dependencies>
</project>

Once we add those lines, we have almost all necessary libraries that we will use in our project. To be specific:

Selenium Webdriver: org.seleniumhq.selenium
TestNG (unit testing framework): org.testng
Maven SureFire (easy test plan execution): org.apache.maven.plugins

A couple more things to note:
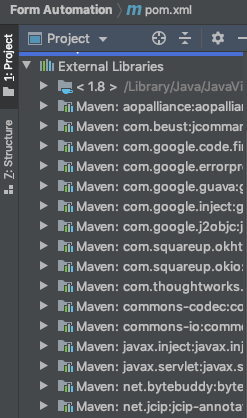
Appearance of downloaded libraries in IDEA
  1. After adding those libraries make sure to press the button on the right side to download those libraries (the one with the “M” symbol). You should see it starts downloading those libraries
  2. Make sure to check the latest versions of those libraries to avoid any problems further down the road. Here is a link to Maven repository for Selenium. You can easily search necessary library and add the proper version to your project

We are ready to start writing the code. However, let’s first draft it out and then proceed.

Drafting up the code

Typically, most of the WebDriver tutorials describe the sequence of commands that we need to execute. Let’s follow this pattern for a moment and outline what actions we are performing here for our test:

System.setProperty("webdriver.chrome.driver", "chromedriver");
WebDriver driver = new ChromeDriver();
driver.get(https://formy-project.herokuapp.com/form);
driver.findElement(By.id("first-name")).sendKeys("First Name");
driver.findElement(By.id("last-name")).sendKeys("Last Name");
driver.findElement(By.xpath("//a[contains(text(),'Submit')]")).click();
driver.close();

That’s it! Seven lines of code to have a working solution for automating a web form. To clarify, the first line shows the location to a chromedriver (since we are executing this script on Chrome) and the second line creates an instance of WebDriver that we work with later on.

The next lines are easy to analyze since we just load the page and performing actions with locators. This code will work and perform the necessary actions (except the assertion part that we discuss later on).

However, what is the problem with this code? The problem is that it’s nowhere near how it would be used in the real environment and the reasons for that are:

  1. It’s not reusable and brings repetitive code if we decide to use it in other places
  2. It’s hard to maintain (imaging changing locators for each line if we call those locators multiple times)
  3. Eventually it will be hard to read and understand once more tests are added

Let’s get back to our project and plan the project structure.

Creating the project structure

We are going to use a PageObject approach as a basis to design our tests. Essentially, in terms of Java Classes it means that we will create a class for each website page and outline locators and methods to perform actions to this class. Also, there would be one “parent” class that we will be inheriting our objects (pages) from.
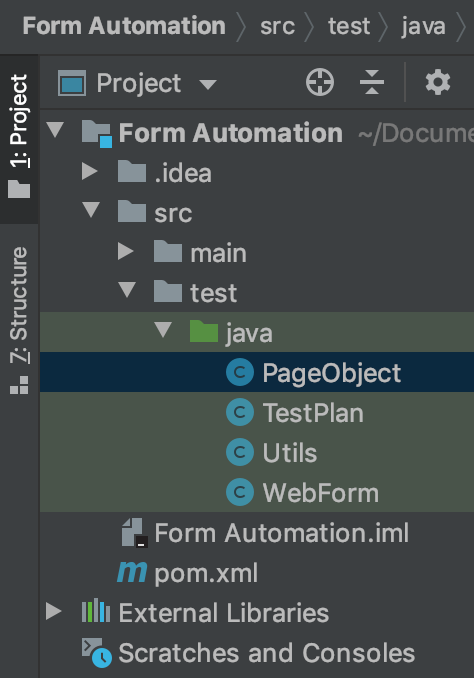
Project structure of Automated test

Additionally, we would need a class that wires up all classes together and has the variables to store our configuration settings.

Here is how our project structure would look like:

PageObject
TestPlan
Utils
WebForm

Let’s go ahead and create those four classes in our project. Go ahead and open “[project]\src\test\” and right click on “test” folder. Select “New -> Java Class” and create those classes accordingly.

Writing code for Test Classes

Let’s first write the code for the PageObject class. Here is how it will look like:

// All Test Pages are inheriting from this class

import org.openqa.selenium.WebDriver;
import org.openqa.selenium.support.PageFactory;

public class PageObject {
    protected WebDriver driver;

    public PageObject(WebDriver driver){
        this.driver = driver;
        PageFactory.initElements(driver, this);
    }
}

What is this code for? Well, it simplifies unnecessary code that we would have duplicated in each of our pages otherwise. We are using a PageFactory approach here that extends the PageObject model. As the name suggests, PageFactory allows us to create test pages with the same mechanism behind it. This way, we don’t need to write WebDriver initialization code for each of our pages.

Next, we need to work on our Utils class. This is where we will add information about the parameters of our tests and “helper” methods to avoid a repeatable code.

// Configuration class for Form Automation project

public class Utils {
    final static String BASE_URL = "https://formy-project.herokuapp.com/form";
    final static String CHROME_DRIVER_LOCATION = "chromedriver";
}

It should be easy to understand what this code does. We are simply creating two variables for us to integrate those later:

BASE_URL: Defines a URL that we will work on

CHROME_DRIVER_LOCATION: Path to a chromedriver

Why do we need chromedriver? So, we already have a WebDriver, but that’s not enough for our tests to function. We also need to download a binary of chromedriver, so that our tests will work properly on a specific browser and platform.
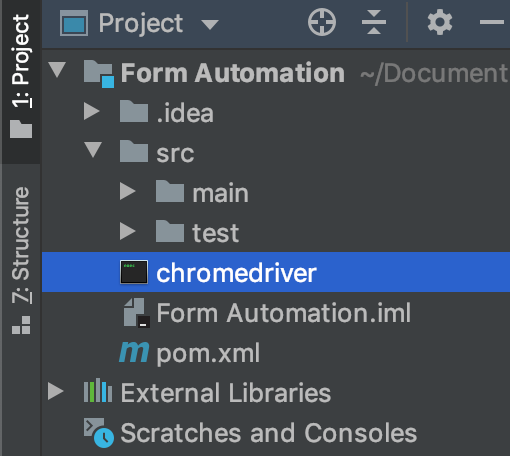
Location of WebDriver in our project

In this case, it’s Chrome. Please download the binary from the official website for your platform and place it in the location that you have specified in CHROME_DRIVER_LOCATION. For simplicity, in this example, I just copied it in the root project directory.
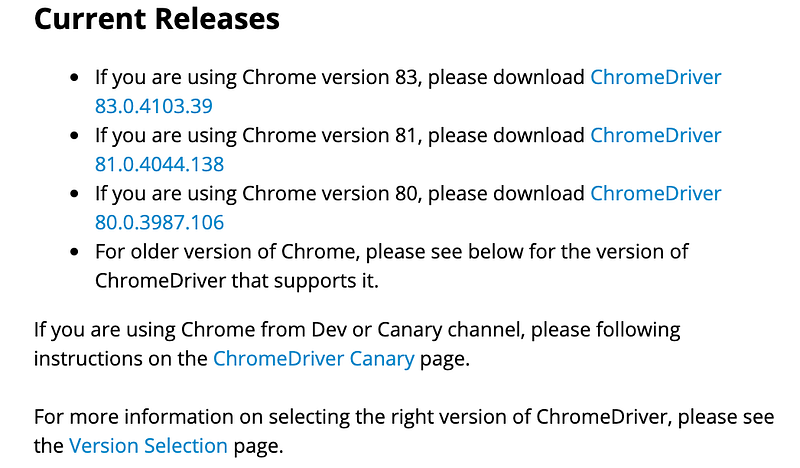
Downloading a ChromeDriver from the official website

Important: Please make sure that your browser version and platform matches the version of the chromedriver. If those are mismatching then your tests will not work.

We are ready to work on our WebForm class which is going to have locators and methods for working with our specific page.

// Page URL: https://formy-project.herokuapp.com/form
import org.openqa.selenium.WebDriver;
import org.openqa.selenium.WebElement;
import org.openqa.selenium.support.FindBy;

public class WebForm extends PageObject{

    private final String FIRST_NAME = "First Name";
    private final String LAST_NAME = "Last Name";

    @FindBy(id = "first-name")
    private WebElement first_name;

    @FindBy(id = "last-name")
    private WebElement last_name;

    @FindBy(xpath = "//a[contains(text(),'Submit')]")
    private WebElement submit_button;

    public WebForm(WebDriver driver) {
        super(driver);
    }

    public void enterFirstName(){
        this.first_name.sendKeys(FIRST_NAME);
    }

    public void enterLastName(){
        this.last_name.sendKeys(LAST_NAME);
    }

    public void pressSubmitButton(){
        this.submit_button.click();
    }
}

Can you see the direction our code is going here? We are breaking up our code in multiple easily reusable blocks. The main benefit here is that our code becomes much more maintainable.

Now we have a PageObject skeleton, Utils class and locators and methods in WebForm class. The next step is to writing up the code to connect everything together. Let’s write our TestPlan class:

import org.openqa.selenium.WebDriver;
import org.openqa.selenium.chrome.ChromeDriver;
import org.testng.annotations.AfterSuite;
import org.testng.annotations.BeforeSuite;
import org.testng.annotations.Test;

public class TestPlan {
    private static final WebDriver driver = new ChromeDriver();

    @BeforeSuite
    public static void main(String[] args) {
        // ChromeDriver location set up in Utils class
            System.setProperty("webdriver.chrome.driver", Utils.CHROME_DRIVER_LOCATION);
    }

    @Test(testName = "Submit a WebForm")
    public static void submitForm(){
        driver.get(Utils.BASE_URL);
        WebForm webForm = new WebForm(driver);
        webForm.enterFirstName();
        webForm.enterLastName();
        webForm.pressSubmitButton();
    }

    @AfterSuite
    public static void cleanUp(){
        driver.manage().deleteAllCookies();
        driver.close();
    }
}

Could you see how our code works now? Here is what we perform here:

  1. We are creating a new ChromeDriver instance to use in multiple methods
  2. We are setting up the chromedriver property to set up the chromedriver location
  3. We are using BeforeSuite, AfterSuite, and Test annotations to structure our tests. Those are annotations of the TestNG framework and allow us to mark each test as a set of executable blocks
  4. We are creating a new method to perform a code submission in ”submitForm()” method
  5. Afterward, we are loading a URL specified in Utils.BASE_URL which is our configuration class. If we decide to change a URL, we can just modify it there and it will be applied to our tests
  6. Next, we create an instance of WebForm class. This is where we perform methods with our WebForm as we outlined in the class itself. If needed, you can scroll up and see those methods described there. Now it looks like a defined set of instructions that is easy to modify if necessary
  7. After we are done with everything, we clear the cookies and close the instance of the driver. That’s it, our test is ready
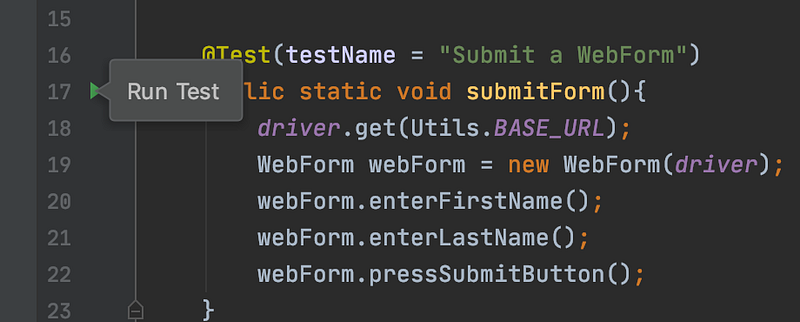
The core of our test

Here comes the most interesting part: executing our test. Hover over the green “play” button on the left and press “Run Test”. This button allows executing individual tests marked with a “Test” annotation.

The Chrome browser should start and perform our test. After it finished, we should see a result at the bottom left:

Test Execution results from TestNG module

As we can see here it shows that those tests have passed and execution time on the right side. We have made our test code easier now, but we should also discuss a couple more things: Locators and Test Validation.

Web page Locators

We are using three locators in our application. Those are specified in WebForm class since it belongs to this page:

// Page URL: https://formy-project.herokuapp.com/form
@FindBy(id = "first-name")

@FindBy(id = "last-name")

@FindBy(xpath = "//a[contains(text(),'Submit')]")

As we discussed earlier, we are using ID and Xpath types of locators here. ID is a more preferable way of identifying the elements on the HTML page, but IDs are not always assigned to objects and in those cases, we need to be more creative in terms of locating the element. Let’s talk about locating an element for a “First Name” field.

We should go to this URL in Chrome, right-click and select the “Inspect” option to see this dialog at the bottom.
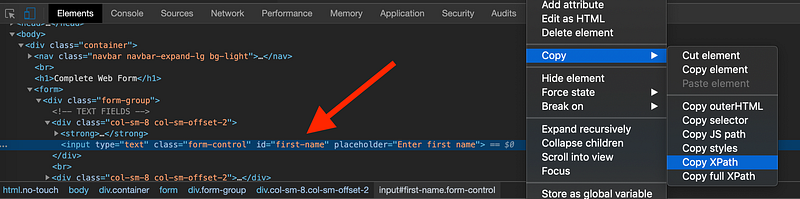
Inspecting an element in Chrome

We can see that this field will be highlighted with a “first-name” specified as an ID locator. This way, we can identify our unique element name.

As you can also see, if you right-click on this field you will have a “Copy” option there which has another locator available which is “XPath”. You can use either absolute (full) or relative XPath. If you take a look at it, the full XPath for a “first name” field will look like this:

/html/body/div/form/div/div[1]/input

As you can see, it indicated the full path to an element in the HTML markup structure. The main problem with using the full XPath is that if something changes on that page (e.g button is shifted to another place) our code will not operate anymore.

That’s why for our “Submit” button automation case we are using relative XPath structure:

//a[contains(text(),'Submit')]
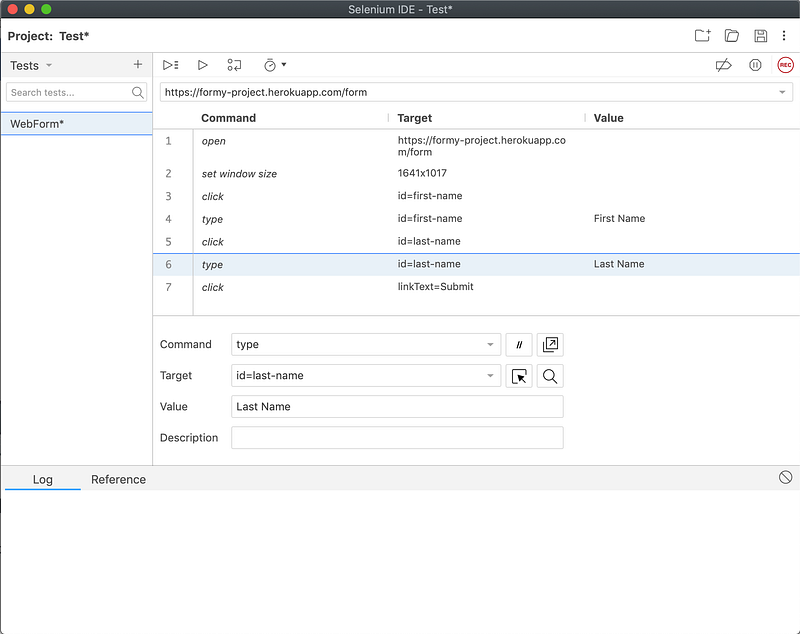
Selenium IDE tool to record/playback test scenarios

In this scenario, we only rely on the identifier text which is “Submit”. It still might stop working in case the button get renamed, but at least there is a bit less room for an error.

Ideally, it should be something unique that never or rarely changes. You don’t want to be re-write your test code every week, right?

Here is one more tool for you to explore which is called Selenium IDE. It’s a Chrome browser extension. It allows you to “record” your interactions with any website and then play it back easily. It also shows any locators it used and you can adjust it accordingly.

You can also export those Selenium IDE actions to actual code. The only problem is that it will not be very maintainable, so it’s mainly useful for drafting up your tests.

Test Validation

We have our tests executing and everything passes. Is our goal achieved? It depends on the goal, of course. If our job was to only verify that buttons appear and we can click on those — then we achieved this goal.

However, what if we also want to make sure that the success message is displayed. How we handle the scenario, then?

Let’s open our WebForm class and add a new locator there and a variable to store it:

@FindBy(xpath = "//div[contains(text(),'The form was successfully submitted!')]")
private WebElement alertSuccess;

Great, we are checking if such text exists our page is loaded. Next, let’s add a corresponding method in the same class, like we did before:

public void verifyAlertSuccess(){
    this.alertSuccess.isDisplayed();
}

We have all the verification logic in place now and we are ready to use this method in our TestPlan class, so our final test will look like this now:

@Test(testName = "Submit a WebForm")
public static void submitForm(){
    driver.get(Utils.BASE_URL);
    WebForm webForm = new WebForm(driver);
    webForm.enterFirstName();
    webForm.enterLastName();
    webForm.pressSubmitButton();
    driver.manage().timeouts().implicitlyWait(5, TimeUnit.SECONDS);
    webForm.verifyAlertSuccess();
}

As you can see, nothing complicated there. I should clarify the timeouts() method that we are using here. Timeouts are necessary part of the test automation. There are multiple timeout methods available, but in this case we are using a simple ImplicitWait approach. It allows us to wait a specified amount of time before our test “gives up” waiting for an element to appear.
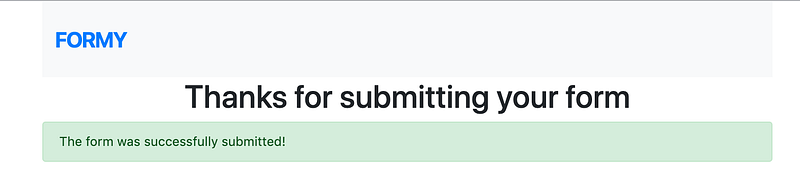
Our WebForm test passed

We can press the green “play” button again and our test will run once again. This time, it will also check that the specified message appeared. If some other message appears then the test will fail.

Conclusion

I hope that this article was useful for you and you have discovered the basics of WebDriver + ChromeDriver testing. We also talked about the importance of using a PageObject/PageFactory model to build complex test solutions.

We will be discussing more topics in the future, such as:

  1. Parametrizing our tests. Sometimes we need to set specific parameters for our tests depending on the requirements. That’s where parametrization comes handy
  2. Using Maven SureFire for setting up our test execution sequence through XML
  3. Taking screenshots of failed test scenarios. It’s always a good idea to have evidence of failed tests to know the point when those fail. Screenshots give us immediate visual feedback on what has happened
  4. Using report creation tools such as Allure to generate meaningful reports
  5. Learning more about TestNG assertions. Assertions are a powerful Unit-testing tool that QA Engineers should be able to use

Thank you for reading and stay tuned for more Web-testing related articles. Happy testing!

Web Development
Test Automation
Programming
Testing
Software Development
Recommended from ReadMedium