
Integrating Keycloak with Spring Boot 3: Authentication and Authorization using OAuth2.0 & OpenID Connect
In this tutorial, I will cover Identity Providers (IDPs) such as Keycloak, explain OAuth 2.0 and OpenID Connect, and demonstrate how to integrate these technologies with a Spring Boot application. We’ll explore the processes of authentication and authorization, learn how to generate access tokens, and understand how to pass these tokens to access protected resources.
✅ What is an Identity Provider (IDP)?
An Identity Provider (IDP) is a service that manages and authenticates users, and provides them with access to various applications or services. It acts as a centralized authority that verifies users’ identities and provides them with the necessary credentials to access resources.
Key Functions of an IDP:
- User Authentication: Validates the identity of users trying to access applications or services. This process typically involves checking user credentials (such as username and password) against a database.
- Single Sign-On (SSO): Allows users to log in once and gain access to multiple applications or services without needing to log in separately to each one. This improves user convenience and security.
- User Management: Provides features for managing user accounts, including registration, password resets, and profile updates.
- Access Control: Defines and enforces access permissions and roles for different users, ensuring they can only access resources they are authorized to use.
👁️Popular IDPs:
Keycloak, Okta, Azure Active Directory (AAD), Amazon Cognito etc.. We will use Keyclock IDP in this tutorial.
Before we proceed further, it’s important to grasp the concepts of OAuth 2.0 and OpenID Connect, as they are fundamental for integrating Keycloak with a Spring Boot application.
✅ OAuth 2.0
OAuth 2.0 is an authorization framework that allows third-party applications to obtain limited access to a user’s resources without exposing credentials.
Key Concepts: ✔ Resource Owner: The user who owns the data. ✔ Client: The application requesting access to the user’s resources. ✔ Authorization Server: The server that issues tokens after authenticating the user. ✔ Resource Server: The server that hosts the user’s resources and validates access tokens to grant or deny access.
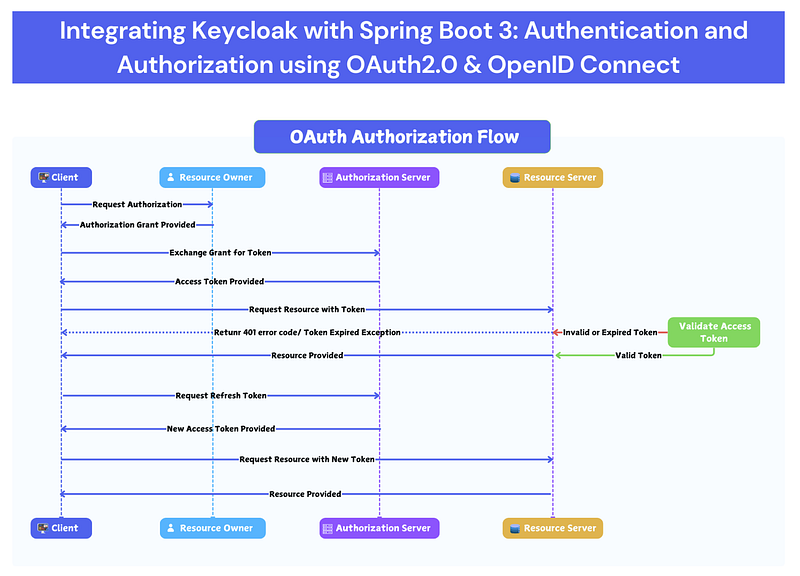
✅ OAuth2 Flows
- Authorization Request: The client application redirects the user (Resource Owner) to the authorization server with a request to grant access.
- User Consent: The user logs in to the authorization server and consents to provide access to their resources.
- Authorization Code: After consent, the authorization server redirects the user back to the client application with an authorization code.
- Token Exchange: The client application exchanges the authorization code for an access token and optionally a refresh token.
- Resource Access: The client application uses the access token to request resources from the resource server.
OAuth2 is not designed to manage user authentication directly, which is where OpenID Connect comes in.
✅ OpenID Connect (OIDC)
OIDC is an authentication layer built on top of OAuth 2.0. It adds identity verification to the process.
- Authentication Request: The client application redirects the user to the authorization server, now requesting authentication in addition to authorization. This request includes an additional
scopeparameter (openid). - ID Token: Along with the authorization code, the authorization server provides an ID token, which contains information about the user (e.g., their identity).
- UserInfo Endpoint: The client application can use the access token to request additional user information from the UserInfo endpoint.
Let’s simplify the explanation by using a real-world example to illustrate how OAuth2 and OpenID Connect work together.
Imagine you’re building a web application that allows users to manage their photos stored in a cloud service:
- OAuth2 Authorization:
- Your web app (the client) wants to access a user’s photos stored on a cloud service (the resource server).
- The cloud service uses OAuth2 to let your app request an access token from its authorization server.
- Once your app gets the access token, it can use it to request photos from the cloud service, without ever knowing the user’s password.
2. OpenID Connect Authentication:
- Your web app also needs to authenticate the user to display their profile and personalized settings.
- By using OpenID Connect, after the user logs in, your app gets an ID token from the authorization server that includes information like the user’s name and email.
- Your app can now securely identify the user and personalize their experience.
In essence, OAuth2 is about granting access to resources, while OpenID Connect is about verifying the user’s identity. Together, they provide a comprehensive solution for secure authentication and authorization.
I believe you will have enough understanding to start the implementation now.
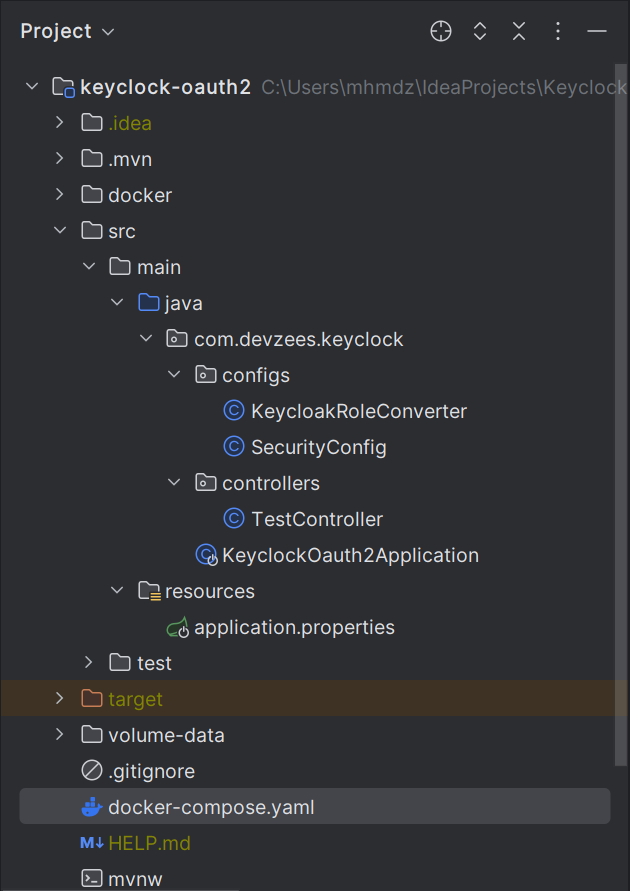
✅ Project Structure
✅ Maven Dependencies Required in POM
<dependency>
    <groupId>org.springframework.boot</groupId>
    <artifactId>spring-boot-starter-web</artifactId>
</dependency>
<dependency>
    <groupId>org.springframework.boot</groupId>
    <artifactId>spring-boot-starter-security</artifactId>
</dependency>
<!-- OAuth2 Resource Server -->
<dependency>
    <groupId>org.springframework.boot</groupId>
    <artifactId>spring-boot-starter-oauth2-resource-server</artifactId>
</dependency>
<dependency>
    <groupId>org.projectlombok</groupId>
    <artifactId>lombok</artifactId>
    <optional>true</optional>
</dependency>
✅ Create docker-compose.yaml in root directory of your project as below:
version: '3.8'
services:
  keycloak-mysql:
    container_name: keycloak-mysql-container
    image: mysql:latest
    volumes:
      - ./volume-data/mysql_keycloak_data:/var/lib/mysql
    environment:
      MYSQL_ROOT_PASSWORD: root
      MYSQL_DATABASE: keycloak
      MYSQL_USER: keycloak
      MYSQL_PASSWORD: password
  keycloak:
    container_name: keycloak-container
    image: quay.io/keycloak/keycloak:24.0.1
    command: [ "start-dev", "--import-realm" ]
    environment:
      DB_VENDOR: MYSQL
      DB_ADDR: keycloak-mysql
      DB_DATABASE: keycloak
      DB_USER: keycloak
      DB_PASSWORD: password
      KEYCLOAK_ADMIN: admin
      KEYCLOAK_ADMIN_PASSWORD: admin
    ports:
      - "8181:8080"
    volumes:
      - ./docker/keycloak/realms/:/opt/keycloak/data/import/
    depends_on:
      - keycloak-mysql
Let’s understand the docker-compose file set up.
This docker-compose file is used to set up a Keycloak instance along with a MySQL database in Docker containers. If you don’t configure an external database like MySQL or PostgreSQL for Keycloak, it will default to using an embedded H2 database.
Why we used MySQL:
- Production Environments: For any production deployment, it’s critical to use an external database like MySQL, PostgreSQL, or Oracle to ensure data persistence, reliability, and scalability.
- Complex Deployments: In environments where you need to manage a significant amount of user data, roles, realms, and sessions, an external database is necessary.
The file defines two services: keycloak-mysql and keycloak.
✔ keycloak-mysql Service:
Volumes:
./volume-data/mysql_keycloak_data:/var/lib/mysql: Maps a local directory (./volume-data/mysql_keycloak_data) to the MySQL data directory inside the container (/var/lib/mysql). This ensures that the database data is persisted even if the container is removed.
Environment:
MYSQL_ROOT_PASSWORD: root: Sets the root password for MySQL.MYSQL_DATABASE: keycloak: Creates a database namedkeycloakin the MySQL instance.MYSQL_USER: keycloak: Creates a user namedkeycloak.MYSQL_PASSWORD: password: Sets the password for thekeycloakuser.
✔ keycloak Service:
Command: [ "start-dev", "--import-realm" ]
start-dev: Starts Keycloak in development mode.--import-realm: Instructs Keycloak to import realms from the specified directory on startup.
Environment:
DB_VENDOR: MYSQL: Specifies that MySQL is the database vendor.DB_ADDR: keycloak-mysql: Refers to the MySQL service defined earlier as the database host.DB_DATABASE: keycloak: Specifies the database name (keycloak) to use.DB_USER: keycloak: Specifies the database user (keycloak) to connect with.DB_PASSWORD: password: Specifies the password for thekeycloakdatabase user.KEYCLOAK_ADMIN: admin: Sets the admin username for Keycloak.KEYCLOAK_ADMIN_PASSWORD: admin: Sets the admin password for Keycloak.
Ports:
- "8181:8080": Maps port8080of the Keycloak container to port8181on the host machine. This allows accessing Keycloak viahttp://localhost:8181.
Volumes:
./docker/keycloak/realms/:/opt/keycloak/data/import/: Maps the local directory (./docker/keycloak/realms/) to Keycloak's import directory (/opt/keycloak/data/import/) inside the container. This is where Keycloak looks for realms to import on startup. Confuse on this point, don’t worry, will explain ahead of this tutorial.
depends_on:
keycloak-mysql: Specifies that thekeycloakservice depends on thekeycloak-mysqlservice. Docker Compose will ensure that the MySQL container starts before the Keycloak container.
👁️ NOTE: If you don’t want to use the docker. You can directly download the keyclock and run it locally. It will run on port:8080 by default.
Download Keycloak from the official site. Extract the archive to a directory. Ensure you have Java 17+ installed and optionally set up environment variables. Start Keycloak using the
kc.bat start-devcommand. Access the Admin Console viahttp://localhost:8080to manage your Keycloak instance.
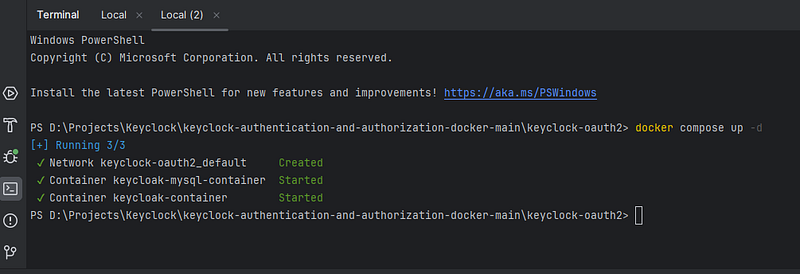
✅ Run Docker Compose and Set up Keycloak Configurations
Go to your terminal and run docker-compose up -d command as below:
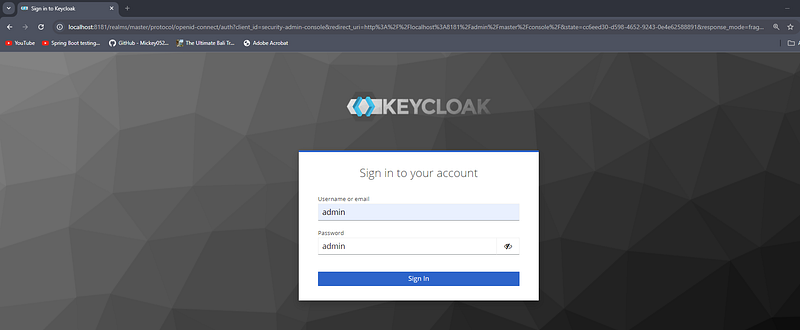
✔ Login to Keycloak Admin Console
When keyclock container is up and running, you can access it on http://localhost:8181/admin (Remember keyclock is run on port on 8080 by default but we expose it on port 8181 and admin console username and password both sets as admin in docker compose file)
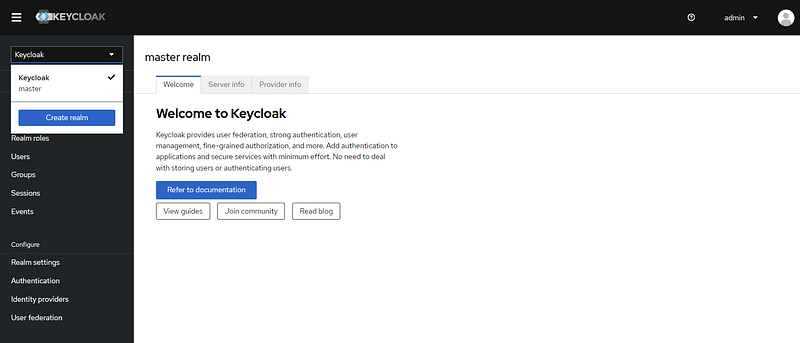
After you log in to the Keycloak Admin Console as an admin, you can begin configuring Keycloak for your identity and access management needs.
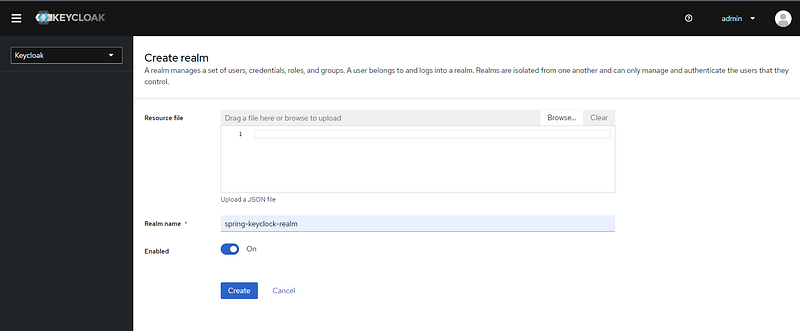
✔ Create a Realm
Realms are the top-level containers in Keycloak, used to manage a set of users, credentials, roles, and groups.
- In the Admin Console, click on the dropdown in the top left corner that usually says “Master”.
- Click on Create Realm.
- Enter a Name for your new realm (e.g.
spring-keyclock-realm) and click Create.
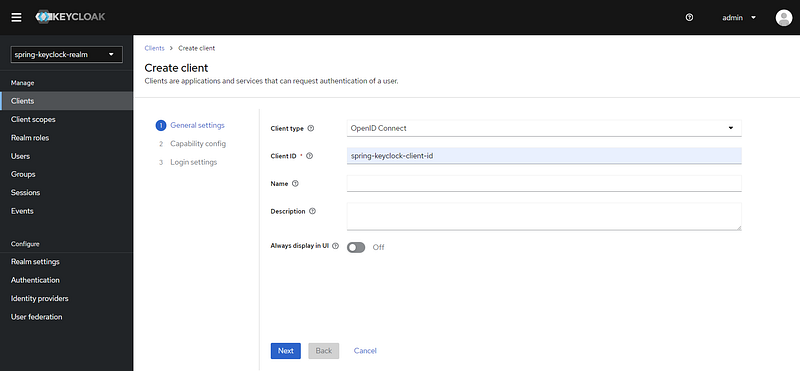
✔ Create Client
- After creating a realm, go to the
Clientssection in the left-hand menu. - Click on
Create Client. - Enter a Client ID (e.g.
spring-keyclock-client-id) and select the Client OpenID Connect. - On next screen keep the by default setting and click on next.
- Set the Root URL to the base URL of your spring boot application which is running on port 9090. So root url will be http://localhost:9090
- Click Save.
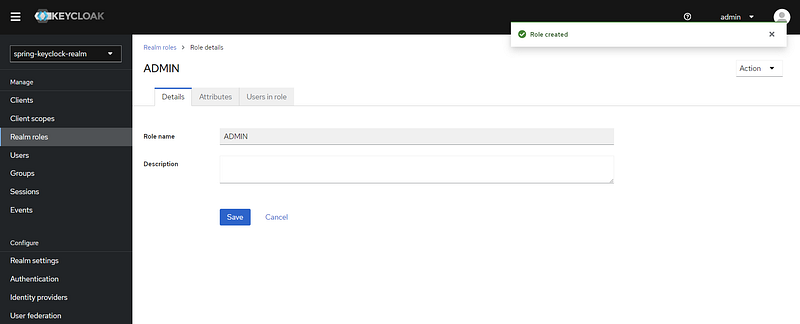
✔ Create Roles
Roles are used to define permissions and are assigned to users and/or groups.
- Go to the Realm Roles section in the left-hand menu.
- Click on Create Role.
- Enter a Role Name (e.g USER, ADMIN).
- Click Save.
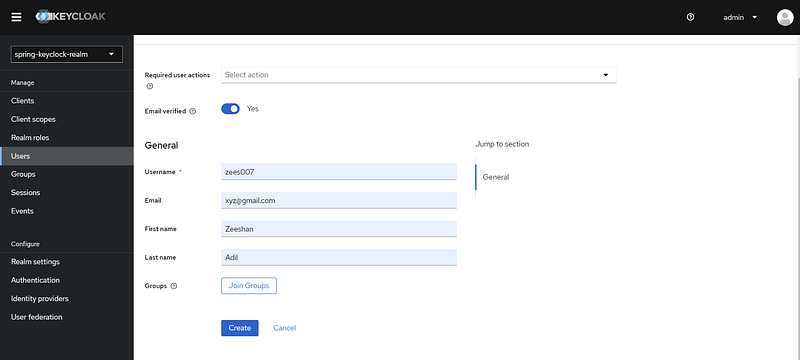
✔ Create Users
- Go to the Users section in the left-hand menu.
- Click on Create New User.
- Enter a Username and other optional details like email, first name, and last name.
- Click Create.
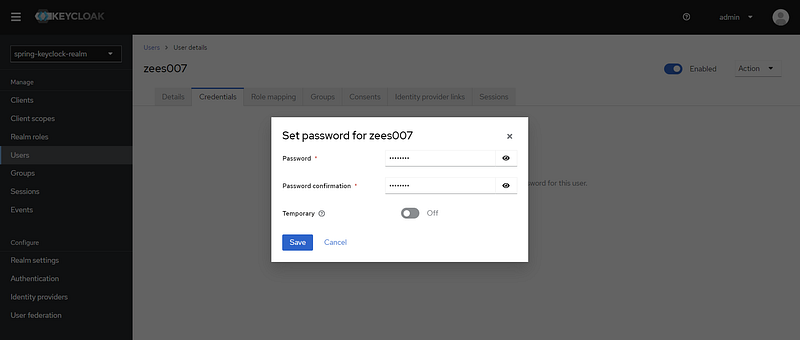
- After saving, go to the Credentials tab to set the password for the user.
- Set a password and toggle Temporary to OFF if you don't want the user to be forced to change their password on first login.
- Click Save.
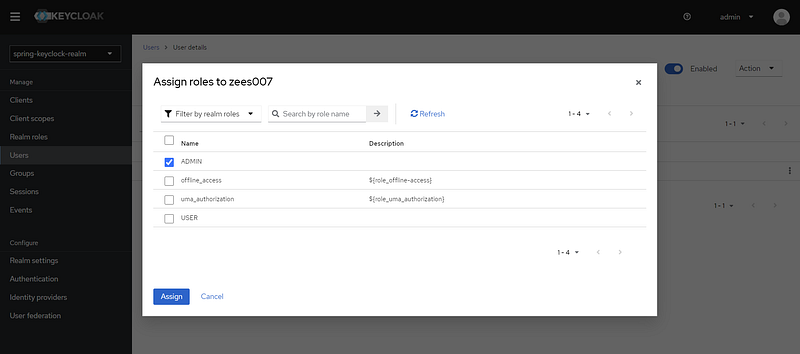
- After setting the password, go to the Role mapping tab.
- In the available roles section, select the roles you want to assign and click Assign.
- Now to go to the Realm Setting and click on OpenID Endpoint Configuration

- Click on OpenID Endpoint Configuration and copy the issuer URL which will configure in our application.properties of spring boot application.

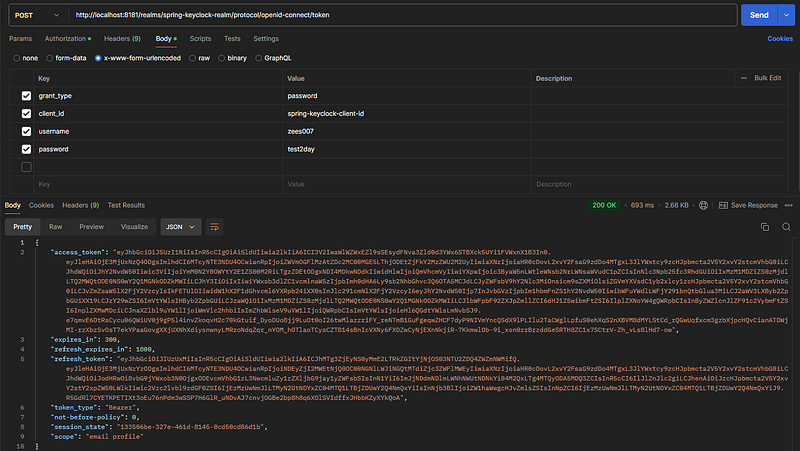
Awesome! We’ve successfully configured the realm, client, user, and role in Keycloak. Now, we can test whether the authorization server is correctly providing JWT access tokens by passing the user credentials and client ID.
✅ Export the Realm Setting
To ensure that your Keycloak configuration persists across container restarts or recreations, you need to export the Keycloak realm configuration to a file and then use this file to import the realm configuration automatically when the Keycloak container starts up.
- Go to the
Realm Settingssection. - Click on the
Exporttab. - Paste the JSON realm file to your spring boot application’s docker/keyclock/realms folder as below:
- commad: [“start-dev”, “ — import-realm”] will take of it as mentioned in docker-compose file and set up the volume to persist the realm setting.

The token_endpoint: http://localhost:8181/realms/spring-keyclock-realm/protocol/openid-connect/token URL is responsible for issuing tokens in OAuth 2.0 and OIDC flows. Clients (applications) interact with this endpoint to obtain access tokens, refresh tokens. These tokens are used to authenticate and authorize access to protected resources from resource server.
✅ Application Properties Configuration
spring.application.name=keyclock-oauth2
spring.security.oauth2.resourceserver.jwt.issuer-uri=http://localhost:8181/realms/spring-keyclock-realm
server.port=9090
The issuer URL in your Keycloak setup identifies the Keycloak server instance that is managing the authentication and token issuance. It is essential for ensuring that the tokens are issued by the correct server and is used as the base URL for accessing various OpenID Connect endpoints, allowing client applications to interact securely with Keycloak.
✅ Create SpringSecuirty class under configs package as below:
package com.devzees.keyclock.configs;

import org.springframework.context.annotation.Bean;
import org.springframework.context.annotation.Configuration;
import org.springframework.security.config.Customizer;
import org.springframework.security.config.annotation.method.configuration.EnableMethodSecurity;
import org.springframework.security.config.annotation.web.builders.HttpSecurity;
import org.springframework.security.oauth2.server.resource.authentication.JwtAuthenticationConverter;
import org.springframework.security.web.SecurityFilterChain;

@Configuration
@EnableMethodSecurity
public class SecurityConfig {

    @Bean
    public SecurityFilterChain securityFilterChain(HttpSecurity http) throws Exception {
        http
                .cors(Customizer.withDefaults())
                .csrf(csrf -> csrf.disable())
                .sessionManagement(session -> session.sessionCreationPolicy(org.springframework.security.config.http.SessionCreationPolicy.STATELESS))
                .authorizeHttpRequests(auth -> auth
                        .requestMatchers("/public/**").permitAll()
                        .anyRequest().authenticated()
                )
                .oauth2ResourceServer(oauth2 -> oauth2
                        .jwt(jwt -> jwt
                                .jwtAuthenticationConverter(jwtAuthenticationConverter())
                        )
                );

        return http.build();
    }

    @Bean
    public JwtAuthenticationConverter jwtAuthenticationConverter() {
        JwtAuthenticationConverter converter = new JwtAuthenticationConverter();
        converter.setJwtGrantedAuthoritiesConverter(new KeycloakRoleConverter());
        return converter;
    }
}
In Spring Security configuration class that sets up security for a Spring Boot application, particularly focusing on integrating with an OAuth2 resource server that uses JWT (JSON Web Tokens) for authentication.
✔ SecurityFilterChain Bean
http.cors(Customizer.withDefaults()):
- Enables CORS (Cross-Origin Resource Sharing) with default settings, which allows the application to handle requests from different origins.
http.csrf(csrf -> csrf.disable()):
- Disables CSRF (Cross-Site Request Forgery) protection, which is typically disabled in stateless, token-based authentication systems like JWT.
http.sessionManagement(session -> session.sessionCreationPolicy(SessionCreationPolicy.STATELESS)):
- Configures the session management to be stateless, meaning no session will be created or used by Spring Security. Each request must be authenticated independently using JWT.
http.authorizeHttpRequests(auth -> auth.requestMatchers("/public/**").permitAll().anyRequest().authenticated()):
- Requests matching the pattern
/public/**are allowed without authentication (public access). - All other requests require authentication.
http.oauth2ResourceServer(oauth2 -> oauth2.jwt(jwt -> jwt.jwtAuthenticationConverter(jwtAuthenticationConverter()))):
- Configures the application as an OAuth2 resource server that uses JWT for authentication.
- The
jwtAuthenticationConverter()method is called to customize how JWT tokens are converted intoAuthenticationobjects.
JwtAuthenticationConverter Bean
The jwtAuthenticationConverter method defines a custom converter that extracts roles (authorities) from the JWT token issued by Keycloak.
JwtAuthenticationConverter converter = new JwtAuthenticationConverter();:
- Creates an instance of
JwtAuthenticationConverter, which is responsible for converting JWT tokens into Spring SecurityAuthenticationobjects.
converter.setJwtGrantedAuthoritiesConverter(new KeycloakRoleConverter());:
- Sets a custom
JwtGrantedAuthoritiesConverter, in this case,KeycloakRoleConverter, which will convert the roles from the JWT token into a collection ofGrantedAuthorityobjects that Spring Security uses to enforce authorization.
✅ Create KeycloakRoleConverter class under configs package as below:
package com.devzees.keyclock.configs;
import org.springframework.security.core.GrantedAuthority;
import org.springframework.security.core.authority.SimpleGrantedAuthority;
import org.springframework.security.oauth2.jwt.Jwt;
import org.springframework.core.convert.converter.Converter;
import java.util.Collection;
import java.util.stream.Collectors;
import java.util.stream.Stream;
public class KeycloakRoleConverter implements Converter<Jwt, Collection<GrantedAuthority>> {
@Override
public Collection<GrantedAuthority> convert(Jwt jwt) {
// Extract roles from the 'realm_access' claim
Map<String, Object> realmAccess = (Map<String, Object>) jwt.getClaims().get("realm_access");
List<String> roles = (List<String>) realmAccess.get("roles");
// Map roles to Spring Security authorities
return roles != null ?
roles.stream()
.map(role -> new SimpleGrantedAuthority("ROLE_" + role))
.collect(Collectors.toList())
:
new ArrayList<>();
}
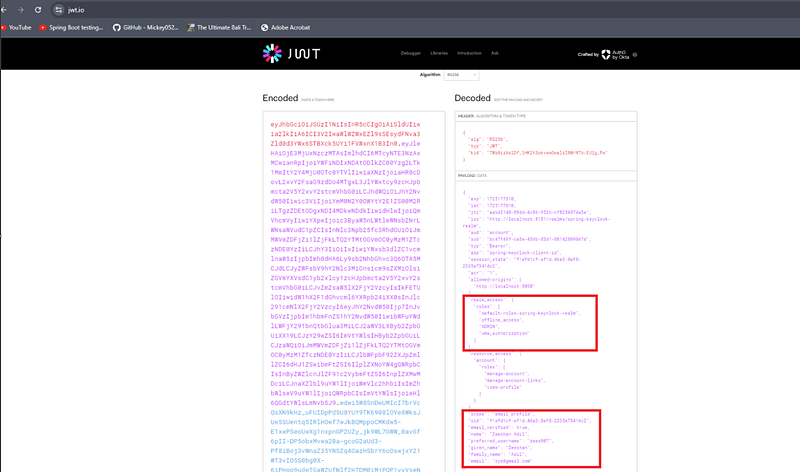
}KeycloakRoleConverter class implements the Converter interface from Spring Security, where Jwt is the input type and Collection<GrantedAuthority> is the output type.
- Keycloak typically stores the roles for a user within a claim called realm_access. This claim is a map that contains a key
roles, which is a list of roles assigned to the user within the Keycloak realm. - The code retrieves the realm_access claim from the JWT's claims and then extracts the list of roles from it.
- Each role is prefixed with “ROLE_” to conform to Spring Security's convention, which typically expects roles to start with “ROLE_”.
- The mapped roles are then collected into a list of
GrantedAuthorityobjects and returned. - If no roles are found, an empty list is returned.
- You can validate the roles available in token on https://jwt.io/
- Paste the generated token on jwt.io and see the realm_access as below:
✅ Create TestController class under controllers package as below:
package com.devzees.keyclock.controllers;

import org.springframework.security.access.prepost.PreAuthorize;
import org.springframework.web.bind.annotation.GetMapping;
import org.springframework.web.bind.annotation.RequestMapping;
import org.springframework.web.bind.annotation.RestController;

@RestController
@RequestMapping("/api/v1")
public class TestController {

    @GetMapping("/public/hello")
    public String publicHello() {
        return "Hello, public!";
    }

    @GetMapping("/user/hello")
    @PreAuthorize("hasRole('USER')")
    public String userHello() {
        return "Hello, user!";
    }

    @GetMapping("/admin/hello")
    @PreAuthorize("hasRole('ADMIN')")
    public String adminHello() {
        return "Hello, admin!";
    }

}- All request mappings in this class will be prefixed with “/api/v1”. It sets the base URL for all endpoints in this controller.
@GetMapping("/public/hello"): Maps HTTP GET requests to the/public/helloendpoint. This is a public endpoint, meaning it does not require authentication or specific roles to access it.@GetMapping("/user/hello"): Maps HTTP GET requests to the/user/helloendpoint. This endpoint requires specific role-based access. It uses Spring Security’s method-level security to check if the user has the “USER” role before allowing access to the method.@GetMapping("/admin/hello"): Maps HTTP GET requests to the/admin/helloendpoint. Similar to the previous endpoint, this one also requires “ADMIN” role to access this endpoint.
We have done spring boot implementations. Now time to test.
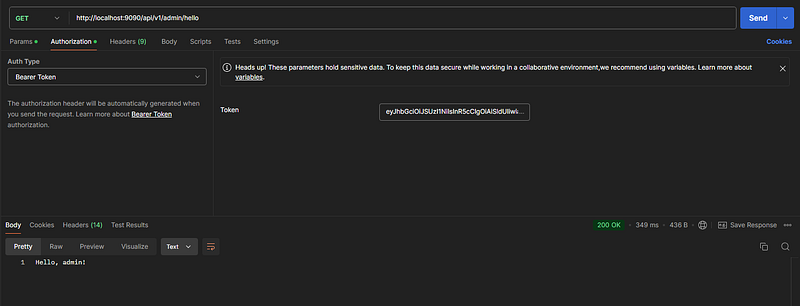
✅ Access "/admin/hello" endpoint:
Generate a new token as you did previously and copy it. Paste the token as a Bearer token below. Since we have created a user “zees007” and assigned them the ADMIN role, this user will be able to access the endpoint.
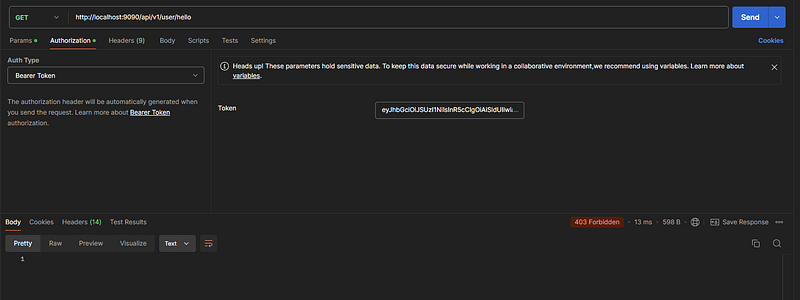
✅ Access "/user/hello" endpoint:
User “zees007” does not have “USER” role. hence we are getting 403 Forbidden.
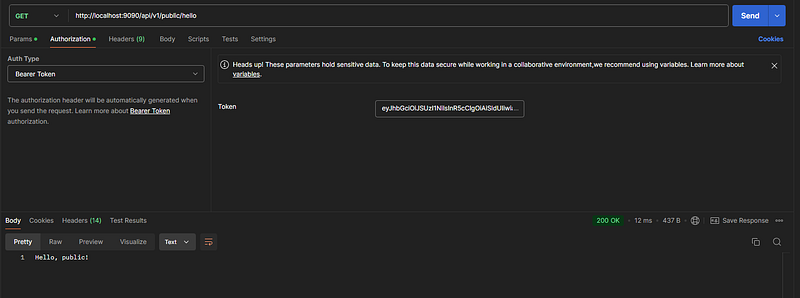
✅ Access "/public/hello" endpoint:
You can access this endpoint without authentication as this is public endpoint accessible by anyone.
✅ Source Code 👇
We have successfully implemented and tested Keycloak with a Spring Boot application. We demonstrated how to set up a Keycloak server using Docker Compose, configured the realm, client ID, and user roles, and integrated it with the Spring Boot application. We also covered generating tokens and accessing protected endpoints. While Keycloak implementation can seem complex at first, it becomes more manageable with hands-on experience. If you have any questions, feel free to reach out. In my upcoming Keycloak tutorial, we will explore additional Keycloak features.
✅ Important Notes:
✔ Access Token typically expires in 5 minutes by default, configurable in Keycloak settings.
✔ You can change this setting on keyclock server. Go to your client ID and navigate the Advanced tab.

✅ Next to Learn 👇
✔ Spring Boot 3 + Spring Security 6 : JWT Authentication & Authorization
✔ Invalidate/Blacklist the JWT using Redis: Logout Mechanism in Spring Security
✔ Integration & Unit Test using JUnit5 Mockito & JaCoCo [PART-1] — How to Write Integration Tests for JWT Authenticated Endpoints
✔ From Localhost to the Cloud: Deploying Spring Boot + MySQL App on Kubernetes with Docker Desktop — A Beginner Guide
❤️ Support & Engagement ❤️
❤ If you find this article informative and beneficial, please consider showing your appreciation by giving it a clap 👏👏👏, highlight it and replying on my story story. Feel free to share this article with your peers. Your support and knowledge sharing within the developer community are highly valued. ❤ Please share on social media ❤ Follow me on : Medium || LinkedIn ❤ Check out my other articles on Medium ❤ Subscribe to my newsletter 📧, so that you don’t miss out on my latest articles. ❤ If you enjoyed my article, please consider buying me a coffee ❤️ and stay tuned to more articles about java, technologies and AI. 🧑💻


