
Integrating Keycloak OIDC with HashiCorp Vault HCP: A Terraform Comprehensive Guide 🧑💻
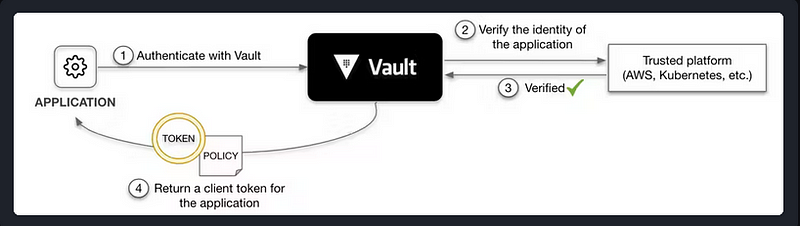
Welcome to this comprehensive guide on integrating Keycloak OIDC with HashiCorp Vault HCP! 🚀 In this guide, we will dive deep into the world of modern authentication and secrets management, exploring how Keycloak and HashiCorp Vault can work together to enhance your system’s security.
Table Of Content
- 👋 Introduction
- ⚙️ Configuring Keycloak for OIDC
- 🔒 Setting Up HashiCorp Vault for OIDC Integration
- 🎉 Conclusion
👋Introduction
Keycloak is an open-source Identity and Access Management solution aimed at modern applications and services. It makes it easy to secure applications and services with little to no code.
Integrating OIDC with HashiCorp Vault using Keycloak combines the power of robust user authentication with secure secrets management. This integration means you can authenticate users with Keycloak and manage their access to secrets stored in Vault, all through OIDC.
We will configure keycloak later to be used as our source of truth to log in to our vault instance that we deployed in the previous episodes.⬇️
🛠 ⚙️ Configuring Keycloak for OIDC
Before we delve into the heart of integrating Keycloak OIDC with HashiCorp Vault HCP, there are a few prerequisites to ensure a smooth and successful setup. It means a fundamental understanding of what Keycloak and HashiCorp Vault are, as touched upon in the introduction, is crucial. This includes familiarity with terms like Identity and Access Management (IAM), secrets management, and authentication protocols.
All the setup that we are going to discuss is written in Terraform to better manage our configurations. Referring to my GitHub repository that I have explained in this episode, We are going to deploy keycloak on our Kubernetes cluster.
CHART_NAME=keycloak DEFAULT=bitnami/keycloak task deployOnce the keycloak is deployed, log in using the default username and the password deployed as secret.
username = user or admin
password = kubectl get secrets keycloak -n keycloak -o jsonpath='{.data.admin-password}'
Initiate Keycloak
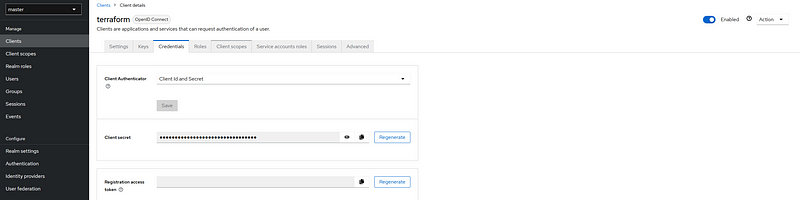
First, we need to prepare Keycloak to be able to link an OIDC client to Vault. Using terraform to manage the configuration, it requires an initial openID client that it bound to the master realm. To set up the Terraform provider for machine-to-machine authentication, it’s advisable to use the client credentials grant. Follow these steps:
- Establish a new client within Keycloak with openid-connect as the protocol. You can opt to position this client in the master realm for overarching Keycloak management or within another realm for specific realm management.
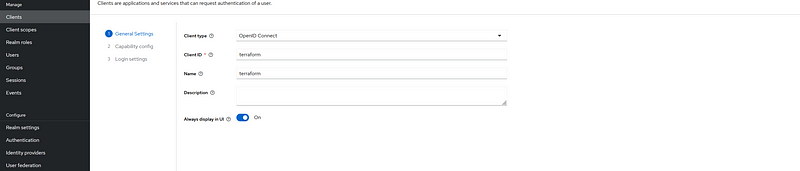
2. Adjust the settings of the newly established client:
- Change Access Type to ‘confidential’.
- Disable ‘Standard Flow Enabled’.
- Disable ‘Direct Access Grants Enabled’.
- Enable ‘Service Accounts Enabled’.

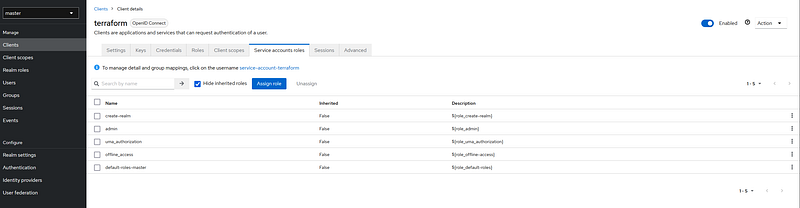
3. Assign the necessary roles for Keycloak management through the Service Account Roles tab, located in the client settings from the first step. Refer to the Assigning Roles instructions for detailed guidance.
Configure Keycloak
Now as keycloak is set up, Refer to the terraform configuration and download the necessary code ⬇️
Let’s explain the setup:
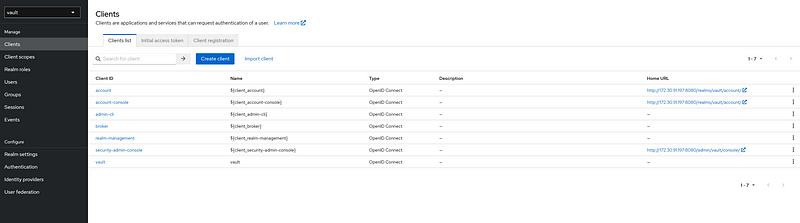
First, we create a realm named vault and create a user. The password of the user will be submitted when we perform a Terraform apply.
resource "keycloak_realm" "vault" {
  realm             = var.realm
  enabled           = true
  display_name      = var.realm
}
resource "keycloak_user" "user" {
  realm_id   = keycloak_realm.vault.id
  username   = var.user_name
  enabled    = true

  email      = format("%[email protected]",var.user_name)
  first_name = var.user_name

  initial_password {
    value     = var.user_password
    temporary = false
  }
}
Create an OIDC client, As valid_redirect_uris for the client, we define the Vault endpoint
resource "keycloak_openid_client" "openid_client" {
  realm_id            = keycloak_realm.vault.id
  client_id           = var.realm

  name                = var.realm
  enabled             = true

  access_type         = "CONFIDENTIAL"
  standard_flow_enabled = true
  valid_redirect_uris = [
    "http://172.30.91.197:8200/*", // or
    "http://192.168.1.249:32355/*" // if node port is used (recommanded)

  ]

}
Define client role, that will be mapped to the client and add the claims to the idToken which is issued for Vault access
resource "keycloak_role" "all_role" {
  realm_id    = keycloak_realm.vault.id
  client_id   = keycloak_openid_client.openid_client.id
  name        = "all"
  description = "manage all paths role"
}

resource "keycloak_openid_user_client_role_protocol_mapper" "user_client_role_mapper" {
     realm_id   = keycloak_realm.vault.id
     client_id  = keycloak_openid_client.openid_client.id
     name       = "user-client-role-mapper"
     claim_name = format("resource_access.%s.roles",
                  keycloak_openid_client.openid_client.client_id)
     multivalued = true
}
Once done 🧪 add the provider configuration
provider "keycloak" {
  client_id     = "terraform"
  client_secret = "xxxxxxx" // client secret from the initial client setup
  url           = "http://xxxxx" //keucloak url
}
terraform apply
🔒 Setting Up HashiCorp Vault for OIDC Integration
Now that Keycloak is configured to act as an OIDC provider, the next step is to configure HashiCorp Vault to authenticate users using Keycloak’s OIDC tokens. Follow these steps to set up the OIDC authentication method in Vault.
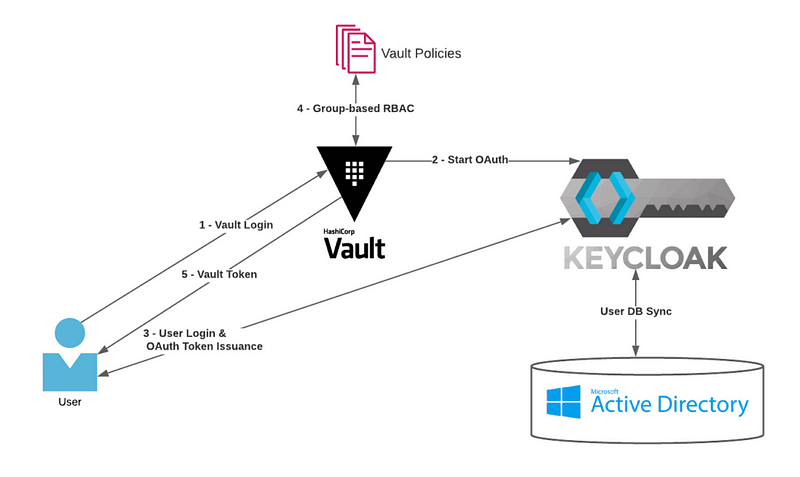
Refer to my GitHub repository ⬇️ and clone it.
Refer to the terraform_vault directory and let‘s start explaining the code.
We created a module called keycloak_oidc and that is where all the magic will happen.
Initially, we will ensure the security of each token issued by the secrets engine by signing them. To facilitate this, we will designate a specific key for our OIDC identity.
resource "vault_identity_oidc_key" "keycloak_provider_key" {
  name      = "keycloak"
  algorithm = "RS256"
}
To integrate OIDC with Vault, it’s necessary to activate the OIDC authentication backend. By setting the listing visibility to unauth, the authentication method will be displayed on the login screen. If you don’t specify a default_role, you must select a role every time you log in. For enhanced user experience and security, it’s advisable to define a default role that possesses minimal privileges.
main.tf
resource "vault_jwt_auth_backend" "keycloak" {
  path               = var.auth_backend_path
  type               = var.auth_backend_name
  default_role       = "default"
  oidc_discovery_url = var.oidc_config.oidc_discovery_url
  oidc_client_id  =  var.oidc_config.oidc_client_id
  oidc_client_secret = var.oidc_secret

  tune {
    audit_non_hmac_request_keys  = []
    audit_non_hmac_response_keys = []
    default_lease_ttl            = "1h"
    listing_visibility           = "unauth"
    max_lease_ttl                = "1h"
    passthrough_request_headers  = []
    token_type                   = "default-service"
  }
}
variables.tf
variable "auth_backend_path" {
  default = "oidc"
}
variable "auth_backend_name" {
  default = "oidc"
}
variable "oidc_config" {
  default = {
    "oidc_discovery_url" = "http://xxxxx/realms/vault"// keycloak ip:port
    "oidc_client_id" = "vault"
  }
}
variable "oidc_secret" {
  type = string
}
To facilitate authentication and permission allocation in Vault, a backend role is essential. This role is pivotal in the process, as it identifies users and maps their permissions. The heart of this configuration lies in the user_claim, which is the unique identifier for the recipient of the token. This identifier is crucial as it enables Vault to automatically create entities for users logging in via OIDC.
For dynamically assigning Vault policies based on Keycloak grants (or claims), it’s necessary to guide Vault to the location of these claims in the idToken. This setup enables Vault to effectively parse and utilize the claims provided by Keycloak for access control and policy assignment.
main.tf
resource "vault_jwt_auth_backend_role" "default" {
  backend        = vault_jwt_auth_backend.keycloak.path
  role_name      = var.jwt_auth_backend_config.role_name
  role_type      = var.jwt_auth_backend_config.role_type
  token_ttl      = var.jwt_auth_backend_config.token_ttl
  token_max_ttl  = var.jwt_auth_backend_config.token_max_ttl

  bound_audiences = var.jwt_auth_backend_config.bound_audiences
  user_claim      = "sub"
  claim_mappings = var.jwt_auth_backend_config.claim_mappings

  allowed_redirect_uris = var.jwt_auth_backend_config.allowed_redirect_uris
  groups_claim = var.jwt_auth_backend_config.groups_claim
}
variabels.tf
variable "jwt_auth_backend_config" {
  default = {
    role_name = "default"
    role_type = "oidc"
    token_ttl = 3600
    token_max_ttl =3600
    bound_audiences = ["<client_id>"]
    claim_mappings = {
      preferred_username = "username"
      email              = "email"
    }
    allowed_redirect_uris = [
      "http://xxxxxx/ui/vault/auth/oidc/oidc/callback",
      "http://xxxxxx/oidc/callback" // vault ip:nodeport
  ]
  groups_claim = "/resource_access/<client_id>/roles"
  }
}
Our authentication backend in Vault is ready to use. Now we need to provide some policies and groups that Vault can actually grant permissions to resources based on the idToken.
The policies attribute will get the value from an outside module that will create the policy.
resource "vault_identity_oidc_role" "all_role" {
  name = "all"
  key  = vault_identity_oidc_key.keycloak_provider_key.name
}

resource "vault_identity_group" "group" {
  name     = vault_identity_oidc_role.all_role.name
  type     = "external"
  policies = var.policies
}
resource "vault_identity_group_alias" "group_alias" {
  name           = "all"
  mount_accessor = vault_jwt_auth_backend.keycloak.accessor
  canonical_id   = vault_identity_group.group.id
}
Once this setup is done, initiate the modules and apply the code.
The keycloak configuration will be found in the keycloak.tf file
module "vault_keycloak" {
    providers = {
        vault = vault.vault-1
  }
  source = "./modules/policies"
  policy_name   = "all"
  file_name = file("policies/keycloak.hcl")
}
module "keycloak" {
   providers = {
        vault = vault.vault-1
  }
   source = "./modules/keycloak_oidc"
   auth_backend_path = var.auth_backend_path
   auth_backend_name = var.auth_backend_name
   oidc_config = var.oidc_config
   oidc_secret = var.oidc_secret
   jwt_auth_backend_config = var.jwt_auth_backend_config
   policies = [module.vault_keycloak.policy_name]
}
terraform init
terraform applyNow let’s test the setup.
Head to the vault URL and you will notice and OIDC section
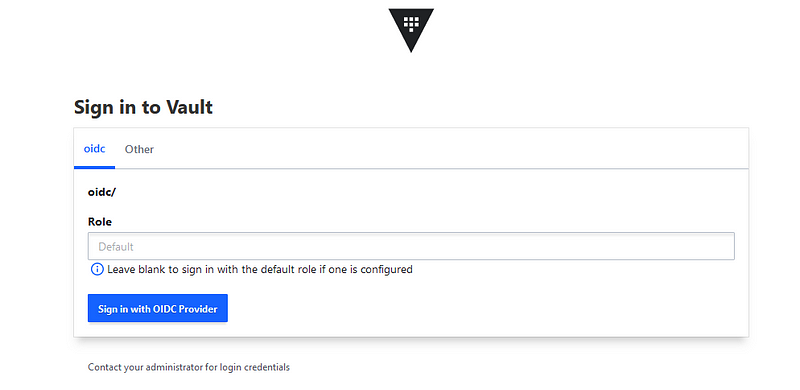
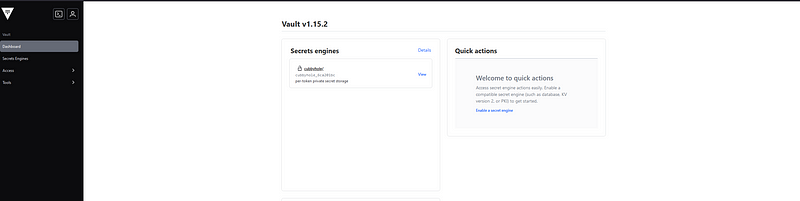
Once signing in, a new pop-up will be opened to log in to keycloak using the user created before, then you will be redirected to vault.
🎉 Conclusion
Congratulations on reaching the end of this guide on integrating Keycloak OIDC with HashiCorp Vault HCP! 🚀 If you need support, reach out to me via LinkedIn and do not forget to subscribe to my medium. A tip will be great also to make me keep up the work.

LinkedIn: ebenamor
Github: Profile
NFT collection: EbenamorNFT


