
Integrating a Spring Boot Application into an Istio Service Mesh
Microservice architectures are experiencing a surge of popularity and with the release of Service Mesh frameworks like Istio, they should be easier to manage and secure in the long run. One of the needs I have seen from our customers is converting their existing monolithic applications into microservices and running in a service mesh. There are patterns for migrating to microservcies, such as the strangler pattern, but getting the microservcies into an Istio service mesh can be a daunting task. A lot of monolithic applications are written in Java and using Spring Boot can be a quick way to extract business logic from the monolith and run it as a microservice within a Service Mesh. This article shows how to develop and deploy a simple Spring Boot Web application into an Istio Service Mesh. Later articles will expand to show more complex services such as a RESTful service.
There are several prerequisites for this article: Java JDK, Docker, Kubernetes, Istio, and a Docker Hub account. If you are developing on your workstation, the quickest way to get started is to install Docker Desktop with Kubernetes, and then install Istio. We will be using Kiali to view Istio resources. Kiali is installed with the default and demo profiles of Istio, so I recommend using the demo profile. You will also need the Docker account to push and pull Docker images you create in this tutorial. Once these systems are up and running you can move on to the next steps.
Building the Spring Boot application
This article uses Maven for building the Java Application, because it helps give a better understanding of the dependencies required to use Spring Boot. We are going to generate the Spring Boot project using the Spring Initializr app found at https://start.spring.io/. For this example, we are creating an artifact called springdemo in the package com.example.servicemesh.
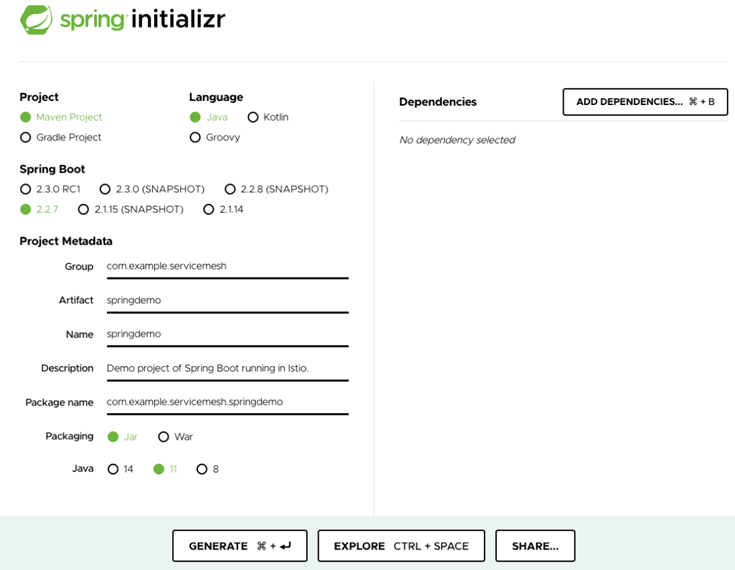
Enter the information as shown above into the Spring Initializer site. After you press the Generate button, the Spring Initializr will generate a zip file containing all of the necessary artifacts for an empty project. Save this file, unzip it in the desired location, and navigate to the project’s root folder. You should see a Maven standard directory layout and POM file. In the project’s root folder run:
./mvnw verify
This will download the initial required jar files, build, and verify the generated project. Once the empty Maven project is verified, we will create a test static web page within the project.
Creating a Test Web Site
Let’s create a static web page so we can do basic testing of the client-server routing and connectivity though Istio. We will put web pages under the path “demo”. Add the /demo/ path and HTML file type suffix to the Spring Model View Controller (MVC) settings in the application.properties file found in the resources folder.
spring.mvc.view.prefix = /demo/
spring.mvc.view.suffix = .html
Create a folder named static under the resources folder, and under the static folder, a folder named demo.
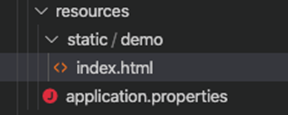
Next, we add a simple index HTML page to the demo folder.
Now that we have Spring Boot configured and a simple static web page to display, we need to setup the Spring Boot project to host the web site. In order to run the application as a web server, we need to add the Spring Boot starter web library by updating the POM to add the spring-boot-starter-web dependency.
<dependency>
  <groupId>org.springframework.boot</groupId>
  <artifactId>spring-boot-starter-web</artifactId>
  <version>${springboot-version}</version>
</dependency>
With the dependency added, we can build and run the application to verify our web page is showing correctly. Build the application using Maven.
./mvnw clean install
After the build, run the application. Note: The application is packed as a self-executing jar.
java -jar target/springdemo-0.0.1-SNAPSHOT.jarNavigate to the page hosted at localhost:8080/demo/index.html, and you will see the page we just created:

Containerize the Spring Boot App
Now that we have code that runs and the Web page displays correctly, let’s put the application into a Docker container. We start by using a JRE container from Docker Hub and create a Dockerfile:
Because we are only running the application and not doing any development in the container, we only need a JRE-based container. This reduces the runtime overhead as well as increases security by removing the compiler. Notice in the Dockerfile, we are copying the previously built jar to the container working directory and making the self-executing JAR the default container command.
Next, build the Docker image. We will call it “springdemo” and tag it as the latest. Note: if you run into permission problems, make sure you have logged into Docker.
docker build . -t springdemo:latestRun the container to test the web page and verify the container is running and serving pages.
docker run -d -p 8080:8080 — name springdemo springdemo:latestNavigate to the website, http://localhost:8080/demo/index.html, and test that it still works. After verifying that the Spring Boot application is running in a Docker container, stop and cleanup the Docker container:
docker stop springdemo
docker rm springdemo
Now to make this image available for our Kubernetes/Istio deployment, you must push the container to your Docker Hub account. This will enable Kubernetes to pull and deploy the image. It is possible to use a private image repository, but beyond the scope of this article. First, we tag the image we just created and then push that image to Docker Hub. Use your account in place of my account ID (pklinker) in the commands below.
docker tag springdemo:latest pklinker/springdemo:latest
docker push pklinker/springdemo
You can navigate to your Docker Hub (https://hub.docker.com/repositories) account to verify that the image was pushed to the repository. Once you have successfully pushed the image to Docker Hub, we can now bring it into the Service Mesh.
Deploy to Kubernetes and Istio
In order to deploy our service to Kubernetes, we need to define a Service configuration and a Deployment configuration. We will do this through a declarative object configuration using YAML. Create a YAML file, we call it springdemo-k8s.yaml, as shown:
You will need to change line 36 to point to the image you created and pushed to Docker Hub (replace pklinker with your account ID). There are several other items to note here:
- The application name is springdemo
- It is listening on port 8080, the same as our Java application and our Docker container from the previous example.
- We are injecting an Istio sidecar container into its pod
- This is version 1 (v1) of the service
Now that we have declared the configuration of the service and its deployment, we need to apply it on our Kubernetes cluster:
kubectl apply -f springdemo-k8s.yamlNavigate to the page http://localhost:8080/demo/index.html and you will see that you are unable to view the page with a “This site can’t be reached” message. If you know Kubernetes, you may realize we didn’t expose port 8080 and attempt to reach it over port 80 at http://localhost/demo/index.html, but that too fails. You can verify that the pod is deployed andrunning. Running kubectl get pods we see the application is running:
springdemo % kubectl get pods
NAME READY STATUS RESTARTS AGE
springdemo-v1-c64c8c5b4-bgn42 2/2 Running 0 2m5s
Let’s look closer at what is going on. Start the Kiali dashboard:
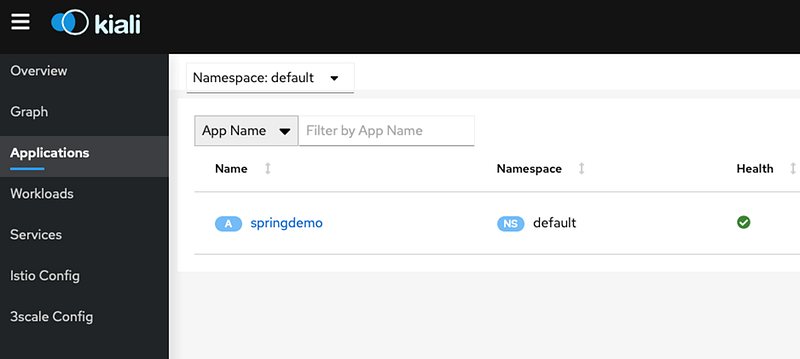
istioctl dashboard kialiAnd look at the applications in the default namespace and you will see the springdemo we just deployed.
Click on springdemo app and you will see the service and the workloads specified in the deployment.
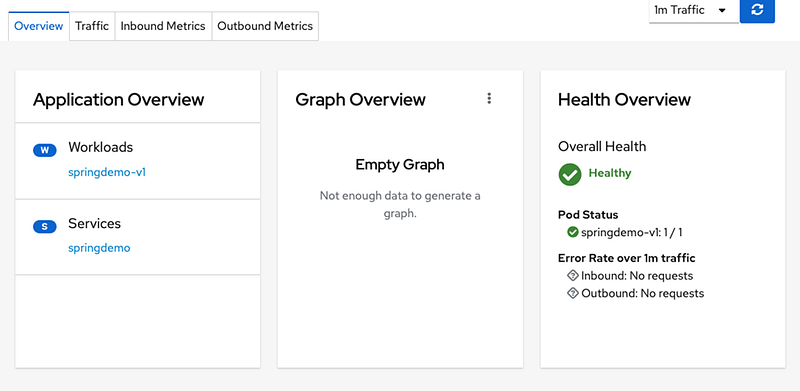
We can see that application is up and running but it is unreachable. This is because we have to create a virtual service and a gateway in order for traffic to ingress the service mesh and reach our service. Our simple architecture will look like:
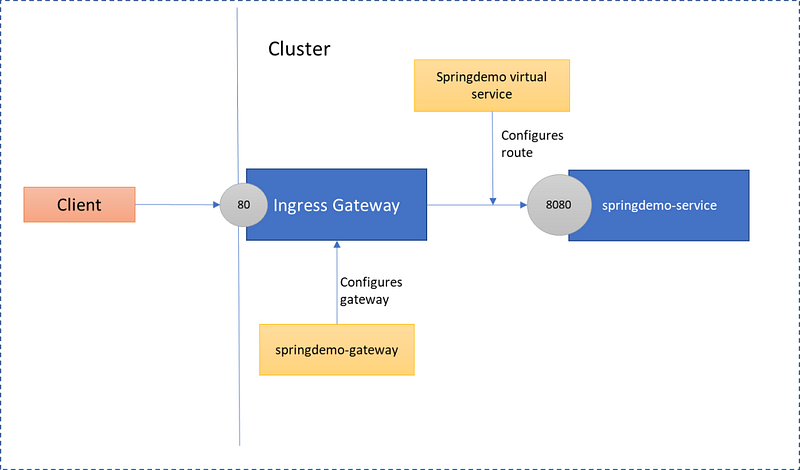
Let’s create a file named springdemo-gtwy-vs.yaml and populate it with a gateway and a virtual service.
There are several items to note in this configuration:
- We are using the Istio default gateway as our selector
- We are routing traffic with a URI that matches the path /demo/ from port 80 to 8080 hosted by the springdemo pod.
Now apply the new configurations to Istio:
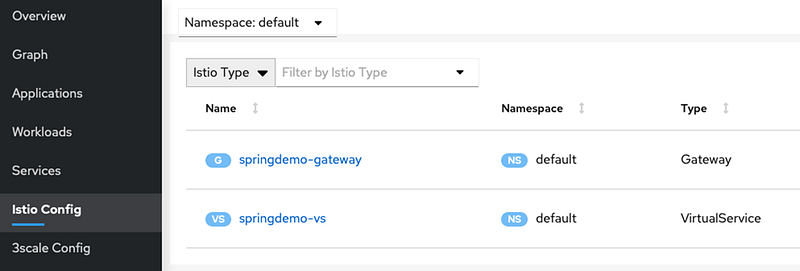
kubectl apply -f springdemo-gtwy-vs.yamlTry the web page again with port 80 and success! What did we do? We added the gateway and virtual service to route traffic. If you go back to you Kiali dashboard and look at the Istio Config you will now see these configurations.
You can clean up the springdemo resources by using the kubectl delete command. The commands below will delete the gateway, virtual service, service, and deployed pods.
kubectl delete -f springdemo-gtwy-vs.yaml
kubectl delete -f springdemo-k8s.yaml
Hopefully this simple demonstration clears up confusion on deploying Java Spring Boot applications into Istio and being able to communicate with them. In the future articles I will dive deeper into securing and running more complex services in a service mesh.


