Installing Tensorflow on Apple M1 With the New Metal Plugin
How to enable GPU acceleration on Mac M1 and achieve a smooth installation

Since Apple abandoned Nvidia support, the advent of the M1 chip sparked new hope in the ML community. The chip uses Apple Neural Engine, a component that allows Mac to perform machine learning tasks blazingly fast and without thermal issues.
When Apple with M1 was released, the integration with Tensorflow was very difficult. The process involved downloading, among other packages, a pre-configured environment.yml file with specific dependencies in such a way that no dependency conflicts will arise.
Unfortunately, that was not always the case. This article discusses how to install Tensorflow on Miniforge by using the Metal plugin, a process that is more straightforward and less prone to errors.
Step 1: Install Xcode
The first component to install is Xcode, which can easily be downloaded from the App Store. Additionally, install the Command Line Tools:
$ xcode-select --installStep 2: Install MiniForge
MiniForge is a minimalistic conda installer which uses by default the conda-forge channel and supports, among others, the aarch64 architecture (including Apple M1).
In other words, it is Apple-friendly. To download it, simply go to this page and download the installer for Apple Silicon. Installation is easy:
$ bash Miniforge3-MacOSX-arm64.shIf you already have a pre-existing conda distribution, e.g. Anaconda or MiniConda, there is no need to uninstall it in order to use MiniForge. For those familiar with the conda ecosystem, only one conda distro can be “functional” at a given time. Check this article to learn how to manage effectively many conda distributions simultaneously!
Step 3: Setup Environment and Install Tensorflow base and tensorflow-metal plugin
Let’s create a new environment, called tensorflow_m1:
$ conda create --name tensorflow_m1 python==3.9
$ conda activate tensorflow_m1
Then, install the following:
$ conda install -c apple tensorflow-deps
$ pip install tensorflow-macos
$ pip install tensorflow-metal
Optionally, install the Jupyter notebook or lab:
$ conda install -c conda-forge jupyter jupyterlabTo make sure everything works, and the TensorFlow installation actually uses the GPU, open the Python prompt and execute:
import tensorflow as tf
tf.__version__
tf.config.list_physical_devices()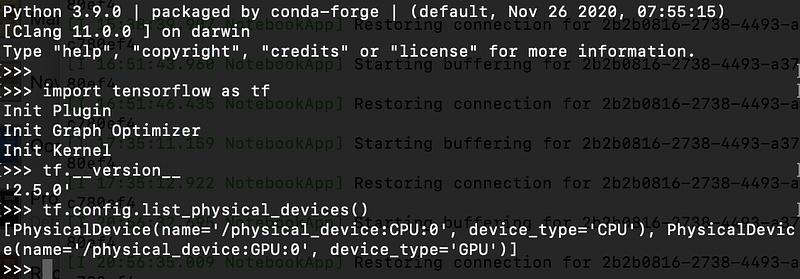
If you see the GPU in the list of devices, it means it is accessible by Tensorflow.
Next, run a simple MNIST example to make sure everything works as expected:
import tensorflow as tf
mnist = tf.keras.datasets.mnist(x_train, y_train), (x_test, y_test) = mnist.load_data()
x_train, x_test = x_train / 255.0, x_test / 255.0model = tf.keras.models.Sequential([
tf.keras.layers.Flatten(input_shape=(28, 28)),
tf.keras.layers.Dense(128, activation=’relu’),
tf.keras.layers.Dropout(0.2),
tf.keras.layers.Dense(10)
])loss_fn = tf.keras.losses.SparseCategoricalCrossentropy(from_logits=True)model.compile(optimizer=’adam’,
loss=loss_fn,
metrics=[‘accuracy’])model.fit(x_train, y_train, epochs=10)Addressing a Few common errors
1. Incorrect python path
It is imperative to make sure that you have the correct python path regarding the MiniForge environment.
If not, you may come across this message:
Collecting package metadata (repodata.json):
done Solving environment:
failed ResolvePackageNotFound:
— tensorflow-depsThis error will also occur if you initialize a new conda environment without specifying a python version, because the latest available versions (e.g. 3.9.7) may not have this package available.
The safest option is to use 3.9.0 (which was aforementioned above).
2. Error building grpcio when installing tensorflow-deps
Most probably, you will encounter this error. To fix it simply install:
$ pip install tensorflow-macos --no-dependencies3. Numpy not recognized
Installing tensorflow-deps sometimes also installs a non-conda-forge NumPy version which does not work properly. In some cases, when trying to import this NumPy version, you may see the following message:
IMPORTANT: PLEASE READ THIS FOR ADVICE ON HOW TO SOLVE THIS ISSUE!Importing the numpy C-extensions failed. This error can happen formany reasonsTo fix this, install the openblas package:
$ conda install -c conda-forge openblas4. Kernel dies when fitting the model
This is the most common error, which occurs when training the model.
Specifically, the execution crashes, and an NSInvalidArgumentException is thrown. Under the hood, TensorFlow uses tensorflow-metal which was built using MPSGraph inference enhancements capabilities for the GPU.
To fix this, use the previous version Tensorflow, as well as the previous version of tensorflow_metal. For instance, if the current version of Tensorflow is 2.6 and tensorflow-metal is 0.2, try:
$ conda create --name tensorflow_m1 python==3.9
$ conda activate tensorflow_m1
$ conda install -c apple tensorflow-deps==2.5.0
$ pip install tensorflow-macos==2.5.0
$ pip install tensorflow-macos==2.5.0 --no-dependencies
$ pip install tensorflow-metal==0.1.2Bonus Tips
- In order to enforce consistency and interoperability, it is important to download packages using only the
conda-forgechannel, even if the package is located in the default channel as well. - Not all libraries can be found in MiniForge. Thus, it is a good practice to keep a separate Anaconda or Miniconda environment for corner cases.
Closing Remarks
As a Mac user, having the ability to use one of the most popular deep learning frameworks at its full capacity is of paramount importance.
Traditionally, they resort to third-party tools (e.g. Colab) which is not always desirable. I hope this guide is found beneficial for many Mac developers and helps them save time during the process.


