
A guide to installing Jupyter Notebook and creating your own conda environment in Mac
Hello! This is going to (hopefully) be a part of short articles on things I’ve learnt to do so far. This is kind of a revision for me as well as a documentation of steps for future reference. Hopefully it can also be useful to whoever may need it.
What is Jupyter Notebook? It’s a neat way for you to write code, run the code, and immediately see the results. In technical terms, its an Integrated Development Environment (IDE). There are a ton of awesome other IDEs out there and honestly, use whatever you’re most comfortable in or whatever your school or workplace is using. In Jupyter Notebook, you can select the option to create a Markdown. This will allow you to add in HTML elements within code chunks. You can use all the normal HTML tags like header tags (e.g <h5>) , underline (<u> ) or colour (<font color='#369c0'> ). Creating a Markdown is not unique to Jupyter. This is also possible in IDEs like R-Studio and Google Colab. Jupyter Notebook also allows you to download your work as a PDF, HTML, iPython Notebook (.ipynb), a python script (.py), markdown (.md) and a few other file formats, making sharing easy.
Jupyter: https://jupyter.org/index.html

Part 1: Installing Jupyter Notebook
Step 1: Install Anaconda on your Mac
Python is prereq for using Jupyter Notebook. Downloading Anaconda will install python and many popular and useful python packages (these are packages created with methods that make programming much easier. Like numpy!) on you computer.
Download here: https://www.anaconda.com/products/individual
Step 2: Install Notebook in Terminal
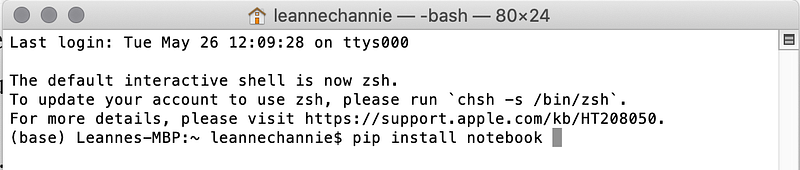
Open terminal on your mac. I like to do this using Mac’s Spotlight Search and just typing in Terminal — simple, haha. The shortcut for opening Spotlight Search is command+spacebar. Search for Terminal, enter, and you should see the app.

Now type in pip install notebook into your terminal right after the $. pip is the package installer for python. This package is downloaded when you install Anaconda. install is one of the methods of pip. notebookthen refers to Jupyter Notebook. Press enter and wait until it has successful installed. You’ll know its done when you see the same last line you saw when you first opened Terminal. Something similar to this (base) Leannes-MBP:~ leannechannie$ and a blinking cursor.
Step 3: Launch Notebook!
We’re basically almost done! Simply type in jupyter notebook in terminal after the $ and that will launch Jupyter Notebook in your browser.

Your browser will have a page like this. Then select ‘New’ from the top right hand corner and start coding!
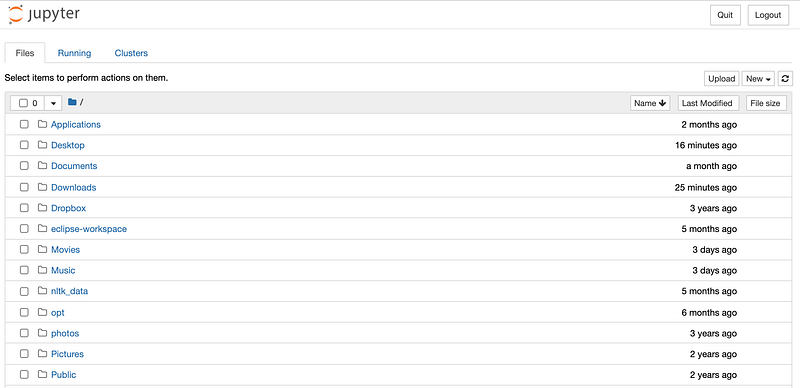
This is alright… but there are too many irrelevant folders! The file or folder you want to access is probably buried somewhere inside Desktop or Documents or something. I mean, you could still access the folder you want from here, but wouldn’t it be neat if you could directly see the file you want, or go to the folder you want to save the new notebook in?
Step 3B: Alternative way of launching Jupyter Notebook
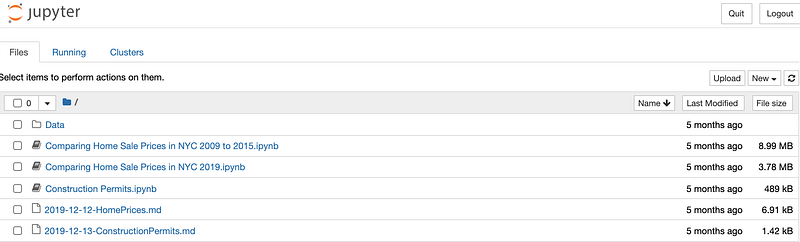
If you’ve done step 3, go ahead and terminate your current Terminal session. Open Terminal again and this time, type in jupyter notebook pathToLocation, where PathToLocation is a path like in the screen shot below. Note: You do not need to install Notebook as done in step 2 again.

Yikes!! It looks super long and messy. Please don’t try to type out the path! In Mac it is simple. Just drag and drop the folder you want into Terminal and it automatically types out the path for you. Press enter, and the following page will open in your browser. Now you’ve got quick access to all the relevant files!
This small extra step goes a long way in staying organised!
Part 2: Using your own Environment
We can use different conda environments every time we launch Jupyter Notebook. Using an environment.yml file allows you to easily install the packages you need when launching Jupyter. This is what an environment.yml file looks like.

Channels: Locations where packages are stored. Dependencies: Python packages.
WHY do this? An environment.yml file is a collection of these python packages. I think having different environment created allows you to switch easily between different versions of packages for different projects. They also make it easier for there to be standardised environment across different team members. I welcome comments on other reasons why we do this because I myself am not 100% sure.
If you have an environment.yml file (always make sure it has a .yml extension and not .txt), we can now move on to how to use the environment.
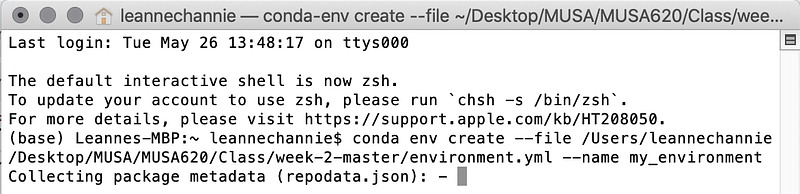
Step 1: Create environment in Terminal
Open Terminal again, and after the $, type: conda env create --file pathToFile --name whateverNameYouWant . Be very careful to have the space before the double dashes and no space right after the double dashes. To get the pathToFile, simply drag and drop the environment file from finder into Terminal after typing in --file (don’t forget the space after file before dropping in the file!). Ensure your whateverNameYouWant has no spaces.

Step 2: Activate the environment
Before launching Jupyter Notebook, you have to activate the environment you wish to use. (Note: You only need to create the environment once, and when you open Terminal subsequently you can jump right to this step.) Type in conda activate nameOfEnvironment, then enter, and you see that what is in the brackets changes. nameOfEnvironment is the name you chose when creating the environment in Step 1. In that new line, repeat part 1 step 3B to launch Jupyter Notebook.

Congrats, you now have launched Jupyter Notebook with specific packages.
Step 3: Updating your Environment
Sometimes you want to change a few packages in your existing environment, but not create a new environment. I very stupidly created new environments every week in one semester when I could just have been updating the existing environment, and it was soooo messy.
To avoid my mistake, update your environment using the following command:
conda env update --name nameOfEnvironmentYouWantToUpdate --file pathToNewEnvironment . Once again, simply drag and drop the new environment file into Terminal after --file .

Now just repeat step 2 to launch Jupyter Notebook with your updated environment!
That’s it! I hope this is useful to my future self as well as anyone who is new to Jupyter Notebook. Please let me know if I’ve made a mistake or missed out any steps! Thank you!
Acknowledgements: Thank you to Nick Hand, professor of the MUSA (Master of Urban Spatial Analytics) 620 course — Geospatial Data Science in Python, who taught me how to program in Python in the Fall 2019.
This article by Matthew Sarmiento on an in-depth explanation on conda environments. https://towardsdatascience.com/a-guide-to-conda-environments-bc6180fc533