

Installing and Configuring Apache Airflow: A Step-by-Step Guide
This article is part of a series evaluating existing data orchestration tools, their capabilities and limitations. It includes some resources that allow users to get started building Data Release Pipelines
Contents
- Why Choose Apache Airflow?
- Ingesting Data in Apache Airflow
- Features of Apache Airflow
- Advantages of Apache Airflow
- Disadvantages of Apache Airflow
- Step 1: Install Python and Pip
- Step 2: Set Up the Airflow Home Directory
- Step 3: Install Apache Airflow
- Step 4: Initialize the Backend
- Step 5: Start the Web Server
- Step 6: Run the Airflow Scheduler
- Conclusion
Why use Airflow for Data Engineering?
Apache Airflow offers a range of features that make it a popular choice for managing workflows in Data. First and foremost, Airflow is learnable as it’s written in Python, the lingua franca of most Data practitioners. Its open-source nature ensures that it has a large user community, providing support and continuously improving the platform. It’s been around since 2014, and is therefore the oldest of all workflow orchestration packages widely used today.
One of the key features of Airflow is the ability to roll back to previous versions of workflows using version control. This allows you to easily revert changes if bugs appear in deployment code. Tasks in Airflow are also idempotent (meaning you get the same output no matter how many times you run them), which is very helpful in this context. Airflow also offers deployment integrations with various technologies, such as Google Cloud Platform, Amazon AWS, and Microsoft Azure.
The user interface of Apache Airflow is another helpful feature. It provides a comprehensive view of your workflows, allowing you to track their status, runtimes, and logs. This makes it easy to monitor and manage your workflows effectively, although the data shown is Data-agnostic and workflow-specific, which means the UI is rarely sufficient to debug a complex Data Release Pipeline.
These characteristics make Airflow a relevant choice for data engineering, specifically, ingesting data, transforming data, and workflows that follow such as Data Science or reverse ELT (“rELT”).
Features of Apache Airflow
Apache Airflow comes with a range of features that make it a versatile and powerful platform for workflow management. Some of the key features include:
- DAG-Based Workflow Management: Airflow allows you to define your workflows using Directed Acyclic Graphs (DAGs), which provide a clear start and end point for each workflow.
- Extensive Operator Library: Airflow provides a wide range of operators that can be used to interact with different technologies, such as databases, cloud platforms, and APIs.
- Web Interface: The Apache Airflow UI provides a user-friendly interface for monitoring and managing your workflows. It allows you to view the status of your DAGs, track task execution, and access logs and task details.
- Scheduling and Dependency Management: Airflow allows you to schedule your workflows based on time or external triggers. It also handles dependencies between tasks, ensuring that they are executed in the correct order.
- Scalability: Airflow is designed to handle large-scale workflows and can be easily scaled up to support high volumes of data and complex workflows.
Ingesting Data in Apache Airflow
There are a number of tools which can be used to ingest data, co-ordinated via Apache Airflow and we’ve seen our own customers using some of these tools, in order of popularity:
Fivetran: Fivetran is a cloud-based Extract, Load, Transform (“ELT”) tool that can be used to ingest data from a wide variety of sources, including SaaS applications, databases, and cloud storage. Fivetran provides pre-built connectors for many popular data sources, making it easy to get started.
Stitch: Stitch is another cloud-based ELT tool that offers a similar set of features to Fivetran. Stitch also provides pre-built connectors for many popular data sources, and it offers a number of features that make it well-suited for businesses that need to ingest data from a variety of sources. Something less well-known is that the Stitch architecture is based an another Open-source project: Singer.
Hevo Data: Hevo Data is a cloud-based data integration platform that can be used to ingest data from a wide variety of sources, including SaaS applications, databases, and cloud storage. Hevo Data offers a number of features that make it well-suited for businesses that need to ingest data from a variety of sources, including support for multiple data formats, data transformation capabilities, and a scalable architecture.
We include an open source tool as well for open source lovers like us :)
Meltano: Meltano is an open-source ELT tool that can be used to ingest data from a wide variety of sources. Meltano is a good choice for businesses that need a flexible and scalable solution for ingesting data.
Advantages of Apache Airflow
There are several advantages to using Apache Airflow for workflow management:
- Time-Based Scheduling: Airflow provides a flexible and intuitive way to schedule your workflows based on specific time intervals, allowing you to automate repetitive tasks.
- Extensive Operator Options: With a wide range of operators available in Airflow, you can choose the most suitable ones for your specific use case. These operators enable you to interact with various technologies and services seamlessly. An Operator is like a plug-in, which are essentially basic task templates that require some basic configuration (like secrets) but allow Airflow to interact with third party tooling (like this mentioned in the Data Ingestion section)
- A UI: The Apache Airflow UI offers a dashboard that allows you to monitor the status of your workflows, track their runtimes, and access detailed logs. This makes it easy to identify issues, but offers little by way of metadata for debugging
- Data Immutability: Airflow follows a data processing pattern where raw data is stored, processed, and then separated from the processed data. This approach ensures data immutability, providing consistency and reliability in your workflows.
- Idempotence: Airflow aims to provide idempotence, meaning that executing a task multiple times will always yield the same output. This ensures the consistency and reliability of your workflows.
Disadvantages of Apache Airflow
While Apache Airflow offers numerous advantages, it also has a few limitations that you should be aware of:
- Difficulty in Writing Test Cases for Raw Data Pipelines: Writing test cases for workflows involving raw data can be challenging due to the complexity and dynamic nature of the data. It requires careful consideration and thorough testing to ensure the accuracy and reliability of your workflows.
- Changing Schedule Requires DAG Renaming: If you need to change the schedule of a workflow in Airflow, you are required to rename the corresponding DAG. This can be cumbersome if you have multiple workflows with complex dependencies.
- Running Airflow Natively on Windows is Complex: While Airflow can be run on Windows, setting it up natively on this operating system can be a complex process. It is recommended to use a Linux-based environment for optimal performance and ease of installation.
Now that we have explored the advantages and disadvantages of Apache Airflow, let’s dive into the step-by-step installation and configuration process.
Step 1: Install Python and Pip
Before installing Apache Airflow, you need to ensure that Python and Pip are installed on your system. If you already have Python and Pip installed, you can skip this step.
To install Python and Pip on Ubuntu, you can use the following commands:
$ sudo apt-get update
$ sudo apt-get install python3 python3-pip
For CentOS, you can use the following commands:
$ sudo yum update
$ sudo yum install python3 python3-pip
Make sure to verify the installation by running the following command:
$ python3 - versionIf the Python version is displayed correctly, you can proceed to the next step.
Step 2: Set Up the Airflow Home Directory
To set up the Airflow home directory, you need to define the location where Airflow will store its configuration files and data. This can be done by setting the AIRFLOW_HOME environment variable. In Windows, you would first set up a virtual environment using conda env or venv, and set the AIRFLOW_HOME environment variable there.
$ export AIRFLOW_HOME=~/airflowReplace ~/airflow with the desired location for your Airflow home directory. This directory will be used to store logs, configuration files, and the Airflow SQLite database.
Step 3: Install Apache Airflow
With Python and Pip installed, you can now proceed to install Apache Airflow using the following command:
$ pip3 install apache-airflowThis command will download and install the latest version of Apache Airflow along with its dependencies. The installation process may take a few minutes to complete.
Note — you may have the problem that I had and need to install some build tools.
Step 4: Initialize the Backend
Before starting Airflow, you need to initialize the backend database. This can be done by running the following command:
$ airflow db initThis command will create the necessary tables and schemas in the Airflow SQLite database located in your AIRFLOW_HOME directory. If you plan to use a different database backend, such as MySQL or PostgreSQL, you will need to configure it accordingly.
Step 5: Start the Web Server
Once the backend is initialized, you can start the Airflow web server by running the following command:
$ airflow webserver -p 8080This command will start the web server on port 8080, allowing you to access the Airflow user interface through your web browser. You can replace 8080 with the desired port number if needed. The webserver is a small API — it serves up the front-end and allows you, interacting with the front-end, to send it requests like starting an Airflow run or cancelling one.
The first time I did this I got this error:
ModuleNotFoundError: No module named 'pwd'That’s because pwd isn’t available on Windows. The answer:
You can either try to use WSL or running it in a Docker container.
In our repo, we have a docker-compose.yml file. If you cd into that, and run “docker compose up”, then you’ll spin up the necessary containers to get airflow started. This takes a while. And also needs 4gb of memory.
Step 6: Run the Airflow Scheduler
To enable task scheduling and execution, you need to start the Airflow scheduler. This can be done by running the following command:
$ airflow schedulerThis isn’t necessary if you just ran `docker compose up` :) It’ll already be running.
The scheduler is responsible for triggering and executing tasks based on their defined schedules. It continuously monitors the state of tasks and ensures that they are executed at the appropriate times.
Congratulations! You have successfully installed and configured Apache Airflow. You can now access the Airflow web interface by opening your web browser and navigating to http://localhost:8080. From here, you can create and manage your workflows, monitor their status, and track their execution logs.
The first time you try to get in, Airflow will ask you for a username and password. To get one of these, you should create a user.
Run
docker exec -it {containername}/bin/bashand then
airflow users create --role Admin --username admin --email admin --firstname admin --lastname admin --password adminOR if you came in via the docker file, the defaut username and password are both “Airflow”
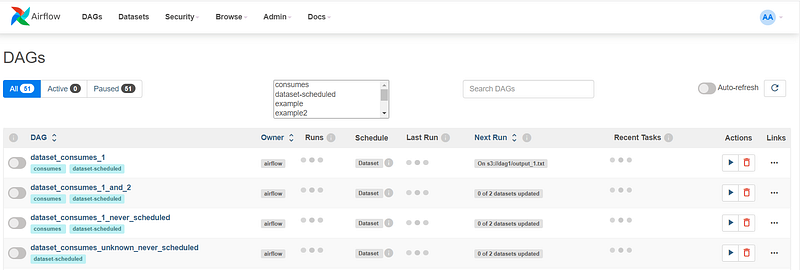
Using these “admin” creds, you’ll now be able to log into the dashboard and see the BEAUTIFUL (coughs) Airflow UI.
Conclusion
In this step-by-step guide, we have walked you through the installation and configuration process of Apache Airflow. We explored the features, advantages, and disadvantages of Airflow, highlighting its flexibility, scalability, and its interface. By following these instructions, you can set up Airflow on your system and start running and monitoring workflows. With Airflow’s extensive operator library and web interface, you have access to a highly comprehensive system for automating and monitoring batch-oriented workflows.
Remember, Apache Airflow is a versatile platform that can be integrated with various technologies, making it suitable for a wide range of use cases — not just data. If Airflow is the tool you choose, we recommend experimenting with different operators, exploring the Airflow documentation, and leveraging the full feature set of Airflow to automate and orchestrate your workflows.
Additional Information:
Here are a few code examples to help you get started with Apache Airflow. We ran through the set-up; DAG Creation is another skillset entirely.
Example 1: Defining a Simple DAG
from airflow import DAG
from airflow.operators.python_operator import PythonOperator
from datetime import datetime
def hello_world():
print("Hello, World!")with DAG('my_dag', start_date=datetime(2022, 1, 1), schedule_interval='@daily') as dag:
task = PythonOperator(task_id='hello_task', python_callable=hello_world)
taskExample 2: Defining Dependencies between Tasks
from airflow import DAG
from airflow.operators.bash_operator import BashOperator
from datetime import datetimedefault_args = {
'start_date': datetime(2022, 1, 1),
'schedule_interval': '@daily'
}with DAG('my_dag', default_args=default_args) as dag:
task1 = BashOperator(task_id='task1', bash_command='echo "Task 1"')
task2 = BashOperator(task_id='task2', bash_command='echo "Task 2"')
task3 = BashOperator(task_id='task3', bash_command='echo "Task 3"')
task1 >> task2
task1 >> task3Feel free to explore the Apache Airflow documentation and experiment with different operators and configurations to customize Airflow according to your specific requirements.
You can also find the code to Orchestra’s template Airflow repo here.
Please note it is a little bare at the moment but we will be fleshing it out with cool orchestration-related functionality to provide you with a template for releasing data.
On Orchestra
We believe data tooling should exist in the context of releasing quality data and running quality data operations. We believe framing the capabilities of a data tool within the context of how it can help release data into production reliably and efficiently is necessary for the elevation of data teams into the stratosphere of value, occupied only by the greatest individual contributors in software teams. What we’re building will let Data Teams do this in a fraction of the time and with a fraction of the cost, leaving data teams time to focus on what really matters: creating business value.
Learn more about Orchestra and what we’re building here.


