
Initialize MySQL database inside the docker container with large-volume data
Application performance is essential. As a web application developer, I do everything to guarantee that my code will run fast. One of the offenders of the application response time is communication with a database.
Offen during development a small amount of data is used to test the code. But when the application goes to production it may handle hundreds of thousands of records and the communication between the app and the database can slow down the application’s performance.
In this tutorial, I will show you how you can create a local instance of a database with a large amount of data and test its performance.
The use case
Imagine we have a database with a table that stores the purchase transactions of customers. The structure of a table:
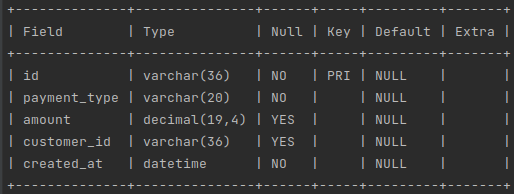
It contains the id of a purchase transaction and a payment type that can be one of the following VISA, MASTERCARD, DISCOVER, AMEX, or CASH. The table has a column to store the amount of the transaction, the date and time the transaction occurs, and the id of the customer to whom the transaction belongs. Any given customer can have many transactions.
Setup creation
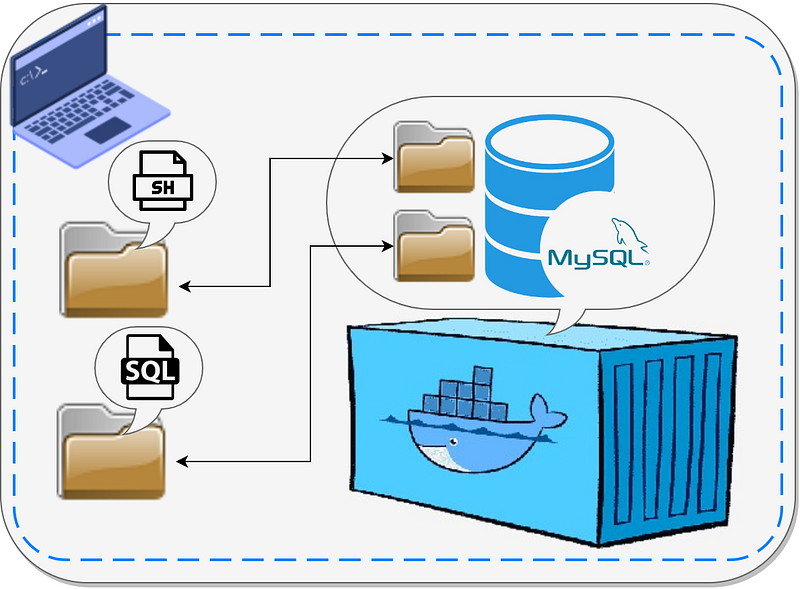
The plan is to during the Docker container initialization create a file with SQL script containing statements to create a table and insert data, then execute this file against the instance of a database inside the container.
To spin a local instance of a MySQL database I will use Docker. I will use a Docker Compose to create a container for more convenience.
First, we have to define the docker-compose file:
version: '3.8'
services:
  my_sql_local:
    container_name: my_sql_local
    image: mysql:8.0.31
    restart: always
    ports:
      - "3306:3306"
    environment:
      MYSQL_ROOT_PASSWORD: root
      MYSQL_DATABASE: customer
      MYSQL_USER: customer_user
      MYSQL_PASSWORD: customer_password
      MAX_ALLOWED_PACKET: 1073741824
    volumes:
      - ./init/mysql/scripts/bash:/docker-entrypoint-initdb.d
      - ./init/mysql/scripts/sql:/tmp/sql
This file is very simple to file, here I define one container based on the official MySQL image. More about the image you can find here:
I defined a couple of environment variables. Most of the variables have self-explanatory names and don’t need further explication.
As I will create the database instance with a large volume of data, I needed to set the MAX_ALLOWED_PACKET variable to the maximum to avoid any issue related to the size of data inserted into the database.
An important part of this definition file is a Docker volume mapping. In this section, I defined two of them. The first volume is mapped to the special directory inside the docker container.
When the container runs it will check this folder and if it finds files in this folder with extension sh or SQL it will execute the files. More about this feature you can find below:
The second volume I map to store the SQL script mentioned before. This volume is not necessary to map. Without this volume, the setup will work properly. I do this mapping to have easy access to the script which is useful for testing and debugging purposes.
In the first volume, I put the following bash script file:
#!/bin/bash

echo "########### Creating env variables ###########"
PAYMENT_TYPES=("VISA" "MASTERCARD" "DISCOVER" "AMEX" "CASH")
ROWS=10000
NUMBER_OF_CUSTOMERS=$((${ROWS} / 3))
echo "########### Numbers of customers is ${NUMBER_OF_CUSTOMERS} ###########"

SQL_SCRIPT_PATH=/tmp/sql/01-init-sql-script.sql

function getUUID() {
  UUID=($(cat /proc/sys/kernel/random/uuid))
}

function getDate() {
  DATE=$(date -d "$((${RANDOM_NUMBER} % 22 + 2000))-
                  $((${RANDOM_NUMBER} % 12 + 1))-
                  $((${RANDOM_NUMBER} % 28 + 1))
                  $((${RANDOM_NUMBER} % 23 + 1)):00:00" '+%Y-%m-%d %H:%M:%S')
}

function getPaymentType() {
  PAYMENT_TYPE=${PAYMENT_TYPES[${RANDOM_NUMBER} % ${#PAYMENT_TYPES[@]}]}
}

function getAmount() {
  AMOUNT=$((1 + ${RANDOM_NUMBER} % (200 - 1))).$((${RANDOM_NUMBER} % 99))
}

echo "########### Creating sql script file ###########"
echo "
DROP TABLE IF EXISTS purchase_transaction;

CREATE TABLE purchase_transaction (
id VARCHAR(36) PRIMARY KEY,
payment_type VARCHAR(20) NOT NULL,
amount DECIMAL(19,4),
customer_id VARCHAR(36),
created_at DATETIME NOT NULL
);
" >${SQL_SCRIPT_PATH}

if [ "${ROWS}" -gt 0 ]; then
  echo "########### Generating insert statement for ${ROWS} rows ###########"
  echo "INSERT INTO purchase_transaction VALUES" >>${SQL_SCRIPT_PATH}
fi

for ((i = ${NUMBER_OF_CUSTOMERS}; i >= 0; i--)); do
  RANDOM_NUMBER=$((RANDOM))

  if [ ${i} == 0 ]; then
    NUMBER_OF_TRANSACTIONS_FOR_CUSTOMER=${ROWS}
  else
    MAX_NUMBER_OF_TRANSACTION_PER_CUSTOMER=$((${ROWS} / ${i}))
    NUMBER_OF_TRANSACTIONS_FOR_CUSTOMER=$((${RANDOM_NUMBER} % ${MAX_NUMBER_OF_TRANSACTION_PER_CUSTOMER} + 2))
    ROWS=$((ROWS - NUMBER_OF_TRANSACTIONS_FOR_CUSTOMER))
  fi
  getUUID
  for ((j = 1; j <= ${NUMBER_OF_TRANSACTIONS_FOR_CUSTOMER}; j++)); do
    RANDOM_NUMBER=$((RANDOM))
    getPaymentType
    getAmount
    getDate
    if [ ${i} == 0 ] && [ ${j} == ${NUMBER_OF_TRANSACTIONS_FOR_CUSTOMER} ]; then
      LAST_CHAR=";"
    else
      LAST_CHAR=","
    fi
    echo "(uuid(),\"${PAYMENT_TYPE}\", \"${AMOUNT}\", \"${UUID}\", \"${DATE}\")${LAST_CHAR}" >>${SQL_SCRIPT_PATH}
  done
done

echo "########### Running SQL script against DB ###########"
mysql --user="customer_user" --password="customer_password" --database="customer" <${SQL_SCRIPT_PATH}

echo "########### Script execution finished! ###########"
The file looks confusing, but it is only the first look. At the beginning of the file, I declare variables. One variable is an array that contains payment types, the next variable is set the number of rows that will be inserted.
As I've mentioned before the customer can have multiple purchase transactions, so we will calculate the number of customers by dividing the number of rows by 3. This number for me makes more sense since if we have for example 10 transactions we can divide it between 3 customers and each customer can have from 1 to 8 transactions.
The next variable defines the path to the directory inside the container where the SQL script will be created. As you may remember this directory is mapped as a volume in the docker-compose file.
To generate values for the insert statement I define a couple of functions. The first function will generate the UUID which is used as an id of a customer. The second function generates a random timestamp, then one more function gets the random value from the payment type array. And the last function generates a random value for the amount of transaction.
After variables and function definition, the SQL statement that creates a table is generated and saved into the file, created in the directory defined in the previously defined environment variables.
Then the most important part is where the script creates insert statements. For each customer, the number of transactions is randomly calculated. For each transaction defined above functions are called to generate the values. And then those values are combined into the insert statement and this statement is appended to a script file created earlier.
And last but not least the script has a command to upload the created file into a database.
The complete code can be found here:
Setup execution
To create and run the container, execute the command from the directory where the docker-compose file is located:
$docker-compose upor for Docker Compose used as a plugin:
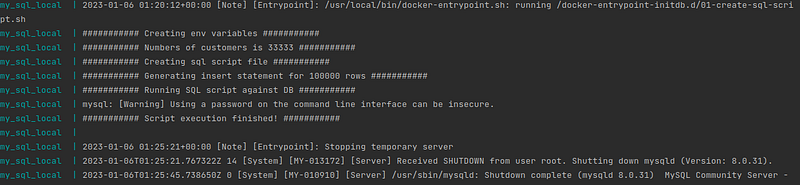
$docker compose upDepending on the number of rows and the configuration of the PC the database creation time may take up to 5 minutes, so be patient. Creating the database instance with 100k records takes up to 5 minutes on my PC with 4 cores CPU and 8 GiB of RAM.
Unfortunately, the bash script is not as performant as for example Java. This is the reason why the creation of the transaction id I’ve left for the database. The execution logs look like below:
Run queries in the database
The easiest way to run the queries in the database is to enter inside the container and use the MySQL command line interface. To enter the container execute the command:
$docker container exec -it my_sql_local bashMore about Docker commands you can find here:
And to login inside the database run the command using credentials configured as environment variables in the docker-compose file:
$mysql -ucustomer_user -pcustomer_password;After successful login, execute the below command to switch to the needed database:
USE customer;

SELECT count(*) FROM purchase_transaction;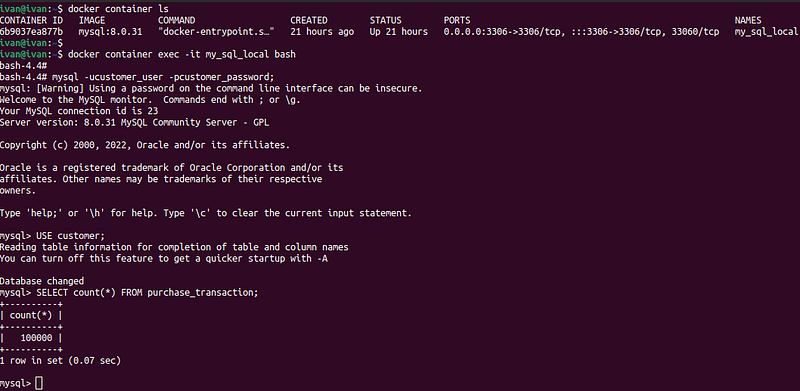
If you don't like to use the CLI you can connect to a DB using any database tool, like DBeaver.
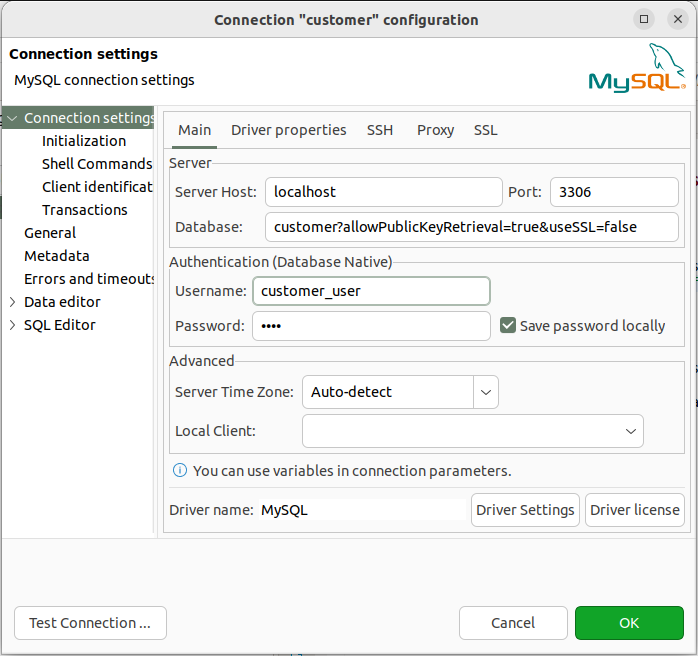
Just need to append the database with extra configurations:
?allowPublicKeyRetrieval=true&useSSL=falsePerformance of queries
Now about performance. There is a great article explaining how you can check the performance of a query. I highly recommend you read it.
I will demonstrate to you how to check the performance of a query using the following example. Imagine our application needs to check if the customer has any purchase transactions. For this, we will create a simple query that checks the existence of any transaction by the customer id. To speed up the query we will add the index for the column that holds the customer id and then compare the performance of the query before and after the index.
To be able to check a performance we have to log in to the database as a root user. If you logged in as a simple database user for example the one set as the environment variable in the docker-compose file with the user name customer_user you won’t be able to query tables with needed information, so keep it in mind. Logg out from the simple user and execute the command:
$mysql -uroot -proot;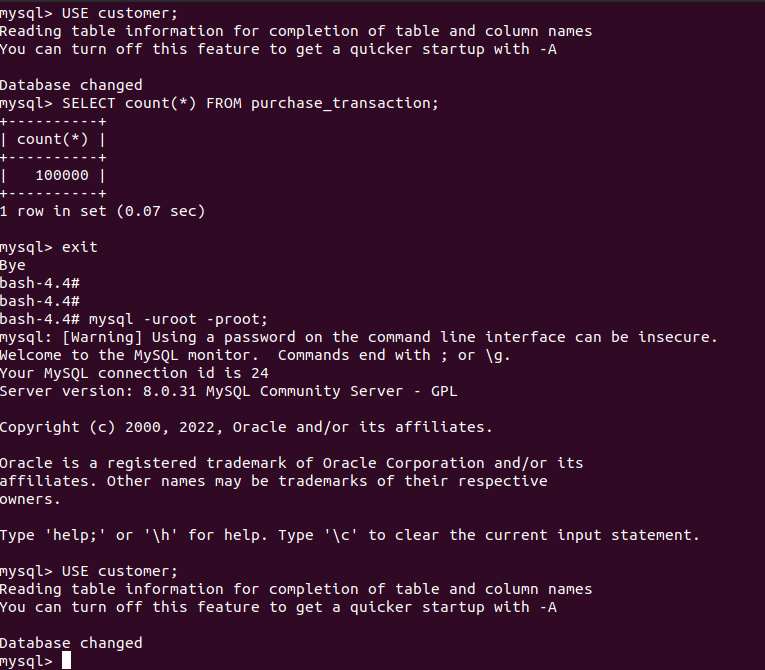
After logging in as a root we have to perform a couple of queries to enable query performance profiling, as explained in the article mentioned before.
UPDATE performance_schema.setup_instruments SET enabled = 'YES', timed = 'YES';

UPDATE performance_schema.setup_consumers SET enabled = 'YES';
First, we perform a simple query that checks if a customer has any purchase transactions. Remember that we don't have yet an index on this column.
SELECT EXISTS(SELECT * FROM purchase_transaction
              WHERE customer_id = 'e68316fa-4c54-419f-8e95-b2d3ce31e258');
Because the customer id is randomly generated in your case it will be different than mine, just get anyone by executing the query.
SELECT * FROM purchase_transaction;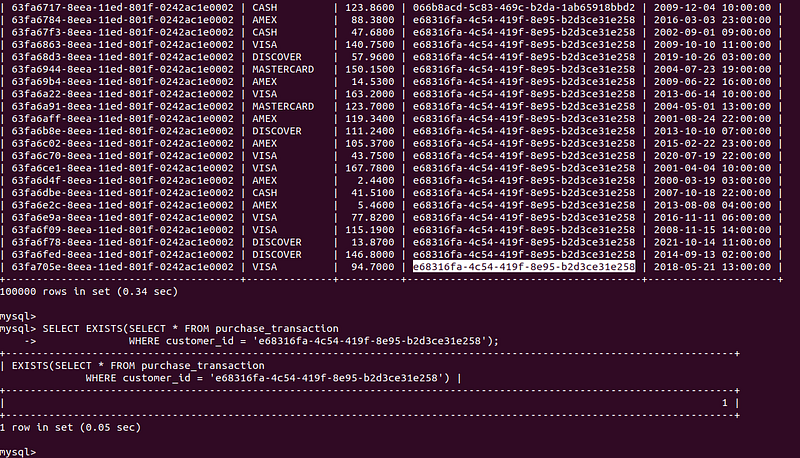
Now we will execute a query to fetch the performance of the previous one:
SELECT
    TRUNCATE(timer_wait / 10000000000, 2) AS timer_wait_sec,
    rows_sent,
    rows_examined,
    select_scan,
    no_index_used,
    digest
FROM
    performance_schema.events_statements_history_long
WHERE
    sql_text LIKE '%e68316fa-4c54-419f-8e95-b2d3ce31e258%';
The only way to get needed information at this point is by the SQL text of a query. Using this column is not that convenient because we have to find something quite distinct in the query to be able to fetch the right one. But this query returns a digest of an original query and in posterior queries, we can use it instead of a SQL text.
SELECT
    sql_text
FROM
    performance_schema.events_statements_history_long
WHERE
    digest = '351a4a86f9401bf26de96e5312f2853aeed0b7177f8ce57090c16e86dadb894f';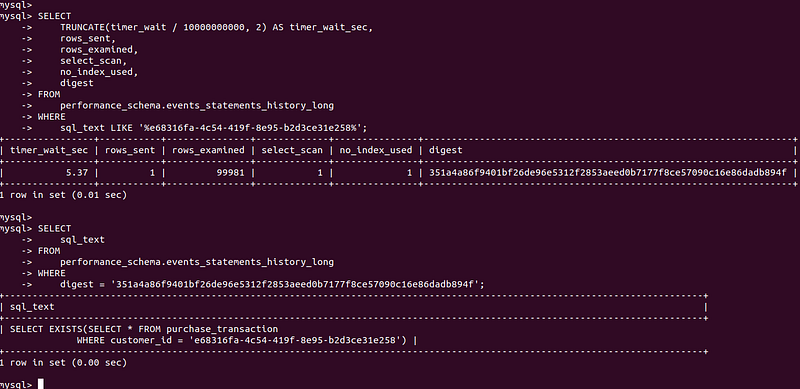
I ran a query a couple of times just to have more performance records. And then checked performance using the digest of a query.
SELECT
    TRUNCATE(timer_wait / 10000000000, 2) AS timer_wait_sec,
    rows_sent,
    rows_examined,
    select_scan,
    no_index_used,
    digest
FROM
    performance_schema.events_statements_history_long
WHERE
    digest = '351a4a86f9401bf26de96e5312f2853aeed0b7177f8ce57090c16e86dadb894f';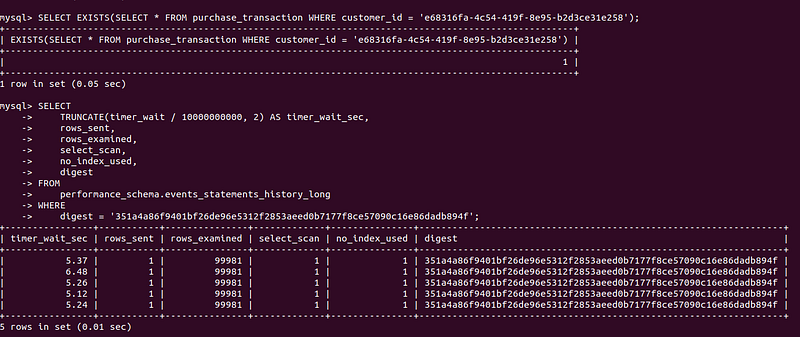
As you can see from the screen the average time of a query fluctuates near 5 milliseconds. And the column no_index_used indicates that no index was used during the execution of a query.
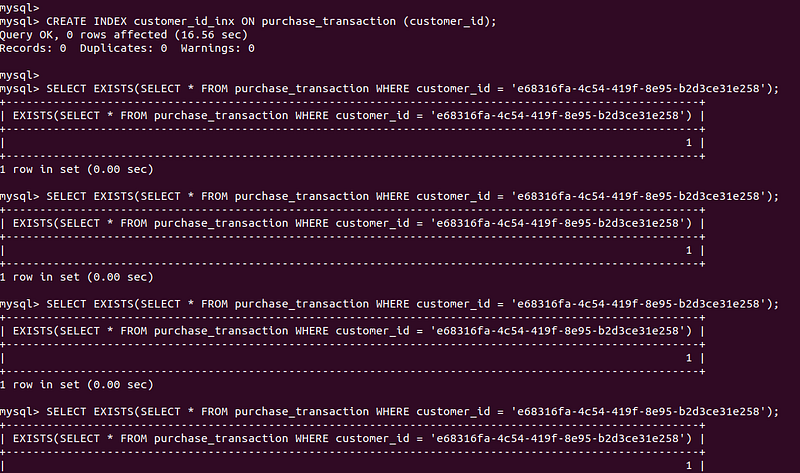
Now I add the index to the customer id column:
CREATE INDEX customer_id_inx ON purchase_transaction (customer_id);After I execute the original query couple of times.
And then I check performance again by the digest:
SELECT
    TRUNCATE(timer_wait / 10000000000, 2) AS timer_wait_sec,
    rows_sent,
    rows_examined,
    select_scan,
    no_index_used,
    digest
FROM
    performance_schema.events_statements_history_long
WHERE
    digest = '351a4a86f9401bf26de96e5312f2853aeed0b7177f8ce57090c16e86dadb894f';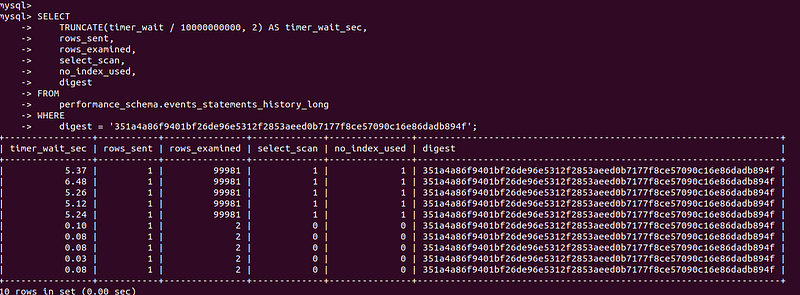
As you can see the performance of the query improved a lot and now it spends less than a millisecond because it takes advantage of an index.
Conclusion
Docker gives us as developers an opportunity to replicate the production environment on our local machine. This tutorial is meant to show how you can create a database with a large amount of data. And use it to test and improve the queries executed by your application. Here I use simple examples, but these examples can serve as a base for your use cases.
Thank you for reading! Please like and follow. If you have any questions or suggestions, please feel free to write me on my LinkedIn account.
Become a member for full access to Medium content.


