
In-App Purchases and StoreKit in iOS 14
Implementing new features in StoreKit

Before you read this story, note an updated version [as in code] can be found here.
Much of the buzz at WWDC2020 was given over to SwiftUI 2.0 and ARKit, so you should forgive yourself for missing a seismic change to the StoreKit framework — a change that will make your life as an app developer far easier.
If you read my article Set Up Your SwiftUI App to SupportIn-App Purchases, then you already know half the story. The second half is unchanged, but Apple has added some new rules to the first half with iOS 14. Let’s go over the whole shebang to paint a complete picture just in case you’re new here.
In my eyes, the seismic change Apple made was giving you, the developer, the ability to implement in-app purchases in the simulator locally. Being able to implement in-app purchases in full without a developer account allows you to do all your testing offline. Obviously, if you want to earn any money, you’ll need to switch to the more traditional route at some point. But just getting the ball rolling is now far easier.
I’ll begin by painting a picture of what I want to build. I want to illustrate the three types of in-app purchases you can make:
- Consumable (will last as long as you’re running the app)
- Non-consumable (in theory, will last forever)
- Subscriptions (renew themselves)
I want to keep things as simple as possible too, so I am going to base my app on the simple idea of an electronic ticket. You can buy a consumable ticket, a pass (a non-consumable ticket) that never expires, or a ticket subscription.
Let’s code. You need to start by creating a project. Use SwiftUI as a User interface. Once created, add two additional files to it. A simple Swift one and a template file that answers to the name StoreKit Configuration:
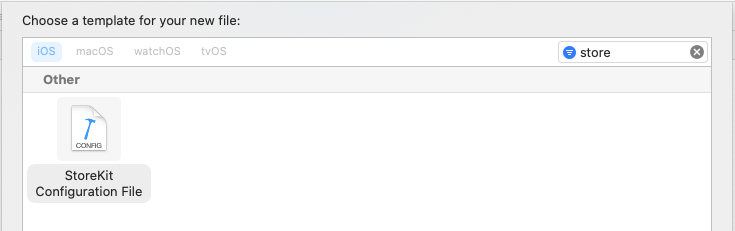
Having added those two files to your project, click on the configuration file itself, which will have a plus sign through which you can add one or more of the different types of in-app purchases:
- Consumable
- Non-consumable
- Auto-renewing subscription
Add one of each type and complete the details shown below:
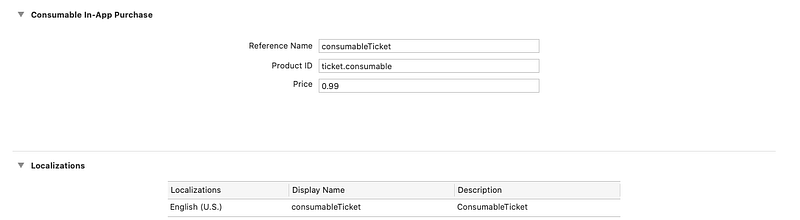
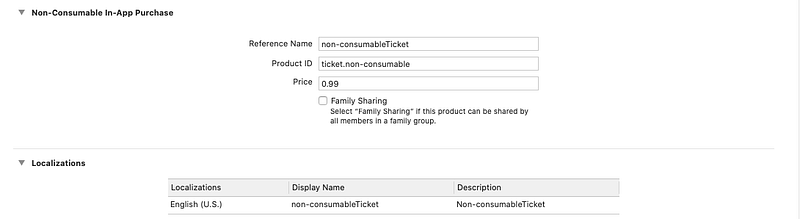
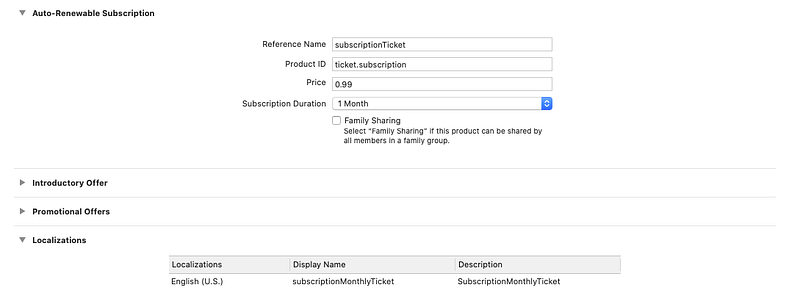
Take special note of the Product IDs you enter for these items. Your IDs need to be unique. Apple suggests you use reverse domain notation to ensure you meet this criterion.
Now edit your additional Swift file, rename it IAPManager.swift, and add to it a set that contains the Product IDs you just defined in the configuration:
private let allTicketIdentifiers: Set<String> = [
"ticket.consumable",
"ticket.non-consumable",
"ticket.subscription"
]
Having defined our in-app purchases, let’s start to fill out the template code we’ll need to liaise with the Apple StoreKit framework:
We’ve got three methods defined here. The first will query the products available in your “local” configuration, whereas the second and third will check that you’re asking for a product when you ask to buy. Now you’re going to get an error when you copy and paste this into your project because you cannot set the delegate of the request type until you conform to the SKProductRequestDelegate protocol. You can do that with this extension to the class:
We’re not quite there yet because I want to define an observable object within which I can populate my in-app data items:
Now having defined the skeleton of an IAP app, we can implement a simple SwiftUI interface to make use of it. We do so by creating a view that we can call within the standard ContentView() of our SwiftUI interface:
This will present the word Tickets. If tapped, it will populate a list with the three types of tickets you can buy. Note that the call will also require a State variable. Here is the code just for completeness:
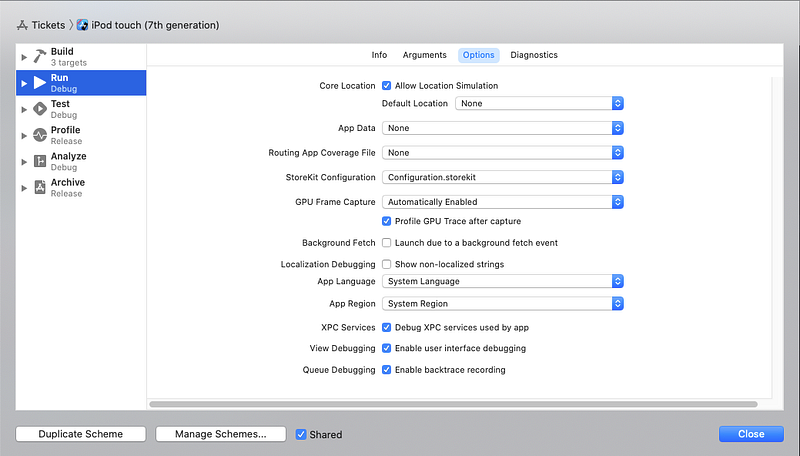
Now if you just compile and run this, nothing will happen because you need to tell Xcode that you want to use the new local configuration file for StoreKit. You do so by editing the run scheme in Xcode. Within Xcode 12, you’ll find the option to select the StoreKit Configuration file you want to reference. You can create multiple configuration files within your project (a useful option too).
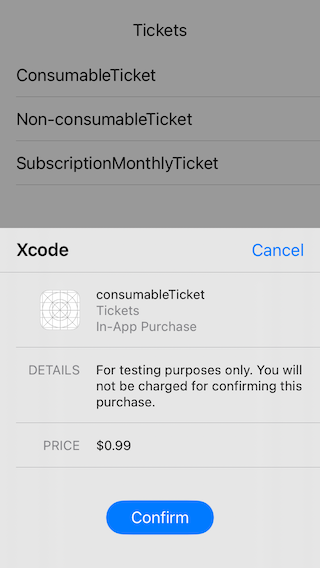
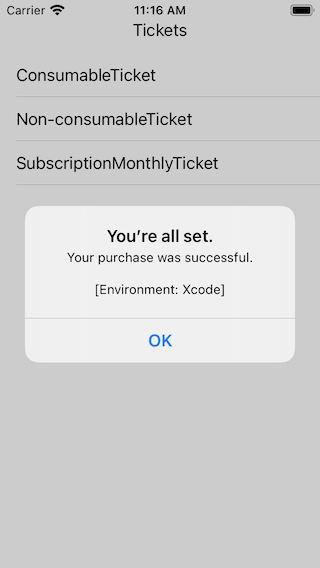
Having done all that, you should be ready to run a test. Have a go. Run the app, tap on the Ticket text, and then on the consumable ticket presented in the list. Assuming you managed to follow along, you’ll get a prompt advising you about the success of your purchase.
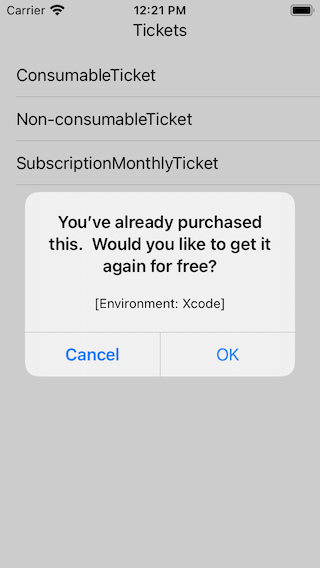
It looks good, but it gets better. Try purchasing a non-consumable ticket. You’ll succeed the first time and indeed the second. But wait! On the second, you get a different prompt:
Now under iTunes connect, you would have been locked in on this purchase. Under the new local XCode management of this, you can edit the transactions made by clicking on the icon to access the Manage StoreKit transactions manager (the icon that looks a little like a lightbulb in a circle):

After clicking on it, I can see the transaction log of what has happened and edit the transaction itself by right-clicking or using the menu seen here at the top right:

Try editing the tickets by deleting your purchase and go back to the simulator to try again. No record will exist and you’ll be able to re-purchase a ticket that should have (in theory) never expired. I can do other things too here in the transaction log, such as mark a transaction as a refund.
You also have full support of the parental control options as well as interrupted purchases, where a user needs to take some action on his account. With that said, I don’t want to make this article too long and I’m not going to go over that here. You should watch the WWDC2020 video on the new StoreKit for full details. It is what I based this article on.
On that note, I’m going to bring this article to an end. I hope you learned something new, as I did while writing it.
Keep calm, keep coding.


