
Implementing Redis Cache in a Spring Boot Project with @Cacheable, @CachePut, and @CacheEvict Annotations
👇👇👇 GITHUB LINK FOR SOURCE CODE👇👇👇 https://github.com/vinosubi/redis-cache-springboot-demo1.git
In this project, we are demonstrating how to store and retrieve data (objects) using Redis cache within a Docker environment. Please save this article for future reference. Download the source code and practice on your local machine using the following instructions. This example demonstrates a fully functional Redis cache workflow.
Redis :
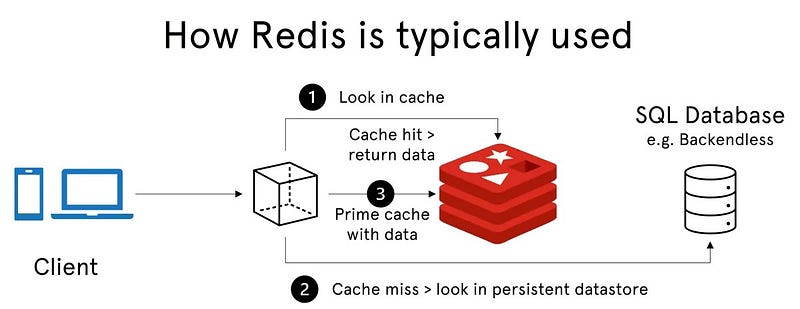
Redis (Remote Dictionary Server) is an open-source, in-memory data structure store that can be used as a cache, database, and message broker. As a cache, Redis stores data in memory to provide extremely fast data retrieval, reducing the need to repeatedly access slower data sources like databases. This is particularly useful for applications that require high performance and low latency.
Key Characteristics of Redis as a Cache
- In-Memory Storage: Redis stores data in RAM, which makes read and write operations very fast compared to traditional disk-based databases.
- Data Structures: Redis supports a variety of data types, such as strings, lists, sets, sorted sets, hashes, and more. This makes it versatile for caching different types of data.
- Persistence Options: Although it’s primarily used as a cache, Redis also offers options to persist data to disk. This way, data can be restored if Redis restarts.
- Eviction Policies: Redis allows for various eviction policies to determine how to handle new entries when the cache is full. Some common policies include:
- Least Recently Used (LRU): Removes the least recently accessed data.
- Least Frequently Used (LFU): Removes the data that has been accessed the least.
- Time-to-Live (TTL): Data expires after a set time.
- High Availability and Scalability: Redis can be configured for high availability with Redis Sentinel and can scale horizontally using Redis Cluster.
- Support for Caching Strategies: Redis supports several caching strategies, including:
- Read-Through Cache: Fetches data from the cache; if it’s missing, retrieves it from the database, stores it in the cache, and returns it.
- Write-Through Cache: Updates the cache and the database simultaneously on writes.
- Write-Behind Cache: Writes data to the cache first and then asynchronously updates the database.
How Redis Works as a Cache in Spring Boot
In a Spring Boot application, Redis can be used as a caching layer by leveraging annotations provided by Spring Cache, such as @Cacheable, @CachePut, and @CacheEvict. Here's how each one works:
- @Cacheable: Checks the cache before executing a method. If the data is in the cache, it returns it immediately; otherwise, it calls the method, caches the result, and then returns it.
- @CachePut: Forces the method to execute and update the cache with the returned data, even if it’s already cached.
- @CacheEvict: Removes the specified data from the cache, which is useful when data is outdated or deleted.
Benefits of Using Redis as a Cache
- Reduced Load on Databases: By caching frequently requested data, Redis reduces the need to access the database repeatedly, lowering the load on the database.
- Improved Application Performance: Redis allows for rapid data retrieval, reducing latency and improving user experience.
- Scalability: Redis can handle high loads and is suitable for large-scale applications.
- Flexibility: With various data types and eviction policies, Redis is adaptable to different caching needs and use cases.
Redis is widely used in scenarios requiring fast data access, like session storage, caching user data, and maintaining real-time counters (e.g., page views, likes), making it ideal for applications that need to deliver real-time experiences.
Here’s a complete implementation of Redis caching in a Spring Boot project using
@Cacheable,@CachePut, and@CacheEvictannotations. This example demonstrates CRUD operations on anUserobject, where caching helps to reduce database hits by caching the results in Redis.
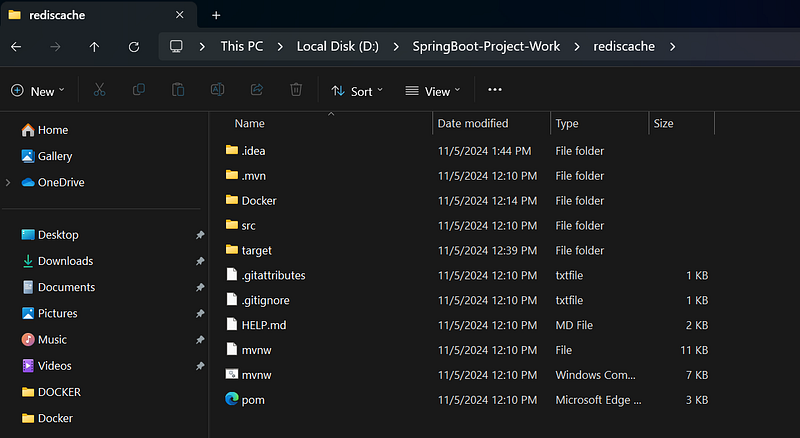
Project Structure
rediscache/
├── Docker/
├── src/
│   ├── main/
│   │   ├── java/
│   │   │   └── com/
│   │   │       └── vinotech/
│   │   │           └── rediscache/
│   │   │               ├── RedisCacheApplication.java
│   │   │               ├── config/
│   │   │               │   └── CacheConfig.java
│   │   │               ├── model/
│   │   │               │   └── User.java
│   │   │               ├── repository/
│   │   │               │   └── UserRepository.java
│   │   │               ├── service/
│   │   │               │   └── UserService.java
│   │   │               ├── controller/
│   │   │               │   └── UserController.java
│   │   ├── resources/
│   │   │   ├── application.properties
│   │   │   └── static/
│   │   │   └── templates/
│   └── test/
│       ├── java/
│       │   └── com/
│       │       └── vinotech/
│       │           └── rediscache/
│       │               └── RedisCacheApplicationTests.java
│       └── resources/
├── target/

└── pom.xml
Project Directory and Docker File
Docker compose File for Redis
version: '3.8'
services:
  redis:
    image: redis:latest
    container_name: redis
    ports:
      - "6379:6379"
    volumes:
      - redis-data:/data

volumes:
  redis-data:
to Run Redis using docker in Terminal window
Step 1: Add Dependencies
Add the following dependencies to your pom.xml for Spring Boot, Spring Data Redis, and Lombok (for concise code).
<dependency>
   <groupId>org.springframework.boot</groupId>
   <artifactId>spring-boot-starter-cache</artifactId>
</dependency>

<dependency>
   <groupId>org.springframework.boot</groupId>
   <artifactId>spring-boot-starter-data-jpa</artifactId>
</dependency>

<dependency>
   <groupId>org.springframework.boot</groupId>
   <artifactId>spring-boot-starter-data-redis</artifactId>
</dependency>

<dependency>
   <groupId>org.springframework.boot</groupId>
   <artifactId>spring-boot-starter-web</artifactId>
</dependency>

<dependency>
   <groupId>com.mysql</groupId>
   <artifactId>mysql-connector-j</artifactId>
   <scope>runtime</scope>
</dependency>

<dependency>
   <groupId>org.projectlombok</groupId>
   <artifactId>lombok</artifactId>
   <optional>true</optional>
</dependency>
Step 2: Configure Redis
In application.properties, configure Redis connection and mysql Database properties details.
spring.application.name=rediscache
server.port=9696
# MySQL configuration
spring.datasource.url=jdbc:mysql://localhost:3306/springboottestdatabase

spring.datasource.username=root
spring.datasource.password=
#spring.datasource.driver-class-name=com.mysql.cj.jdbc.Driver

# Hibernate configuration
spring.jpa.hibernate.ddl-auto=update
spring.jpa.show-sql=true

# Redis configuration
spring.data.redis.host=localhost
spring.data.redis.port=6379

# Enable caching
spring.cache.type=redis
CacheConfig.java
import org.springframework.cache.annotation.EnableCaching;
import org.springframework.context.annotation.Bean;
import org.springframework.context.annotation.Configuration;
import org.springframework.data.redis.cache.RedisCacheConfiguration;
import org.springframework.data.redis.cache.RedisCacheManager;
import org.springframework.data.redis.connection.RedisConnectionFactory;
import org.springframework.data.redis.serializer.GenericJackson2JsonRedisSerializer;
import org.springframework.data.redis.serializer.RedisSerializationContext;
import org.springframework.data.redis.serializer.StringRedisSerializer;

import java.time.Duration;

@Configuration
@EnableCaching
public class CacheConfig {

    @Bean
    public RedisCacheManager cacheManager(RedisConnectionFactory redisConnectionFactory) {
        RedisCacheConfiguration cacheConfig = RedisCacheConfiguration.defaultCacheConfig()
                .entryTtl(Duration.ofMinutes(10))
                .serializeKeysWith(RedisSerializationContext.SerializationPair.fromSerializer(new StringRedisSerializer()))
                .serializeValuesWith(RedisSerializationContext.SerializationPair.fromSerializer(new GenericJackson2JsonRedisSerializer()));

        return RedisCacheManager.builder(redisConnectionFactory)
                .cacheDefaults(cacheConfig)
                .build();
    }
}
UserController.java
import com.vinotech.rediscache.model.User;
import com.vinotech.rediscache.service.UserService;
import org.springframework.beans.factory.annotation.Autowired;
import org.springframework.http.HttpStatus;
import org.springframework.http.ResponseEntity;
import org.springframework.web.bind.annotation.*;

@RestController
@RequestMapping("/users")
public class UserController {

    @Autowired
    private UserService userService;

    @GetMapping("/{id}")
    public ResponseEntity<User> getUserById(@PathVariable Long id) {
        User user = userService.getUserById(id);
        return user != null ? ResponseEntity.ok(user) : ResponseEntity.notFound().build();
    }

    @PostMapping
    public ResponseEntity<User> createUser(@RequestBody User user) {
        User savedUser = userService.saveUser(user);
        return ResponseEntity.status(HttpStatus.CREATED).body(savedUser);
    }

    @DeleteMapping("/{id}")
    public ResponseEntity<Void> deleteUser(@PathVariable Long id) {
        userService.deleteUser(id);
        return ResponseEntity.noContent().build();
    }
}
User.java
import jakarta.persistence.*;
import lombok.AllArgsConstructor;
import lombok.Data;
import lombok.NoArgsConstructor;

import java.io.Serializable;

@Data
@AllArgsConstructor
@NoArgsConstructor
@Entity
@Table(name = "users")
public class User implements Serializable {
    @Id
    @GeneratedValue(strategy = GenerationType.IDENTITY)
    private Long id;
    private String name;
    private String email;

}
UserRepository.java
import com.vinotech.rediscache.model.User;
import org.springframework.data.jpa.repository.JpaRepository;
import org.springframework.stereotype.Repository;

@Repository
public interface UserRepository extends JpaRepository<User,Long> {
}
UserService.java
import com.vinotech.rediscache.model.User;
import com.vinotech.rediscache.repository.UserRepository;
import lombok.extern.slf4j.Slf4j;
import org.springframework.cache.annotation.Cacheable;
import org.springframework.beans.factory.annotation.Autowired;
import org.springframework.cache.annotation.CacheEvict;
import org.springframework.cache.annotation.CachePut;
import org.springframework.stereotype.Service;
@Slf4j
@Service
public class UserService {
@Autowired
private UserRepository userRepository;
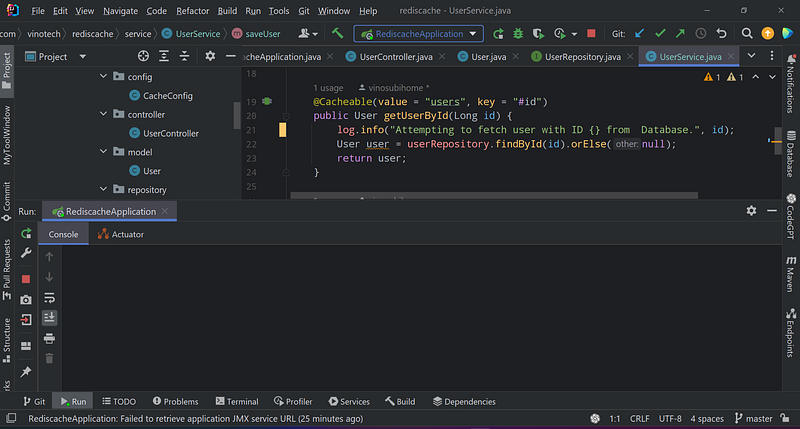
@Cacheable(value = "users", key = "#id")
public User getUserById(Long id) {
log.info("Attempting to fetch user with ID {} from Cache. iDatabase.", id);
User user = userRepository.findById(id).orElse(null);
return user;
}
@CachePut(value = "users", key = "#user.id")
public User saveUser(User user) {
log.info("Saving user with ID {} to the database and updating cache.", user.getId());
return userRepository.save(user);
}
@CacheEvict(value = "users", key = "#id")
public void deleteUser(Long id) {
log.info("Deleting user with ID {} from the database and evicting from cache.", id);
userRepository.deleteById(id);
}
}Sample SQL Data for users Table
-- Create the users table
CREATE TABLE users (
id BIGINT AUTO_INCREMENT PRIMARY KEY,
name VARCHAR(255) NOT NULL,
email VARCHAR(255) NOT NULL
);
-- Insert sample data into the users table
INSERT INTO users (name, email) VALUES ('John Doe', '[email protected]');
INSERT INTO users (name, email) VALUES ('Jane Smith', '[email protected]');
INSERT INTO users (name, email) VALUES ('Alice Johnson', '[email protected]');
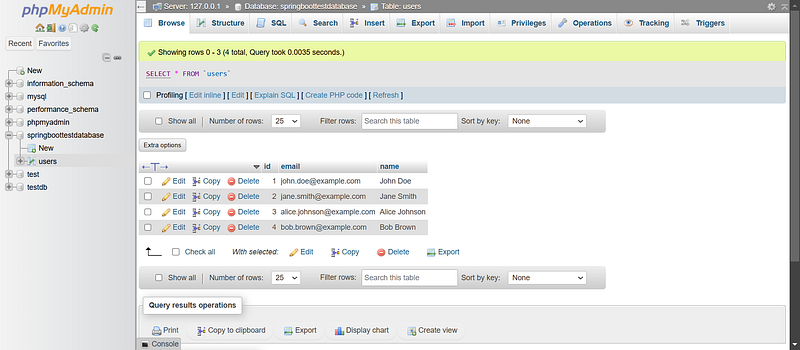
INSERT INTO users (name, email) VALUES ('Bob Brown', '[email protected]');MYSQL Dashboard
Test the Application
Run the application and test the endpoints using a tool like Postman. Redis will cache the results, reducing database hits for repeated requests to the same User ID
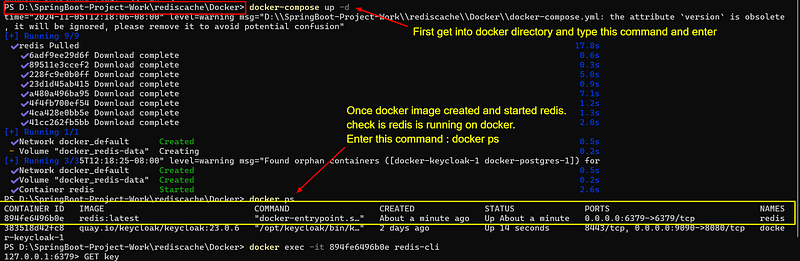
First check Docker for redis

access the Redis CLI in docker :
docker exec -it <container_id_or_name> redis-cli

docker exec -it 894fe6496b0e redis-cli
Screenshot in docker After it goes into Redis CLI

Now we check any cache data are present in redis cache for user object. Enter this command in redis CLI :
KEYS *
In database we having four records. you may check with the screenshot above.
First we run the spring boot project using maven command
mvn spring-boot:runWe will use with user id :1 endpoint
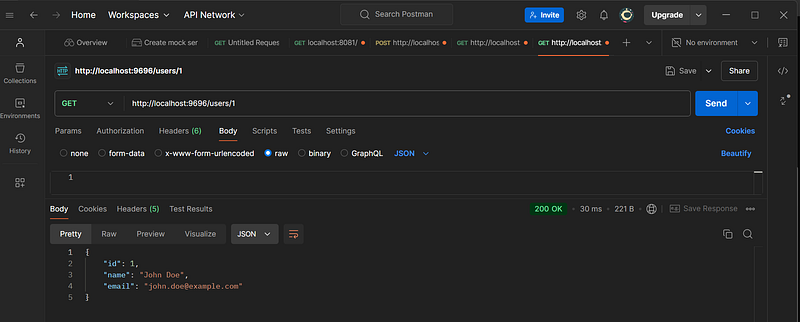
http://localhost:9696/users/1
First time it will fetch the user object from database using above endpoint and continuously send requesting from postman for same user id :1 it will be fetching from cache and not from mysql database.
Before sending request from postman. No logs found in IntelliJ console and also no data that is empty in Redis cache(check above screenshot for redis : empty array)
First Request from postman
IntelliJ Console
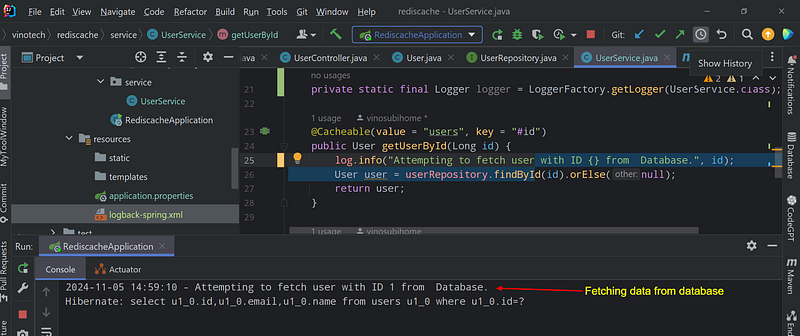
First, it will check the user ID in the Redis cache. If not found in the Redis cache, then it will search for the user ID in the MySQL database. Once the user ID (e.g., 1) is fetched from the database, it will also be saved into the Redis cache. The next time the same request for user ID 1 comes in, it will fetch the data from Redis only, not from the database.
we will check redis cache also now

We will hit next request in postman and check it. whether it is fetching form database or Redis cache.
The first time, it will return respond from the database because there is no data in the Redis cache. Once we retrieve the data from the database, it will also update the record in the Redis cache. The next time, we will get the response from the Redis cache, not from the database, for the same repeated requests.
Now we will update the username for user ID 1 and. it will update the records in both the Redis cache and the database and also we check fetch api endpoint. we will see the response whether we get the updated response from Redis cache or not.
Once we update the object using the update API endpoint, it also updates the data in the Redis cache and the database. When using the fetch API endpoint, we will see the updated data from the Redis cache, not from the database.
Redis is used to cache data (objects) to improve performance and reduce the load on the primary database (MySQL in this case). Once data is retrieved from the database, it is stored in the Redis cache. Subsequent requests for the same data are served from the Redis cache instead of querying the database again
By storing frequently accessed data in the Redis cache, the number of read operations on the database is reduced. This helps to improve the overall performance and scalability of the application
When data is updated using the update API endpoint, the changes are reflected in both the Redis cache and the database. This ensures that the cache remains in sync with the database, and the application can continue to serve the most up-to-date data from the cache
Redis is an in-memory data store, which makes it much faster to access data from Redis than from a disk-based database like MySQL. This enables the application to respond more quickly to user requests.
👇👇👇 GITHUB LINK FOR SOURCE CODE👇👇👇 https://github.com/vinosubi/redis-cache-springboot-demo1.git
If you found my articles useful, please consider giving it many claps 👏👏👏 and sharing it with your friends and colleagues. Please 🔖 save it for future reference. 🔗 Follow and 🔔subscribe me for more updates


