

Implementing a simple Python CI/CD pipeline with GitHub Actions
Part 1 — Initial setup and intro to Pylint
In this and a subsequent article, I’m going to talk about one of the ways to use the Github Actions functionality within Github to implement a simple Continuous Integration/Continuous Deployment (CI/CD) pipeline for a Python project.
In Part 1 we’ll cover the following:
- Using pylint to check our Python module for syntax errors and other issues.
- Setting up a Github action on a push change to our Github repository that does the following:
- Install pylint to do static code analysis on our Python module.
- Check if the code passes the lint test.
In part 2 we’ll be adding automated testing and deployment to our pipeline.
Assumptions and Prerequisites
Some knowledge of Github and Python would be great. I’m assuming you have Python and pip (or conda) installed on your local system.
You’ll need pylint too. You can install this from your command line using pip (or conda)
$ pip install pylint

or

$ conda install pylint
And finally, you need a GitHub account. This is free to set up, just head over to github.com and sign up.
Pylint
Let’s talk about Pylint first. Pylint is a linter. Linters check source code for errors and various other issues. They pick up bits of “fluff” from your code, hence the name. Linters don’t really check the logic of your code, just the syntax.
The types of issues they can detect vary but some common examples would be general syntax errors, unreachable sections of code, unused arguments etc … They can also check that your code agrees with a particular coding standard such as PEP8 for Python. This means they will highlight issues such as a lack of white space around operators for instance.
When you run Pylint against your code, as well as reporting any issues it discovers, it takes all the problems it finds into account and, conveniently, gives it a mark out of ten for “correctness”, with 10/10 meaning the code is perfect. Your CI pipeline can use this mark in conjunction with an appropriate threshold to determine if your code passes the linting stage and can progress to the next stage of your pipeline.
GitHub Actions
GitHub actions are a fairly recent addition to the GitHub eco-system and allow you to perform a series of “actions” whenever a supported Github “event” occurs. The most popular event that is monitored is probably the PUSH event. This happens when someone Pushes (updates) a file in a GitHub repository.
These updated files will normally be source code modules that were previously downloaded (cloned or forked) from GitHub, worked on by a programmer using a version control tool like Git and are now ready to be re-integrated back into the master copy of the source code.
Naturally, before re-integrating the changed source code to the master copy you will want to ensure that it’s bug-free and maybe passes some predefined tests. That’s the CI part of CI/CD. At the time of writing, GitHub actions are free to use for public repositories on GitHub.
Ok, let’s get started. The first thing we need is some Python code to work on. I’m going to use similar code that I use all the time when testing different features out. Basically, it’s just a little function that computes the factorial of a number. I call it 50 times for each number 0 to 49, store the results of the computations then sum up all the results to compute a final value. The code and its output are shown below.
# factorial.py

import time

final_list = []

def factorial(n):

    time.sleep(.1)

    factorial = 1

    for i in range (1,n+1):

    factorial = factorial * i

    return factorial

def sum_factorial():

    for i in range(50):

        final_list.append(factorial(i))

    result=sum(final_list)

    print("Final SUM = {}".format(result))

    return result

if __name__ == “__main__”:
    sum_factorial()


# Outputs the following
Final SUM = 620960027832821612639424806694551108812720525606160920420940314
In order to lint our code we are actually going to use a second Python script to do this for us. This script will run Pylint on our factorial code, and then compare the score that Pylint returns with a threshold value that we set to determine if the factorial code passes the lint test.
When pylint lints your code it gives it a score out of 10, 10 being perfect and less than 10 indicating there are one or more issues with your code. Here we set the threshold lint score to 9, meaning that lint will complain about our code for any score less than 9.
The code to do this is quite simple and is shown below.
#lint.py

import sys

from pylint import lint

THRESHOLD = 9

run = lint.Run(["factorial.py"], do_exit=False)

score = run.linter.stats["global_note"]

if score < THRESHOLD:

    print("Linter failed: Score < threshold value")

    sys.exit(1)


sys.exit(0)
Pylint will report all the issues it finds with the factorial source module, then depending on what score it assigns to it, will either print out our “Linter failed …” error message and exit abnormally or exit normally.
Create both of the above files on your laptop or PC in a suitable sub-directory somewhere.
You run Pylint against your source code like this:
$ python lint.pyWhen I ran the above lint.py file from the command line I got the following output and you should see something similar on your system too.
************* Module factorial

factorial.py:13:0: W0312: Found indentation with tabs instead of spaces (mixed-indentation)

factorial.py:1:0: C0114: Missing module docstring (missing-module-docstring)

factorial.py:5:0: C0103: Argument name "n" doesn't conform to snake_case naming style (invalid-name)

factorial.py:5:0: C0116: Missing function or method docstring (missing-function-docstring)

factorial.py:9:4: W0621: Redefining name 'factorial' from outer scope (line 5) (redefined-outer-name)

factorial.py:17:0: C0116: Missing function or method docstring (missing-function-docstring)

 ------------------------------------------------------------------

Your code has been rated at 6.00/10 (previous run: 6.00/10, +0.00)


Linter failed: Score < threshold value
You will note that my code is assigned a rating of 6/10. In a production environment, you would be striving for as close to 10/10 as you could get but as you can see, a lot of the issues Pylint finds do not actually affect the running of the program and are mainly informational messages.
We need to get both Python modules into a GitHub repository so we can begin to automate all this using GitHub actions, so log in to your GitHub account and create a new public repository called, say, factorial. In that repository create a dev branch and switch to that branch. You need to create a factorial.py and a lint.py with the above contents. It’s good practice to add a README.md file to your repository too. If you have Git set up on your local system you can create the files on GitHub by using a Git Stage/Commit/Push series of commands, otherwise, login to GitHub and look for the Add File button near the top right-hand side of your screen like this.
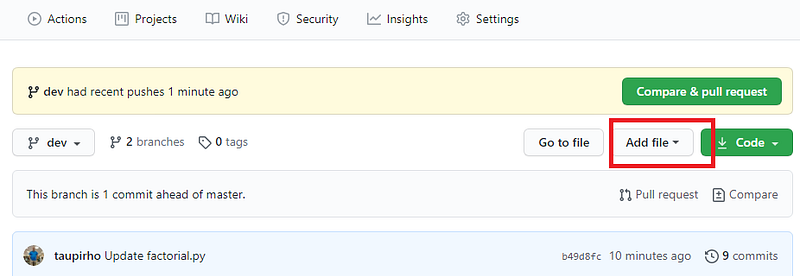
Click on Add file, then Upload Files to add factorial.py and lint.py to your repository. Be sure to Commit your changes. Your Github screen should then look something like this: -
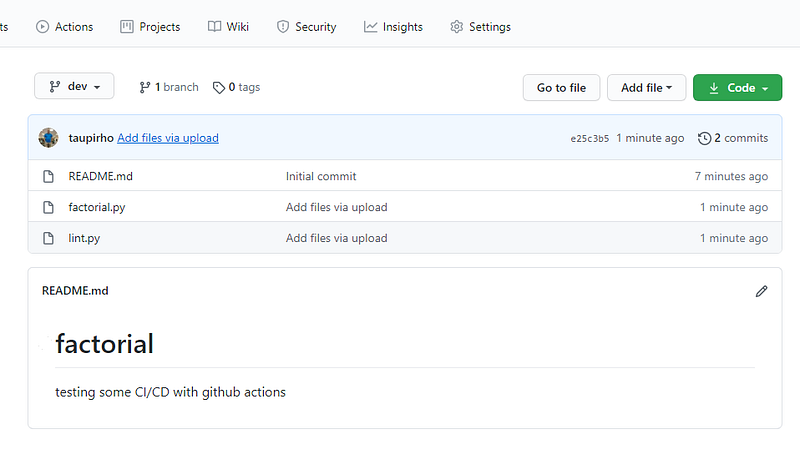
The next stage in our process is to automate the linting of our factorial code each time it’s updated and pushed back into our repository. The updating and pushing are normally done using GIT on your local system. For the purposes of this article, we’ll bypass the use of GIT and just update our files using the GitHub editor. The automation part is done using GitHub Actions
In the above diagram, you’ll notice there is an Actions button at the top left. Find this on your own Github repository and click on it. You’ll be presented with a “Get started with GitHub Actions” screen. GitHub automatically detects what kind of project or module you’re working on and presents a series of preset workflows you can use as the basis of your own. If none of them suits you can create your own from scratch.
Hopefully, you’ll see that Github Actions has correctly deduced that we are doing something with Python and presents four different workflow scenarios we can use. The one that most closely fits our bill is the Python Application Action workflow so click the Set Up This Workflow button under there. This will then display a workflow file in YAML format. YAML stands for Yet Another Markup Language and is a JSON-like text specification language. Instead of using curly braces for section demarcation as JSON does, YAML uses indentation. It’s just a definition of what tasks are to be run under what conditions.
Here is the YAML file we’ll be using.
on:
  push:
    branches: [ dev ]
    paths:
    - 'factorial.py'
    - 'lint.py'

 jobs:
  build:
    runs-on: ubuntu-latest
    steps:
    - uses: actions/checkout@v2
    - name: Set up Python 3.8
      uses: actions/setup-python@v2
      with:
        python-version: 3.8
    - name: Install dependencies
      run: |
        python -m pip install --upgrade pip
        pip install pylint
     - name: Lint with pylint
      run: |
        python lint.py
I’ve made a few changes to the original file that GitHub Actions presented as it didn’t quite do what we wanted it to. For example, it used a different linter called flake8 so we changed that to use Pylint everywhere. Also, we haven’t discussed automated testing yet using Pytest so we can remove that section too for now. In the top section, I’ve removed the pull request part as we’re not interested in that event just now.
Hopefully, the rest of the file should be fairly straightforward to understand. You’ll notice that it’s using Ubuntu to run our commands. Github spins up an Ubuntu server for us on the fly before running any of the commands we specify in the YAML file under it.
The four lines under the on: directive at the top of the YAML file ensure that we only monitor pushes (updates) to our dev branch and then only if the file that is pushed is our factorial or lint python file.
Other things the YAML file is doing include setting up our Python environment (python 3.8) on the Ubuntu server and installing pip which is used to also install Pylint before actually running the linter job itself.
Once you are happy with your YAML code, commit it using the Start Commit button on the right-hand side of the screen near the top. This will create a github/workflows sub-directory in your factorial repository containing your YAML file.
All we need to do now is test it, and for that, we just need to make a change to the factorial.py file. I just changed the line:
print("Final SUM = {}".format(result))

to

print("Final SUM is {}".format(result))
As I said before, normally changes, updates and pushes back to our GitHub repository would be done using some kind of version control tool such as Git. However, to keep these articles as concise as possible we are just going to use the built-in Github editor to make the changes to our files and commit (i.e. push) them to our dev repository.
To make the change just click on the factorial.py file link in Github, then click on the edit button near the top right of the screen. It has a little pencil-like icon on it. Make the required change as shown above then commit it. As soon as you do this, the GitHub action workflow will start to run so click over to the Actions screen and you should see something like this.
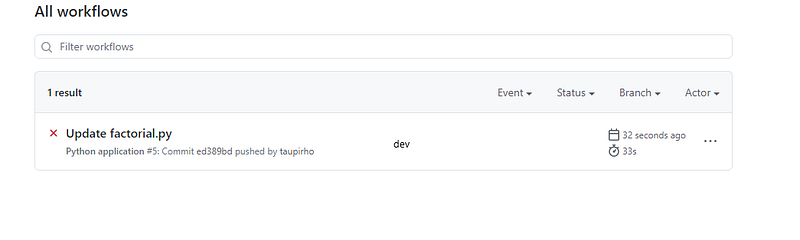
The little red cross beside it indicates it failed which is what we were expecting since our lint threshold was not met. Click on the Update factorial.py link for more information. This will show the following screen.
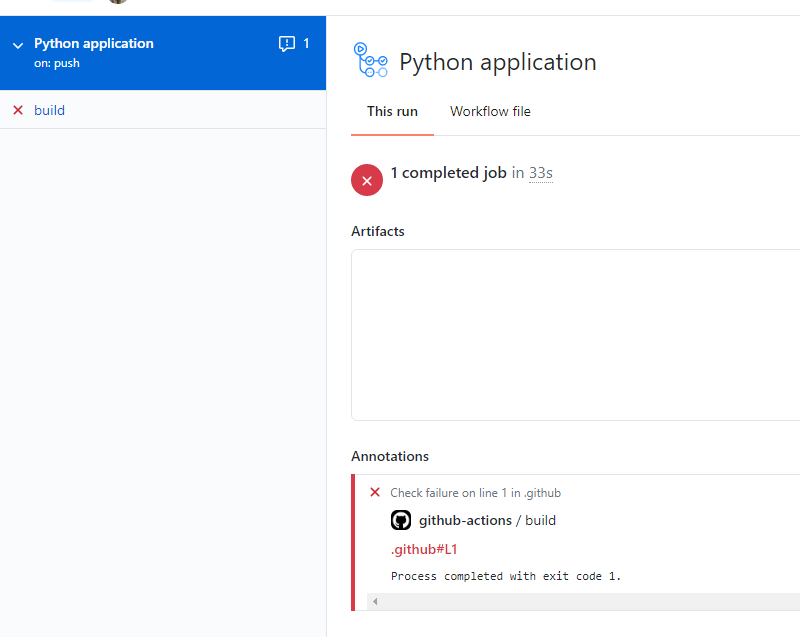
It shows that the process was completed with exit code 1. If you now click on the build link at the left-hand side of the screen you get to see some more information as to why it failed.
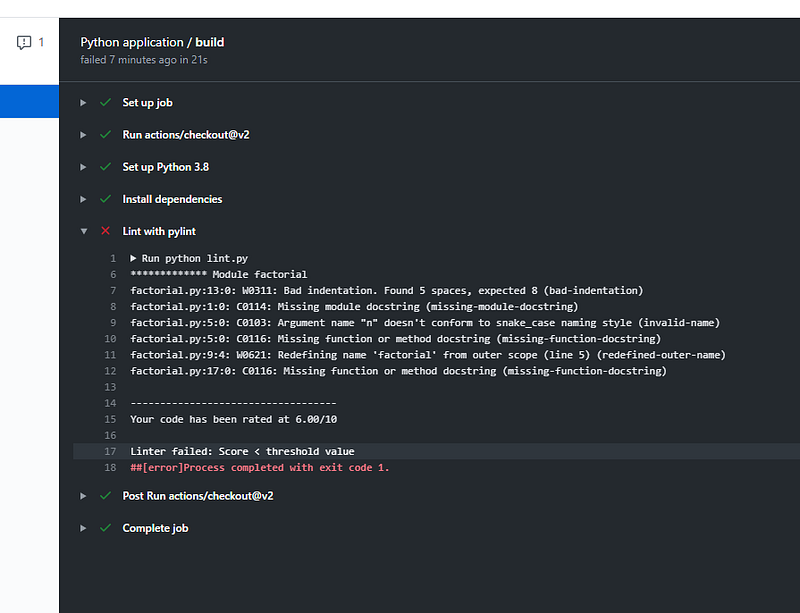
At last, we get to see a lot more detail. We can see that all tests passed except for the lint job and if you click into that job the output is quite similar to what you saw when you linted this file on the command line of your local system. Importantly our threshold fail message can be seen clearly.
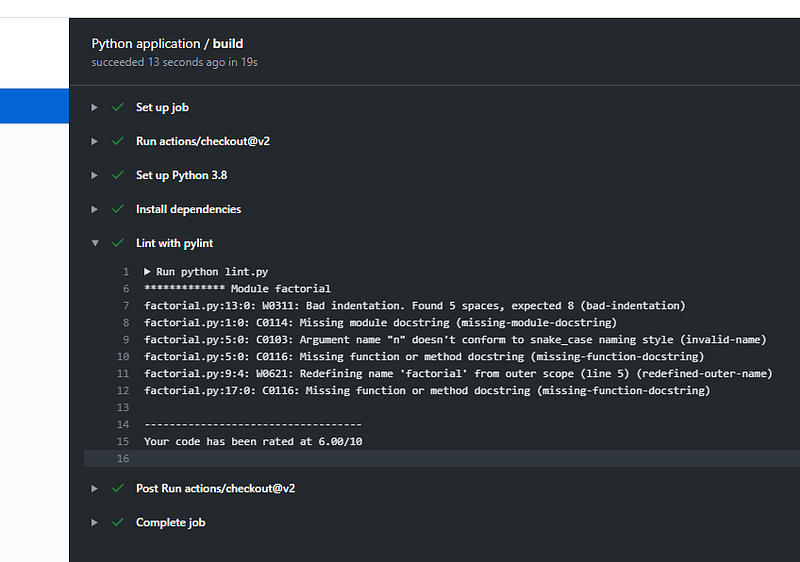
Finally, just to double-check check things are working as expected, let’s artificially lower our threshold pass so that the linter job doesn’t fail and make sure this is reflected in the GitHub actions log. Edit the lint.py file and change the threshold value to something that passes, say 2. Save that, then check the GitHub actions log again.
This time success!
For more detail and information on Github, Github Actions and Pylint please check out the following documentation links.
Ok, that’s all I have for now. If you enjoyed this story please consider following me for more content like this.


