
I Got a Hoodie from Streamlit’s Connections Hackathon with a Simple Flight Search Project
A Step-by-Step Tutorial for Data Connection Development in Streamlit
As one of the most expected Streamlit features, the data connection API and its construction methods have been brought to life recently. The objective of this feature is to eliminate the redundant tasks of locating and incorporating external packages, applying secure credential management beyond the code, and extracting data in the required format during each web development.
With this connection feature, you are able to:
- Simply call build-in connections such as SQL database and SnowPark to interact with these data sources smoothly.
- Construct customer connection to the desired data sources and APIs to be reused in application development.
To promote this feature release, Streamlit hold a two-week online hackathon to challenge the developers to build more customized data connections with decent demo applications. For encouragement, they ship every participant a hoodie as a reward and will include the projects from 5 winners in their official community.
As an enthusiastic developer, trying such an innovative feature which is probably helpful in my next web or chatbot project is always fun, having a hoodie with the logo of Streamlit would be the icing on the cake. To own that hoodie… I submitted a quick demo with a custom connection object to a flight data source called Kiwi API, supporting my future LLM-powered application which may need a chatbot to connect to flight information. To join the hackathon, I deployed it on Streamlit Cloud, please have a try if you would like — Flight Search with Streamlit Connection.
Now, let me walk you through the code of my flight search project with the implementation of data connection to Kiwi API.
1. Kiwi API
Kiwi.com is an online travel booking system that provides traditional flight search and sales services. What makes it a little special is that Kiwi offers a partnership program known as Tequila. This program allows business users to integrate Kiwi’s content into their own apps and make a commission. Instead of a basic link or widget for direct flight booking, Kiwi offers APIs for customizing searches, bookings, and management, and in addition to that, there are no strict qualification requirements for applying for these APIs.
I have once written an article about how to use Kiwi API to create an AI chatbot that generates flight recommendations by human language:
In that application, besides the LLM development, I implemented the data connection to the Kiwi flight database by directly calling its RESTful API.
a) API Key
In order to call Kiwi API, you must have a Tequila account on its homepage to obtain your API Key. Once you sign up for an account, and create a new solution, your key can be found in the API document under your particular solution. https://tequila.kiwi.com/portal/docs/tequila_api/search_api

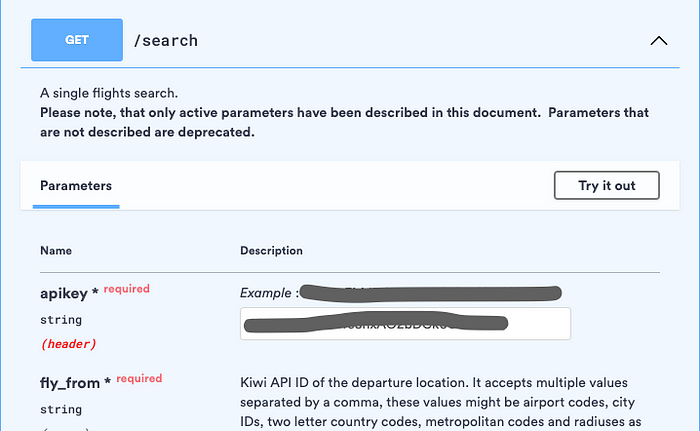
b) Search API
The /Search endpoint is used to search for one-way or return itineraries. The entire URL of this endpoint is https://api.tequila.kiwi.com/v2/search. Along with the endpoint, there are various parameters that offer high flexibility for users’ flight preferences.
2. Create a Connection Class
After knowing what the Kiwi API is, we are ready to build a new connection class to integrate with it. First of all, let’s create a Python file called “kiwi_connection.py” which is dedicated to storing the class definition.
Install the latest version of Streamlit first.
!pip install --upgrade streamlitImport the packages.
from streamlit.connections import ExperimentalBaseConnection
from streamlit.runtime.caching import cache_data

import requests
Declare the Connection class, inheriting ExperimentalBaseConnection with the type parameter bound to the underlying connection object. To make this simple, in this case, I don’t define the type parameter.
class KiwiConnection(ExperimentalBaseConnection):As the usage of Kiwi API is more instinctive than SQL/DB type of data sources, only two internal functions _connect() and _query() are required to be implemented in the KiwiConnection class.
a) _connect()
class KiwiConnection(ExperimentalBaseConnection):
    def _connect(self, **kwargs) -> dict:
        if 'apikey' in kwargs:
            key = kwargs.pop('apikey')
        else:
            key = self._secrets["KIWI_API_KEY"]
        self.headers = {"apikey": key}
        return self.headers
This method is originally used to establish a connection to your data source. It accepts keyword arguments **kwargs that can be used to pass parameters during the connection process. Since connecting to API does usually not require any so-called “connection” process, in this case, the connection process is utilized to pass the Kiwi API key in dict format which will be consolidated into the request header as defined.
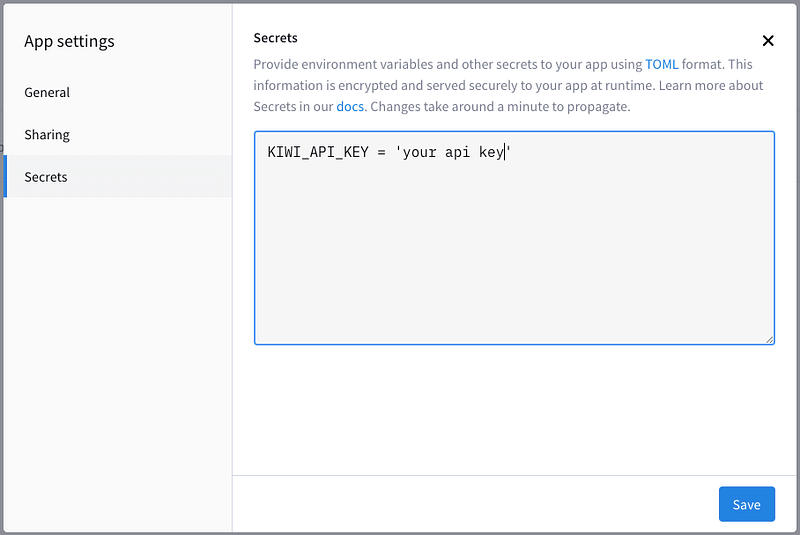
If an apikey is provided in the keyword arguments, it is used as the Kiwi API key; otherwise, it uses the apikey stored in the _secrets attribute named as KIWI_API_KEY. The _secrets attribute contains all the environment variables defined in the setting of Streamlit Cloud. This is a secure way to protect your confidential data used by your cloud app.
b) _query()
    def query(self, ttl=3600, **kwargs) -> dict:
        @cache_data(ttl=ttl)
        def _query(headers, **kwargs) -> dict:
            BASE_URL = 'https://api.tequila.kiwi.com/v2/search'
            params = {
                "fly_from": kwargs.get('fly_from'),
                "fly_to": kwargs.get('fly_to'),
                "date_from": kwargs.get('date_from'),
                "date_to": kwargs.get('date_to'),
                "adults": kwargs.get('adults'),
                "children": kwargs.get('children'),
                "infants": kwargs.get('infants'),
                "sort": kwargs.get('sort'),
                "limit": kwargs.get('limit'),
                "curr": kwargs.get('curr', 'USD')
            }
            if kwargs.get('return_from'):
                params['return_from'] = kwargs.get('return_from')
            if kwargs.get('return_to'):
                params['return_to'] = kwargs.get('return_to')
            if kwargs.get('max_fly_duration'):
                params['max_fly_duration'] = kwargs.get('max_fly_duration')
            if kwargs.get('max_sector_stopovers'):
                params['max_sector_stopovers'] = kwargs.get('max_sector_stopovers')

            response = requests.get(BASE_URL, params=params, headers=headers)
            response = response.json()

            return response

        return _query(self.headers, **kwargs)
The query(self, ttl=3600, **kwargs) method is used to execute a search against the Kiwi API. It accepts a time-to-live (TTL) value (default is 3600 seconds) and keyword arguments (**kwargs) for query parameters. The method is decorated with @cache_data(ttl=ttl), which implies that the query results will be cached for the specified TTL duration.
In the implementation function_query(headers, **kwargs). It performs the actual API request using the provided headers (which include the API key from the _connection() process). It constructs a base URL for the Kiwi API with searching parameters that I picked from Kiwi’s parameter list and performs a GET request using the requests library. The API response is then parsed as JSON and returned as a dictionary.
Now, that’s it. We have a custom connection class that can interact with Kiwi API to search for flight tickets. This class potentially across many apps can be an efficient practice for frequent reuse of the same data source.
3. Demo Application
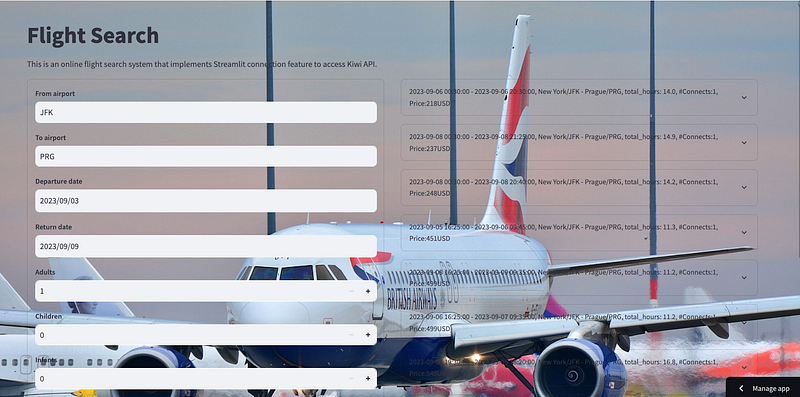
Creating a “kiwi_app.py”, let’s make a simple demo application to test our KiwiConnection class. The demo implements a search form that allows users to input the criteria such as dates, locations and display the results with routes, duration, ticket price, and other info in the form of a list.
Firstly, import the class KiwiConnection we created, and with other packages we need.
import streamlit as st
from kiwi_connection import KiwiConnection
import datetime
Define a connection object conn that is created by Streamlit’s innovative st.experimental_connection() method, with a type of customized KiwiConnection and apikey that read from secrets of Streamlit Cloud backend.
conn = st.experimental_connection("kiwiapi", type=KiwiConnection, apikey=st.secrets["KIWI_API_KEY"])Then, separate the web page into two columns. The right column illustrates the search UI that accepts user input with the following code snippet:
flights = []
col1, col2 = st.columns([0.5, 0.5], gap='medium')
with col1:
    with st.form("my_form"):
        fly_from = st.text_input("**From airport**", "JFK")
        fly_to = st.text_input("**To airport**", "PRG")

        date_from = st.date_input("**Departure date**", value=datetime.date(2023, 9, 3))
        date_to = st.date_input("**Return date**", value=datetime.date(2023, 9, 9))
        date_from_str = date_from.strftime("%d/%m/%Y")
        date_to_str = date_to.strftime("%d/%m/%Y")
        adults = st.number_input("**Adults**", min_value=1)
        children = st.number_input("**Children**", min_value=0)
        infants = st.number_input("**Infants**", min_value=0)

        sort = st.selectbox("**Sort by**", ["price", "duration"])
        limit = st.number_input("**Limit**", min_value=10)

        submitted = st.form_submit_button("Submit")

        if submitted:
            # Call API with input parameters
            results = conn.query(
                fly_from=fly_from,
                fly_to=fly_to,
                date_from=date_from_str,
                date_to=date_to_str,
                adults=adults,
                children=children,
                infants=infants,
                sort=sort,
                limit=limit
            )

            if results:
                flights = results['data']
The “Submit” button created by st.form_submit_button() widget will trigger the conn.query() function that is defined in KiwiConnection class to execute the Kiwi API. The results will be decently organized in the left column by st.expander() widget for different densities of flight information.
from dateutil.parser import isoparse

def format_datetime(datetime_str):
    date_part, time_part = datetime_str.split("T")
    time_part = time_part[:-5]  # Removing the ".000Z" from the time
    return f"{date_part} {time_part}"

with col2:
    for flight in flights:

        overall_departure_time = min(route["local_departure"] for route in flight["route"])
        overall_arrival_time = max(route["local_arrival"] for route in flight["route"])
        city_from = flight["cityFrom"]
        city_to = flight["cityTo"]
        fly_from = flight["flyFrom"]
        fly_to = flight["flyTo"]
        connection_number = len(flight["route"]) - 1
        price = flight["price"]

        overall_departure_time_fm = format_datetime(str(overall_departure_time))
        overall_arrival_time_fm = format_datetime(str(overall_arrival_time))

        utc_departure_time = flight["route"][0]["utc_departure"]
        utc_arrival_time = flight["route"][connection_number]["utc_arrival"]
        total_hours = (isoparse(utc_arrival_time) - isoparse(utc_departure_time)).total_seconds() / 3600

        with st.expander(f":white[{overall_departure_time_fm} - {overall_arrival_time_fm}, {city_from}/{fly_from} - {city_to}/{fly_to}, total_hours: {total_hours:.1f}, #Connects:{connection_number}, Price:{price}USD]"):
            st.json(flight)
It’s much more convenient to search flight tickets in your program code with the class function conn.query() compared to the string combination work of HTML requests to achieve API repeatedly.
It looks like the hackathon has contributed so many interesting connections. Have fun trying these, or build your own! I can’t wait to get my hoodie!
Thanks for reading. If you think it’s helpful, please Clap 👏 for this article. Your encouragement and comments mean a lot to me, mentally and financially. 🍔
Before you go:
🎥 If you prefer video tutorials, please subscribe to my YouTube channel where I started to convert most of my articles to visual demonstrations.
✍️ If you have any questions or requests, please leave me responses or find me on Twitter (Now X) and Discord where you can have my active support on development and deployment.
☕️ If you would like to have exclusive resources and technical services, joining the membership of my Ko-fi will be a good choice.