
How We Built an Infrastructure Platform on Top of Kubernetes
How and why we used Kubernetes for our infrastructure platform and some lessons learned along the way
Having dabbled with Kubernetes for a while, our team decided to build an infrastructure platform on top of it four years ago.
Kubernetes is one of the most widely adopted and fastest growing Open Source projects in history.
No-brainer, right? Well… it’s not quite that simple. Here I’d like to explain the benefits and challenges of using Kubernetes through my team’s experience running our platform in production for a few years. I’ll also cover some of the decisions we made that may help you on your own journey.
Why Use Kubernetes?
I’ll assume you haven’t been living under a rock and have some idea of the general concepts and benefits of using Kubernetes — declarative deployments, self-healing, etc. Instead, I’d like to focus on the benefits I have seen in practice completely transform my team and the speed/quality we can deliver.
Portability
One of the great things about Kubernetes is that you can run it anywhere, and the concepts will be the same. Azure, GCP, AWS, bare-metal, who cares! This makes it a great bet for your infrastructure platform.
I have found that even more important than this is how transferable the skills that we develop are. The monopoly that Kubernetes has on the industry means that building these skills is great for your team, and bringing new people in is much easier.

Supercharge developers
Kubernetes unlocks a huge amount of power and options for your developers. Running and deploying complex distributed systems becomes a doddle. Your teams can run pretty much anything they want: Redis, RabbitMQ, Elasticsearch, MongoDB… the possibilities are endless!

Built for multitenancy
Kubernetes was built for multitenancy, so building a platform around it can save you a lot of time and money. We can invest in complex supporting systems for capabilities such as monitoring and security, which can all be leveraged by our teams using the platform.
There’s a heap of tools and techniques available to you to isolate your different tenants from each other inside Kubernetes; I’ll cover some of the ones we have found helpful in the next section.

Standardisation
For me, this is probably the most valuable benefit Kubernetes brings. A great platform is powerful and flexible yet secure and compliant. This is where Kubernetes comes into its own.

Well, clearly, Yoda had never used Kubernetes. Kubernetes has a host of features that keep our teams on the straight and narrow without being too invasive. In the next section, I will discuss some safeguards and policies I found useful to keep our platform safe and compliant.
Is Kubernetes Right for My Team?
I speak to many teams who want to use Kubernetes due to the advertised generic benefits. In practice, Kubernetes comes into its own when you use policies and standards and have infrastructure built around it for cross-cutting concerns such as monitoring and security. If you don’t have the team or skills to manage the additional infrastructure around your clusters to keep them up-to-date, secure, and available, then I would not recommend going down this route!
As well as needing the right team to maintain your clusters, you will need to upskill your developers to understand how to deploy to Kubernetes.
Kubernetes is brilliant for big teams or complex applications using lots of microservices. If you are a small team or only use a simple three-tier architecture, then Kubernetes is probably not the right choice for you.
I regularly get asked why teams would pick Kubernetes over serverless computing or PaaS services. What Kubernetes brings that these other types of services can’t is the ability to build shared infrastructure around it easily. This makes it perfect if you want to build a sophisticated platform with a suite of supporting capabilities rather than just running a few basic containers.
Goals of our Infrastructure Platform
Imagine a world where, out of the box, you get an environment for your application that is secure and resilient. There are monitoring and policies to stop you from doing things incorrectly, and it is compliant with your organisation’s standards. This is what our infrastructure platform provides to our application teams.
The Holy Grail is a platform where developers can spin these environments without involvement from another team.
These are some of the key principles our infrastructure platform strives for:
- Flexibility
- Self-service
- Availability
- Security
- Standardisation
- Developer Empowerment
Platform Design
Here are some important decisions that helped shape our infrastructure platform.
Managed service
Running a Kubernetes cluster is extremely hard; I would only recommend managing everything yourself if you have a good reason. If you consider running on bare metal VMs, I will approach this project with serious caution unless you have a highly skilled infrastructure team to manage it!
There’s a plethora of managed options available from the various cloud providers. We chose Azure Kubernetes Service, and it has been brilliant so far. Azure has invested in AKS significantly over the last five years, and it has become one of its flagship offerings.
Even with a “fully” managed offering, you will still be on the hook to decide when Kubernetes updates should happen, and you will need to manage any supporting systems for your platform (more to come on these).
Platform team
Having a dedicated platform team to run our infrastructure platform has been key. The platform team handles everything related to the Kubernetes platform so our application team tenants can spend as much time as possible focusing on their business domains.
Here’s some of the activities your Kubernetes platform team should be doing:
- Managing upgrades to the clusters.
- Monitoring and support. This also includes implementing and enhancing your monitoring system.
- Managing certificates and DNS changes for the platform.
- Keeping up to date with Cloud and Kubernetes trends. This will include spending much of their time on proofs-of-concept to validate new options.
- Teaching your development teams about Kubernetes and the infrastructure platform.
- Studying towards relevant certifications. I’d recommend all of the Kubernetes ones: CKA, CKAD, CKS
Environment split
Kubernetes is built to handle running lots of different tenants, and you could happily run everything in a single cluster if you wanted to. We have found it is easier to run different clusters for each environment, e.g., Development, QA, Staging, and Production. This is really important so platform changes can be planned, rolled out to your teams incrementally, and tested. Here’s some examples of changes that might need to be rolled out through your environments incrementally:
- Implementing a new policy that requires a change to all of the underlying applications, e.g., denying containers running as root user
- An
ApiVersionbeing deprecated or removed - Kubernetes version updates
- Platform feature updates
Another set of environments my team has found useful are integration and sandbox environments that can be used for testing platform changes and PoCs before they hit the main environments used by your application teams.
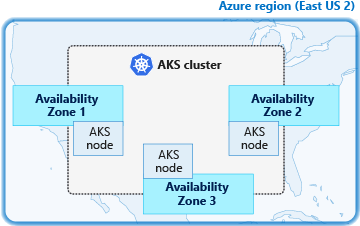
I would also recommend splitting the nodes in your clusters across multiple availability zones to protect them from single data centre outages.
If you require geo-redundancy for your platform, you will need a BCP environment in a different region with replicas of everything in your Production environment. An edge load balancer such as Azure Front Door can serve traffic to the correct regional cluster.
Tenant isolation
Kubernetes namespaces are the way we can isolate our application team environments from each other. We can also use namespaces to segregate any supporting platforms we run inside our clusters.
For each application team environment, we provide a namespace with the following resources to help isolate it:
Roles andRoleBindings (RBAC): so the app team can access their namespace. It’s important to separate app team roles from platform team roles, i.e., app teams shouldn’t be able to edit any of the resources in this list. They should be concerned with deployments, services, jobs, etc.- Service Account: which has access to their namespace for running automated deployments for their apps.
- Network Policies: so that applications cannot access other namespaces and vice-versa. You should block all outbound traffic by default and allow only what is needed for the specific app.
- Resource Quotas: restrict how much CPU and memory can be utilised in the namespace. This can stop a rogue application from going wild and taking down your cluster.
- Ingress Controller: we decided to provide an Ingress Controller for each app namespace. This makes it much easier to isolate traffic between applications. We don’t allow app teams to deploy
LoadBalancerservices; the platform team controls that. Routing traffic within a namespace is covered in the next section.
The following diagram shows a simplified view of how our clusters are segregated. I’d also recommend running your system/platform components in dedicated ‘System’ node pools and using ‘User’ node pools to run your tenant namespaces. This will protect your platform's functioning if one of your apps goes rogue.
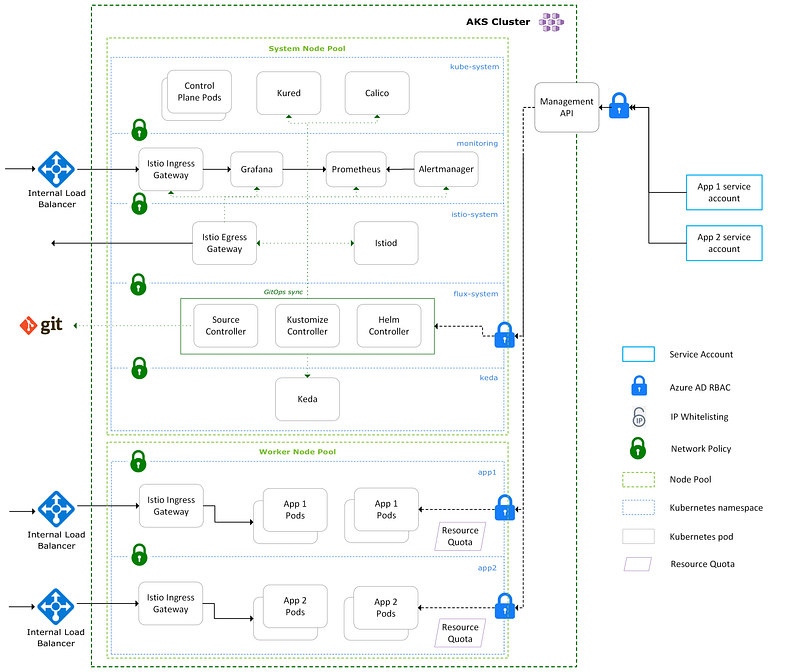
If App 1 needed a dev, QA, staging, and Production environment, then we would provide an app1 namespace in each of the relevant clusters. Keeping the namespace name standard across environments makes things simpler for the app team. If your app team needs more environments than clusters available, you’ll need to use different namespace names.
Routing
The previous section explains how each tenant namespace is provided its own dedicated Ingress Controller. The app team is then in complete control of how the routing happens within their namespace for routing traffic to different Pods/Services.
Each Ingress Controller is backed by an internal load balancer using a LoadBalancer type service. The following diagram shows how an Application gateway routes traffic to the internal load balancers on each tenant namespace Ingress Controller. Application gateways can be expensive so sharing them across environments for non-prod helps save money. We also use a Hub Spoke network topology in our organisation for centralising ingress and egress to our spoke network.
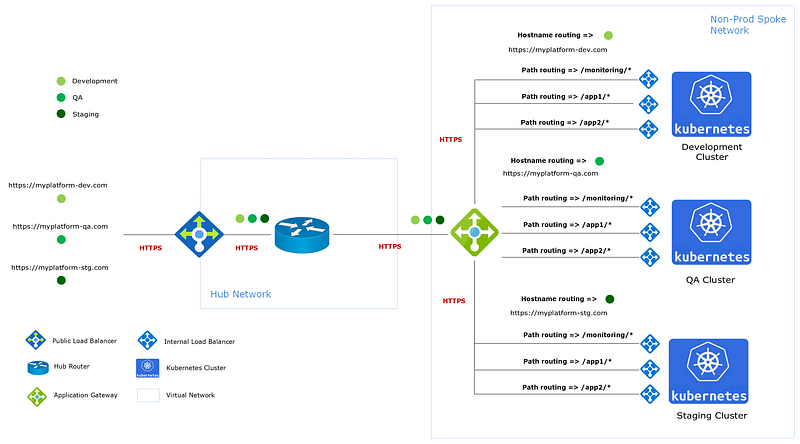
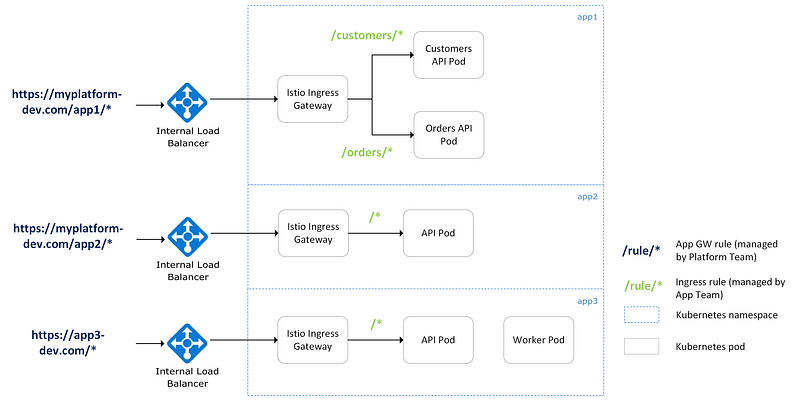
This setup is very flexible because we can use ‘Path-based routing’ or ‘Hostname routing’ using a custom domain to route traffic to namespaces. We try to push our tenants down the path of using our platform domains with path-based routing so that additional SSL certificates and custom domains don’t need to be managed.
The following diagram shows examples of how different routing scenarios can be achieved. App1 and App2 use path-based routing, and App3 uses hostname routing with a custom domain. App1 uses microservices and has additional subroutes to direct traffic within the namespace to the relevant APIs. It’s important to note that the app team manages the Ingress rules within a namespace, and the platform team manages the application gateway rules.
Monitoring
A good monitoring solution is a must-have. As we have a shared platform, any investment in the monitoring solution can be leveraged by everyone using it. We use the Prometheus stack for monitoring, which has served us well. With little configuration, you get a load of metrics, alerts, and dashboards straight out of the box. The open source Helm chart is easy to use and configure for your use case.
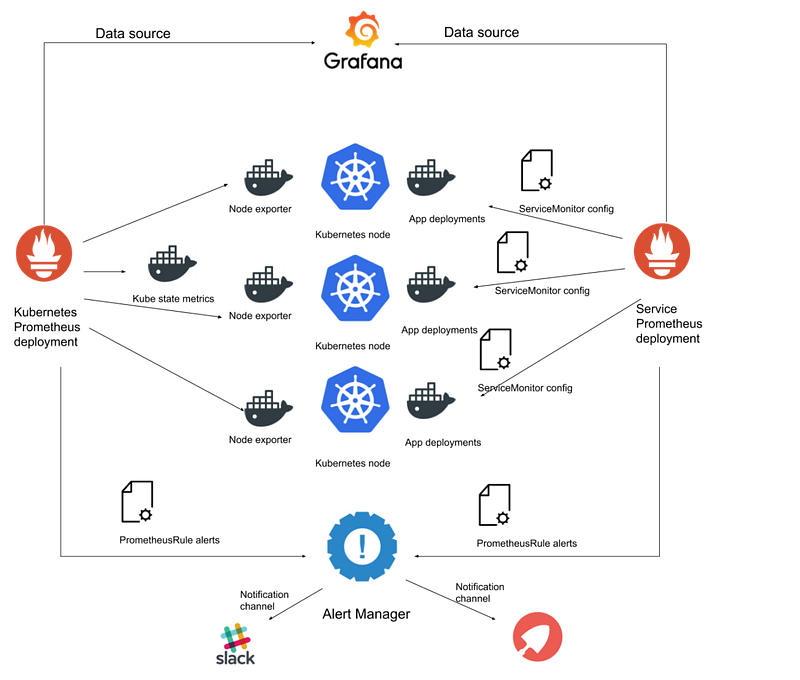
Prometheus creates brilliant default alerts for your app team namespaces, and the output channels can be customised per namespace. Your app teams can collect additional custom metrics from their applications and create alerts for them.
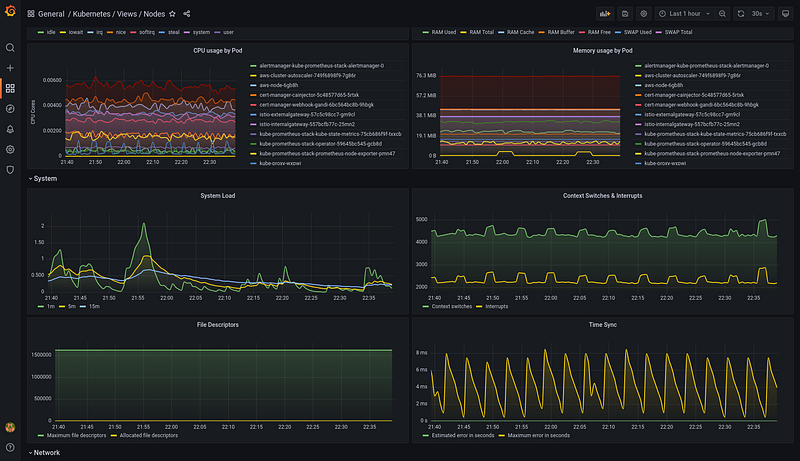
The Prometheus stack ships with useful Grafana dashboards for viewing the metrics it collects. These are invaluable for helping diagnose performance problems when they occur.
Threat detection
You’ll need a good threat detection system for runtime monitoring in your clusters. This will help alert you and block malicious activity in your cluster.
If you want to go down the open source route, then Falco is a good option; however, you will need a solution to enforce rules to deny pods. As this is so important, investing in a licensed solution such as Prisma Cloud, Sysdig, or Aqua is a good area.
Scaling
There are a few tools available in Kubernetes to help you scale as your platform usage increases:
- Cluster Autoscaler: can be used to scale the number of worker nodes in your cluster. This allows the cluster to grow automatically as you take on more tenants.
- Horizontal Pod Autoscaler: can be used by your app teams to dynamically scale the number of replicas in their deployments as load increases. HPAs use resource metrics such as CPU or Memory to scale.
- Keda: an additional system that can be deployed to your cluster for ‘event-driven’ scaling. This is useful for apps that read from a queue and don’t use many resources.
Application deployment
There’s lots of deployment options available to your app teams, but I would recommend using Helm. Helm is a cross-platform CLI tool built for deploying to Kubernetes, and it is what most teams use. app teams package their Kubernetes manifest files into Helm ‘charts’ for deployment. As we have a flexible platform, your teams can deploy to their namespaces however they want to!
Platform deployment/configuration
When we first built our platform, we used a combination of Helm charts and Kubernetes manifests to bootstrap and configure our platform. This included setting up all our platform components and configuring all of the app team tenant namespaces. We ended up with complex deployment pipelines to manage this process, and they became really difficult to manage.
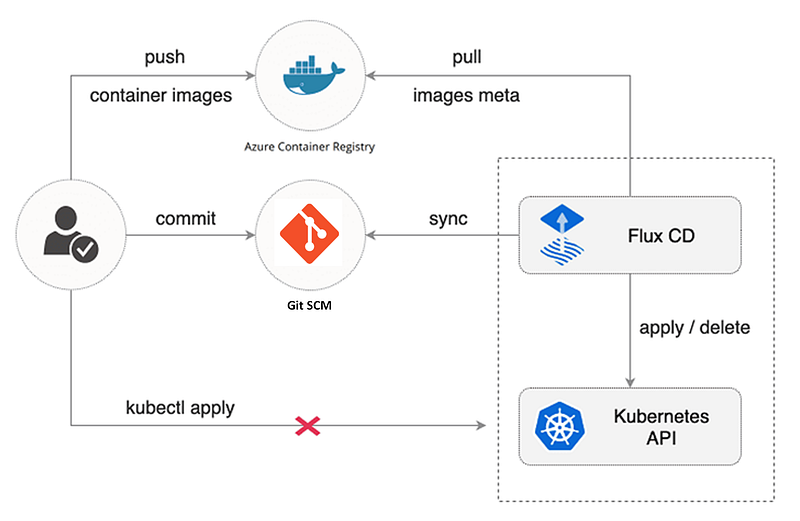
As the Kubernetes world moved on, we used a GitOps-based approach for bootstrapping our clusters instead. Instead of using a deployment pipeline to ‘push’ changes to the cluster, GitOps ‘pulls’ configuration from Git and applies it to the cluster using an agent running inside the cluster. There’s a few benefits to doing things this way:
- You don’t need to manage complex deployment pipelines.
- Your Git repository accurately reflects what is currently deployed in your clusters.
- It is much easier to see changes to your environments and roll them back. You need to look at your Git commits.
- Changes to the cluster are coming from outbound requests from your GitOps agent inside the cluster rather than inbound requests from an external machine — this is more secure.
There’s a few options out there for using GitOps, but we went with Flux which is currently the most widely used. Flux requires a set of Controllers deployed inside your cluster to keep the configuration in line with your Git repository.
Setting up your GitOps repositories can be rather complicated, but it is worth investing some time to get a maintainable and clean solution. Using Kustomizations to overlay environment-specific changes on top of a generic base works well. Here’s an example to see what I mean.
You’ll also need a good branching strategy for using GitOps; we use a branch-per-cluster environment and promote code through each branch by ‘rebasing.’ This can feel a little weird if you are used to using modern branching strategies, but it is needed when using GitOps.
Policies
There are quite a few gotchas when using Kubernetes, and many defaults need to be more secure. Therefore, it is important to implement policies in your clusters to stop your app teams from doing things they are not meant to do (on purpose or by accident). Gatekeeper is the most widely used policy agent, which is also what we use. It validates your YAML (or JSON) files as they are applied to the cluster using validation Webhooks.
Service mesh
This last one is the most complex aspect of my suggestions, but it can certainly take your platform to the next level!
Most service mesh solutions use ‘sidecar’ containers to intercept traffic in and out of your pods. As always, there’s lots of options available; we use Istio. Istio is probably the most complicated service mesh, but the features it provides are unparalleled.
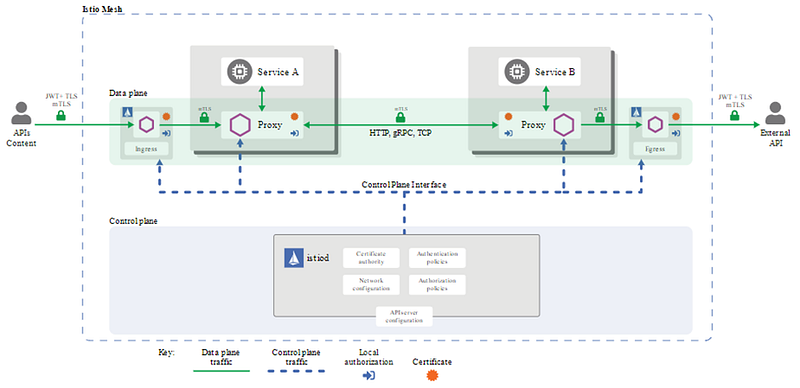
Istio uses Mutual TLS to transparently enforce end-to-end encryption across the cluster so that our app teams don’t need to manage certificates themselves.
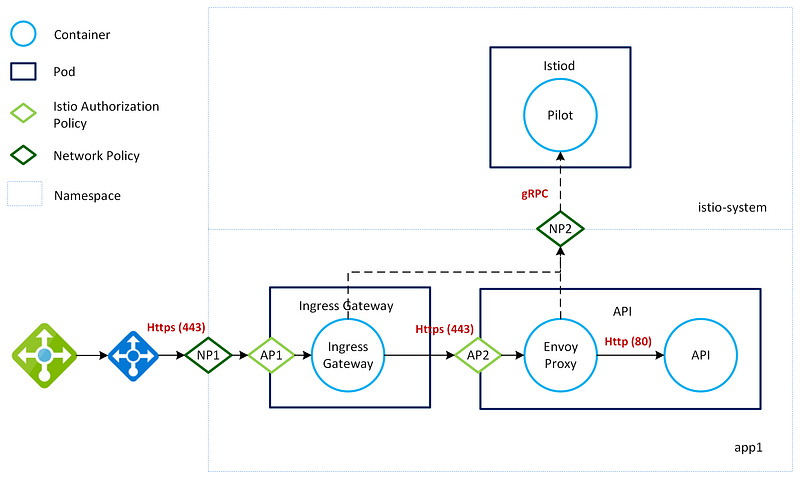
The following diagram shows how traffic enters the mesh via the Istio Ingress Controller in an app team namespace. Istiod is the control plane component that manages certificates across the mesh. Istio uses Envoy for its sidecar containers, and they communicate with Istiod securely using gRPC.
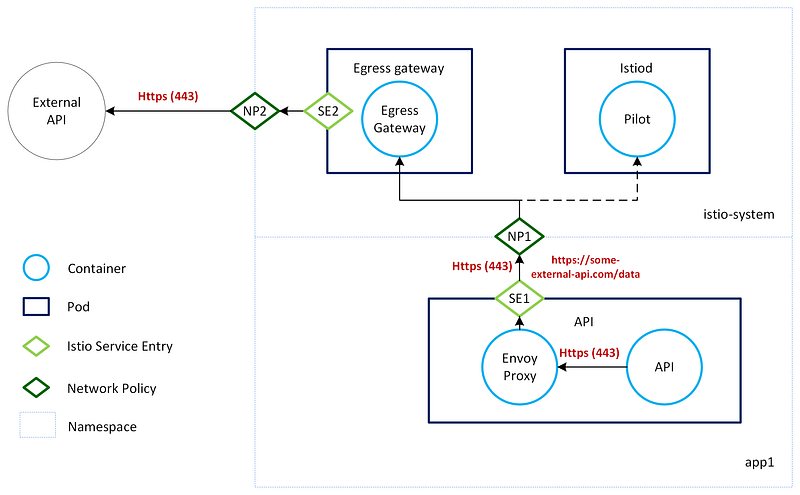
Kubernetes Network Policies work at layer 3/4 using port/IP Address. This makes it hard to control outbound traffic to services using dynamic IPs. Istio provides Layer 7 network rules (Service Entries) so that rules can be applied using domains instead. A centralised Istio Egress Gateway can enforce Layer 7 network rules to lock down outbound traffic from your tenant namespaces. This is a really useful feature that no other service mesh supports.
Istio also makes it easy to run complex deployment scenarios, e.g., Blue/Green, Canary environments, and Dark Launches.
Learning culture
I have been lucky enough to speak to many people worldwide who use Kubernetes every day, and I have seen a huge shift in the number of teams wanting to use Kubernetes over the last few years. Creating learning groups and centres of excellence within our organisation has been key to designing our platform and understanding all of the different options out there — there’s certainly a lot of them!
There has also been a huge appetite from our app teams to get involved with Kubernetes. Bespoke Kubernetes training courses and example applications have been super helpful in getting our teams interested and up to speed.
Our journey to create a Kubernetes infrastructure platform has not been easy, but it has been well worth it! I hope some of the ideas presented here might help you on your own journey. Our platform has completely transformed our team, and I highly recommend exploring a Kubernetes-based platform if you are a fairly large team or use complex distributed architectures.
I hope to see you along for the ride!


