
How To Use Python To Post on Popular Blogging Websites
Create once; publish multiple times. Automate the manual work with Python
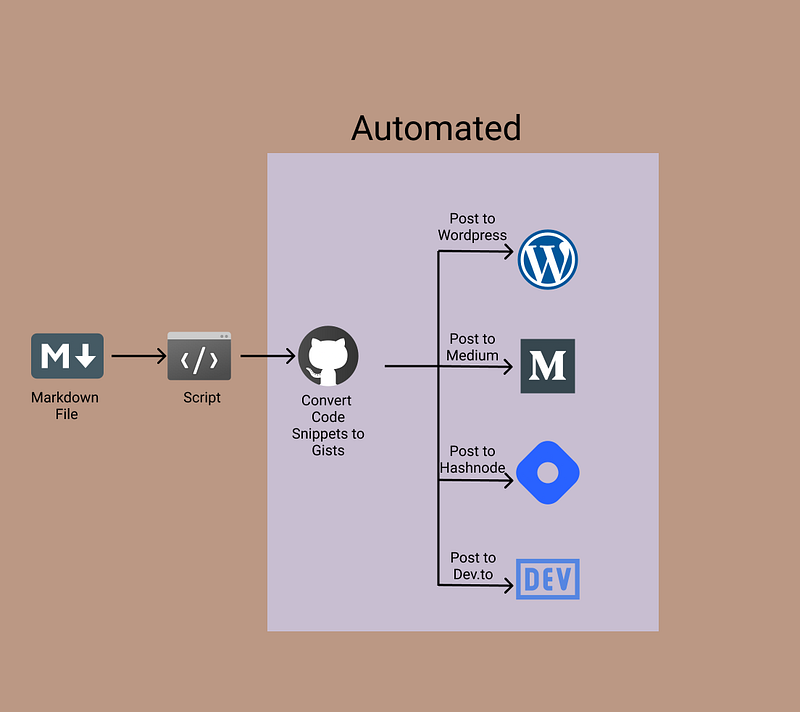
In this article, we will use Python to automate the following tasks:
- Creating gists for your code snippets
- Embed gists into the article with different requirements for WordPress, Medium, Dev.to, and Hashnode
- Post the article on WordPress
- Post the article on Medium with WordPress canonical link
- Post the article on Dev.to with WordPress canonical link
- Post the article on Hashnode with WordPress canonical link
Essentially, we will be using Python to automate cross-posting to multiple websites. We will be using various APIs for doing the above tasks.
You can find all the code in my GitHub repo.
Setting Up the Project
First, create a new folder for the project:
mkdir crossPoster
cd crossPoster
Next, create a virtual environment and activate it, as shown below:
python3 -m venv venvsource venv/bin/activateInstall the required libraries, as shown below:
pip3 install requests, Markdown, python-dotenvCreate a file named .env in your root directory. This will be used to store all your credentials. You will also need a test markdown file to be able to cross-post. In this tutorial, I am going to assume that all the images have public URLs and are not loaded from local files.
1️. How To Use GitHub API To Create Gists for Code Snippets
Before proceeding, we will need a GitHub token. Go to your developer settings token page to get your GitHub token. When creating the token, make sure the option “Create Gist” is checked. This allows you to create gists using your GitHub token. Copy the token and save it in your .env file.
GITHUB_TOKEN = "YOUR_GITHUB_TOKEN"First, we will need to write a function to get all the code snippets from a markdown file. We will use a Regex pattern to get the code snippet blocks. For now, ignore the function “getSnippetName.” Just assume it returns a tuple consisting of the file name and actual code. If the code snippet has a language “bash,” we ignore it. You can extend the list of languages to ignore.
We are going to assume that the user will begin their code snippet with a comment and the comment will have the name of the gist (basically like the above code snippet). If no such comment is provided, the gist will have a default name, for example, index.js for a JavaScript file, init.py for a Python file. Now, let’s look at the getSnippetName function:
It searches for a comment in the first line of the code snippet. If a comment is present, it extracts the file name from the first line. If no comment is present, it uses a dictionary to return the default file name. You can extend the code to support comments in other languages.
Now we have an array of tuples. The first element in the tuple is the name of the gist and the second element is the content of the gist. We can use this to create our gists.
We will make a post request to the following endpoint:
https://api.github.com/gistsIf you want the create gists to be private, you can set the parameter “public” to False. The function will return all the URLs of the created gists.
Now, we need to replace the code snippets in the markdown file with the relevant gist URLs. Medium, WordPress, Dev.to, and Hashnode have different formats to embed gists, so let’s create a dictionary for that. Here’s what it looks like:
Each of the lambda functions will accept the gist URL as an argument and return the corresponding embed element. The logic to replace to code snippet is similar to the logic to get all the code snippets. Here’s what it looks like:
We keep a counter to keep track of which code snippet corresponds to which gist URL. Since we ignored “bash” when creating the gists, we increment the counter by 1 without actually replacing anything. In all other cases, we replace the code snippet with the gist URL at the “counter” index and increment the counter by 1. This function is going to create new files for WordPress, Medium, Dev.to, and Hashnode.
Check the below code snippet that uses the above-created functions. It will create public gists for the code snippets present in index.md and create a markdown for WordPress, a markdown for Medium, etc.
2️. How to use the WordPress API to Create a Post
You can find the documentation here.
You will have to install a plugin to generate an application password for your account. Search for the plugin Application Password, and install it. After you install it, go to your Users>Profile. There should be an option called Application Passwords and a button to Add new application password. Give it a name and create a new application password. Copy the new password.
Update your .env file
WP_USERNAME = "YOUR ADMIN USERNAME"
WP_PASSWORD = "YOUR NEW APPLICATION PASSWORD"
Your WordPress username is the one shown in Users>Profile.
We will create a class to post to WordPress. The WordPress API endpoint is of the following format:
{Your Website Domain}/wp-json/wp/v2/{route}Check out the below code snippet that creates the class:
Now, we will have to add some methods to this class that will be used to post to WordPress.
The first method will be used to upload our cover image or header image to WordPress.
It has three inputs: the path to the image, alternative text, and the caption of the image. A post request has to be made to the following endpoint:
{Your Website Domain}/wp-json/wp/v2/mediaThe response is going to have a field called id. This will be used when we are posting our article. It will have another field called jetpack_featured_media_url that contains the URL to the image.
Next, we need a method to create tag IDs for our article. Here’s what that looks like:
It has one input — the list of tags. For each tag, it will try to create a new tag. The response is either going to contain the id of the newly created tag. If the tag already exists, the response will contain the existing tag id. We will combine the ids and return them.
A similar function can be created for categories as well.
Finally, we will add a method to post to WordPress.
The function logic itself is pretty simple, let’s look at the JSON data we will be adding to our post request:
title: A string that is the title of your articlecontent: Your article’s content in HTML. (I’ll show you how to convert your markdown file to HTML)status: A string “publish” or “draft” depending on if you want to post your article as a draft or notcategories: The Category IDs returned by theget_category_idsmethodtags: The Tag IDs returned by theget_category_idsmethodfeatured_media: The ID of the cover/header image returned by theupload_mediamethod
To convert your markdown file to HTML, we will use a library called markdown:
pip3 install MarkdownWe will need to write the following helper function to do the conversion. Here’s the code:
Below is a sample usage of the wordpress class:
If you are posting a draft, you can create a new variable to store the post slug. The post slug is the URL to your article after it has been posted. The slug should be present in the response object.
3️. How to use the Medium API to Create a Post
We will be using Medium’s REST API for this part. You can find the documentation here.
To get your access token, go to your profile settings and go to Integration Tokens. Enter a description and click on the 'Get Integration Token' button.
Save the token in your .env file.
MEDIUM_TOKEN = "Your Meidum Token"Similar to the class we created for WordPress, we will create a class for Medium as well.
Now let’s define the getUserID method.
This simply makes a GET request to the following endpoint and returns your user ID. Note: this is different from your username.
https://api.medium.com/v1/meNow, we can add the method to create a Medium post. Here’s the code:
Let’s take a look at the JSON data added to the post request.
title: The title of your articlecontent: The content of your article in HTMLpublishStatus: A string ‘draft,’ ‘published,’ or ‘unlisted’contentFormat: In our case, this will be ‘HTML’tags: A list of strings that are the tags of the article.notifyFollowers: A boolean valuecanonicalUrl: If applicable, the canonical URL. In my case, I am going to set it to the WordPress post’s URL.
Now, let’s take a look at a sample usage of the class:
4️. How to use the Dev.to API to Create a Post
The Dev.to implementation is pretty similar and I am not going to go much in detail. You can find your token here. Scroll to the bottom to generate a token and update your .env file.
DEVTO_TOKEN = "GCP1itdmDAmVzfTjEQRRnnFc"You can find the documentation here
The following shows the dev.to class:
For dev.to, we do not need to convert our markdown file to HTML. We can directly use the markdown content.
5️. How To use the Hashnode API to Create a Post
A hashnode has a GraphQL API, and it took me quite some time to figure out the correct query and how to make the correct request. You should be able to directly use the code snippet shown in this section. You can generate your token here.
You can play around with their API over here.
Here’s the Hashnode class implementation:
If you are not familiar with GraphQL, try playing with the API in their API Playground. Let’s take a look at some of the variables that are passed to the query:
title: The title of your article.content: Your article’s content in markdown. Similar to dev.to, you do not need to convert to HTML.publicationID: This is a required parameter. If you do not add it to your query, your article won’t be listed under your profile, but it’ll still be posted. It’ll be underhashnode.comand not your personal hashnode blog or account. To find your publication ID, go to your dashboard and copy it from the URL.
https://hashnode.com/{YOUR PUBLICATION ID}/dashboardtags: A list of tagscanonicalUrl: The canonical URL of the articlehideFromHashnodeFeed: The API doesn’t support posting drafts (or at least I couldn’t find a way to post drafts). SettinghideFromHashnodeFeedtoTrueposts the article, but it won’t show up on anyone else’s feed. You can toggle this in the hashnode editor as well.
Future Improvements
You can find a sample usage of all the above classes to create an “automated pipeline” in this file in the repo.
You can think of this as a POC to automate your process. It obviously doesn’t cover all use cases. Feel free to clone the repo and edit it as you like. Here are some improvements that can be made:
- Support for local images — The logic should be similar to how code snippets are converted to gists. Either one of the existing APIs can be used or a new API like Imgur can be used
- Extend this to automatically share your article to various subreddits or Twitter as well
- Add support for other blog editors
Please let me know in the comments if you found this article useful or if you have any suggestions on features that can be automated, improved, etc.
Want to Connect?Find me on LinkedIn at https://www.linkedin.com/in/rahulbanerjee2699/This article was originally posted on https://www.realpythonproject.com/how-to-use-python-to-post-on-popular-blogging-websites/


