
How to use Postman to automate API tests
Learn to test your APIs with a friendly GUI
Postman is a collaboration platform for API development. If you are a software developer and need to develop, test, and maintain an API or a set of API endpoints, you will find Postman very helpful. In this article, we won’t introduce too many concepts about API and Postman but will focus on some of the most common use cases which shall be handy for your development work.

You can use the web version of Postman directly, or you can download and install it on your computer. The desktop version can have some features that may not yet be supported by the web version.
Once you open the web or desktop version of Postman, on the Home page, click Workspaces to check the available workspaces. In Postman, a workspace allows you to organize your Postman work and collaborate with teammates. In a workspace, you can group your projects together, which includes collections, environments, mocks, monitors, etc. In this article, we will only work in the default workspace which is called My Workspace. Once you know how to make API tests by yourself, it will be very straightforward to collaborate with your colleagues in some shared workspace.
When you are in a workspace, you can see various tabs such as Collections, Environments, Mock Servers, Monitors, etc. The most important concept in Postman is collection which is a group of saved requests that can be organized into folders. When importing or exporting some APIs in Postman, it has to be done by collections. When you run some APIs on the command line with Newman, even if it’s a single API, you need to put it in a collection.
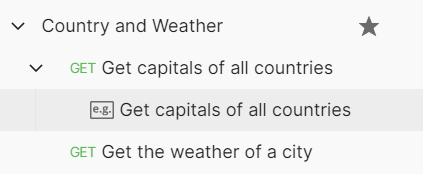
You can click the plus (+) sign or the New button to create a new collection. Give it a meaningful name and save it. In this article, I will use the country and weather APIs for demonstration, so I will call the collection “Country and Weather”. Once the collection is created, you will be prompted to add a request. Alternatively, you can click the three dots (…) on the right side and choose “Add a request”. Postman is very user-friendly and the same utility can be found in multiple places. Feel free to poke around and get familiar with it.
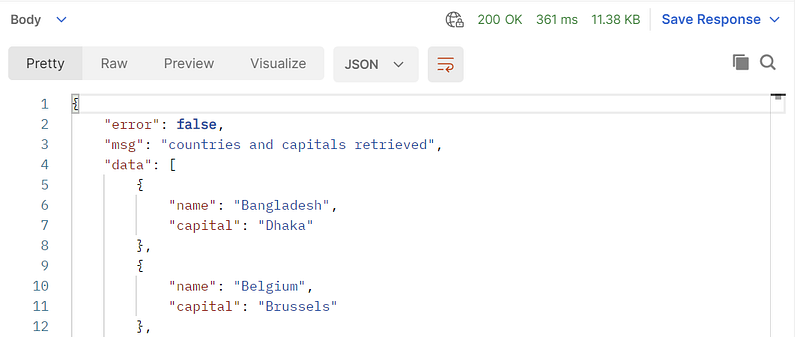
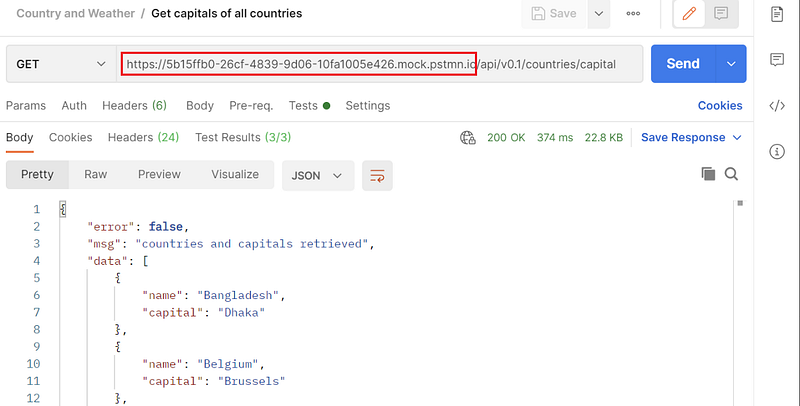
The first request we are going to make is a GET request which can get the capitals of all the countries in the world. The API we will use is the COUNTRIES & CITIES API supported by Postman.

Choose the GET method, and paste into the URL for the API. Also, give it a meaningful name and save it. When we click Send, we can get the response data:
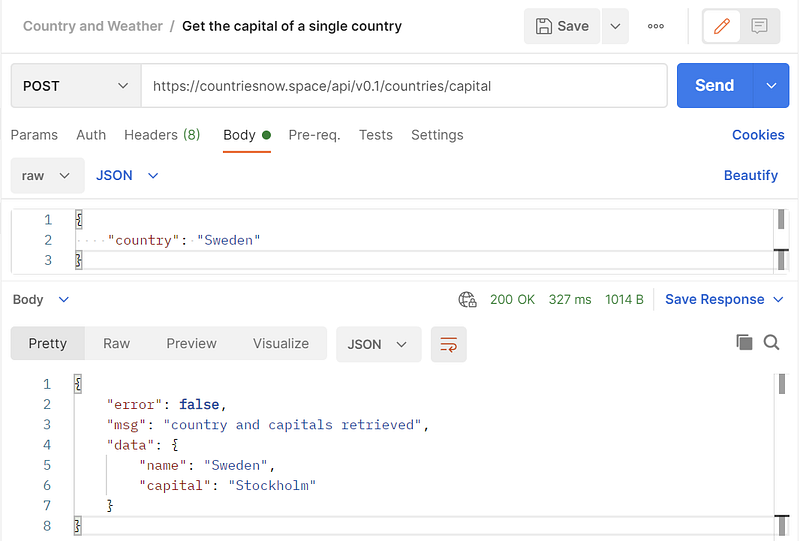
If we want to get the capital of a single country, we need to use the POST method and specify the body which contains the country name:
It is very simple to use Postman, isn’t it? Too simple you may think. Don’t be proud yet, it will get more complex later and there would definitely be something that you don’t know yet.
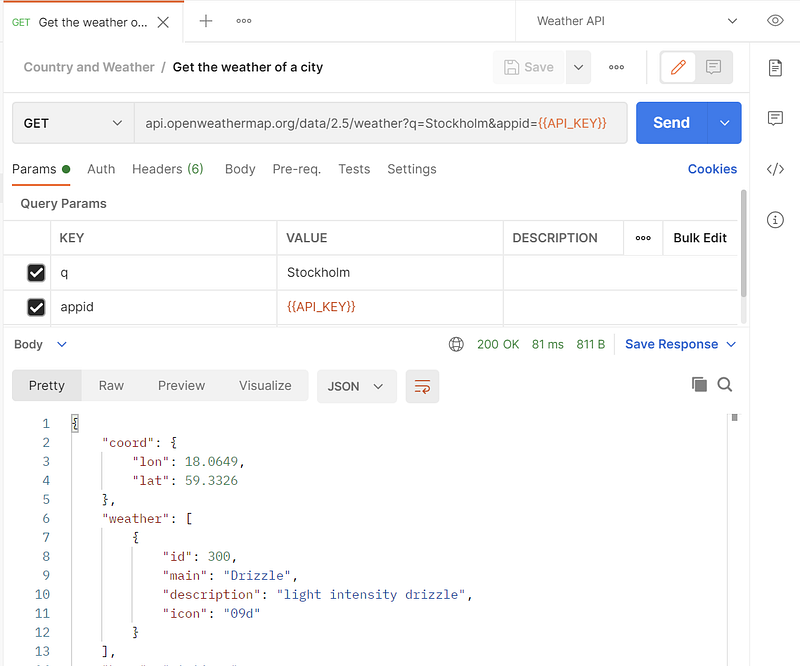
How to create an environment? Another API we will use is the Weather API. Unlike the Country API demonstrated above, the Weather API needs an API key. To get an API key, you need to register at this website and activate your email. After registration, you can find the API key on your account page. Note that the API key may take a couple of minutes to get activated, so be a little patient there. The Weather API has a free plan which is enough for study purposes. If you want to have some special service, you would need to choose a paid plan.
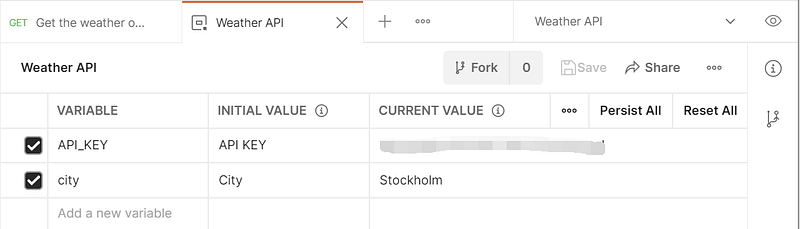
Once your API key is activated, you can start to use it to get the weather for a city. Since the API key is a piece of sensitive data, we should normally not store it in the URL as plain text. Instead, we should create an environment that will hold sensitive data for us. In Postman, an environment is a set of variables you can use in your Postman requests. You can use environments to group related sets of values together and manage access to shared Postman data if you are working as part of a team. You can create environments for different setups — local machine, development server, production API, etc. You can also create environments for different types of users — external, internal, management users, etc.
In this example, let’s create an environment called “Weather API”. To create an environment, you can either click the plus sign in the Environments tab or simply click the eye symbol (👀) in the upper right corner of the window.

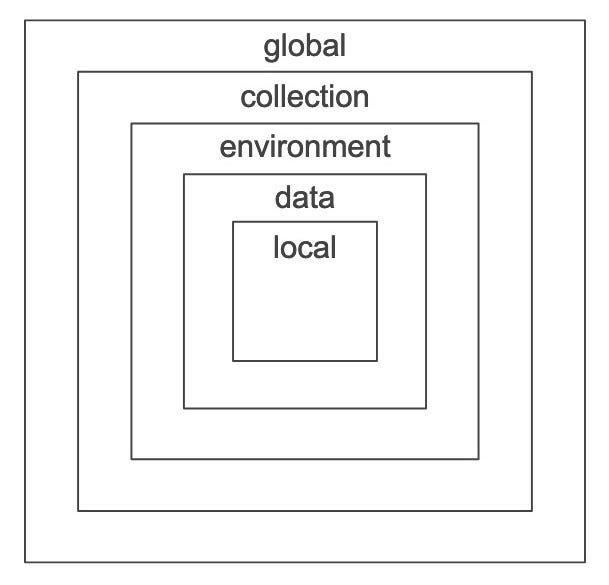
Especially, initial values are the values shared when you share an environment. It is just a placeholder for the variable. Current values are local and not synced or shared. It is the current value that is actually used for a variable. Therefore, always put sensitive data like API key or JWT token in the current value, and never put them in the initial value.
When the environment is created, click the drop-down on the left side of the eye symbol and choose the environment. The environment will be used for all collections in the workspace.
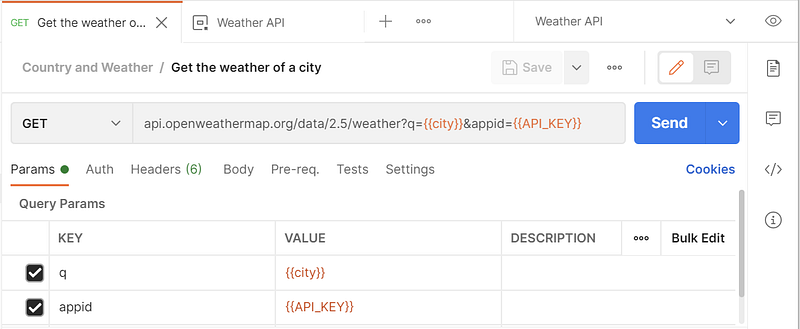
Let’s create a new request to get the weather for a city. The API endpoint used can be found in this link. To use an environment variable, put it in double curly brackets ({{}}).
As we can see, the environment variable works, hooray!
How to connect related requests? Now let’s try something even cooler. Let’s first get the capital city of a country and then get the weather for it. We need to link the two requests “Get the capital of a single country” and “Get the weather of a city” somehow. To achieve this, we need to create another environment variable for the city. Even though a global variable will also work, it’s better to minimize the number of global variables and always put related variables in some specific environments.
To add a new environment variable, click the eye symbol and then click Edit for the corresponding environment. Add a new row for the city variable. The initial value is just a placeholder, and the current value is the actual value that will be overwritten and used later.
The “Get the weather of a city” request should still work, for the city specified in the “CURRENT VALUE” of the city variable.
Now let’s set the value for the city variable from the request “Get the capital of a country”. To do this, first specify the country we want to request in the Body tab, for example:
{
"country": "Germany"
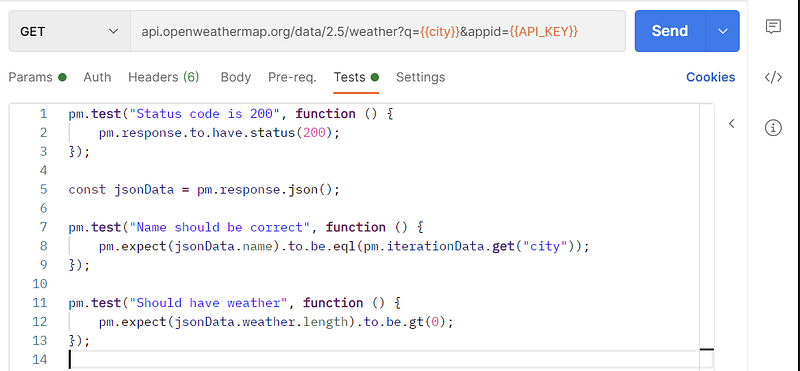
}Then write the logic in the Tests tab:
const jsonData = pm.response.json()
pm.environment.set("city", jsonData.data.capital)
You need to have a little knowledge of JavaScript in order to write test code in Postman. Here the pm object provides most of the functionality for testing your request and response data. The syntax should be quite self-illustrative. You can click the Snippets on the right side of the Tests tab to get the boiler-plate code for some commonly used tests.
With the update above for the request “Get the capital of a country”, when you click Send, the city variable should be updated to “Berlin”. And when you run the “Get the weather of a city” request now, you should get the weather for Berlin.
How automate API tests with Collection Runner? We have now known how to make API requests for a single city. Before we make requests for multiple cities at the same time, let’s write some tests for the three requests, which are shown below:
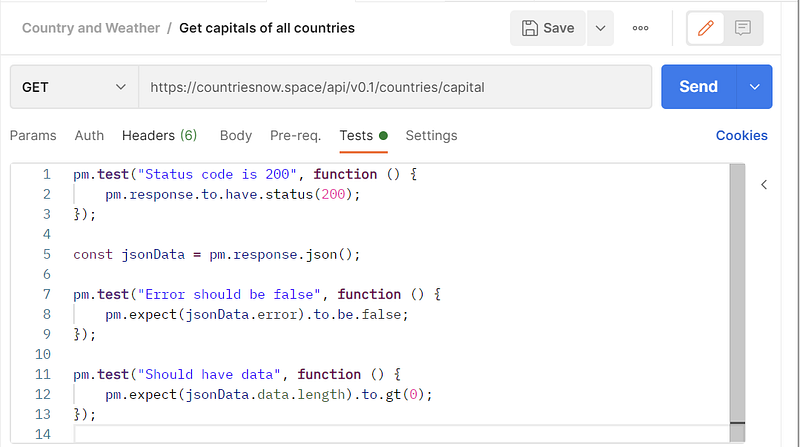
For request “Get capitals of all countries”:
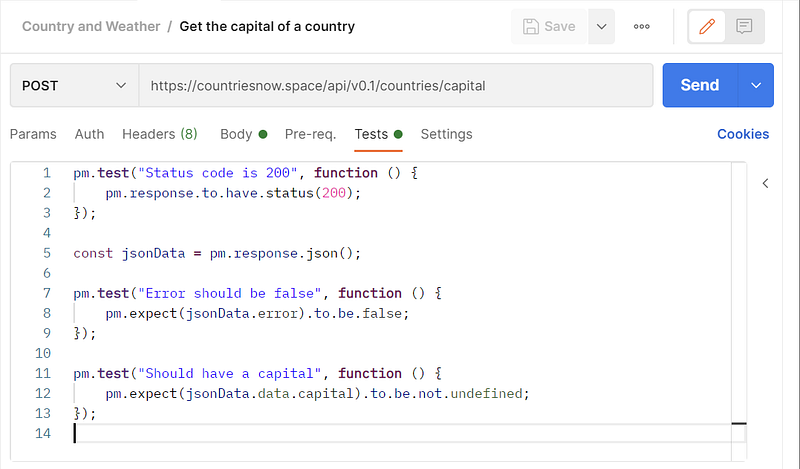
For request “Get the capital of a country”:
For request “Get the weather of a city”:

Assertions in Postman are based on the capabilities of the Chai Assertion Library. You can check more examples about how to write tests in Postman in this link.
Now our collection is ready, let’s run all the requests in the collection one after another automatically. This operation can be done by the Collection Runner which allows you to run sets of requests in a specified sequence. The Collection Runner will log your request test results, and your scripts can pass data between requests as well as alter the request workflow. Remember to save the changes to all the requests before you run them in the Collection Runner, otherwise, the latest version won’t be used.
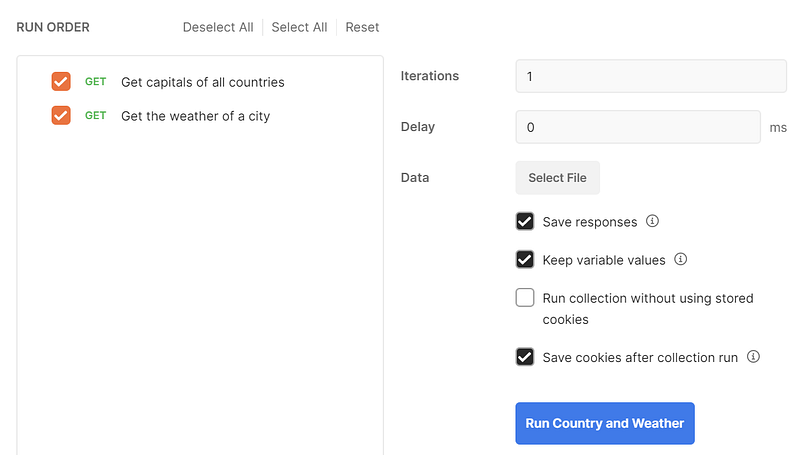
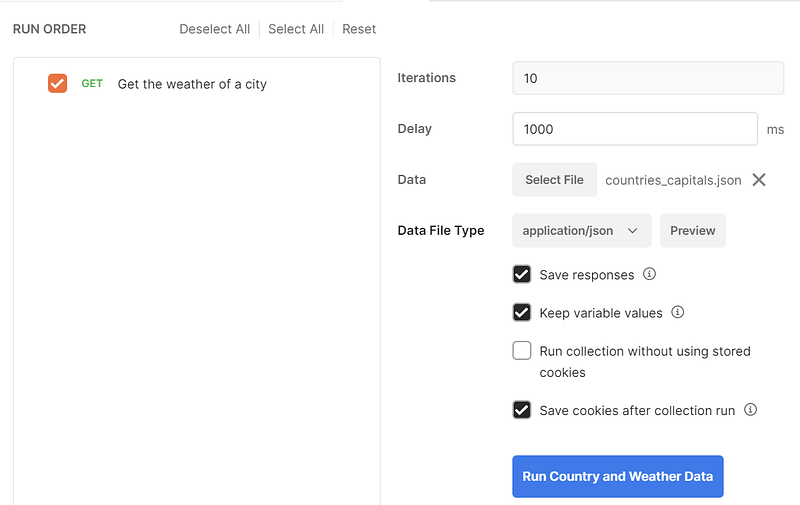
To open the Collection Runner, you can click the three dots on the right side of the collection “Country and Weather” and choose “Run Collection”. In the window opened, “Iterations” specify the number of iterations for your collection run. When we read data from an external file as will be demonstrated later, iterations correspond to the rows of data we have in the data file. “Delay” is an interval delay (milliseconds) between each request. In practice, you would normally want to set a reasonable value for Delay so that your API server won’t be bombarded with too many requests in a short period. We will demonstrate the use of external data files later. We can also check “Save responses” for debugging purposes, but bear in mind that it would slow down the API tests.
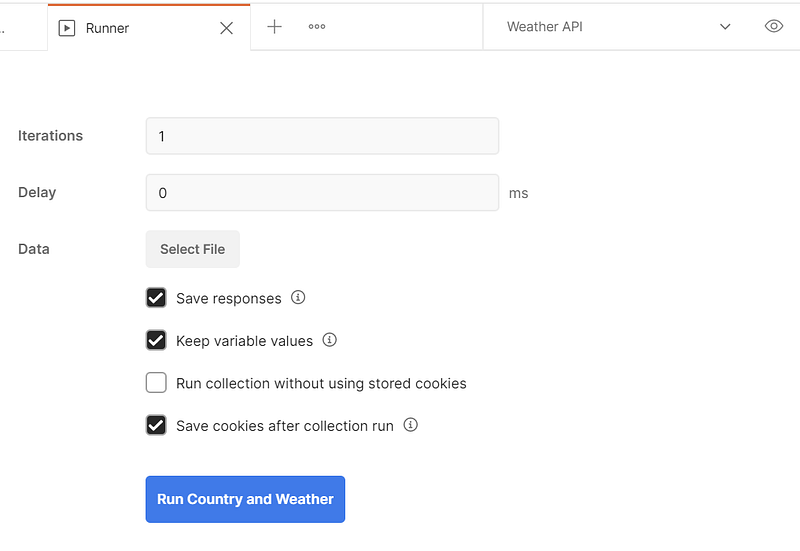
Don’t forget to choose an environment for your collection if have not yet done so. When everything is ready, click “Run Country and Weather”. The tests should all be finished successfully for all requests:

You can click each request to check the Request URL, Request Headers, Response body, etc:
How to write workflow for API tests? So far everything should be pretty simple, let’s introduce a little more complexity and do API tests for all the capital cities of all countries in the world, programmatically.
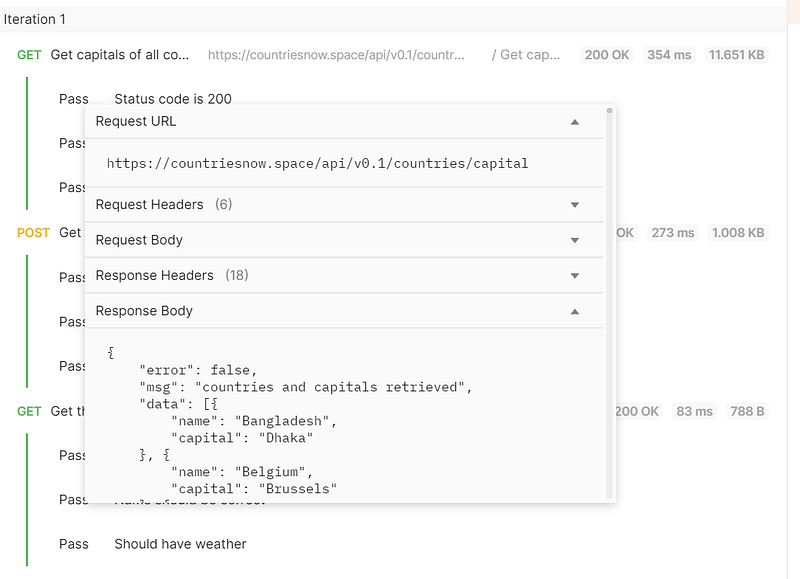
For the request “Get capitals of all countries”, we need to create an environment variable countries_capitals which contains the capital cities we want to get the weather for.

When the request “Get capitals of all countries” is run again, the new environment variable countries_capitals will be created and populated with 10 country/capital pairs.
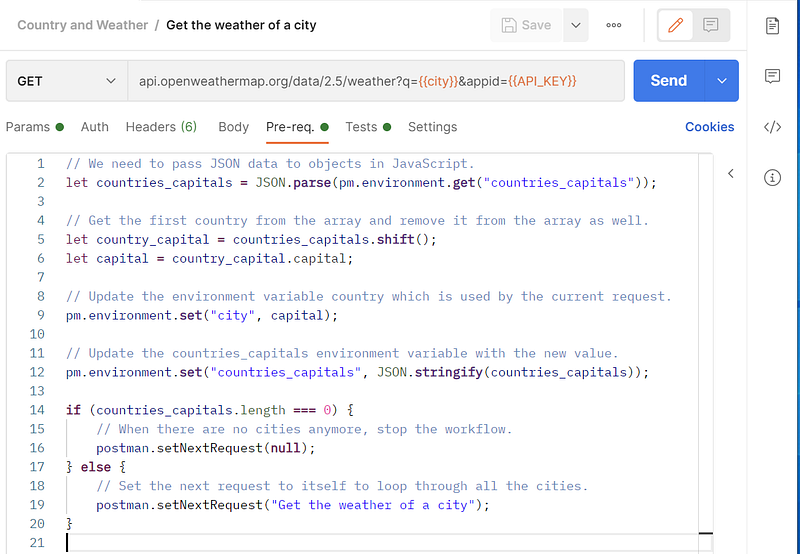
Then for the request “Get the weather of a city”, we need to have some logic in the Pre-request Script which would update the values for environment variables countries_capitals and city. Importantly, the setNextRequest method is used to set up the workflow which determines what should run after the current request. Note that the postman object is used here, rather than the pm object.
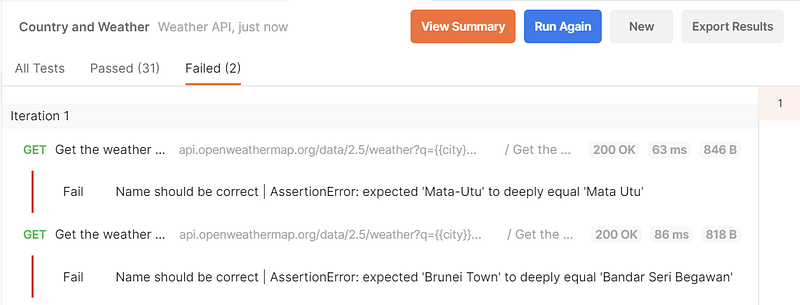
We don’t need request “Get the capital of a country” anymore and can delete it from the collection. Run the collection as before and we should see that request “Get the weather of a city” is run 10 times, each with a different city. Some tests fail because the city names in the two APIs are different. This is normal for this example. In practice, you may need to have some logic to deal with failed tests.
How read from an external file in API tests? In the example above we get the city data on the fly. Sometimes we may be provided with some text data and need to make API requests for each row of data. In Postman, the data can be a CSV file or JSON file. For a CSV file, the first row must be column names. For a JSON file, it must be an array of objects. Some data variables will be created automatically for the column names in a CSV file or the keys in a JSON file. The examples of the CSV file and JSON file are shown below:
CSV file:
country, city
Bangladesh, Dhaka
Belgium, Brussels
Burkina Faso, Ouagadougou
......
JSON file:
[
  {
    "name": "Bangladesh",
    "capital": "Dhaka"
  },
  {
    "name": "Belgium",
    "capital": "Brussels"
  },
  {
    "name": "Burkina Faso",
    "capital": "Ouagadougou"
  },
  ......
]
The original collection “Country and Weather” won’t work anymore because we won’t fetch data on the fly but would read them from the data file. Let’s duplicate the original collection and call the new one “Country and Weather Data”. We need to remove request “Get capitals of all countries” and remove the code in Pre-request Script for request “Get the weather of a city”. Importantly, we need to update the Tests code for request “Get the weather of a city” as follows:
The only change we make is to change the variable type for the city variable from environment to iterationData. This is necessary because we should compare the response data to the one in the data file, rather than the one in the environment. If you don’t make this change, the tests would fail. As shown below, iterationData type has a higher priority than the environment type.
I have prepared a JSON file that can be used directly. Let’s specify this JSON file as the data file and run collection “Country and Weather Data”:
When you run this collection, you should see similar but also different results as for collection “Country and Weather”. A similar point is that request “Get the weather of a city” is run 10 times in both collections. However, in collection “Country and Weather”, are tests are in the same iteration, whereas in “Country and Weather Data”, each test is in an independent iteration. Each row of data (or each object) in the data file corresponds to an iteration.
How to use Mock Server? We may not want to make API calls to the Country API all the time because the data won’t change. In this case, we can create a Mock Server for it. Besides, you can make requests that return mock data defined within Postman if you do not have a production API ready, or you do not want to run your requests against real data yet. By adding a mock server to your collection and adding examples to your requests, you can simulate the behavior of a real API.
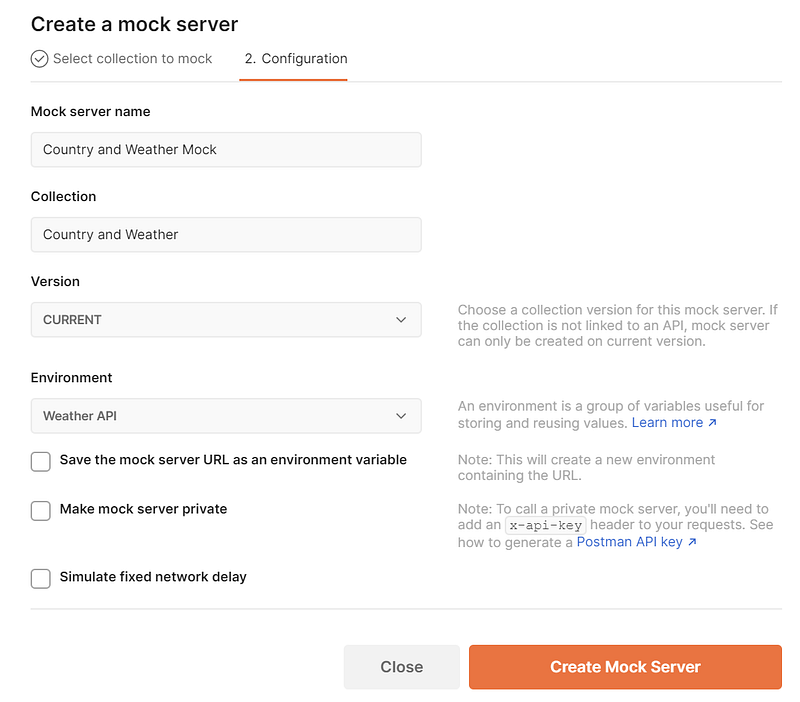
To create a mock server, click the three dots on the right side of collection “Country and Weather” and choose “Mock Collection”. In the window opened, specify a name (“Country and Weather Mock”) for the mock server and choose the environment (“Weather API”). Do not check “Save the mock server URL as an environment variable” because a new environment will be created, rather than adding the variable to the existing environment. The other options can be left as default. After clicking “Create Mock Server” a mock server will be created for the collection.
Then run request “Get capitals of all countries” in Collection “Country and Weather” and make sure it finishes successfully. Click “Save Response” -> “Save as example”. In the window opened, no changes are needed. You will find that an example is added for request “Get capitals of all countries” in the collection window.
Now you can replace the URL of request “Get capitals of all countries” with the URL of the mock server (everything before the path /api/v0.1/countries/capital. When you run a request to the mock server, you will see the same result as to the real API:
A mock Server can be really important in the development stage of an API. You can even make a custom response to an API with the mock server. If you want to learn more about mock servers, you can check this link.
How to set up monitors for API tests? A monitor lets you run a collection periodically to check for its performance and response. The monitor can be very useful in production because your API tests can be run regularly and you can be notified immediately when something goes wrong.
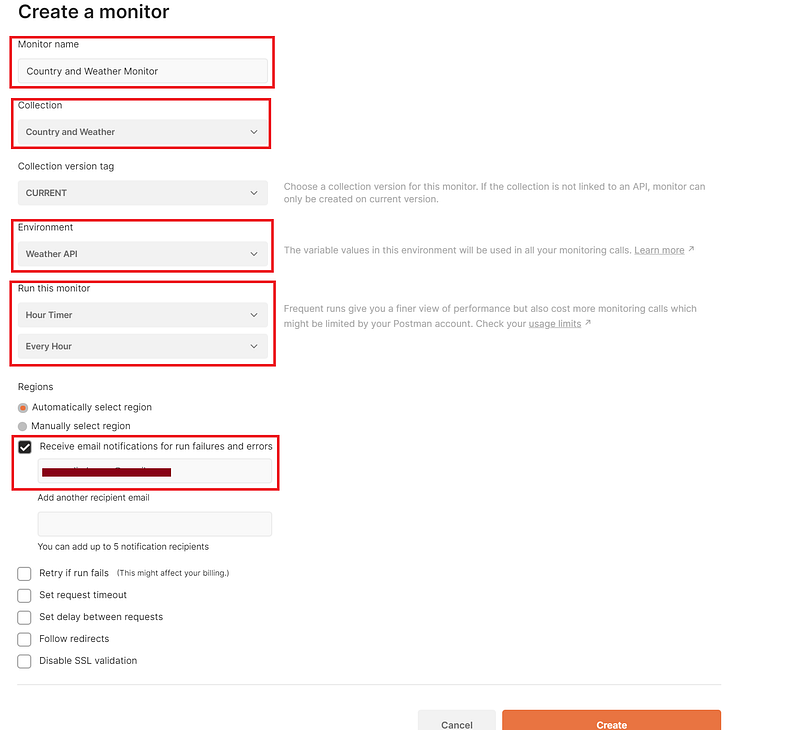
To create a monitor, click the Monitors tab on the left-hand side of the Postman window and then click Create a Monitor. In the window opened, specify a name for the monitor, choose the collection and the environment, and specify the frequency and recipient emails. Then click Create. Note that you cannot create a monitor for a collection that relies on external data files otherwise it won’t work properly.
After the monitor is created, you can click Run to trigger it. Note that the CURRENT VALUE for the environment variables cannot be accessed in the monitor, which is a known bug for the Monitor service. If you want to use the API key in the environment, you need to persist the variable, namely to update the INITIAL VALUE of a variable with the CURRENT VALUE. If you work in a team, you may need to ask the administrator to grant you permission to do so. I will persist the API_KEY variable in the “Weather API” environment in order for the monitor to work properly.

You can click Run to manually trigger the monitor if it has not run yet.
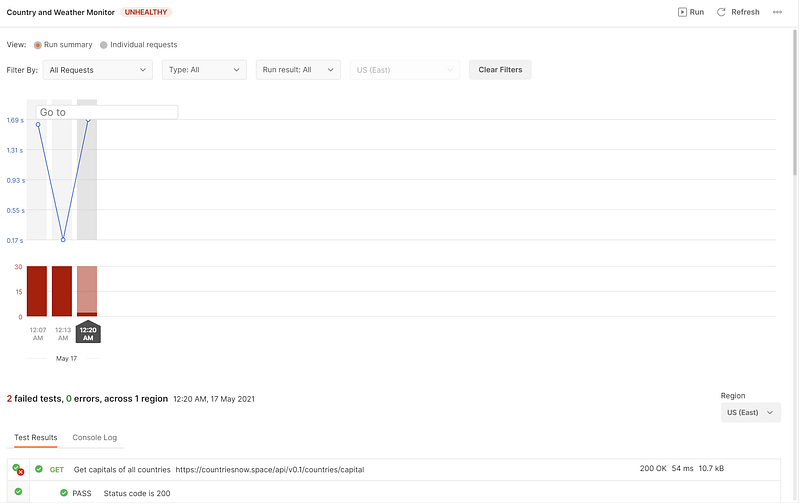
In this example, the first two runs failed completely because the environment variable API_KEY was not persisted. The third run finished successfully. The failed tests are due to the inconsistent names in the Country API and the Weather API as discussed previously.
It is better to delete the monitor if you don’t need it anymore, otherwise, it may exceed your quota easily.
How to use newman to run your collection from the command line? In the examples above, we have used the Web/Desktop version of Postman to run the collections. Sometimes we need to run the collection from the command line. For example, when making changes to the API, we may want to set up a continuous integration (CI) system which can test our APIs automatically. This is possible with newman, which is the command line Collection Runner for Postman. It allows you to run and test a Postman Collection directly from the command line.
To use newman, we need to install it with Node.js. If you have not yet installed Node.js, you can follow this link to install it on your computer. The command to install newman is:
npm install -g newmanWe can run a collection from a public link, or from a local JSON file. Let’s first demonstrate how to run a collection from a public link, which can be obtained when you click Share collection for a collection.
You will see that all the tests fail. This is because we didn’t specify the environment for the collection. Unlike collection, we cannot get a public link for the environment, you need to export the environment as a JSON file.
Remember to put the file name in quotes if it contains white spaces. This time the command would run successfully.
We can also export the collection as a JSON file, which can be better for code review. To run the JSON file exported, just replace the URL of the collection with the JSON file:
If the collection requires an external file, we can provide it with the -d option. Let’s export collection “Country and Weather Data” and run it with newman:
The result should be the same as in Collection Runner in Postman GUI.
How to run a collection with Docker? We have already known how to run a collection in Postman GUI and with newman on the command line. It is also good to know how to run a collection with docker because many CICD tools use docker containers for testing and deployment.
We will use the official image postman/newman. Note that we need to mount the collections, environment files, and data files to folder /etc/newman so that we don’t need to specify the path for them.
For the syntax of the current folder, check this topic for the different cases for different operations systems.
If you prefer to use a docker-compose file, you can refer to the following example:
To run with this docker-compose file:
docker-compose -f docker-compose-newman.yml run newman_testsHow to run newman as a Node.js library? We can also run newman as a library of Node.js, which can make API tests even more programmatically. You need to install newman in your working directory before you can use it in Node.js (not globally).
npm i newmanYou can now use newman in Node.js to run your collection as follows:
You can check more options and use cases of newman in the API Reference.
In this article, we covered most of the basic use cases of Postman, which include the basic concept and usage of collections, environments, mock servers, monitors, etc. Especially, the command line tool newman is introduced which can be used to further automate API tests in different scenarios. However, we can’t cover everything about Postman and many functions you may need to find out by yourself or refer to the official documents of Postman. Nonetheless, with the basics in this article, you shall be able to start to use Postman to automate your API test in your work now.
Related article:


