

How to use Packer to Build an Ubuntu 18.04 Template for VMware vSphere
Packer is an open-source tool used to create virtual machine templates from a .json file.
To automatize the creation of templates in VMware vSphere ESX, there are two major approaches:
- Use the VMware-iso provider. This provider creates VMware VMs from an ISO file as a source. It currently supports building virtual machines on hosts running VMware Fusion for OS X, VMware Workstation for Linux & Windows, and VMware Player on Linux. It can also build machines directly on VMware vSphere Hypervisor using SSH as opposed to the vSphere API.
- Use the vSphere-iso provider. This provider, created originally by JetBrains, merged into the official Packer repository and released with Packer since version 1.5.2, builds VMs on VMware vSphere directly using vSphere API.
In this story, we will use vsphere-iso to create a Ubuntu 18.04.4 LTS (Bionic Beaver) template using Packer.
If you want to learn more about the process of building Windows Templates for vSphere with Packer, check this post → How to use Packer to build a Windows Server template for VMware vSphere
If you want to learn more about the process of building CentOS/RedHat Templates for vSphere with Packer, check this post → How to use Packer to build a CentOS template for VMware vSphere
If you want to learn more about the process of building Debian 10 Templates for vSphere with Packer, check this post → How to use Packer to Build a Debian 10 Template for VMware vSphere
1. Requirements:
1. Packer → Available for free at https://www.packer.io
2.Ubuntu 18.04 ISO → Ubuntu introduced the subiquity server installer in Ubuntu 18.04. The following code will not work on Ubuntu 18.04 Live or Daily Build versions. See point 6 to learn how to choose the right image.
3. VMware vSphere with vCenter → This example requires a VMware vCenter and will not work on the free VMware ESXi.
2. Creating a VMware vSphere Template for Ubuntu 18.04 using Packer
In our code, there are three files required to deploy a Ubuntu 18.04 Template in VMware using Packer:
- The Packer template → ubuntu18.json
- The Variables file → variables.json
- The preseeding file → preseed.cfg
3. The Variables file for Ubuntu 18.04
We create a file called variables.json and add the following content.
This file defines variables to connect to VMware vCenter and create the virtual machine:
{
"vm_name": "Ubuntu-1804-Template", "vcenter-server":"kopi-vsphere-01",
"vcenter-username":"[email protected]",
"vcenter-password":"Ins3cur3P@ssw0rd",
"datacenter": "KopiCloud",
"datastore":"Kopi-Datastore-01",
"folder": "Templates",
"cluster": "Kopi-Cluster",
"network": "VM Network",
"vm-cpu-num": "1",
"vm-mem-size": "1024",
"vm-disk-size": "10240",
"ssh_username": "kopicloud",
"ssh_password": "kopicloud",
"iso_url": "http://cdimage.ubuntu.com/releases/18.04/release/ubuntu-18.04.4-server-amd64.iso",
"iso_checksum": "e2ecdace33c939527cbc9e8d23576381c493b071107207d2040af72595f8990b",
"iso_checksum_type": "sha256"
}4. The Packer template file for Ubuntu 18.04
We create a file called ubuntu18.json and add the following content.
This file will connect to VMware vCenter and create the virtual machine.
We will break the file in several pieces to understand how it works.
Builders section: Establish the connection with the VMware vSphere.
"builders": [
{
  "type": "vsphere-iso",

  "vcenter_server": "{{user `vcenter-server`}}",
  "username": "{{user `vcenter-username`}}",
  "password": "{{user `vcenter-password`}}",
  "insecure_connection": "true",
"datacenter": "{{user `datacenter`}}", "datastore": "{{user `datastore`}}",
"folder": "{{user `folder`}}",
"host": "{{user `host`}}",
"cluster": "{{user `cluster`}}",Builders section: The communicator, uses ssh to communicate with the VMware virtual machine:
"ssh_username": "{{user `ssh-username`}}",
"ssh_password": "{{user `ssh-password`}}",
Builders section: virtual machine settings. The convert_to_template is used to convert the VMware Virtual Machine to a VMware Template.
"vm_name": "{{user `vm-name`}}",
"convert_to_template": "true",

"network": "{{user `network`}}",
"network_card": "vmxnet3",

"boot_order": "disk,cdrom",

"guest_os_type": "ubuntu64Guest","CPUs": "{{user `vm-cpu-num`}}",
"RAM": "{{user `vm-mem-size`}}",
"RAM_reserve_all": true,
"disk_controller_type": "pvscsi",
"disk_size": "{{user `vm-disk-size`}}",
"disk_thin_provisioned": true,Builders section: the final part of the Builders section is used to configure ISO images and floppy disks.
Here, we will define the ISO image: the Ubuntu iso file specified in the variables section.
Also, we will create a floppy and copy the preseed.cfg file inside it.
Then, we use the boot_command command to request Ubuntu to load the preseed.cfg file from the floppy disk and configure the server.
"iso_urls": "{{user `iso-url`}}",
"iso_checksum": "{{user `iso-checksum`}}",
"iso_checksum_type": "{{user `iso-checksum-type`}}",
"floppy_files": ["./preseed.cfg"],
"boot_command": [
"<enter><wait><f6><wait><esc><wait>",
"<bs><bs><bs><bs><bs><bs><bs><bs><bs><bs>",
"<bs><bs><bs><bs><bs><bs><bs><bs><bs><bs>",
"<bs><bs><bs><bs><bs><bs><bs><bs><bs><bs>",
"<bs><bs><bs><bs><bs><bs><bs><bs><bs><bs>",
"<bs><bs><bs><bs><bs><bs><bs><bs><bs><bs>",
"<bs><bs><bs><bs><bs><bs><bs><bs><bs><bs>",
"<bs><bs><bs><bs><bs><bs><bs><bs><bs><bs>",
"<bs><bs><bs><bs><bs><bs><bs><bs><bs><bs>",
"<bs><bs><bs>",
"/install/vmlinuz",
" initrd=/install/initrd.gz",
" priority=critical",
" locale=en_US",
" file=/media/preseed_server.cfg",
"<enter>"
]Provisioners section: the provisioner executes commands on the virtual machine using the shell provisioner. We can execute multiple provisioners here.
"provisioners": [
  {
    "type": "shell",
    "inline": [
      "inline": ["echo 'Packer Template Build -- Complete'"]
    ]
  }
]
5. The pre-configuration file
This file will configure the server on the boot time. We create a file called preseed.cfg and copy the content below.
Note: Learn more about this file at https://help.ubuntu.com/lts/installation-guide/i386/apbs04.html
# Setting the locales, country
# Supported locales available in /usr/share/i18n/SUPPORTED
d-i debian-installer/language string en
d-i debian-installer/country string us
d-i debian-installer/locale string en_US.UTF-8
# Keyboard setting
d-i console-setup/ask_detect boolean false
d-i keyboard-configuration/layoutcode string us
d-i keyboard-configuration/xkb-keymap us
d-i keyboard-configuration/modelcode string pc105# User creation
d-i passwd/user-fullname string kopicloud
d-i passwd/username string kopicloud
d-i passwd/user-password password kopicloud
d-i passwd/user-password-again password kopicloud
d-i user-setup/allow-password-weak boolean true# Disk and Partitioning setup
d-i partman-auto/disk string /dev/sda
d-i partman-auto/method string regular
d-i partman-partitioning/confirm_write_new_label boolean true
d-i partman/choose_partition select finish
d-i partman/confirm boolean true
d-i partman/confirm_nooverwrite boolean true# Set root password
d-i passwd/root-login boolean true
d-i passwd/root-password password kopicloud
d-i passwd/root-password-again password kopicloud# Package installations
d-i pkgsel/include string open-vm-tools openssh-serverd-i grub-installer/only_debian boolean trued-i preseed/late_command string \
echo 'kopicloud ALL=(ALL) NOPASSWD: ALL' > /target/etc/sudoers.d/kopicloud ; \
in-target chmod 440 /etc/sudoers.d/kopicloud ;d-i finish-install/reboot_in_progress note
Note: The preseed.cfg creates a user called kopicloud with password kopicloud. Update both preseed.cfg and variables.json files with your own credentials.
6. How to choose the right Ubuntu ISO
Ubuntu introduced the subiquity server installer in Ubuntu 18.04, so there are two major versions of Ubuntu:
- Live Build → ubuntu-18.04.x-live-server-amd64.iso
- Release Build → ubuntu-18.04.x-server-amd64.iso
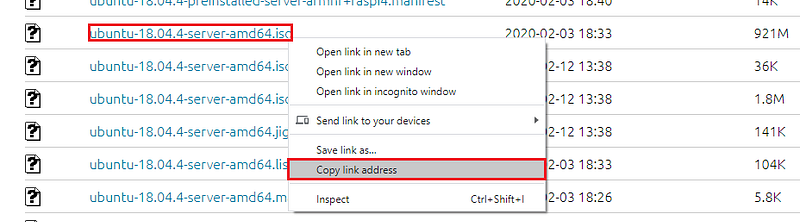
There are a lot of ISOs on the page, so which one is the right one?
We open the page http://cdimage.ubuntu.com/releases/18.04/release/ in our browser and search for the file ended on server-amd64.iso. Right-click on the file and click on Copy link address option.
Update the iso_url variable on the variables.json with this link.
Then, we search for the checksum file SHA256SUMS.

We open the file and search for the file name ended on server-amd64.iso, copy the checksum string, and update the iso-checksum variable on the variables.json file.

7. Building the Template with Packer
We open our command line (As Administrator) and type:
packer build -var-file variables.json ubuntu18.json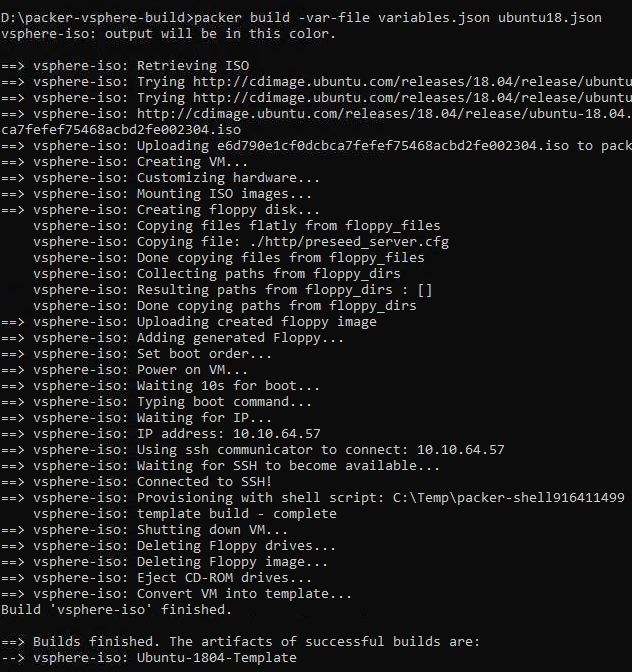
And our new Ubuntu template is available in the vSphere vCenter:
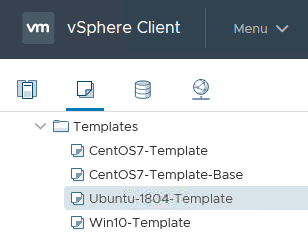
The complete code to build a Ubuntu 18.04 template is here → https://github.com/guillermo-musumeci/packer-vsphere-iso-linux
And that’s all folks. If you liked this story, please show your support by 👏 this story. Thank you for reading!


