
How To Use Miniconda With Python and JupyterLab
Setting up a minimalist Python environment from scratch

Miniconda is a minimal conda installer including only Python, conda, and its dependencies. Miniconda allows you to create customized environments by installing additional packages from the thousands of additional packages. You can create separate environments for each project and easily share your environment with others for easy reproducibility. With conda, you can create an environment on your local machine and seamlessly copy it to large shared high-performance computers (HPC).
This article will outline everything you need to know to install and use Miniconda to create and manage custom environments, install packages, and move these environments to remote computers. Miniconda puts you in control and doesn’t install unnecessary packages for your needs, which may come with a full-blown Anaconda installation.
Table of contents
- Installation
- The basics
- Install packages
- Create a custom environment
- Use an environment with JupyterLab
- Move an environment to a new computer
- Fix and clean your environments
- Modify the condarc file
- Final thoughts
Installation
To start, download the Miniconda installer for your system. Copy the installer script using wget or cURL. Here is an example using wget to copy the 64-bit Linux installer into the current working directory. The -O flag renames the file to miniconda.sh.

Once copied, run the installer script and follow the on-screen instructions.
bash miniconda.shYou will be prompted to:
- Accept the license terms.
- Choose the install location.
-
$HOMEis the default location, but you can choose any location. - If you are installing on a shared computer with limited$HOMEspace, you should choose a different location. - Initialize Miniconda.
- “Yes” will update the
$PATHvariable in your.bashrcfile. I recommend this option. - “No” required you to update$PATHmanually:export PATH=”$HOME/miniconda/bin:$PATH” - Restart your terminal or source your
.bashrcfile for the changes to take effect.
The Basics
Now that conda is installed we can start exploring. The first command to try is conda info. This displays information about your conda installation, such as the install location, where environments are located, your conda version, and a ton of other information.

You can display just your environments with conda info --envs. Note that conda env list achieves the same result. At first, you will only see the base environment. This is where packages will be installed if you don’t first activate an environment or explicitly specify where to install the package.
Here is an example of output with two environments: base and test. The name of the environment is on the left and the location is on the right. The * indicates the currently active environment.

Install Packages
Miniconda is extremely minimalist and requires you to install the packages you need, not just commonly used packages like NumPy. You can install packages with the conda install command followed by the package name.
Here is how to install NumPy:
conda install numpyBefore the installation begins, it always prompts which dependencies will be installed and which packages will be upgraded or downgraded. This lets you know whether you want to install or not.
You don’t have to install one package at a time. Instead, you can specify multiple packages at once.
conda install xarray netcdf4Packages are downloaded from remote channels, which are URLs to directories containing packages. This is important because not all packages are in the default channel. You can specify different channels with the -c flag. In this example, I am installing NumPy from the community-driven conda-forge channel.
conda install numpy -n base -c conda-forgeThe -n flag specifies which environment the package will be installed in. Without specifying this flag, the package will be installed in the active environment. However, I think it’s a good idea to be explicit here.
List packages
You can list all the packages currently installed like this:
conda listRemove a package
Removing a package is just as easy as installing. Here is an example of removing a package.
conda remove numpy -n base -c conda-forgeJust like installing a package, I think it’s a good idea to be explicit about which environment you are removing the package from and which channel to use.
Error installing or removing packages?
If you receive an error when installing a package, you can try two things:
- Update conda:
conda update -n base -c defaults condaNotice the use-nand-cflags to specify the environment and channel. - Install or remove from a different channel. It’s best to remove a package from the channel you installed from.
Conda-forge typically has the latest versions. You can install from the conda-forge channel like this:
conda install numpy -n base -c conda-forgeor remove a package installed from conda-forge like this:
conda remove numpy -n base -c conda-forgeCreate a Custom Environment
Some people prefer to have a different environment for each project or a different environment for a specific task. For example, maybe one is solely for machine learning and another is specifically for regridding data with xESMF.
Another way to use environments is to have one clean base environment and a separate development environment to make sure there are no conflicts when adding a new package.
However you use environments, the way you create them is the same. Here is how to create a new environment with the name myenv and using Python version 3.7.
conda create --name myenv python=3.7Note on = versus == when specifying the Python version:
python=3.7tells conda to use the latest version in the Python 3.7 tree. For example, if the latest version is Python 3.7.6, then that version will be installed.python==3.7tells conda to use exactly that version, Python 3.7.
You can activate the environment whenever you want to use it with:
source activate myenvThen you can install packages just like before and specify the environment (-n) and channel (-c).
conda install numpy -n myenv -c conda-forgeWhen you are finished, you can deactivate the environment like this:
conda deactivateIf you want to copy one of your existing environments, maybe to test how a new package behaves, you can pass the --clone flag when you create it.
conda create --clone myenv --name myenv2This will copy all the packages installed in myenv to myenv2. Note that this copies the packages; it doesn’t share them. In other words, removing either environment does not impact the other.
Cloning the base environment is the same as cloning any other environment.
conda create --clone base --name basecloneIf you need to delete an environment, you can do that like this:
conda env remove --name basecloneThis removes baseclone and the packages it contains.
List environments
Remember, If you ever forget which environments you created, you can always display them with conda env list.
Use an Environment With JupyterLab
You cannot use an environment with JupyterLab right away. There is a little bit of setup involved. First, you need JupyterLab installed. You can install JupyterLab with conda install jupyterlab -c conda-forge.
Then follow these instructions to turn the environment into a kernel so you can use it in a Jupyter notebook.
- Activate the environment:
source activate myEnv. - Install ipykernel:
conda install ipykernel. - Run this command:
python -m ipykernel install --user --name myEnv --display-name “my_environment”.
Here,--name specifies the environment name and --display-name is the kernel name that will display in JupyterLab. After you launch JupyterLab, you will see my_envionrment as a kernel option. Selecting this will run commands in the myEnv environment.
Move an Environment to a New Computer
Let’s say you have an environment you work with on your laptop and you want to transfer that same environment to an HPC. Instead of wasting time installing each package manually, you can create from an environment file.
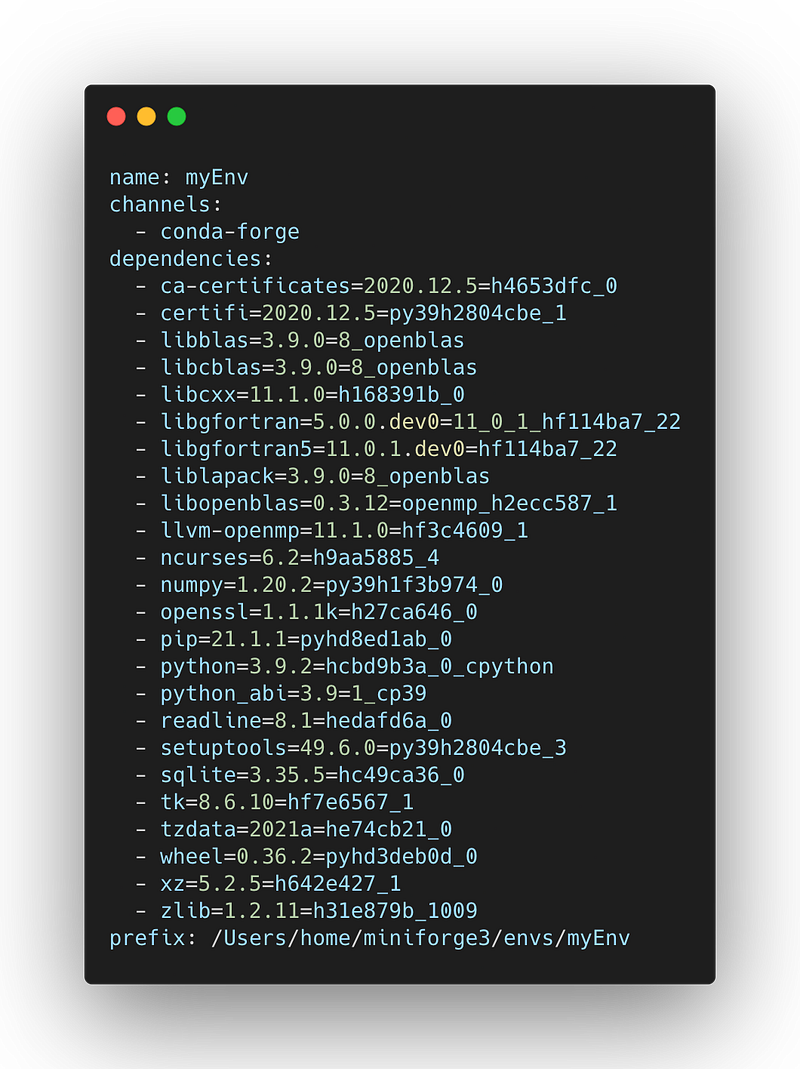
To do this you first need to create your environment.yml file from the environment on your laptop:
conda env export --name myEnv > environment.ymlThis exports the myEnv environment to a file named environment.yml. You can either specify the environment directly with the name flag or activate the environment first and then remove the --name myEnv part: conda env export> environment.yml . Here is an example of an environment.yml file.
Now you can move the environment.yml file to your HPC using scp. Then, after you install conda, you can create your new environment from a file like this:
conda env create --file environment.ymlThis will download and install all the packages and their dependencies. There is no need to specify a name since it is already declared in environment.yml.
Fix and Clean Your Environments
Revert to a previous revision
We have to remember that Python is free and open source and packages are community-driven. Sometimes when we install a package, it doesn’t fare well with packages already installed. Thankfully, conda has a memory and we can revert back to a previous revision of our environment.
This will list all the revisions and what was modified.
conda list --revisionsUsing the (rev) number, we can revert to previous revision like this:
conda install --revision 0Now the environment will be just like (rev 0).
Here is an example of a revision list. This displays packages that are installed and removed with a + and -, respectively. Version and channel changes are indicated with ->.

Remove cached package tarballs
The more environments you create, the more tarballs you acquire. You can remove all these unneeded tarballs like this:
conda clean --tarballsModify the condarc File
Now that you know how to use conda, the last subject I want to touch on is how to modify your .condarc file. This is useful if, for instance, you prefer to download from a specific channel, such as conda-forge. You can then add conda-forge to the default list of channels to search.
For example, you can add the conda-forge channel to your .condarc file like this:
conda config --append channels conda-forgeFinal Thoughts
This article provides the majority of what you need to know to use conda to manage environments. Each command has more flags than the ones I discussed, which you find in the documentation.
Documentation also provides a handy cheat sheet that outlines some of the common commands.
The benefit of using Miniconda is the ability to move environments across computers. As somebody who works on multiple machines, I find Miniconda has made it seamless to move environments.
In addition to transferring an environment to a new computer, I can also transfer the environment file to somebody else when I share a project. This ensures that the environment is stable and that code will run as expected for somebody else, which is very important for reproducibility.
Thank you for reading and supporting Medium writers