
Tutorial
How to Use Custom Fonts in Matplotlib Plots
A short but comprehensive guide


If you’ve had enough of a default matplotlib font in your visualisations, today I’m going to show you how to tap into system fonts and how to use 3rd party fonts downloaded from the Internet.
matplotlib doesn’t see all the system fonts from the get go. But, there’s an easy way to fix it.
You can even use the fonts that haven’t been installed in your system!
At the bottom of the article you’ll find a graphical summary of all the methods we’re going to cover.
And now, let’s see how it’s done!
Imports
from pathlib import Path
import matplotlib.pyplot as plt
from matplotlib import font_manager, rcParams, rcdefaults
What is a Font Manager?
In simple terms, font_manager is an object that handles
- Finding fonts.
- Caching fonts so they can be used in the plots.
If you want to see the fonts that can be used right away, call the .get_font_names() method.
It returns a list of font names:
sorted(font_manager.get_font_names())The output:
['Abyssinica SIL',
 'Andale Mono',
 'Ani',
 'AnjaliOldLipi',
 'Arial',
 'Arial Black',
 'Chandas',
 'Chilanka',
 'Comic Sans MS',
...
 'ori1Uni',
 'padmaa',
 'padmaa-Bold.1.1']
I’ve checked with len(font_manager.get_font_names()) — there are currently 132 fonts available for me to use right away.
Find you system fonts
To see all the fonts matplotlib can find on your system call .findSystemFonts() method.
It returns a list of the paths to fonts found in your OS:
sorted(font_manager.findSystemFonts(fontpaths=None, fontext="ttf"))The output:
['/home/pawjast/.local/share/fonts/DancingScript-VariableFont_wght.ttf',
 '/home/pawjast/.local/share/fonts/Google/TrueType/Roboto/Roboto_Black.ttf',
 '/home/pawjast/.local/share/fonts/Google/TrueType/Roboto/Roboto_Black_Italic.ttf',
 '/home/pawjast/.local/share/fonts/Google/TrueType/Roboto/Roboto_Bold.ttf',
 '/home/pawjast/.local/share/fonts/Google/TrueType/Roboto/Roboto_Bold_Italic.ttf',
 '/home/pawjast/.local/share/fonts/Google/TrueType/Roboto/Roboto_Italic.ttf',
 '/home/pawjast/.local/share/fonts/Google/TrueType/Roboto/Roboto_Light.ttf',
 '/home/pawjast/.local/share/fonts/Google/TrueType/Roboto/Roboto_Light_Italic.ttf',
 '/home/pawjast/.local/share/fonts/Google/TrueType/Roboto/Roboto_Medium.ttf',
 '/home/pawjast/.local/share/fonts/Google/TrueType/Roboto/Roboto_Medium_Italic.ttf',
 '/home/pawjast/.local/share/fonts/Google/TrueType/Roboto/Roboto_Regular.ttf',
 '/home/pawjast/.local/share/fonts/Google/TrueType/Roboto/Roboto_Thin.ttf',
...
 '/usr/share/fonts/truetype/ubuntu/UbuntuMono-Italic[wght].ttf',
 '/usr/share/fonts/truetype/ubuntu/UbuntuMono-R.ttf',
 '/usr/share/fonts/truetype/ubuntu/UbuntuMono-RI.ttf',
 '/usr/share/fonts/truetype/ubuntu/UbuntuMono[wght].ttf',
 '/usr/share/fonts/truetype/ubuntu/Ubuntu[wdth,wght].ttf']
I’ve specified two parameters inside the .findSystemFonts():
fontpaths=None: ifNone, it will search all the default system locations.fonttext="ttf": the extension of a font file to look for.
💡 Note: These fonts aren’t yet available to use in the plots. They’ve only been discovered.
Now all you need to do is to add them to the font manager.
Let’s download more fonts
Before we add the newly discovered OS fonts to the font manager, let’s download one more, completely new font from the Internet.
I’ve gone for a font called Rubik.
It’s available for free from Google Fonts (here).
Once you’ve downloaded and installed it, we’re good to move to the next step.
Add fonts to the font manager
Before adding the fonts to the manager let’s confirm the manager is not aware (yet) of e.g. the Rubik font we’ve just installed.
"Rubik" in font_manager.get_font_names()This returns False .
Now, call the fontManager.addfont() method to add any new font to the manager.
In the example below I’m looping over all discovered fonts to cache them all.
for font in font_manager.findSystemFonts(fontpaths=None, fontext="ttf"):
    try:
        font_manager.fontManager.addfont(font)
    except:
        print(f"Problem with the: {font}")
In the code above I used:
.findSystemFonts— to identify the paths to all.ttffiles.forloop to go over every path (stored in variablefont)- Passed the
font(actually a path to.ttffile) as a parameter to the.fontManager.addfont(). - I’ve wrapped everything in a
try/exceptto ensure the corrupted files won’t break the process (I had one file that wouldn't add to the manager).
Before I had 132 fonts available to use. Running this command again:
len(font_manager.get_font_names())revealed I get 180 fonts now.
When I check if Rubik is one of them:
"Rubik" in font_manager.get_font_names()I get True .
Using fonts
Now that we’ve added new fonts, let’s see how to use them.
Each text object ( title , text , label , etc.) has a parameter for setting a font. There are actually 3 different keywords that does the same job. These are:
fontnamefontfamilyfamily
In the example below I’ve created 3 Axes and set the title for them. In each case I’ve used a different keyword to change the font and the result was always the same.
fig, axs = plt.subplots(
    1, 3,
    figsize=(14, 6),
    layout="constrained"
)

axs[0].set_title(
    "My title using `Rubik` font",
    fontname="Rubik",  # Using 1st keyword
    fontsize=25
)
axs[0].text(
    0.5, 0.5,
    "parameter: fontname",
    fontname="Rubik",  # Using 1st keyword
    fontsize=18,
    ha="center",
    va="center"
)
axs[1].set_title(
    "My title using `Rubik` font",
    fontfamily="Rubik",  # Using 2nd keyword
    fontsize=25
)
axs[1].text(
    0.5, 0.5,
    "parameter: fontfamily",
    fontfamily="Rubik",  # Using 2nd keyword
    fontsize=18,
    ha="center",
    va="center"
)
axs[2].set_title(
    "My title using `Rubik` font",
    family="Rubik",  # Using 3rd keyword
    fontsize=25
)
axs[2].text(
    0.5, 0.5,
    "parameter: family",
    family="Rubik",  # Using 3rd keyword
    fontsize=18,
    ha="center",
    va="center"
)

for ax in axs:
    ax.set_xlabel("x label")
    ax.set_ylabel("y label")
The outcome:

Let’s bring in the `rcParams`
In the above example we’ve set the new font directly inside the call to a text object (e.g. ax.set_title ).
However, if you’d like to update the font for all the text elements in your plot(s) — once and for good — you need to change the rcParam settings.
In a nutshell, the rcParam is a file that stores the information about what the plot is supposed to look like.
💡 Note: if you want to explore this subject more, I wrote a separate article on the utility of rcParam.
All you have to do is:
- Import
rcParams(we did that at the beginning). - Update the desired parameter.
rcParams["font.family"] = "Rubik"From now on, every text element in every plot will be using Rubik font by default.
You can still choose a different font locally (from within the text object itself).
Let’s see the following example.
fig, ax = plt.subplots(
    figsize=(10, 6),
    layout="constrained"
)

ax.set_title(
    "I'm using `Rubik` font everywhere by default",
    fontsize=25
)
ax.set_xlabel(
    "x label",
    fontsize=20
)
ax.set_ylabel(
    "y label",
    fontsize=20
)
The output:
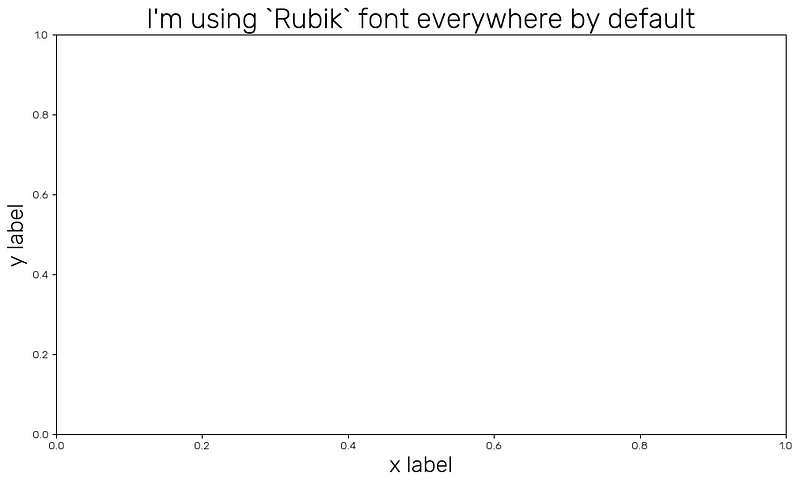
You can see the title and both axis labels use the Rubik font in the plot above.
Using fonts that aren’t installed in the system
It’s not necessary to install a font prior to using it in matplotlib.
You’ll be able to use it as long as you:
- Have downloaded the font on your computer.
- Can create a path to its location.
I’ve downloaded a few more files from Google Fonts.
These are: Pixelify Sans, Dancing Script and Fascinate Inline.
I’ve placed them in a sub-folder in a location where I keep my notebook with all the code I’m using to produce examples for this article:

Then I use Path module to create a proper, system independent path to this folder:
my_path = Path('./fonts')Typing my_path in the Terminal or a notebook shows this:
PosixPath('fonts')Now, let’s create paths to all fonts in the fonts folder:
# Show all subfolders inside `fonts`
all_fonts = [x for x in my_path.iterdir() if x.is_dir()]
The output:
[PosixPath('fonts/Pixelify_Sans'),
 PosixPath('fonts/Fascinate_Inline'),
 PosixPath('fonts/Dancing_Script')]
At this point we’re back to using the two methods we’ve used before.
First, let’s find all the .ttf files using .findSystemFonts() method:
all_not_installed = sorted(
    font_manager.findSystemFonts(fontpaths=all_fonts, fontext='ttf')
)
Notice, this time the parameter fontpaths is not set to None .
This time it gets the list of the sub-folders containing the new fonts. I store the list in a variable called all_not_installed .
The output:
['/home/pawjast/Documents/my github/medium-WIP/dev_medium/fonts/Dancing_Script/DancingScript-VariableFont_wght.ttf',
 '/home/pawjast/Documents/my github/medium-WIP/dev_medium/fonts/Dancing_Script/static/DancingScript-Bold.ttf',
 '/home/pawjast/Documents/my github/medium-WIP/dev_medium/fonts/Dancing_Script/static/DancingScript-Medium.ttf',
 '/home/pawjast/Documents/my github/medium-WIP/dev_medium/fonts/Dancing_Script/static/DancingScript-Regular.ttf',
 '/home/pawjast/Documents/my github/medium-WIP/dev_medium/fonts/Dancing_Script/static/DancingScript-SemiBold.ttf',
 '/home/pawjast/Documents/my github/medium-WIP/dev_medium/fonts/Fascinate_Inline/FascinateInline-Regular.ttf',
 '/home/pawjast/Documents/my github/medium-WIP/dev_medium/fonts/Pixelify_Sans/PixelifySans-VariableFont_wght.ttf',
 '/home/pawjast/Documents/my github/medium-WIP/dev_medium/fonts/Pixelify_Sans/static/PixelifySans-Bold.ttf',
 '/home/pawjast/Documents/my github/medium-WIP/dev_medium/fonts/Pixelify_Sans/static/PixelifySans-Medium.ttf',
 '/home/pawjast/Documents/my github/medium-WIP/dev_medium/fonts/Pixelify_Sans/static/PixelifySans-Regular.ttf',
 '/home/pawjast/Documents/my github/medium-WIP/dev_medium/fonts/Pixelify_Sans/static/PixelifySans-SemiBold.ttf']
OK, we’re able to detect the 3 new fonts with all their styles.
Now I can either loop over all of the fonts and add them to the font manager or just pick one. Let’s go with the latter (for a change).
Let’s use Fascinate Inline Regular.
This is item number 5 in my list of fonts.
all_not_installed[5]The output:
'/home/pawjast/Documents/my github/medium-WIP/dev_medium/fonts/Fascinate_Inline/FascinateInline-Regular.ttf'Let’s add it to the font manager.
font_manager.fontManager.addfont(all_not_installed[5])All done. Let’s check if the font has been cached properly.
"Fascinate Inline" in font_manager.get_font_names()This returns True .
Let’s test the new font.
# Reset all previous settings to the defaults
rcdefaults()

fig, ax = plt.subplots(
    figsize=(10, 6),
    layout="constrained"
)

ax.set_title(
    "My title using `Fascinate Inline` font",
    fontname="Fascinate Inline",
    fontsize=25
)

# This still uses default font
ax.set_xlabel("x label")
ax.set_ylabel("y label")
The outcome:

All worked as expected.
There’s another way
There’s one more way to add a font to the manager.
I still have my list of new fonts — this time I’ll go with Dancing Script Bold. It’s indexed at 2nd position in my list:
all_not_installed[1]The output:
'/home/pawjast/Documents/my github/medium-WIP/dev_medium/fonts/Dancing_Script/static/DancingScript-Bold.ttf'Now use .FontProperties() method to cache the font with matplotlib .
# Cache font
font_manager.FontProperties(
    fname=all_not_installed[1]
)
The fname parameter is a path to the selected .ttf file.
Last check.
"Dancing Script" in font_manager.get_font_names()This returns True .
Final plot example.
fig, ax = plt.subplots(
    figsize=(10, 6),
    layout="constrained"
)

ax.set_title(
    "My title using `Dancing Script` font",
    fontname="Dancing Script",
    fontsize=25
)

# This still uses default font
ax.set_xlabel("x label")
ax.set_ylabel("y label")
The output:

Summary

We’re done 🎉.
Full code
Connect with me

💬 Medium ◽ Twitter / X ◽ GitHub ◽ Substack ◽ LinkedIn
💬 Not a Medium member yet? Consider joining ➡ link.
⭐ Star my GitHub Medium repo to access all of the code from my articles.
Thank you.
Resources
1️⃣ https://matplotlib.org/stable/api/font_manager_api.html#module-matplotlib.font_manager


