
How To Update Your GitHub Repository in Visual Studio Code
An overview to clone a repository, push changes, and make pull requests in VS code

For a lot of time, I updated my GitHub repository by simply inserting the files. But doing this can waste a lot of time when you have to repeat the same operation more than one time and when you are working with other people in that repository.
Recently, I have started to use Visual Studio Code when working on Jupyter notebooks and editing file .py. It’s a really efficient IDE that supports multiple languages and allows you to provide additional functionalities by installing extensions.
In this post, I am going to show how to work and update your GitHub repository on Visual Studio Code. The steps are as follows:
1. Prerequisites

Before getting started with GitHub on Visual Studio Code, there are previous requirements you need to know. First, you need to install Visual Studio Code, Python (at least Python 3.6), and Git. Once they are installed, you can enter in Visual Studio Code and select the Python interpreter from the Command Palette, which will appear with the keyboard shortcut Ctrl+Shift+P.
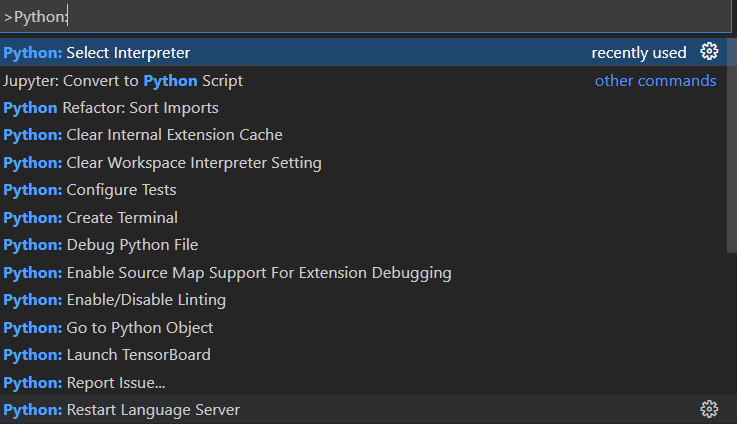
After this, we need to install the following extensions within VS Code:
- Python Extension
- GitLens Extension
- GitHub Pull Requests and Issues
Let’s also check on Visual Studio Code to see if Git is enabled in the settings:

The last and most important step is to click on the Account button located at the bottom left of the VS Code’s Panel and sign in with GitHub:

If all these steps are satisfied, we can finally start this tutorial!
2. Clone GitHub Repository
The first operation is to clone your GitHub repository on your local computer using Visual Studio Code. In this way, you have a full copy of the repository on your local PC and you can easily add, remove, and update the files on GitHub using Visual Studio Code directly.
To clone a GitHub repository, you need to have a GitHub repository already. If you don’t have any repositories on GitHub, I suggest you create a new repository and upload Python files that will be updated later.
There are three different ways to clone your GitHub repository:
- From the terminal
git clone <repository.git> - Using the
Git:Clonecommand in the Command Palette - Using the
Clone Repositorybutton in the Source Control tab, located in the left-side panel
In this post, I am going to show you how to clone the repository using the Source Control tab. First, you click Clone Repository and, then, a GitHub repository dropdown of your account will appear (if you have already signed in with GitHub, as I showed in the prerequisites section). Here’s what it looks like:

Select one of your repositories, and then select the repository location, which must be a folder. Once you choose the folder, you click the Select Repository Locationbutton.

Now you should see the local repository opened on Visual Studio Code, as shown below:

After this, we need to set the Git username and email address with the git config command on the terminal. Then, let’s open the terminal and write the commands. You only have to substitute “Your Name” and “[email protected]” with your GitHub username and email.
git config --global user.email "Your Name"
git config --global user.name "[email protected]"
Et Voilà! Now we finally have a copy of the GitHub Repository on the local computer, and we are done with most of the configurations!
3. Commit and Push Changes

The biggest advantage of having a local copy of your GitHub repository is the possibility to easily update your files. For example, let’s add a simple comment in the Jupyter notebook, and let’s save the file. In this way, you can visualize the changes of your local GitHub repository on the Source Control icon.
There are three steps to add your local modification on GitHub Repository:
- Click the
+icon by the modified file.
2. Once the file is added, press the v button, and write a message. For example, I wrote “comment added” and pressed Enter.
3. Select the Push option after selecting the ... icon.

If we check the changed file on the GitHub repository, you’ll see the modification, which is shown below:

Great! We updated the Jupyter notebook using only Visual Studio Code!
4. Make a Pull Request

A pull request is useful to have the most updated version of your GitHub repository. If you work in the repository with other collaborators that often update the files, these changes can’t be seen on your local copy on VS Code without doing a pull request.
Don’t worry, a pull request is very fast to do. You only need to select the Pull option after selecting the ... icon.
Final Thoughts
I hope you found this tutorial useful to get started with Git and GitHub on Visual Studio. When I discovered it, I never stopped using it because it helps me avoid wasting time. With more time, I can focus on other things.
Thanks for reading! Have a nice day!
Other related articles
Useful References
Did you like my article? Become a member and get unlimited access to new data science posts every day! It’s an indirect way of supporting me without any extra cost to you. If you are already a member, subscribe to get emails whenever I publish new data science and python guides!


