
How to turn VSCode into Neovim 🙃

VSCode != Neovim
Okay, first things first: of course, this post is as much a joke as anything else. VSCode is not Neovim and neither should it be! Both editors have different strengths and I’m a firm believer in picking your development tools based on your specific needs. For some, that might be VSCode or a JetBrains IDE, for others that might be Neovim with Tmux.
Even though I belong to the latter category, I do fire up VSCode once in a while, specifically in scenarios where it’s just better than Neovim. One example is when I need to edit and run Jupyter Notebook files, which is not possible (or very impractical) in a terminal based environment. Another is that, while I have debuggers set up in Neovim, debugging is one case where using a mouse-driven interface is often quicker than keyboard shortcuts.
Moreover, even if there’s probably no way to beat Neovim as a “hyperextensible” editor (you can literally program it to do pretty much anything), VSCode has a ton of features and a very active extension ecosystem too, so there’s probably more configuration possible than some might give it credit for!
All of this got me interested lately in a little experiment: I wanted to see just how far I could get in trying to get VSCode to behave like my Neovim installation.
So I gave it a try and besides being good fun, I actually learned a lot about VSCode customization. So in the end, I hope this blog inspires you to make the most out of your development environment — whatever it is you prefer!
Zen mode
First thing I noticed when comparing VSCode with Neovim is how much clutter there is on the screen with the out-of-the-box config:

Compare that to the calm of Neovim:

So first of all, we’re going to need Zen mode (Ctrl-Alt-Z) for both the editor and Gitlens. Here are my settings for that:
    "zenMode.hideStatusBar": false,
    "zenMode.hideLineNumbers": false,
    "zenMode.restore": true,
    "zenMode.centerLayout": true,
    "gitlens.mode.active": "zen",
That’s already much better:

Vim motions
Next, we obviously want to have Vim motions enabled. I used to use “VSCode Neovim” for that:
which actually uses a fully embedded Neovim instance. However, I had it for a while (when first getting familiar with Vim motions) and it wasn’t perfect. Moreover, it requires an installation of Neovim that is aware of VSCode (when trying to load plugins for instance), so it’s a bit of a hassle.
Instead, I have been using the standard option which is just called “Vim”, and I must say, it’s pretty good out of the box!
You use its settings to define a number of standard Vim options like easymotion, using the system clipboard, highlighting searches, your leader key, and so on:
    "vim.easymotion": true,
    "vim.incsearch": true,
    "vim.useSystemClipboard": true,
    "vim.useCtrlKeys": false,
    "vim.hlsearch": true,
    "vim.leader": "<space>",
You can even leave the status bar highlighting to Vim so that you get different colors for the different editing modes!

Keybindings
Of course, every Vim user has their own keybindings that they prefer, and the Vim extension offers a nice way to implement these.
For instance, I like jj instead of
    "vim.insertModeKeyBindings": [
        {
            "before": [
                "j",
                "j"
            ],
            "after": [
                "<Esc>"
            ]
        }
    ]
and some handy line operations, like H for ^ (go to beginning of line), L for $ (go to end of line) andYfor y$ (yank till end of line):
    "vim.normalModeKeyBindingsNonRecursive": [
        {
            "before": [
                "L",
            ],
            "after": [
                "$"
            ]
        },
        {
            "before": [
                "H",
            ],
            "after": [
                "^"
            ]
        },
        {
            "before": [
                "Y",
            ],
            "after": [
                "y",
                "$"
            ]
        }
    ]
Note that you might need “vim.NormalModeKeyBindings” for some keymappings to work, like C for c$ (change to end of line):
    "vim.normalModeKeyBindings": [
        {
            "before": [
                "C",
            ],
            "after": [
                "c",
                "$"
            ]
        }
    ]
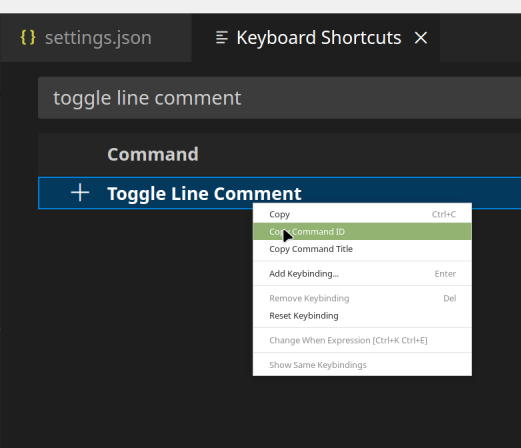
These are commands bound to a Vim command, but you can also use the Vim extension to define keybindings that perform VSCode actions. For instance, I like cc for toggling selected line comments:
    "vim.visualModeKeyBindingsNonRecursive": [
        {
            "before": [
                "c",
                "c"
            ],
            "commands": [
                "editor.action.commentLine"
            ],
            "silent": true
        }
    ]
Notice that for this, you need to know the ID of a VSCode command, which you can easily look up in the keybindings UI and then copy the ID by right clicking:
Navigating
One thing I particularly like about using Neovim is that I can navigate through my open buffers blazingly fast, without having to touch the mouse.
For this I use:
tl(go to next buffer)th(go to previous buffer)tn(open new buffer)td(close buffer)
In VSCode we can implement this as follows:
 "vim.normalModeKeyBindingsNonRecursive": [
        {
            "before": [
                "t",
                "l"
            ],
            "commands": [
                "workbench.action.nextEditor"
            ],
            "silent": true
        },
        {
            "before": [
                "t",
                "h"
            ],
            "commands": [
                "workbench.action.previousEditor"
            ],
            "silent": true
        },
        {
            "before": [
                "t",
                "n"
            ],
            "commands": [
                "workbench.action.files.newUntitledFile"
            ],
            "silent": true
        },
        {
            "before": [
                "t",
                "d"
            ],
            "commands": [
                "workbench.action.closeActiveEditor"
            ],
            "silent": true
        }
    ]
Searching
In Neovim, for searching files by name or content, there’s the fantastic plugin Telescope:
This allows you to fuzzy find files or file content in a highly extendable way. For instance, I have Ctrl-F to search file content and Ctrl-P to search file names in a context-dependent “workspace” (which I establish based on the file path of the current file).
VSCode’s native Ctrl-P, i.e. “Go to file…” (workbench.action.quickOpen ), is already quite good at this, because it lets you fuzzy search and select a file without taking your hands of the keyboard.
For search file content, you can use an extension called “Binocular” for this, which explicitly tries to mimick Neovim’s Telescope:
Be careful though to satisfy the necessary dependencies (binocular-cli , ripgrep , fzf , …) when you set it up!
    "binocular.general.additionalSearchLocations": [
        "~/home/Dropbox/projects"
    ]
If you’re interested in using fzf inside VSCode, have a look at “fzf fuzzy quick open” too:
Custom commands or “Tasks”
With “tasks” VSCode has one final trick up its sleeve to offer a powerful, built-in way to run commands in its own shell/terminal environment:
With this, we can mimic some of Neovim’s other behavior, namely that you use its embedded terminal emulator to run external applications like, for instance,lazygit . You do that by defining a custom task:
{
    "version": "2.0.0",
    "tasks": [
        {
            "label": "lazygit",
            "type": "shell",
            "command": "lazygit",
            "presentation": {
                "reveal": "always",
                "panel": "new",
                "focus": true, // this does not seem to work
                "clear": true,
                "close": true
            },
            "options": {
                "cwd": "${fileDirname}"
            },
        }
    ]
}
As you can see, in tasks you can use a number of handy variables like ${fileDirname} (the directory path of the current file) which are all neatly documented:
You then define a keymapping (I have
     "vim.normalModeKeyBindingsNonRecursive": [
        {
            "before": [
                " ",
                "l",
                "g"
            ],
            "commands": [
                {
                    "command": "workbench.action.tasks.runTask",
                    "args": [
                        "lazygit"
                    ]
                }
            ],
            "silent": false
        }
    ]
Colorscheme
Finally, if you want, you can even use a Vim-like colorscheme:
which, indeed, looks quite nice:

or use both the native VSCode settings, and the Vim extension settings to assign custom colors to parts of the UI:
    "workbench.colorCustomizations": {
        "statusBar.background": "#393836",
        "statusBar.noFolderBackground": "#393836",
        "editor.lineHighlightBackground": "#393836"
    },
    "vim.statusBarColorControl": true,
    "vim.statusBarColors.normal": ["#8FBCBB", "#434C5E"],
    "vim.statusBarColors.insert": "#BF616A",
    "vim.statusBarColors.visual": "#B48EAD",
    "vim.statusBarColors.visualline": "#B48EAD",
    "vim.statusBarColors.visualblock": "#A3BE8C",
    "vim.statusBarColors.replace": "#D08770",
    "vim.statusBarColors.commandlineinprogress": "#007ACC",
    "vim.statusBarColors.searchinprogressmode": "#007ACC",
    "vim.statusBarColors.easymotionmode": "#007ACC",
    "vim.statusBarColors.easymotioninputmode": "#007ACC",
    "vim.statusBarColors.surroundinputmode": "#007ACC",
Dotfiles
By the way, if you’re interested in seeing just how I’ve set up VSCode, you can checkout my settings in this GitHub repo:
Conclusion
So what is the outcome of this little experiment?
In think we can say it’s (somewhat) close, but (definitely) no cigar!
For instance, “Binocular” does indeed look like Telescope, but it’s nowhere as fast or as customisable. In Neovim, for instance, I can search files or file content based on workspace, based on current directory, based on extension, and so on. And the results are almost instantaneous, even for large code bases.
There are hiccups in tasks (like I couldn’t get VSCode to focus on the editor again after running the tasks), but maybe these could be resolved with a little more tweaking. As said in the introduction I was positively surprised just how much you can configure in VSCode, so that’s definitely a plus.
But the most important thing to remember is that, of course, this experiment does not make much practical sense. Why would you use lazygit inside VSCode, for instance, if you have the excellent “Gitlens” extension at your disposal? And why would you jump through hoops to configure something like “Binocular” and fzfin VSCode, if there is a very good built-in “quick open” and “find in files”?
The experiment did, however, convince me that it’s perfectly doable to set up a really nice set of Vim motions and basic keybindings, which is something I’ll definitely leave in my day-to-day VSCode config.
But for the rest, I’ll leave both editors to do what they do best!
Hi! 👋 I’m Tom. I’m a software engineer, a technical writer and IT burnout coach. If you want to get in touch, check out https://tomdeneire.be


