
How To Transform ReactJS Animation into Video: the Lightweight Version of Remotion
We will create a lightweight version of Remotion, which allows the creation of MP4 videos from animations made with ReactJS.
The final result of the article — is a generated video in MP4 format from JS animation:
Remotion is a framework that allows the creation of MP4 videos from the animation that is built using ReactJS. The idea under the hood is pretty simple. Video may be considered as a set of frames that spread across time. What Remotion is required from developers is to describe the position of the scene’s objects for each frame. Remotion provides access to the video timeline via a special hook useCurrentFrame:

Remotion provides multiple options for playing animated scenes. One can either play them directly in a special Remotion player (without converting animated scenes into MP4 format) or convert them to MP4 format and play them in a regular HTML player. This article will be focused on the process of converting animated scenes to MP4.
If you are anticipated to see the code, you may go to the repository following this link.
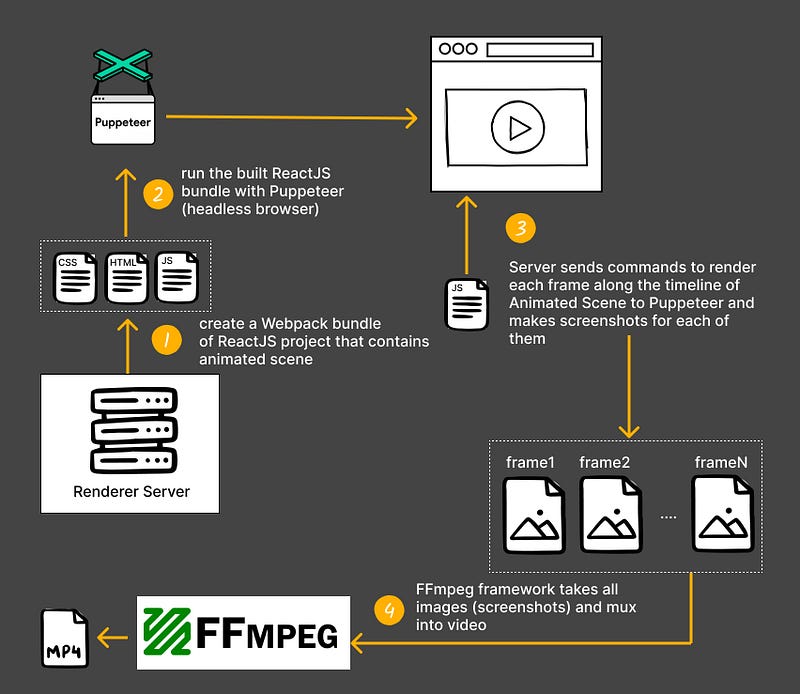
The following tools will be used to perform the conversion of animation on the server: - a NodeJS server; - the Puppeteer — NodeJS API that provides a high-level API to control Chrome/Chromium — it helps to create screenshots for each frame of animated video; - the FFmpeg framework — it helps to create a video from captured screenshots.
On the server endpoint, we should get a folder that contains a code that implements animation. The server should build the project and run it with serverless Puppeteer. Using Puppeteer, we should capture screenshots in JPG/PNG format for each frame and, after that, use the FFmpeg framework to create a video from captured screenshots (see picture 2).
Let’s start our work by taking it step by step.
Project initialization
It will be a monorepository project with two workspaces: web and server. The web will include the animated scene and utility components that simplify the process of rendering the particular frame on the server.
1 [WEB]: Implementation of useCurrentFrame hook
It's essential to have a mechanism to control the value of the current frame in the project. We will use React Context for this:
// packages/web/src/library/VideoContext.tsx

import { createContext, useContext } from "react";

export const VideoContext = createContext<{
  frame: number;
  duration: number;
  fps: number;
}>({ frame: 0, duration: 0, fps: 24 });

export const useCurrentFrame = () => {
  const context = useContext(VideoContext);
  return { frame: context.frame };
};
2 [WEB]: Implement the animated scene
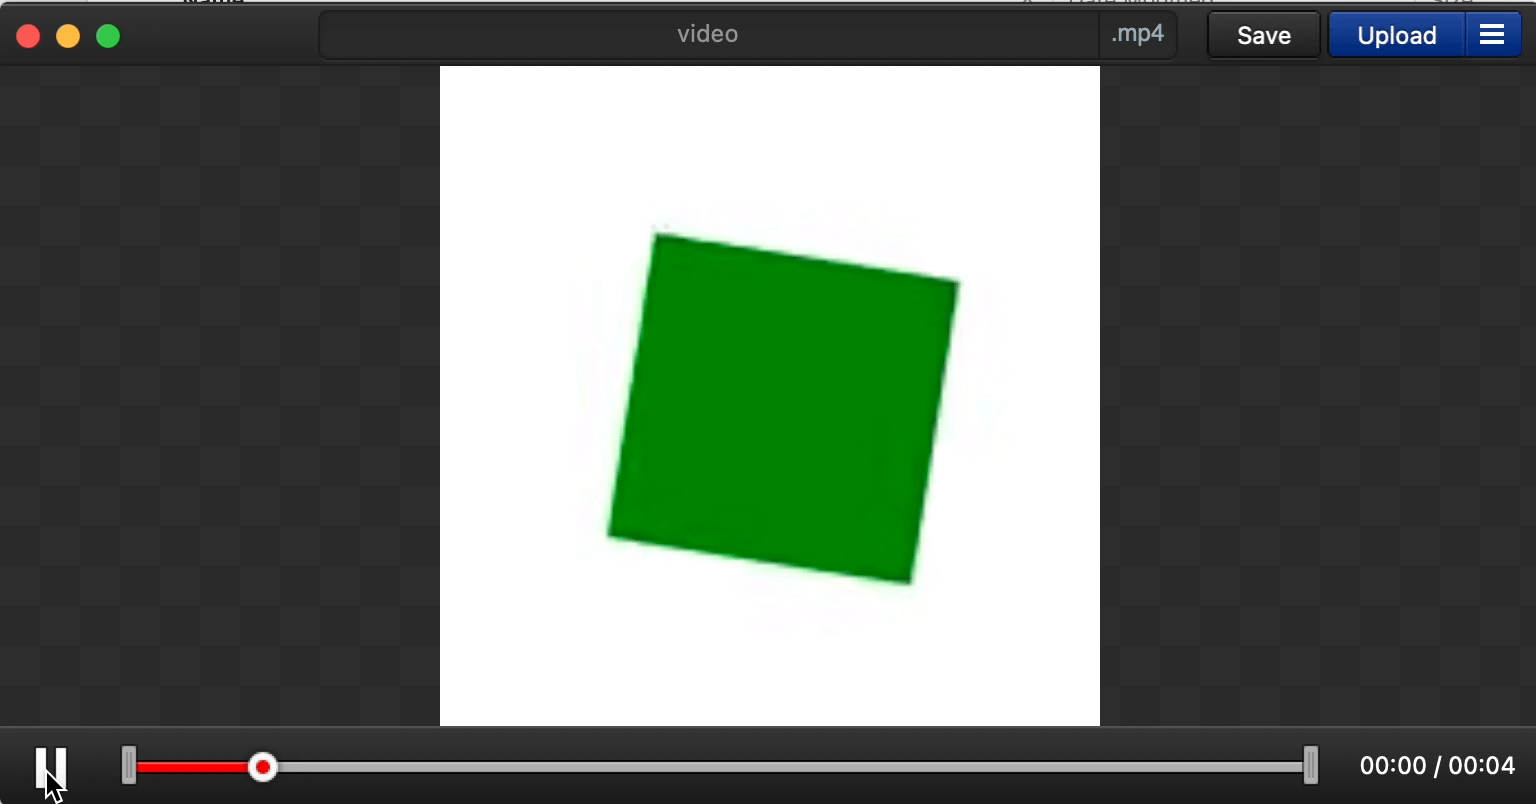
Let's create a simple animated scene with a rotated green triangle, as depicted in picture 1:
// packages/web/src/index.tsx

const AnimatedScene: React.FC = () => {
  const { frame } = useCurrentFrame();
  return (
    <div
      style={{
        width: 70,
        height: 70,
        background: "green",
        transform: `translate(50%, 50%) rotate(${frame}deg)`,
      }}
    />
  );
};
3 [WEB]: Utility component that manages the current value of a frame
It will be a simple Provider that passes down React Context to the application along with an animated scene. Since we’re going to get screenshots using the Puppeteer, we should have a mechanism to set the value of the current frame. We will complete it by assigning the callback setFrame as a global variable in thewindow object. Also, we should know the duration of the video and its frame rate and make it available as a global variable:
// packages/web/src/library/VideoContextProvider.tsx

import React, {
  PropsWithChildren,
  createContext,
  useContext,
  useEffect,
  useState,
} from "react";
import { VideoContext } from "./VideoContext";

declare global {
  interface Window {
    setFrame: (frame: number) => void;
    duration: number;
    fps: number;
  }
}

const VideoContextProvider = ({
  children,
  duration,
  fps,
}: PropsWithChildren<{ duration: number; fps: number }>) => {
  const [frame, setFrame] = useState(0);

  // assign setFrame, duration, fps as a global
  // variable to have a way to mange it outside
  // React application
  useEffect(() => {
    window.setFrame = setFrame;
    window.duration = duration;
    window.fps = fps;
  }, [duration, fps]);

  return (
    <VideoContext.Provider value={{ frame, duration, fps }}>
      {children}
    </VideoContext.Provider>
  );
};

export default VideoContextProvider;
And the final step — let’s wrap our animated scene with this context provider:
// packages/web/src/index.tsx

const root = ReactDOM.createRoot(document.getElementById("root")!);

root.render(
  <VideoContextProvider duration={2} fps={24}>
    <AnimatedScene />
  </VideoContextProvider>
);
We have completed everything on the web part. Congratulations!
4 [SERVER]: Function that bundles ReactJS project to run it with Puppeteer
We should bundle our project on the server to run it with Puppeteer in a headless Chrome browser. We bundle the project with webpack in this way:
// packages/server/functions/bundleProject.js

const webpack = require('webpack');
const path = require('path');
const HtmlWebpackPlugin = require('html-webpack-plugin');

const template = `
<!DOCTYPE html>
<html lang="en">
<head>
    <meta charset="UTF-8">
    <meta http-equiv="X-UA-Compatible" content="IE=edge">
    <meta name="viewport" content="width=device-width, initial-scale=1.0">
    <title>React + Webpack</title>
</head>
<body>
    <div id="root"></div>
</body>
</html>
`
const bundleProject = async (entry) => {
    const outputDirectoryPath = path.resolve(__dirname, '../dist');
    return new Promise((res, rej) => {
        webpack({
            entry,
            output: {
                filename: 'bundle.js',
                path: outputDirectoryPath
            },

            // other webpack config is skipped for brevity

            plugins: [
                new HtmlWebpackPlugin({
                    templateContent: template
                })
            ]
        }, (err) => {
            if (err) {
                rej(err);
                return;
            }
            res(`${outputDirectoryPath}/index.html`)
        })
    })

}

module.exports = bundleProject;
The bundleProject function gets a root path to the entry point of the project that contains the animated scene wrapped in the VideoContextProvider component. In our case, it will be ../web/src/index.tsx . It builds a project with the webpack and returns a Promise with a path to the index.html file of the built project. To see the full configuration, follow this link.
5 [SERVER]: Get screenshots from the animated scene
Now we have an output file of the built project (in theprojectPath variable) and we’re ready to run it with Puppeteer as a static server:
 const browser = await puppeteer.launch();
 const page = await browser.newPage();

 // Navigate to the built React application URL
 await page.goto(`file://${projectPath}`);
We need to extract the current duration and fps of the scene, and as you remember — we make these parameters as a global parameter, and they were attached to the window object in the VideoContextProvider component (see Chapter 3):
// extract values from Puppeter from global context
const { duration, fps } = await page.evaluate(() => ({
   duration: window.duration,
   fps: window.fps
}));
The next step is to create a screenshot for each frame and keep in mind that we attached a callback setFrame to window that allows us to change the value of the current frame for the animated scene (see Chapter 3):
for (let i = 0; i < duration * fps; i++) {
   // set up the value for the next frame to render
   await page.evaluate((frame) => {
      window.setFrame(frame);
    }, i);
    // make a screenshot
    await page.screenshot({
      path: `screenshots/screenshot-${padWithLeadingZero(i, 3)}.jpg`
    });
}
6 [SERVER]: Create a video from captured screenshots
For this purpose, we are going to use the FFmpeg framework. It has a special command that creates a video with a defined frame rate from images that have names with a particular pattern. This command will look like this:
ffmpeg
   -framerate 24
   -i screenshots/screenshot-%03d.jpg
   -r 24
   -filter:v format=yuv420p
   video.mp4
Since it’s a command for CLI, to simplify our task — we are going to use the fluent-ffmpeg package:
ffmpeg('screenshots/screenshot-%03d.jpg')
    .inputOptions(`-framerate ${fps}`)
    .videoFilter('format=yuv420p')
    .output('video.mp4')
    .fps(fps)
     .on('start', function (commandLine) {
         console.log('Spawned Ffmpeg with command: ' + commandLine);
      })
     .run();
The main code has been completed. You may find the full version of this code by following this link.
Here is the final result:
I strongly recommend finding some time to review the possibility that the FFmpeg provides in the context of NodeJS. Here is a collection of articles that may be a starting point:
Conclusions
Pay attention that it’s just a prototype that helps to understand the basic technologies, but there are many things to improve. For example, in this project, we render all frames in one NodeJS process — but evidently, it makes sense to spawn other NodeJS processes that would render their own part of frames. Another issue is that some animation scenes may require some external sources, for example, images, and we should make sure that all those resources have been downloaded during rendering and making a screenshot for each frame.
It means that It’s important to use a mature framework like Remotion in your project in production, but it’s also important to understand how it works under the hood. The best approach is to implement a lightweight version of it, as we did in this article.


