
How to Train a Custom Faster RCNN Model In PyTorch
Fine-tuning a pre-trained Faster RCNN model with custom images in the COCO data format using PyTorch
In this PyTorch tutorial for beginners, we will use a pre-trained object detection model from Torchvision and fine-tune it on a custom image dataset in the COCO data format.
PyTorch or TensorFlow?
First of all, is it worth learning PyTorch, or should you learn another framework like TensorFlow?
According to Papers With Code, PyTorch is currently the leading deep learning framework for academic paper implementations. In fact, PyTorch is by far the leading framework with 61%. Only 4% of papers are currently implemented in TensorFlow.
Additionally, PyTorch has overtaken TensorFlow in the global Google Trends statistics in 2021.
If you want to learn deep learning right now, PyTorch is the way to go.
COCO Dataset for Object Detection (and Segmentation)
To train an object detection model, we first need a dataset containing images and bounding box annotations.
One of the most commonly used dataset formats is the Microsoft COCO benchmark dataset [1].
The official COCO dataset format for object detection annotations is as follows:
image{
    "id": int,
    "width": int,
    "height": int,
    "file_name": str,
    "license": int,
    "flickr_url": str,
    "coco_url": str,
    "date_captured": datetime,
}

annotation{
    "id": int,
    "image_id": int,
    "category_id": int,
    "segmentation": RLE or [polygon],
    "area": float,
    "bbox": [x,y,width,height],
    "iscrowd": 0 or 1,
}

categories[{
    "id": int,
    "name": str,
    "supercategory": str,
}]
Each image requires an id and a file_name. Each image can have multiple annotations, where category_id is the class number and bbox is the bounding box information.
To get your own annotated dataset, you can annotate your own images using, for example, labelme or CVAT.
I will use a synthetic toy dataset created with a sample 3D model using blender-gen. As a custom object, I used Blender’s monkey head Suzanne.
Here’s an example image from my custom dataset, and it’s annotation in the COCO format:

"images": [{
      "id": 0,
      "file_name": "000000.jpg",
      "height": 360,
      "width": 640
}]

"annotations": [{
    "id": 0,
    "image_id": 0,
    "bbox": [293.03, 137.7, 92.31, 91.92],
    "category_id": 1
}]

"categories": [{
      "id": 1,
      "name": "Suzanne"
}]
Install PyTorch
If you do not already have the latest PyTorch and Torchvision installed, you can use pip or conda to install it.
With anaconda:
conda install pytorch torchvision pytorch-cuda=11.8 -c pytorch -c nvidia
Or with pip:
pip3 install torch torchvision --index-url https://download.pytorch.org/whl/cu118
For more details, see PyTorch’s documentation.
Training a Faster RCNN Model in Python with PyTorch and a custom COCO dataset
We can check if PyTorch is installed correctly and if we have a GPU installed we can use it as our device, otherwise we use the CPU.
import torch

# Get cpu, gpu or mps device for training.
device = (
    "cuda"
    if torch.cuda.is_available()
    else "mps"
    if torch.backends.mps.is_available()
    else "cpu"
)
print(f"Using {device} device")
Torchvision Object Detection Model: Faster RCNN
We will use a pre-trained Faster RCNN model as our object detection model. Faster RCNN is a widely used two-stage model (YOLO, for example, is a single shot detector).
Faster RCNN first uses a Region Proposal Network (RPN) to output rectangular regions of interest given an image. Each region is classified as either an object or a background.
The second stage is the Faster RCNN detector, which takes the proposed regions as input and outputs refined bounding boxes with object class labels [2].
Torchvision currently offers 4 different models to choose from. I will use the smaller MobileNet version for this tutorial.
First, we import the model and the model weights.
from torchvision.models.detection import (
    fasterrcnn_mobilenet_v3_large_fpn,
    FasterRCNN_MobileNet_V3_Large_FPN_Weights,
)
Next, we build the custom model. Since the COCO dataset originally has 91 object classes, we need to change the final layers of the model to match the number of classes in our custom dataset.
NUM_CLASSES = 2  # background=0 included, Suzanne = 1

def get_faster_rcnn_model(num_classes):
    """return model and preprocessing transform"""
    model = fasterrcnn_mobilenet_v3_large_fpn(
        weights=FasterRCNN_MobileNet_V3_Large_FPN_Weights.DEFAULT
    )
    model.roi_heads.box_predictor.cls_score = torch.nn.Linear(
        in_features=model.roi_heads.box_predictor.cls_score.in_features,
        out_features=num_classes,
        bias=True,
    )
    model.roi_heads.box_predictor.bbox_pred = torch.nn.Linear(
        in_features=model.roi_heads.box_predictor.bbox_pred.in_features,
        out_features=num_classes * 4,
        bias=True,
    )
    preprocess = FasterRCNN_MobileNet_V3_Large_FPN_Weights.DEFAULT.transforms()
    return model, preprocess


model, preprocess = get_faster_rcnn_model(num_classes=NUM_CLASSES)
model.to(device)
Specific preprocessing steps are stored by Torchvision in the weights transforms()function. This function transforms PIL images into torch.tensor objects and rescales them to [0, 1].
The model itself already includes input normalization and resizing:
print(model.transform)
>> GeneralizedRCNNTransform(
      Normalize(mean=[0.485, 0.456, 0.406], std=[0.229, 0.224, 0.225])
      Resize(min_size=(800,), max_size=1333, mode='bilinear')
  )
COCO custom dataset in PyTorch
The Faster RCNN model from Torchvision’s detection module is currently incompatible with the official COCO dataset format.
The Faster RCNN model expects the following inputs according to the documentation:
The input to the model is expected to be a list of tensors, each of shape
[C, H, W], one for each image, and should be in0-1range. Different images can have different sizes.
During training, the model expects both the input tensors and a targets (list of dictionary), containing:
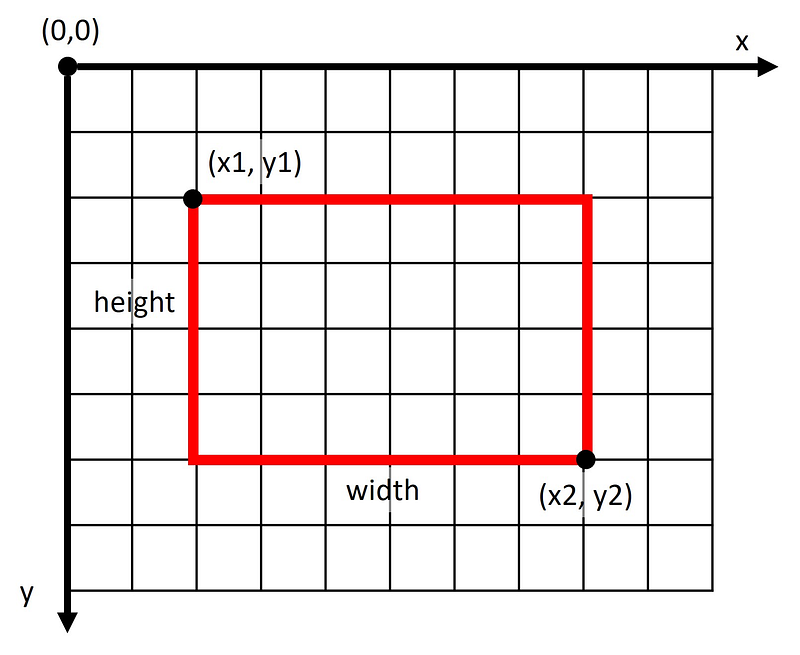
- boxes (
FloatTensor[N, 4]): the ground-truth boxes in[x1, y1, x2, y2]format, with0 <= x1 < x2 <= Wand0 <= y1 < y2 <= H.
- labels (
Int64Tensor[N]): the class label for each ground-truth box
Thus, we have to transform the COCO data format from [x1,y1,width,height]to [x1,y1,x2,y2]. The figure below visualizes the difference in those formats.
COCO uses the object keybbox, while the Torchvision detection model expects bboxes. Also, COCO uses category_id, while Torchvision expects the key labels.
So, we need to create a custom PyTorch Dataset class to convert the different data formats.
In PyTorch, a custom Dataset class from torch.utils.data has to implement the three functions __init__, __len__, and __getitem__.
The __init__ function is called once when the Dataset object is instantiated.
The __len__ function returns the number of samples in the dataset.
The __getitem__ function loads a sample from the data set at the specified index and returns it.
The following custom class loads a dataset in the COCO data format and transforms it to the expected model input format of the Torchvision detection module.
import json
from collections import defaultdict
from pathlib import Path
from PIL import Image
from torch.utils.data import Dataset


class CocoDataset(Dataset):
    """PyTorch dataset for COCO annotations."""

    # adapted from https://github.com/pytorch/vision/issues/2720

    def __init__(self, root, annFile, transform=None):
        """Load COCO annotation data."""
        self.data_dir = Path(root)
        self.transform = transform

        # load the COCO annotations json
        anno_file_path = annFile
        with open(str(anno_file_path)) as file_obj:
            self.coco_data = json.load(file_obj)
        # put all of the annos into a dict where keys are image IDs to speed up retrieval
        self.image_id_to_annos = defaultdict(list)
        for anno in self.coco_data["annotations"]:
            image_id = anno["image_id"]
            self.image_id_to_annos[image_id] += [anno]

    def __len__(self):
        return len(self.coco_data["images"])

    def __getitem__(self, index):
        """Return tuple of image and labels as torch tensors."""
        image_data = self.coco_data["images"][index]
        image_id = image_data["id"]
        image_path = self.data_dir / image_data["file_name"]
        image = Image.open(image_path)

        annos = self.image_id_to_annos[image_id]
        anno_data = {
            "boxes": [],
            "labels": [],
            "area": [],
            "iscrowd": [],
        }
        for anno in annos:
            coco_bbox = anno["bbox"]
            left = coco_bbox[0]
            top = coco_bbox[1]
            right = coco_bbox[0] + coco_bbox[2]
            bottom = coco_bbox[1] + coco_bbox[3]
            area = coco_bbox[2] * coco_bbox[3]
            anno_data["boxes"].append([left, top, right, bottom])
            anno_data["labels"].append(anno["category_id"])
            anno_data["area"].append(area)
            anno_data["iscrowd"].append(anno["iscrowd"])

        target = {
            "boxes": torch.as_tensor(anno_data["boxes"], dtype=torch.float32),
            "labels": torch.as_tensor(anno_data["labels"], dtype=torch.int64),
            "image_id": torch.tensor([image_id]),
            "area": torch.as_tensor(anno_data["area"], dtype=torch.float32),
            "iscrowd": torch.as_tensor(anno_data["iscrowd"], dtype=torch.int64),
        }

        if self.transform is not None:
            image = self.transform(image)

        return image, target
PyTorch Dataset and DataLoader
Now, we can create our custom COCO datasets. We need a training dataset and a separate validation dataset.
Our CocoDataset class requires a root directory, where the images are located, an annotation JSON file path annFile, and the preprocess transform from the model.
import random
import torchvision.transforms as T
from IPython.display import display
from PIL import ImageDraw

# create datasets
training_dataset = CocoDataset(
    root="./data/train/images/",
    annFile="./data/train/annotations/instances_default.json",
    transform=preprocess,
)
validation_dataset = CocoDataset(
    root="./data/validation/images/",
    annFile="./data/validation/annotations/instances_default.json",
    transform=preprocess,
)

print(f"training dataset size: {training_dataset.__len__()}")
>> training dataset size: 50

print(f"validation dataset size: {validation_dataset.__len__()}")
>> validation dataset size: 10
To see if the Dataset class works, we can load a random example and visualize it:
# get a random training sample
img, label = training_dataset[random.randint(0, len(training_dataset) - 1)]
print(f"random training label: {label}")
>> random training label: {'boxes': tensor([[273.8000,  96.6700, 371.9400, 210.9500]]), 'labels': tensor([1]), 'image_id': tensor([47]), 'area': tensor([11215.4395]), 'iscrowd': tensor([0])}

# display image with bbox label
transform = T.ToPILImage()
img = transform(img)
x1, y1, x2, y2 = label["boxes"].numpy()[0]
draw = ImageDraw.Draw(img)
draw.rectangle([x1, y1, x2, y2], fill=None, outline="#ff0000cc", width=2)
display(img)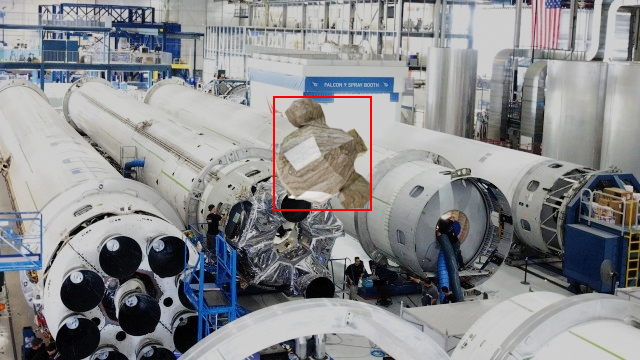
Since we typically train deep learning models with batches instead of single training examples, PyTorch has the DataLoader from torch.utils.data to iterate over datasets.
The DataLoader returns batches of data during training and validation. The collate function collate merges a list of samples into a batch of tensors.
BATCH_SIZE = 4

def collate(batch):
    """return tuple data"""
    return tuple(zip(*batch))

train_loader = torch.utils.data.DataLoader(
    training_dataset,
    batch_size=BATCH_SIZE,
    shuffle=True,
    num_workers=4,
    collate_fn=collate,
)

validation_loader = torch.utils.data.DataLoader(
    validation_dataset,
    batch_size=BATCH_SIZE,
    shuffle=False,
    num_workers=4,
    collate_fn=collate,
)
We can test the DataLoader by computing the model’s forward pass with a batch from the validation DataLoader.
The model input X has to be a list of tensors, each of shape [channel, height, width].
X, y = next(iter(validation_loader)) # get a validation batch

model.eval() # set the model in evaluation mode
with torch.no_grad(): # do not compute gradients
    X = [x.to(device) for x in X] # move images to device
    out = model(X) # model forward pass
    print(out)

>> [{'boxes': tensor([[4.3257e+02, 1.7866e+02, 4.8162e+02, 1.9539e+02],
>>        ... , device='cuda:0'),
>>   'labels': tensor([1, 1, 1, ..., 1, 1, 1, 1], device='cuda:0'),
>>   'scores': tensor([0.7026, 0.6994, 0.6841, ..., 0.5681], device='cuda:0')},
>>  ...
As you can see, the model outputs a dictionary for each input image with the following keys:
- Predicted bounding boxes
bboxesin the format[x1,y1,x2,y2] - Predicted object class labels
labelsas integer (0 = background, 1 = Suzanne) for each detection - Confidence scores
scoresfor each detection (from 0 to 1).
Model Training
Now comes the model training.
The model weights are stored in model.parameters(). We will only fine-tune the parameters where required_grad is set to True. By default, all parameters will be fine-tuned.
params = [p for p in model.parameters() if p.requires_grad]We will use Stochastic Gradient Descent (SGD) with momentum as our optimizer to fine-tune our Faster RCNN object detection model on the custom COCO dataset.
SGD requires a learning rate lr, a momentum factor momentum, and a weight decay L2 penalty weight_decay.
Depending on the dataset, these parameters will probably need to be adjusted.
optimizer = torch.optim.SGD(
    params,
    lr=0.00001,
    momentum=0.9,
    weight_decay=0.0001
)
Next comes the training loop. A pass through the training data is called an epoch. We loop through the training data for a maximum number of epochs num_epochs.
In each epoch, we loop through the DataLoader train_loader to get batches of images and annotations. Each time, we perform the forward pass with model(images, targets) to get the training loss, and then perform an optimization step with SGD.
After each epoch, we also compute the forward pass on the validation dataset to see if the model learns to recognize our custom object on unseen images.
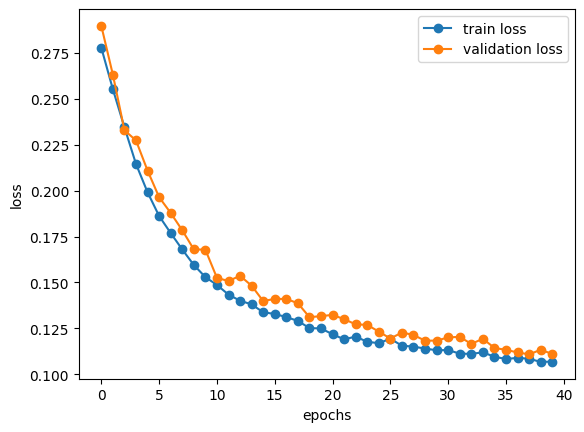
num_epochs = 40
train_loss_list = []
validation_loss_list = []
model.train() # set model in training mode
for epoch in range(num_epochs):
    N = len(train_loader.dataset)
    current_train_loss = 0
    # train loop
    for images, targets in train_loader:
        # move data to device and build the right input format for our model
        images = list(image.to(device) for image in images)
        targets = [
            {
                k: v.to(device) if isinstance(v, torch.Tensor) else v
                for k, v in t.items()
            }
            for t in targets
        ]

        loss_dict = model(images, targets)
        losses = sum(loss for loss in loss_dict.values())
        optimizer.zero_grad()
        losses.backward()
        optimizer.step()

        current_train_loss += losses
    train_loss_list.append(current_train_loss / N)

    # validation loop
    N = len(validation_loader.dataset)
    current_validation_loss = 0
    with torch.no_grad():
        for images, targets in validation_loader:
            images = list(image.to(device) for image in images)
            targets = [
                {
                    k: v.to(device) if isinstance(v, torch.Tensor) else v
                    for k, v in t.items()
                }
                for t in targets
            ]

            loss_dict = model(images, targets)
            losses = sum(loss for loss in loss_dict.values())
            current_validation_loss += losses
    validation_loss_list.append(current_validation_loss / N)

    print(f"epoch: {epoch}")
    print(
        f"train loss: {train_loss_list[-1]}, validation loss: {validation_loss_list[-1]}"
    )
While training, the training and validation loss are printed out.
>> epoch: 0
>> train loss: 0.2776359021663666, validation loss: 0.28950902819633484
>> epoch: 1
>> train loss: 0.2550429403781891, validation loss: 0.26295432448387146
>> ...
>> train loss: 0.10681132227182388, validation loss: 0.11342205107212067
>> epoch: 39
>> train loss: 0.10700208693742752, validation loss: 0.11115328222513199
After completing the maximum number of epochs, we can save the latest model and visualize the logged loss data with a matplotlib graph.
torch.save(model, "./models/model.pth") # save model to file

# plot losses
train_loss = [x.cpu().detach().numpy() for x in train_loss_list]
validation_loss = [x.cpu().detach().numpy() for x in validation_loss_list]

plt.plot(train_loss, "-o", label="train loss")
plt.plot(validation_loss, "-o", label="validation loss")
plt.xlabel("epochs")
plt.ylabel("loss")
plt.legend()
Training and validation losses roughly decrease with each epoch, and both losses begin to converge toward the end.
Object Detection Model Inference
After training the object detection model on a toy dataset, we can use the stored model to predict bounding boxes on new images.
model = torch.load("./models/model.pth")

def inference(img, device, model):
    model.eval()
    with torch.no_grad():
        pred = model([img.to(device)]) # forward pass

    # display image with bbox
    transform = T.ToPILImage()
    img = transform(img)
    x1, y1, x2, y2 = pred[0]["boxes"].cpu().detach().numpy()[0]
    draw = ImageDraw.Draw(img)
    draw.rectangle([x1, y1, x2, y2], fill=None, outline="#ff0000cc", width=2)
    display(img)
    return pred
Let’s test the fine-tuned Faster RCNN model on a random validation image:
img, _ = validation_dataset[random.randint(0, len(validation_dataset) - 1)]
>> inference(img, device, model)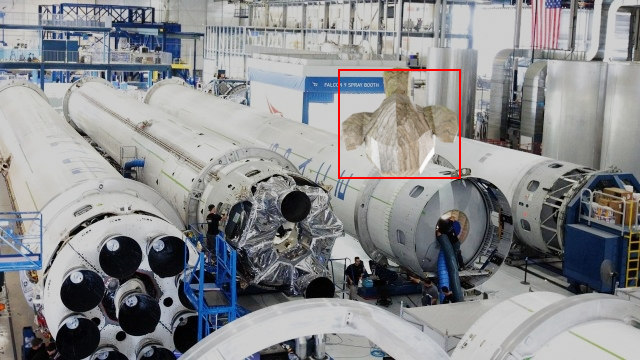
Conclusion
This article described how to fine-tune a pre-trained Faster RCNN object detection model on a custom dataset in the Microsoft COCO dataset format.
The tricky part was the incompatibility of the Torchvision detection module with the official COCO dataset format.
There are many possible improvements from here. This tutorial only covered the basics. Here are some suggestions:
- Instead of using the MobileNet backbone, try using the ResNet50 backbone weights.
- Adjust the hyperparameters
num_epochs,lr,momentum,weight_decay. - Save the best model with the lowest validation loss instead of the last model.
- Perform online data augmentation using, for example, Albumentations.
- Perform a mean average precision (mAP) evaluation on the validation data after each epoch using pycocotools.
There are higher level, easier to use alternatives to using PyTorch. I have written an article on how to train an object detection model in MMDetection, which is based on PyTorch. If you are interested, feel free to check it out:
References
[1] T. Lin et al., Microsoft COCO: Common Objects in Context (2015), arXiv:1405.0312v3
[2] S. Ren, K. He, R. Girshick, J. Sun, Faster R-CNN: Towards Real-Time Object Detection with Region Proposal Networks (2016), arXiv:1506.01497v3
An interactive jupyter notebook is available at https://github.com/leoneversberg/object-detection-pytorch


