
How to set up In App Purchases in Apple Connect and Google Play Console
This article explains you what to do to be ready to add In App Purchases (IAP) capabilities to your iOS and Android app. The article is not about writing code or creating an application; it is about doing all the preparatory steps to be able to use In App capability. If you look for instructions on how to code an app with Flutter, read this article
This guide is relevant for all developers whatever language you are using to develop your app, be it Swift, Java, Kotlin, Flutter, etc. Most of the action will happen in the Apple Connect and Google Play Console however we will also need to navigate to the Google Cloud Platform and we also need your favourite integrated development environment (IDE) like Android Studio and Xcode to set up a dummy project.
The article is organised in 3 sections:
Part 1: Project set up in your IDE
Part 2: How to set up In App Purchases with Apple
- Step 1: ensure you can get paid by Apple in App Connect
- Step 2: create a bundle ID in Apple Developer website
- Step 3: create the app and the In App Subscription in App Connect
- Step 4: create a sandbox account
Part 3: How to set up In App Purchases with Google
- Step 1: ensure you can get paid by Google in the Google Play Console
- Step 2: create the app and the In App Subscription in Google Play Console
The article is part of an In-App Purchases’ series which explains the end-to-end process to deliver your IAP capabilities in your app with Flutter. Check out my article here.
You are starting from zero and you have never enabled payment with Apple or Google allow approx 1 hour of your time to dedicate to this setup. You will soon realise that there is so much in here but do not panic: this is mostly a one off activity. Once you will have done it, it is done forever! No need to do it again
An important pre-requisite, on top of having your IDE properly installed in your machine, is to have a valid developer membership with Apple and Google.
Now let’s get started with the set up of In App Purchases
Part 1: Project set up in your IDE
This is a basic step that is super easy to achieve. Whatever system you are going to use you basically must create your In App Purchases in the app stores. Just make sure you create your project in your favourite IDE as usual. The end goal for this step is to get the bundle ID for your projects.
Here is an example of what you need to do in Flutter
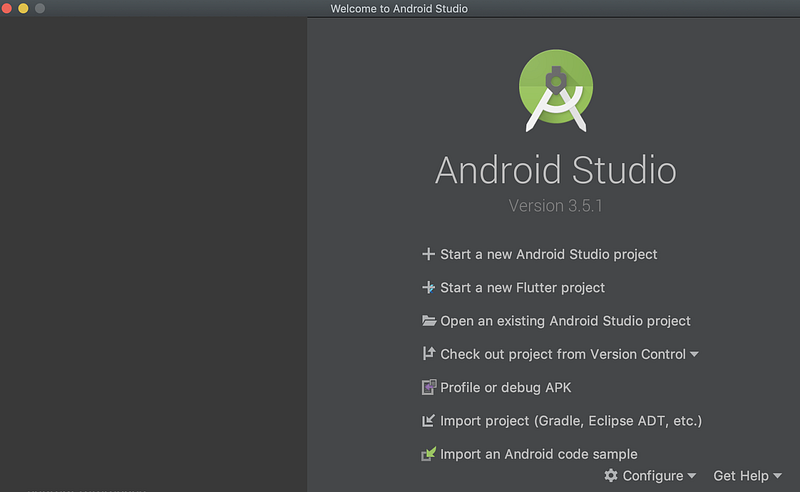
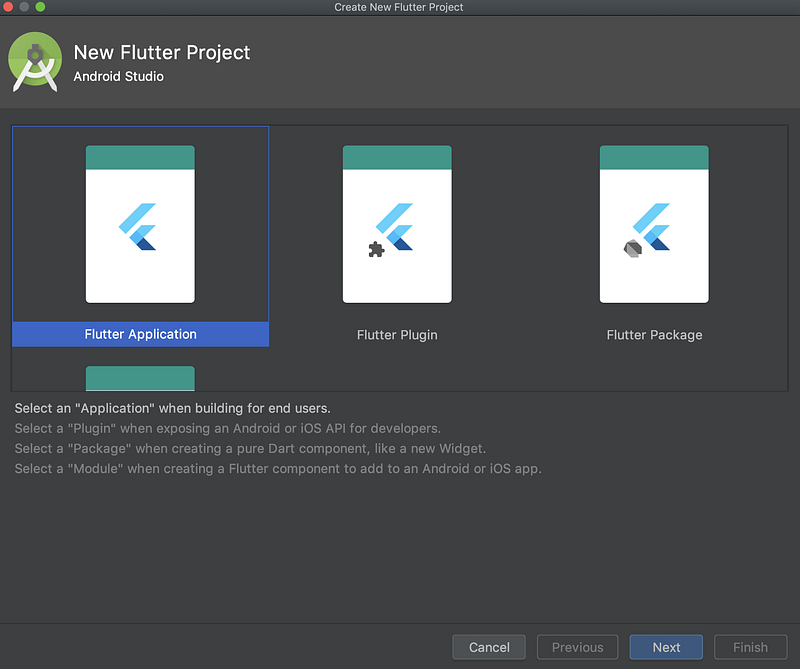
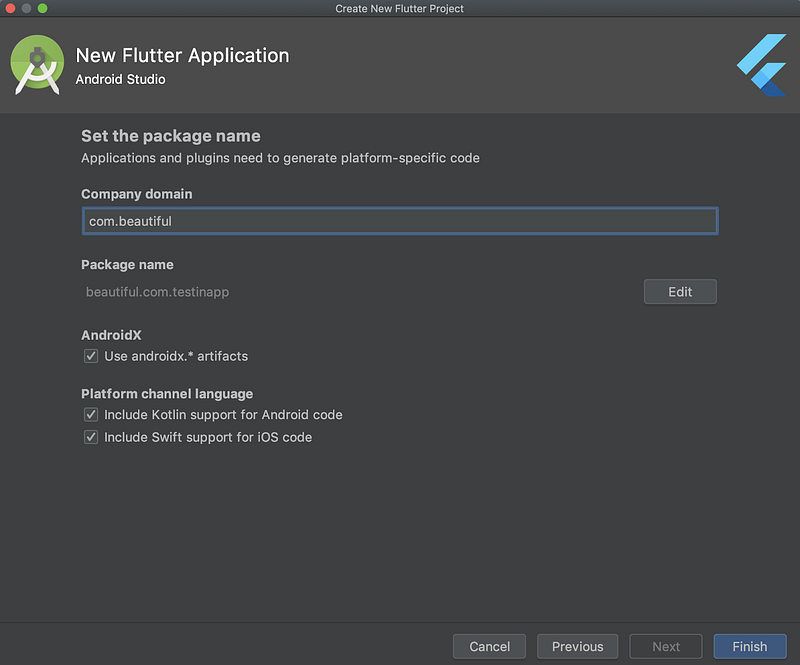
Launch Android Studio and Start a new Flutter project
Select Flutter Application and click Next
Add the name of your project
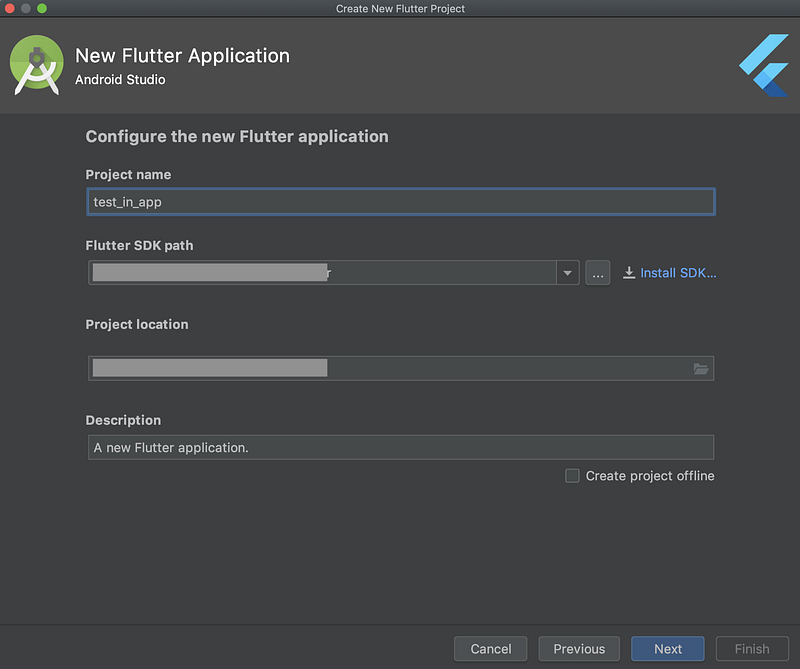
Provide a company domain
Make note of your bundle ID in iOS and Android (it can be different!). In my case, it is beautiful.com.test_in_app in Android and beautiful.com.testInApp in iOS. You can check the bundle ID in the build.gradle file in Android Studio and in the General tab in Xcode

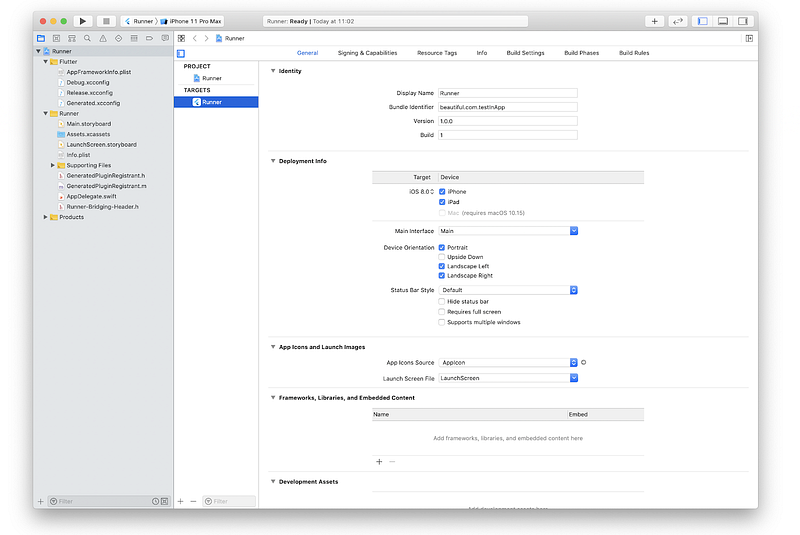
Since you are in Xcode, lets also run the project and confirm everything is fine
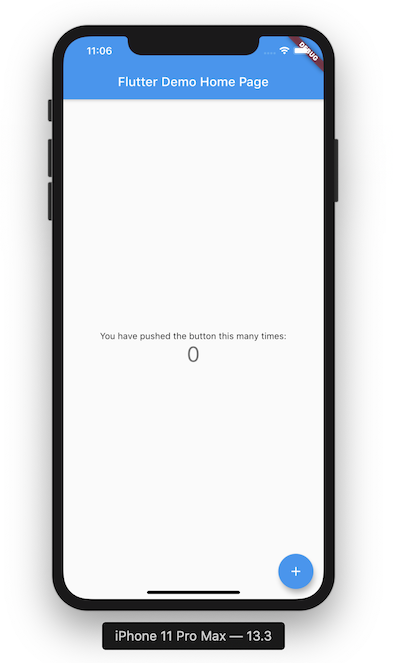
You are done! I told you it was easy!
Now let’s move in the iOS set up first.
Part 2: set up IAP for iOS
For iOS you need to go thought these steps:
- Step 1: ensure you can get paid by Apple in App Connect
- Step 2: create a bundle ID in Apple Developer website
- Step 3: create the app and the In App Subscription in App Connect
- Step 4: create a sandbox account
Step 1: ensure you can get paid by Apple in App Connect
This step has to be done only once for all your app and I guess you may have likely already done it if you ever created a paid app. If this is the case well done, you have saved the pain to go through this step. If not, this is going to test your patience. Please stay focused, keep going and never give up.
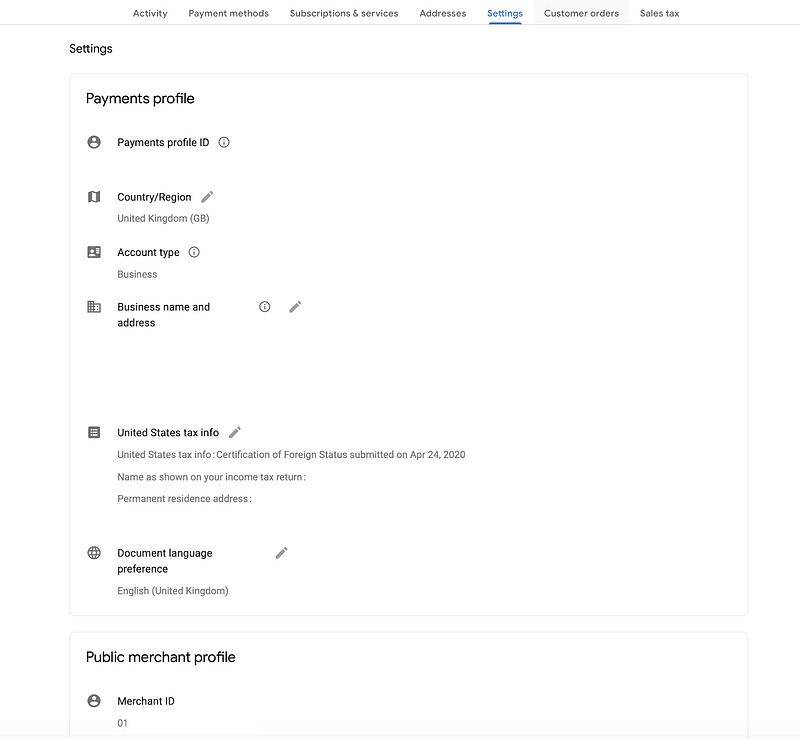
You need to accept the Apple contract and provide some information about yourself or your business as well as your bank account where the money will flow. You will also need setup the US tax form which is required for all developers.
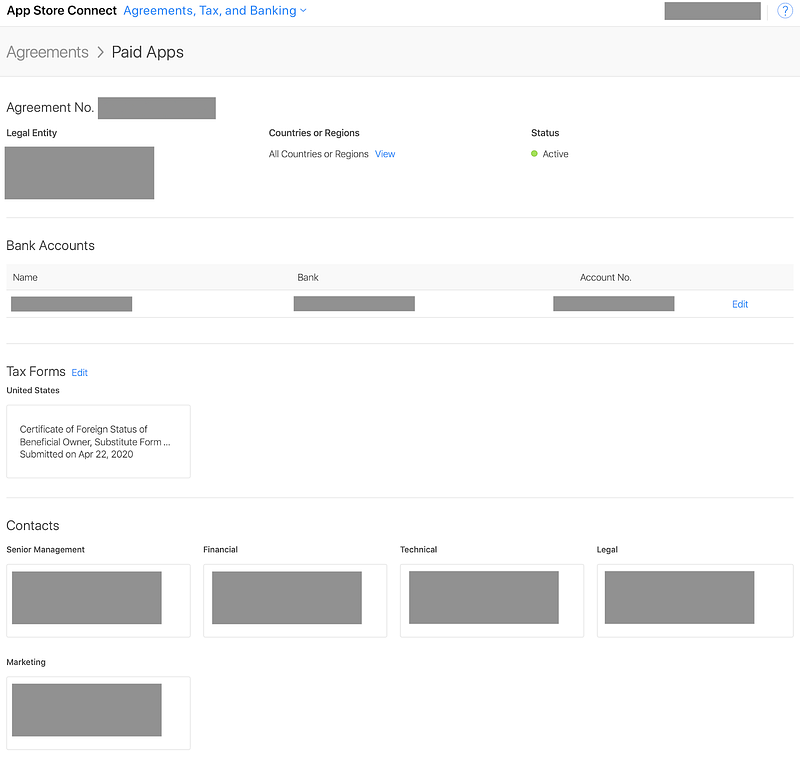
Hand over to App Store Connect and click on the Agreements button

I have already accepted the agreement so the screenshot below will be different from what you can see.
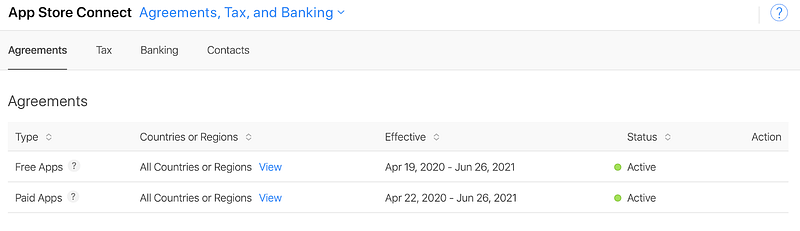
You are likely to have a green dot for Free Apps line and a yellow dot for the Paid Apps. Your target is to make the paid App green → do not leave the website until you see it green otherwise your IAP may not work. Here are the steps to turn that dot from yellow to green
Sign the agreement
- In the Agreements section, find the Paid Applications agreement, then click View and Agree to Terms.
- Verify your legal entity information is correct in the dialog, then click Add. Enter the same information that is provided when the Account Holder is enrolled in the Apple Developer Program.
- Read and accept the terms, then click Agree. You can also download a copy of the agreement.
- Important: Once this contract is requested, you can’t undo this action or revert to the Developer Program License Agreement for free apps.
Enter banking information
- In the Agreements section, find the agreement you want to sign and click Set up Tax, Banking, and Contacts.
- Under Bank Accounts, click Add Bank Account.
- Fill in the required fields and click Add. Note: Be sure to enter the name exactly as it appears on your bank account or your payment may be rejected.
- The look up field will allow you to search by your Bank Name, City, or Postal Code in order to find and and select your bank. Not all branch locations are published in App Store Connect. Select a branch using your bank code for your account if you do not see your branch location listed.
- In the Bank Account Number field, enter the bank account for the legal entity or individual responsible for the Paid Applications agreement.
- In the Account Holder Name, enter the name on your bank account held at your financial institution.
- In the IBAN field, enter your IBAN if applicable. An IBAN (International Bank Account Number) is used for payments to bank accounts in Europe and certain other countries or regions.
- From the Bank Account Currency pop-up menu, choose the primary currency of the bank account to ensure successful payments.
- Once your banking information is complete, your bank account info will appear under the Banking tab. Please note that depending on the country or region of your bank, there may be additional required fields than those listed above.
Provide U.S. tax information
This is the most complex step and you may want to seek advise from an accountant to correctly set up your tax profile. Depending on where your legal entity address is based, you will be required to complete a U.S. tax form and any applicable certification for your agreement to go into effect. If you are based in the United States, you are prompted to complete a W-9 form. If you are based outside the United States, the W-8BEN, W-8BEN-E, or W-8ECI may be required, but you will be prompted to complete a series of questions to direct you to the most appropriate tax form and any applicable certification. Here are the steps to add the US tax info:
- In the Agreements section next to Paid Applications, click Set up Tax, Banking, and Contacts.
- Under Tax Forms, click Complete U.S. Tax Forms and follow the instructions.
- The form or certification presented must be completed for your Paid Applications Agreement to go in effect.
- Tip: Use the downloadable instructions and tip sheets near the top of the page to help you provide the right information for your W9, W-8BEN, or W-8BEN-E.
- Verify that the information you entered if correct and complete, and then click Submit. Note: After you click Submit, you won’t be able to make changes to this form.
Enter contacts
Lastly you need to provide contact information for people who can address legal, financial, or marketing topics for your business. Add all the contacts which you see on screen otherwise your application will result active but still with a yellow dot.
To enter your company contacts:
- In the Agreements section, find the agreement you want to sign and click Set up Tax, Banking, and Contacts.
- In the Contacts section, select the role you would like to add.
- From the pop up window, choose from the list of existing contacts. If you have not entered any contacts previously, select Add a New Contact.
- Fill in the required details and click Add.
By the end of this step you should be able to see something like this. If this is the case, give yourself a big round of applause!
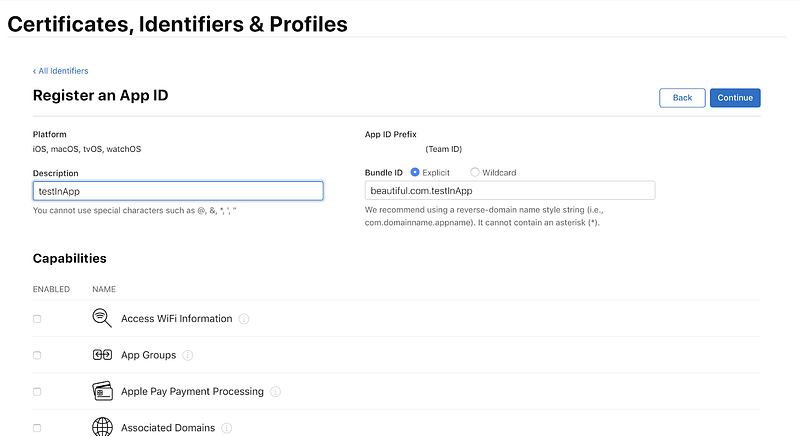
Step 2: create a bundle ID in Apple Developer website
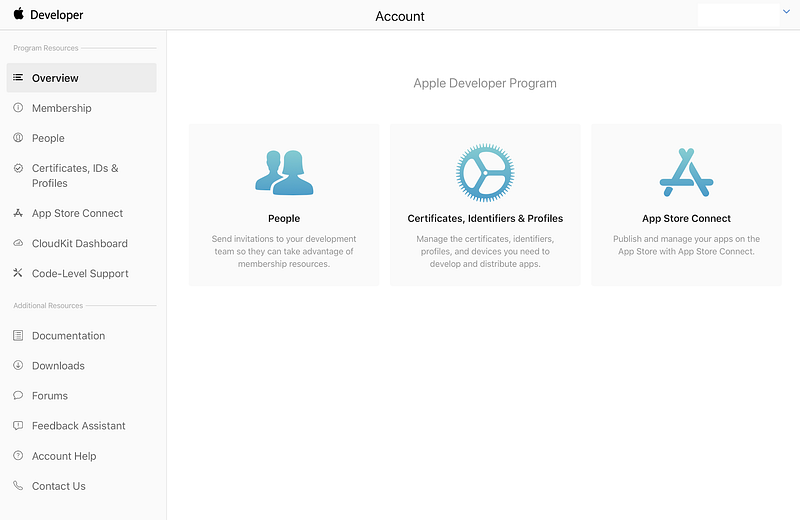
Navigate on over to developer.apple.com and setup the bundle ID for your app.
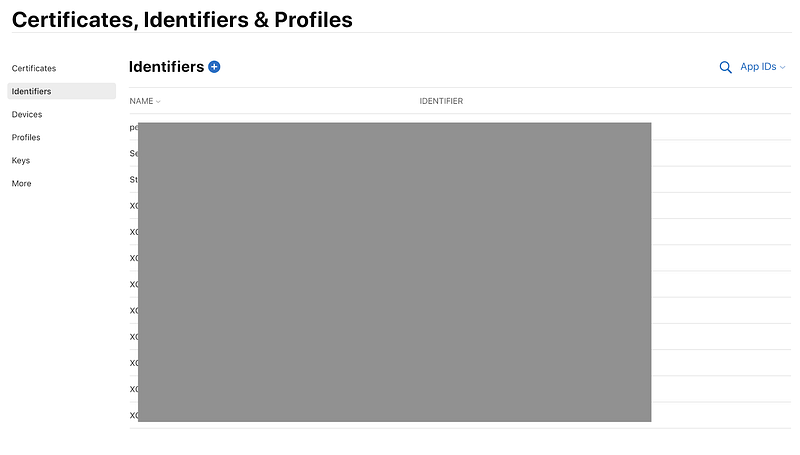
Click on Certificates and then Identifier and then on the plus button
Click on App ID
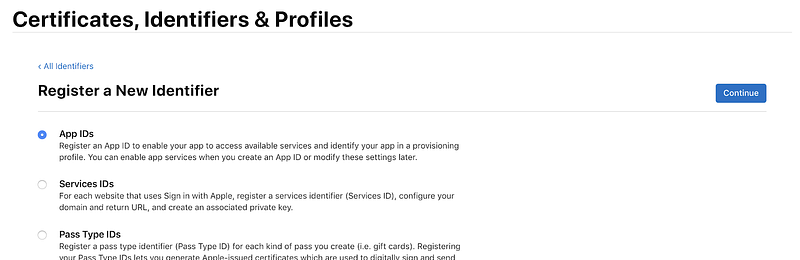
Add a description and the bundle ID you have just created when you have created the flutter project. Make sure explicit Bundle ID is selected and click continue
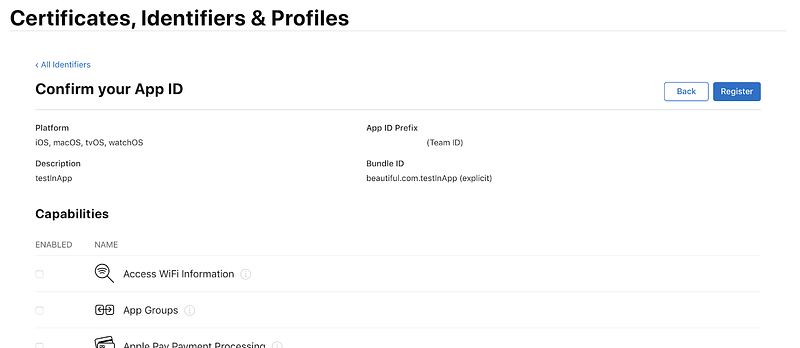
Click on register
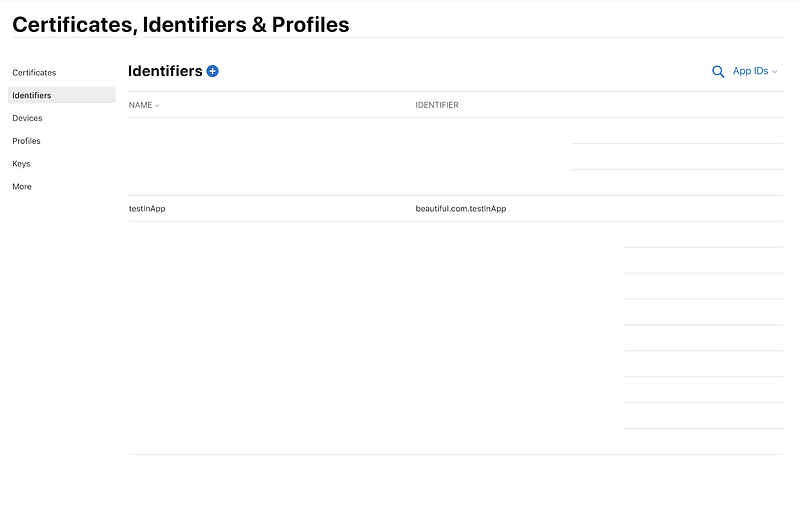
Your identifier should now appear in the list of identitiers. Job done!
Step 3: create the app and the In App Subscription in App Connect
Your task here is to create the app in the Apple connect site and ensure the app will have a ‘Ready to Submit ’status. This is the second test of your patience. For some strange reasons Apple has decided to hide things to do in the most mysterious and not- obvious places and your mission is to find all of them! Do not leave the site until the status is as that otherwise the In App will not work.
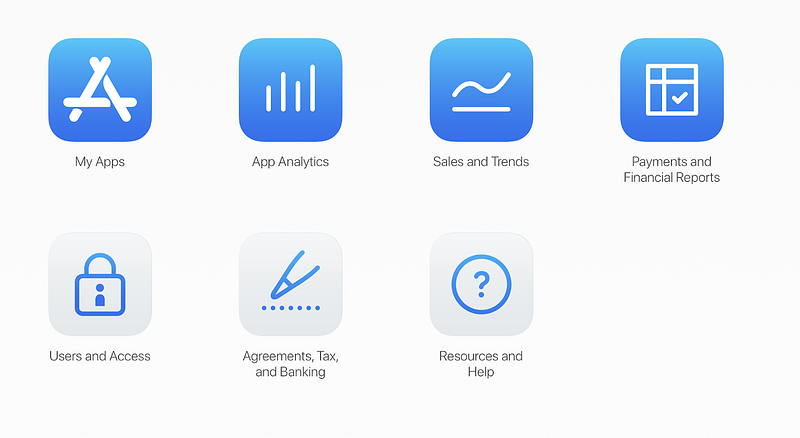
Navigate to Apple connect and click on My Apps
Click on the + button on the left corner and select New app, add the relevant data and click on Create. Note: you need to give a unique name to your app (a message like the one in red below will pop up to alert you). You also need to provide an SKU number — this is just a reference to you and it will not be visible.
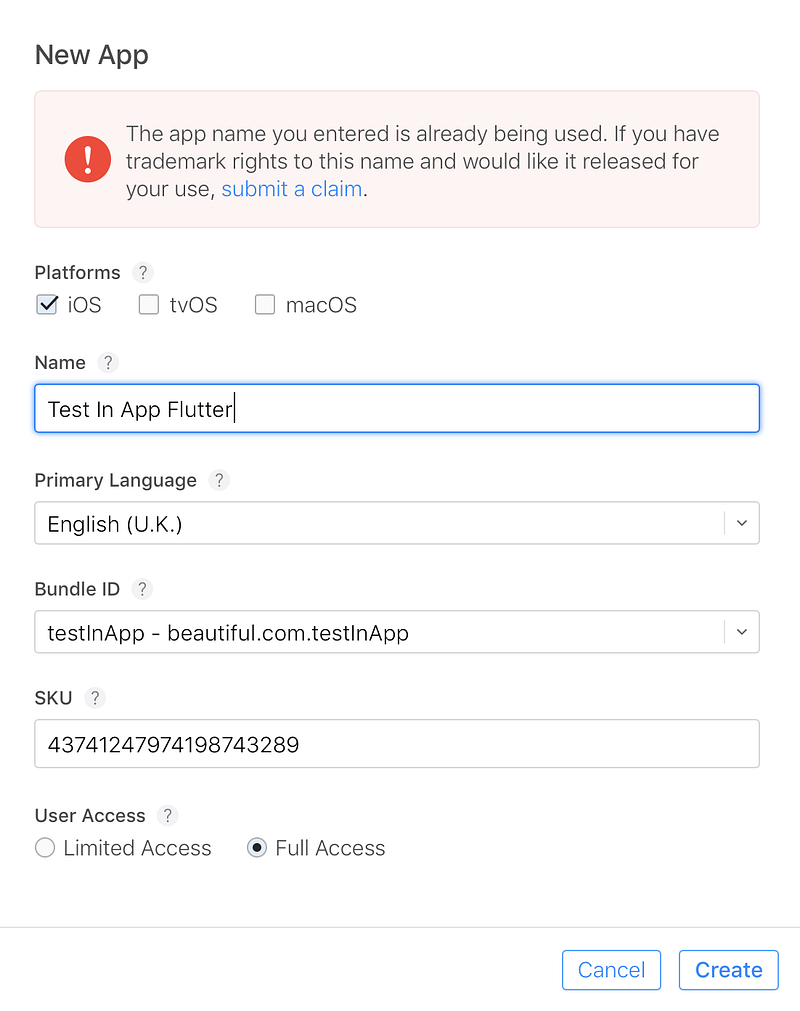
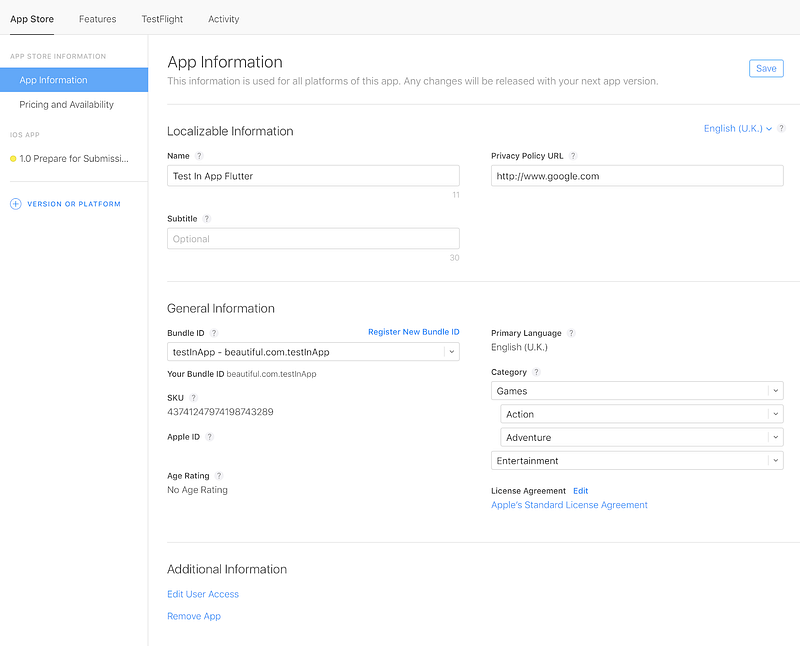
Add all the relevant info in the App Information section and click save
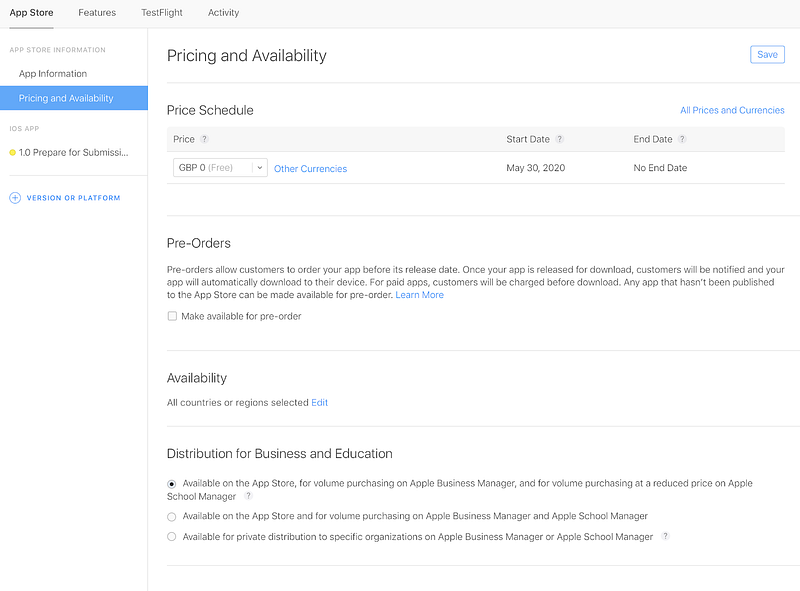
Choose the price for your app, in my case I set it as free but you could think to charge something on top of the In App cost (warning: you need to have a valuable app if you do so otherwise the number of download will be close to zero)
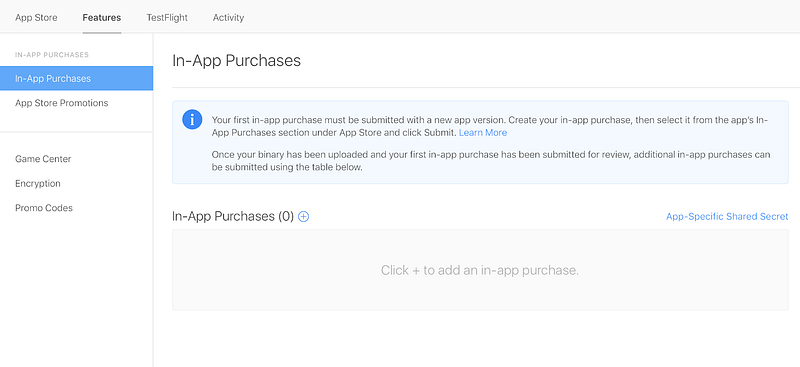
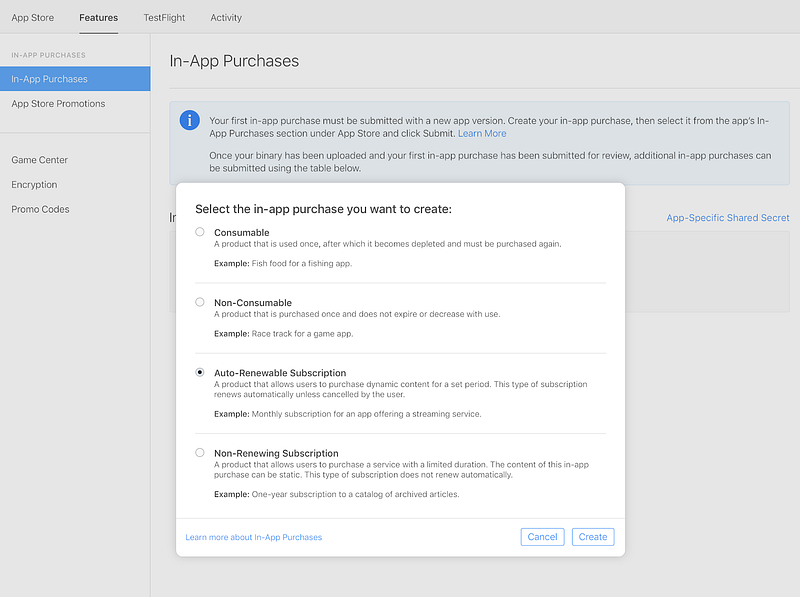
Hand over to the Feature tab and create a new In app by clicking on the plus button
In this example, we will create a recurring subscription. Select this option and click create
Add some reference text (it is used for internal reporting only)
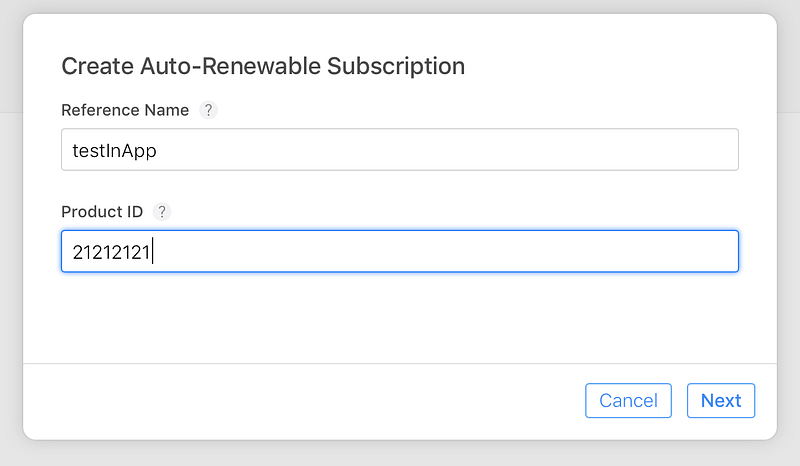
Add the name of your subscription, again this is for internal use only
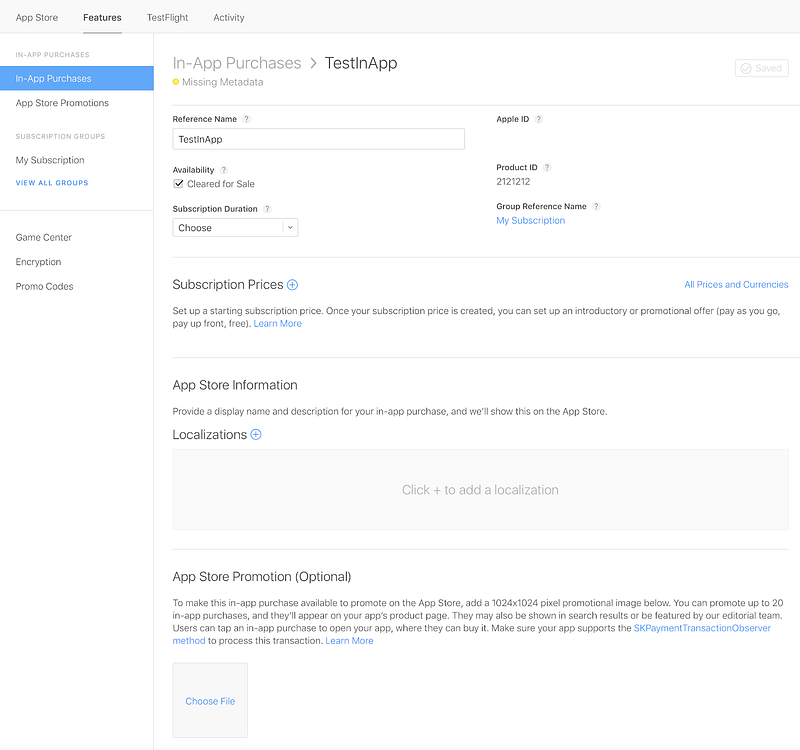
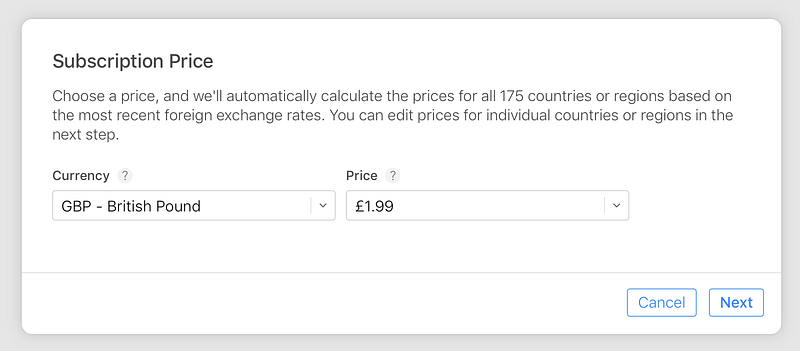
Now you need to make sure the next screen is completed in all its part. As you can see the status is ‘Missing Metadata’. First select the subscription duration, for example 1 month. Then click on the plus button to add a subscription price.
The pick the relevant price you want to charge, in my case I set £1.99 per month.
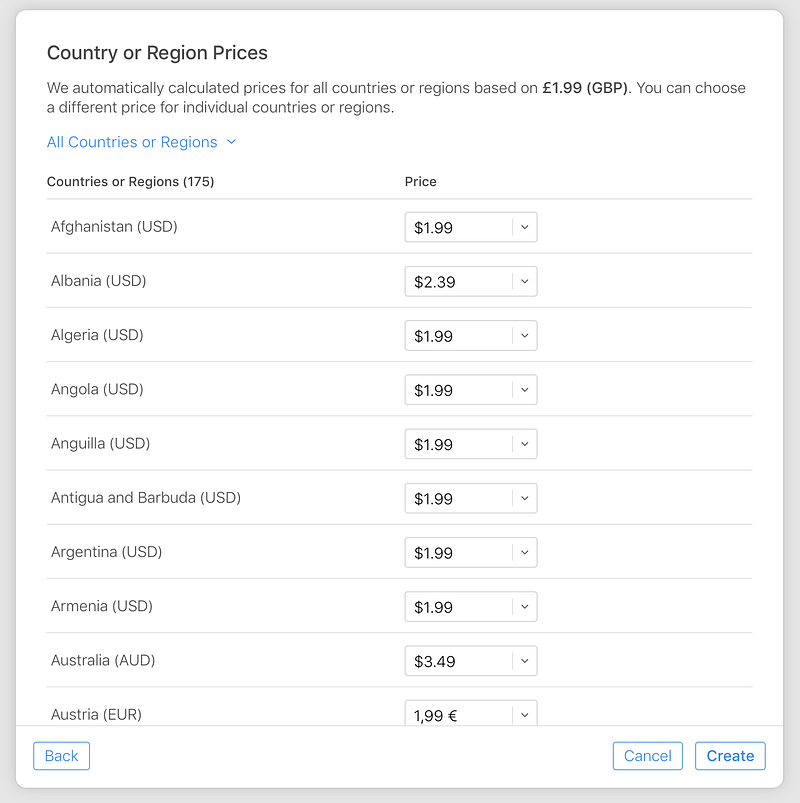
Then accept the price proposed by Apple for all the other countries or change the price for the relevant country of interest. Finally click on create.
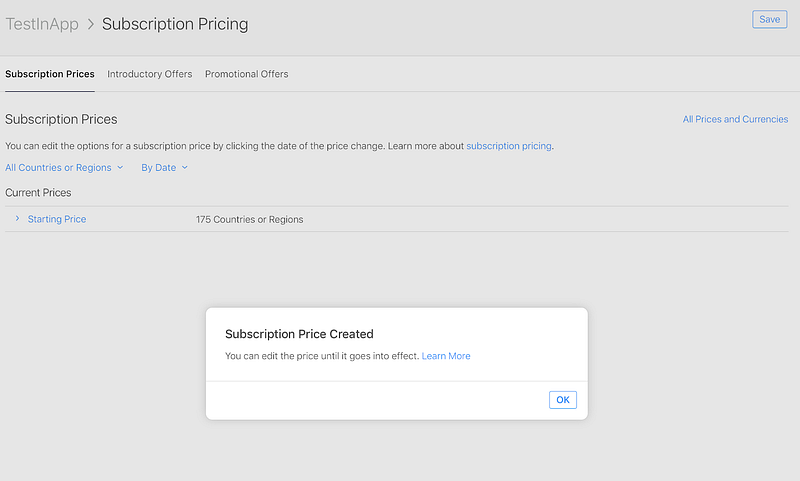
You will get a note saying the price is created. Now click on save
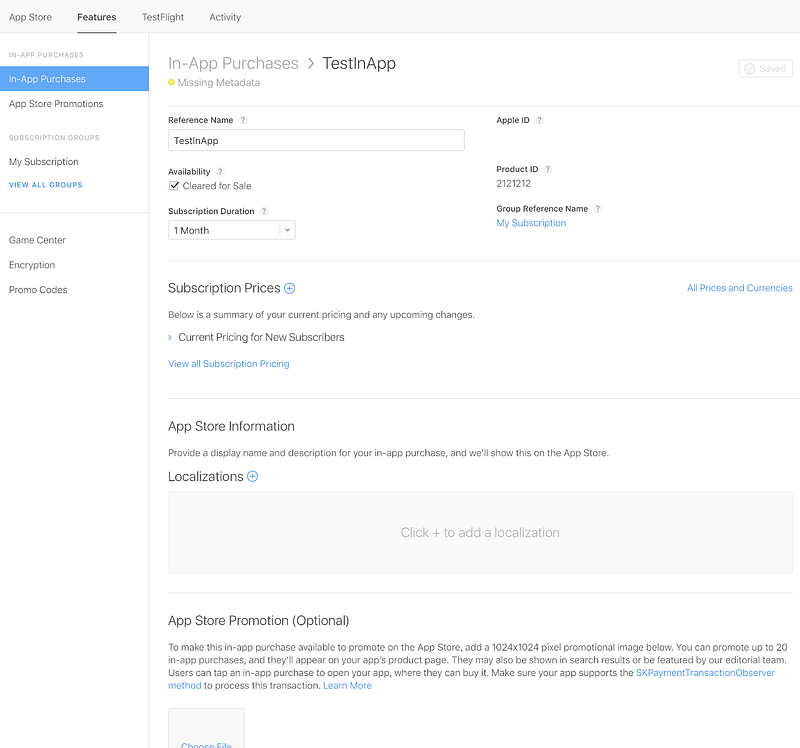
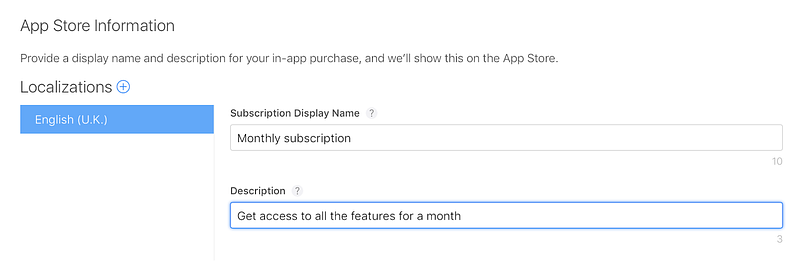
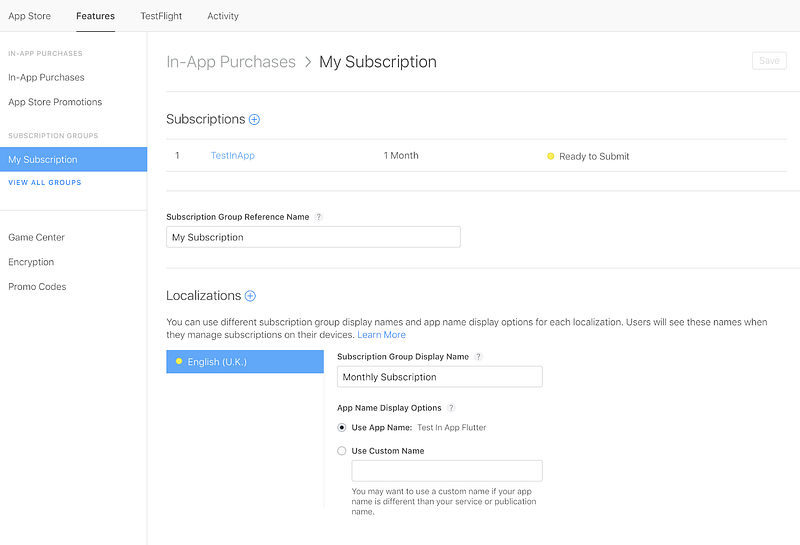
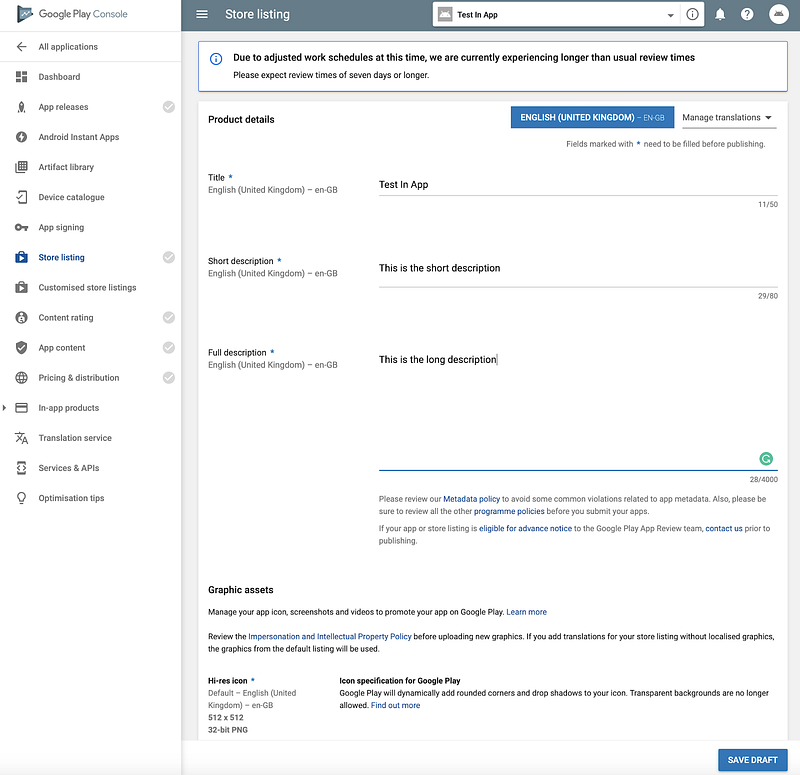
Now go back to the TestInApp page and click on Localization
Add as many localization as you want. In this example I only add a UK localization. Add a description for your app. Important: this is the description that your customer will see. Click Save on the top of the page to save the localisation
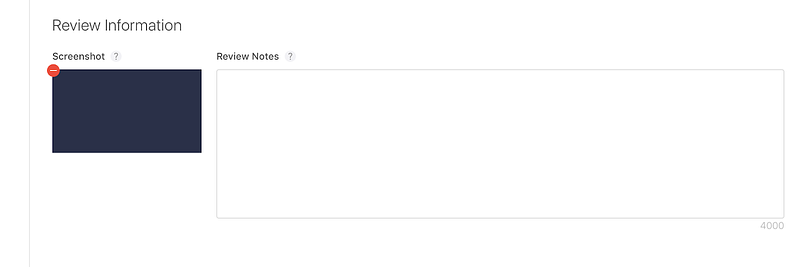
Lastly, scroll down to to the bottom of the page and add a screenshot. Make sure your screenshot will have the following spec
- iOS requires at least 640 x 920 pixels.
- tvOS requires 1920 x1080 pixels.
- macOS requires 1280 x 800 pixels.
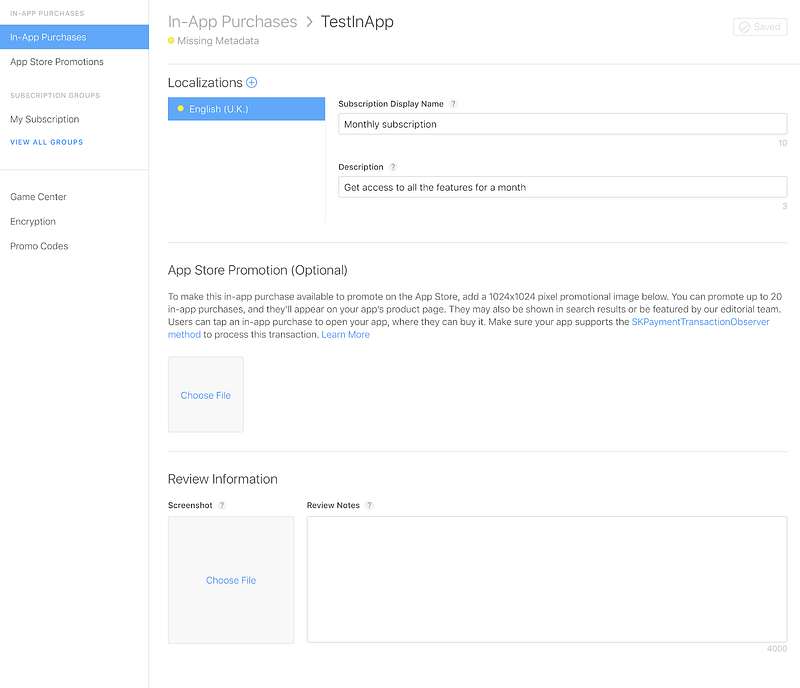
You probably do not have a screenshot now so for now you can create something. In my case I have added a blue screen
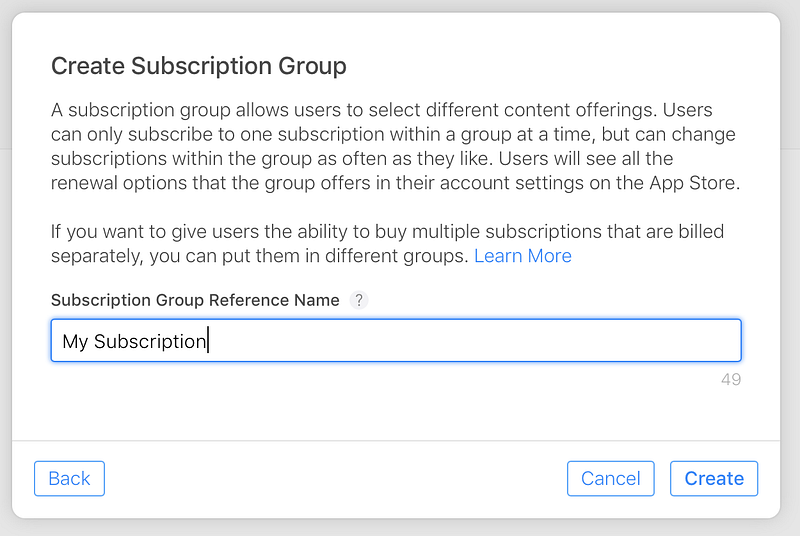
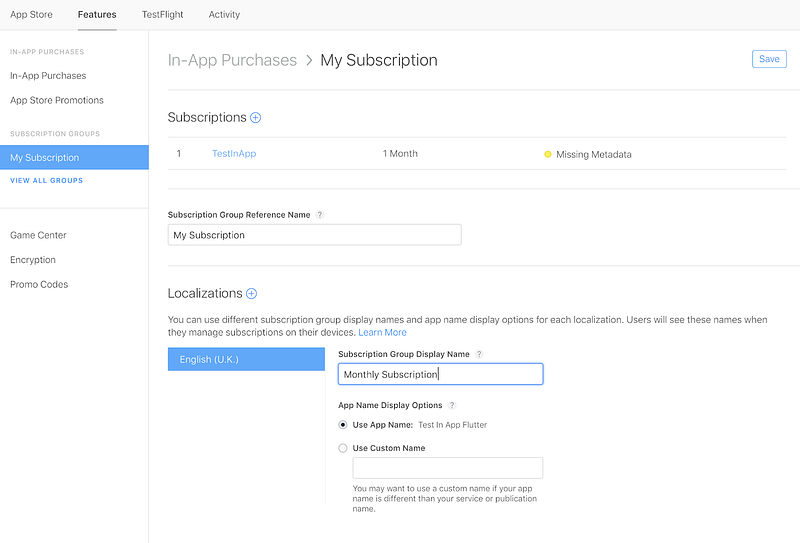
Lastly, you need to add a localization to your subscription. Click on the My Subscription section, add a localization and then click SAVE
If you have done all these steps you should now see the status is changed to ‘Ready for review’
The last step is to get your App Connect App-Specific Shared Secret. The App-Specific Shared Secret allows RevenueCat to connect with Apple on your behalf and it will be used later on in the tutorial
- Select “In-App Purchases” from the left side menu
- Select App-Specific Share Secret from the right side above your in-app products.
- Generate and copy your shared secret
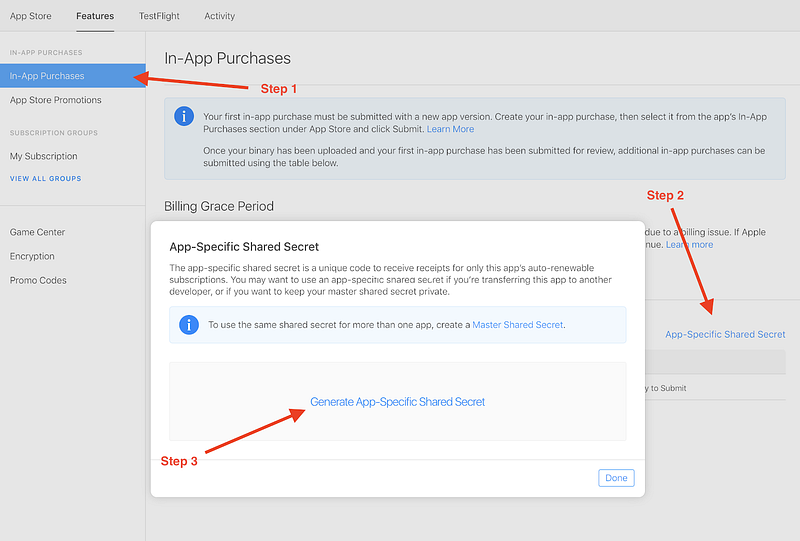
Your code will be generated. Copy it and save it somewhere: you will need it later on.
+++++++
Well done! You have created your first In App Purchases!
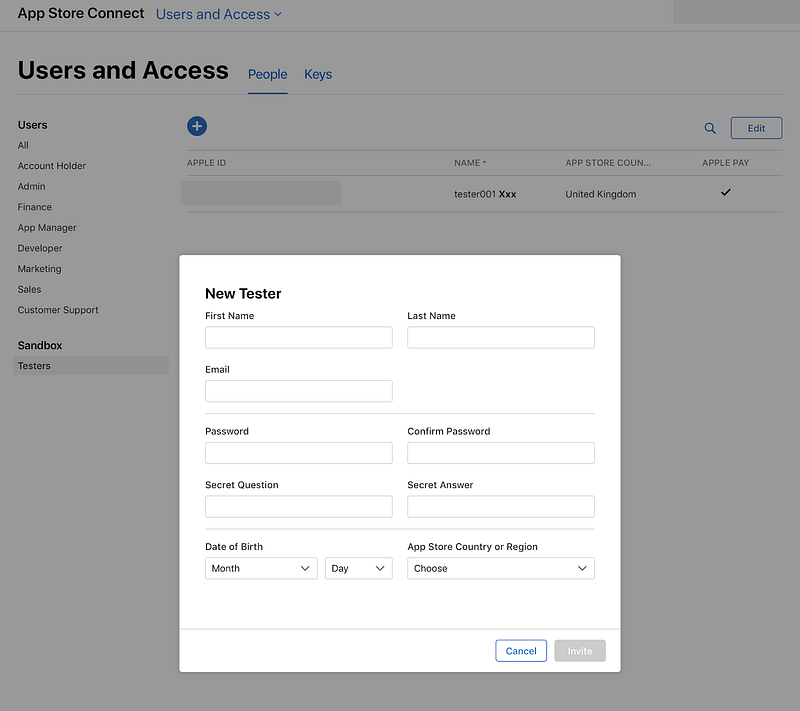
Step 4: create a sandbox account
The last step here is to create an account which will be used to test the functionality of the IAP.
It is important to note that you actually need a real iOS device to test In App Purchases
In-app purchases do not work on the simulator. If you try to make a purchase on a simulator you will get an error and the transaction will no be successful
The advantage is that once Apple recognises an IAP transaction is coming from a sandbox account, you can do as many test s you want. The duration of the subscription in the sandbox environment id 5 minutes and auto-renewal are limited to 6 in total, so you will be able to test in 30 minutes the set up of the In App Purchase as well as six automatic renewals. Apple decision to use sandbox account is controversial and probably outdated. We need to log in a device with the sandbox account, and we need to do it in a real device, which means we need to delete all the existing user data. This is not nice and it pushes developers to have a device to use for sandbox purposes only. We will see that this is not required for Android but unfortunately we need to deal with it, so let’s get started
To create a sandbox tester account, follow these steps:
- Sign in to App Store Connect.
- On the homepage, click Users and Access.
- Under Sandbox, click Testers.
- Click “+” to set up your tester accounts.
- Complete the tester information form and click Invite.
- Sign out of your Apple ID on all testing devices and sign back in with your new sandbox tester account.
For more information on how to create a sandbox tester account, see App Store Connect Help: Create a sandbox tester account.
Important: If you mistakenly use a sandbox tester account to sign in to a production environment, like iTunes, on your test device instead of your test environment, the sandbox account becomes invalid and can’t be used again. If this happens, create a new sandbox tester account with a new email address.
Congratulation! You have successfully completed the set up for iOS. Now take a break since you are probably working on this for an hour or so, have a cup of tea and come back energised to work on the Android set up!

Part 4: set up IAP for Android
The process we need to go through with Android is similar to the iOS one but much simpler in many aspects (I still cant get over to the design flaw of the Apple connect website). Here are the steps:
- Step 1: ensure you can get paid by Google in the Google Play Console
- Step 2: create the app and the In App Subscription in Google Play Console
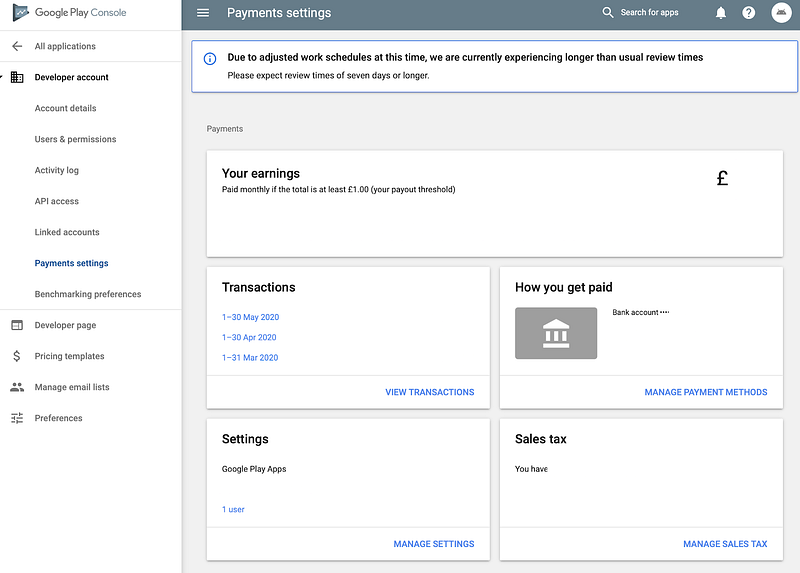
Step 1: ensure you can get paid by Apple in the Google Play Console
This step has to be done only once for all your app and I guess you may have likely already done it if you ever created a paid app. Does it sound familiar?
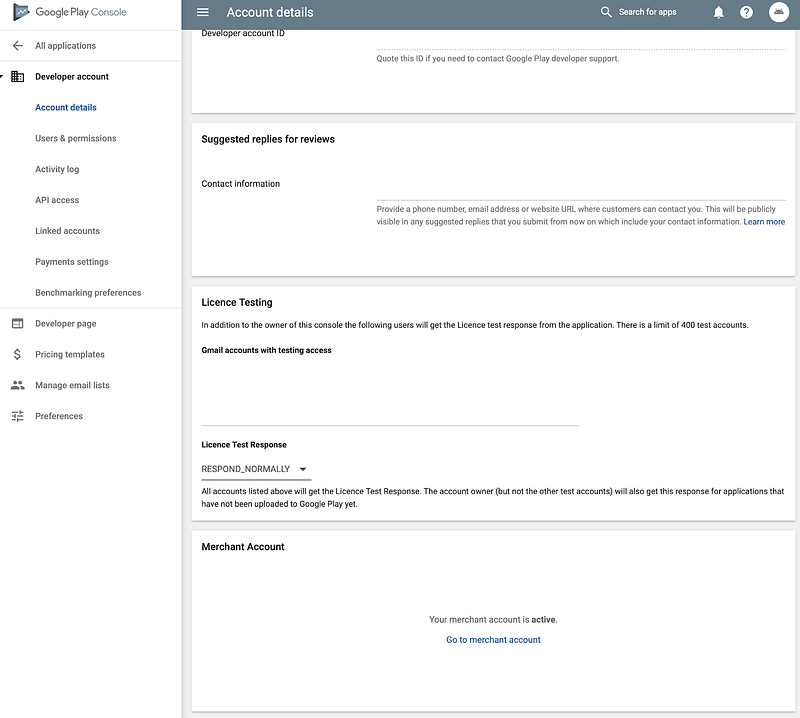
First click on settings

Then click on account details and scroll to the bottom of the page. If you have a merchant account already active (as I do) then you are all set and you can move on in step 2 otherwise you will need to create one.
Create a merchant account
Here is how to create a merchant account:
- Under ‘Merchant Account’, click Set up a merchant account. You’ll be redirected from Play Console to the payments centre to set up your payments profile. Make sure that you have your business information available to set up your payments profile.
- Enter the name of your business as you want it to appear on your payments profile. This information will be shown to your customers and also on your receipts.
- Enter the name of an authorised representative for your company who Google can contact if they have questions about your payments profile. This is visible to google only
- Provide your legal business address as it appears on official documents. It’s important that you have a valid, physical address on file for your business. PO box address are not allowed. Later, you’ll need to make sure that your bank account is registered in the same country listed in your payments profile. Learn more about bank account requirements.
- Enter business phone number: Google will use this number to contact you if we have questions about your account.
- Enter the following public business information, or choose to match your public merchant profile and payments profile information: Your business website, The category of your products (i.e. what you sell) and your customer support email address.
- The business/product name that will appear on your customers’ credit card statements. Note: To help customers remember what they purchased and keep chargebacks to a minimum for you, use an appropriate credit card statement name.
- When you’ve finished, click Submit.
Again this is all but fun but we need to do it to make sure they transfer you the money. Go through all the steps. Sometimes you will be asked to do some other actions based on your specific circumstances. This is how your page should look like at the end of this step
Provide your bank details
After this you need to make sure to provide your bank details. Go back to the Play console and click on payment setting. In my case I am all set but in your case you need to add your payment settings
Here is how to do it:
- Find How you get paid, then click Choose payment method.
- On the next screen, click Add Payment Method.
- Enter your Bank account holder name exactly as it appears on your bank statement. If you need help locating your account information, contact your bank representative.
Verify bank account
To use a bank account as a payment method in your payment profile, you must verify it.
To verify that your information was entered accurately and to make sure that merchant payments will be seamless, Google will make a small deposit into your bank account. It may take up to three working days for your bank to process this deposit.
Contact your bank or find the deposit on your bank statement. The deposit will be labelled ‘Google Deposit [your chosen credit card statement name]’. This deposit will be less than $1.00 USD.
It will take a day or so to get the deposit in your bank account. Once you get the deposit go back to the same page (Play console, Settings, Account details, Payment Settings)
If you are based in the US, US-based merchants who get their merchant payouts from Google through Electronic Funds Transfers (EFT) can instantly verify their bank account. Verifying your bank instantly takes just a few seconds. If you are based outside of the US, it may take up to three working days for your bank to process this deposit.
After you get the deposit amount you can verify your bank account following the steps below:
- Sign in to your Play Console.
- Click Settings
- Payments settings.
- Under ‘How you get paid’, click Choose payment method.
- Find the name of the payment method that you want to verify and click Fix.
- On the next screen, use the drop-down to select the amount that was deposited into your account by Google, then click Verify.
After you verify your bank account, to get merchant payments from Google, you can select your primary account by following the steps below:
- Click Settings
- Payments settings.
- Find ‘How you get paid’, then click Choose payment method.
- Find the account that you want to make your primary payment account and click the Down arrow to change its status from None to Primary.
By the end of this process you should have managed to successfully verified your bank details.
Step 2: create the app and the In App Subscription in the Play Console
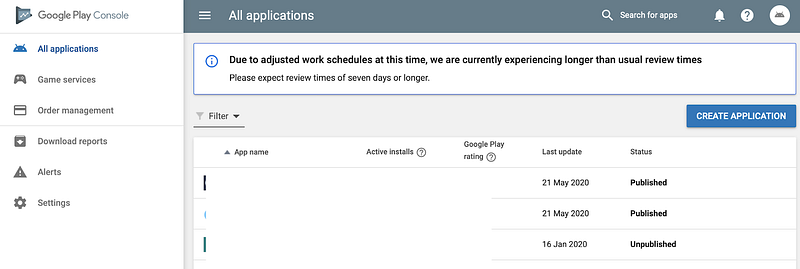
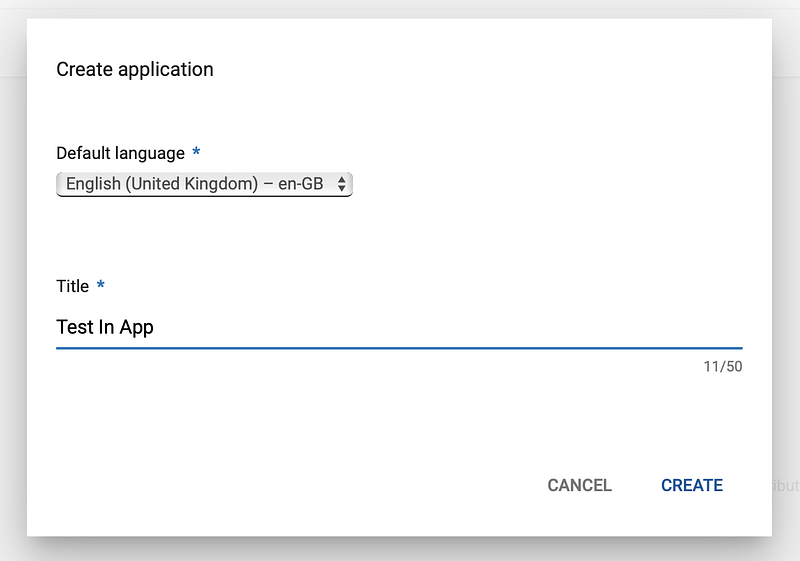
Go to the Play Console and click on ‘Create Application’
Give a name to your app
If you want to publish your app, you need to turn all the grey flag in the left column to green. Do it now if this is your case
In Android the requirement for testing IAPs is to have your APK in the Play console, so let’s upload our app!
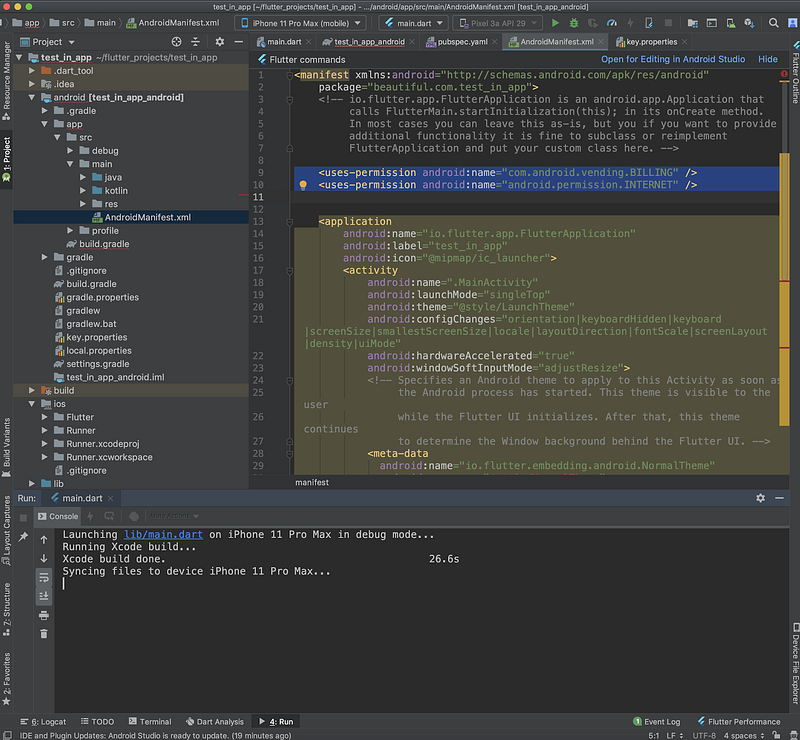
An important pre-requisite is to enable the BILLING permission in your AndroidManifest.xml file. Since you are there add the INTERNET permission
Next, follow the instruction here to create your your apk file. You need to sign your app and run flutter build appbundle command.

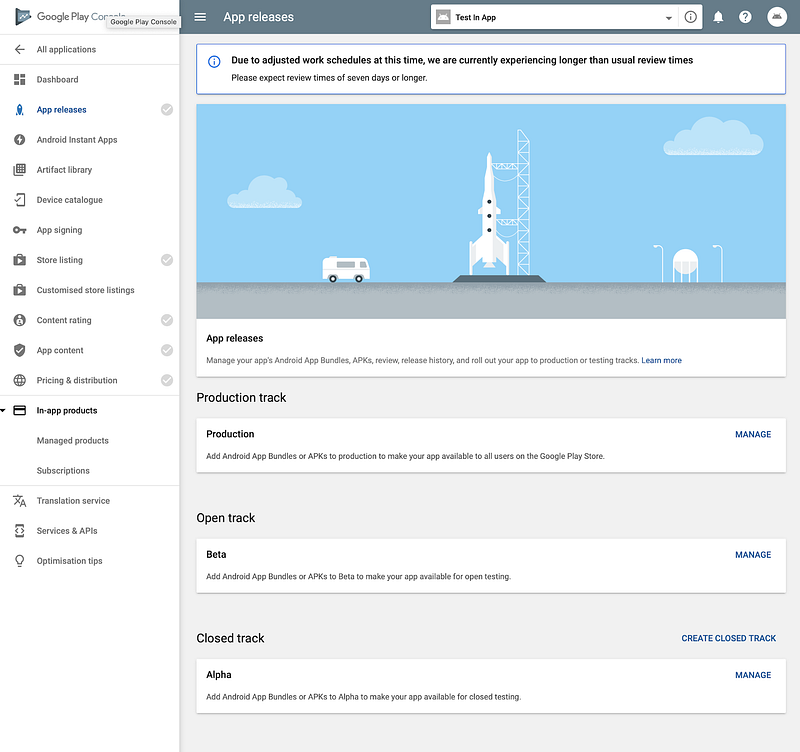
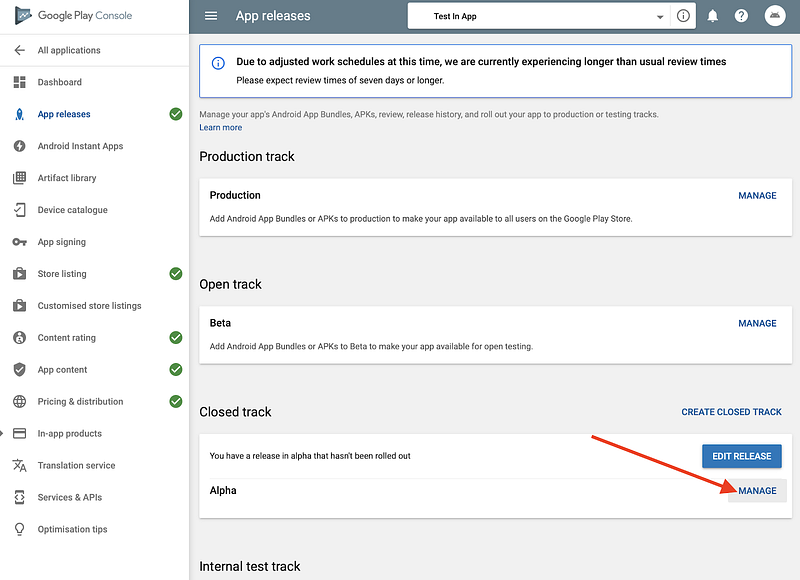
Next, go to the Play console and create an Alpha release under the App release section. Click on the ‘Manage’ button
In our case, since we want to test the In App Purchase functionality for the moment, we only focus on the ‘In-App product’ section.
The create release
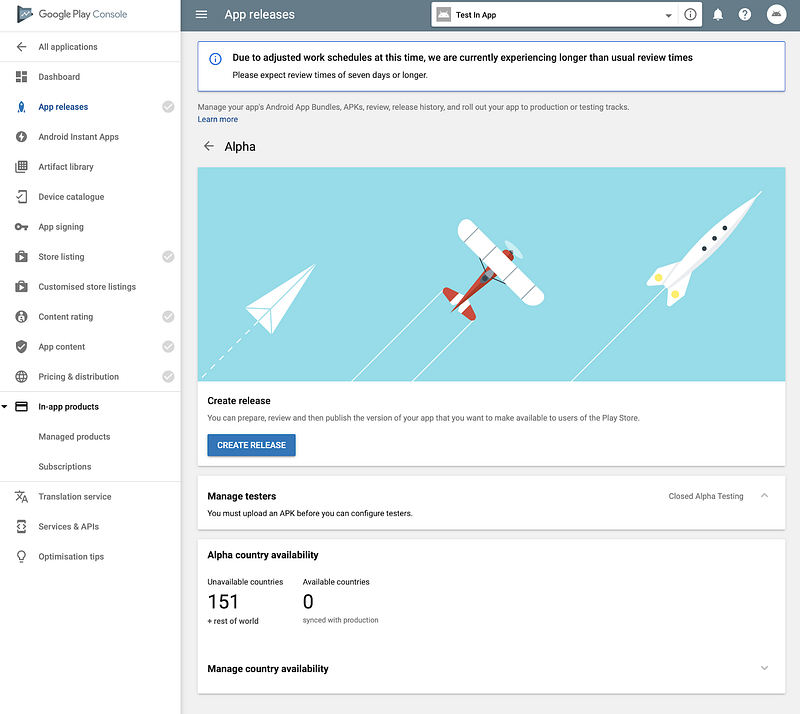
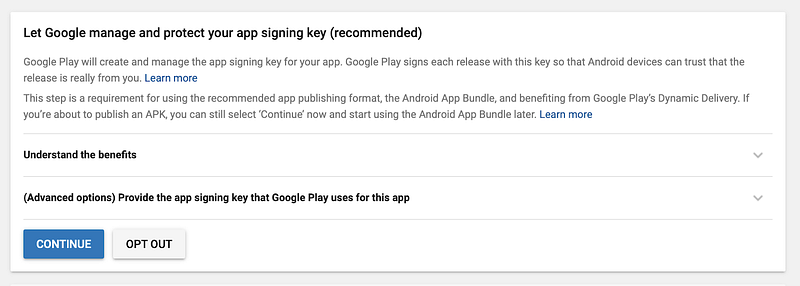
Click continue to enable automatic signing unless you want to manage your signature on your own
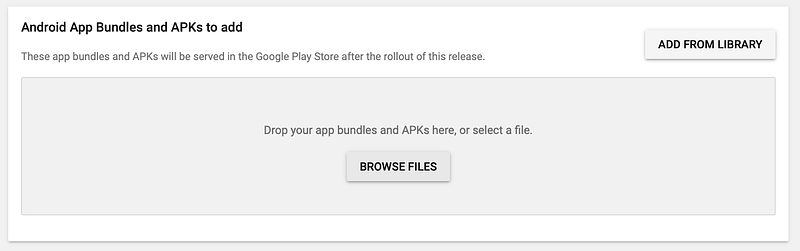
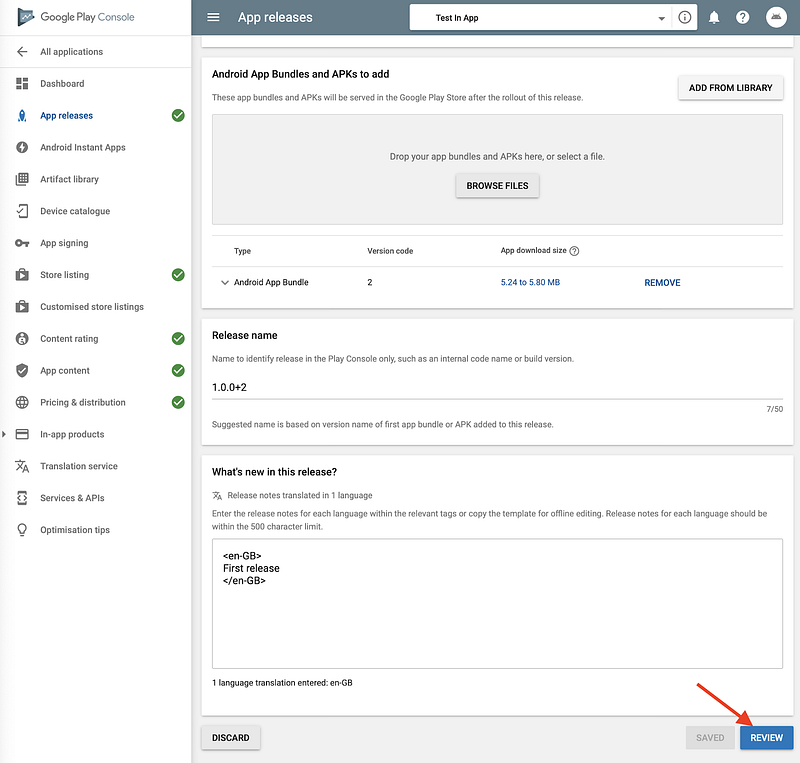
Click Browse file
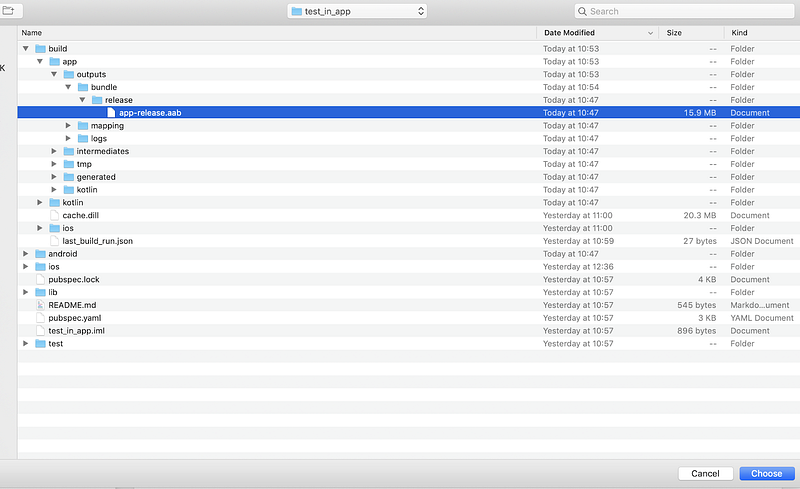
Navigate to the release folder and click Choose.
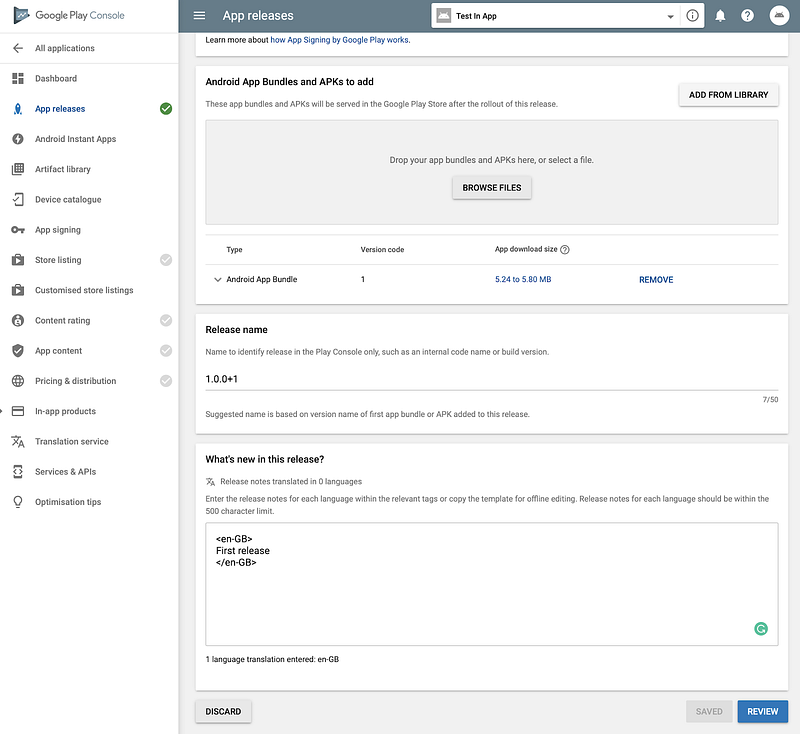
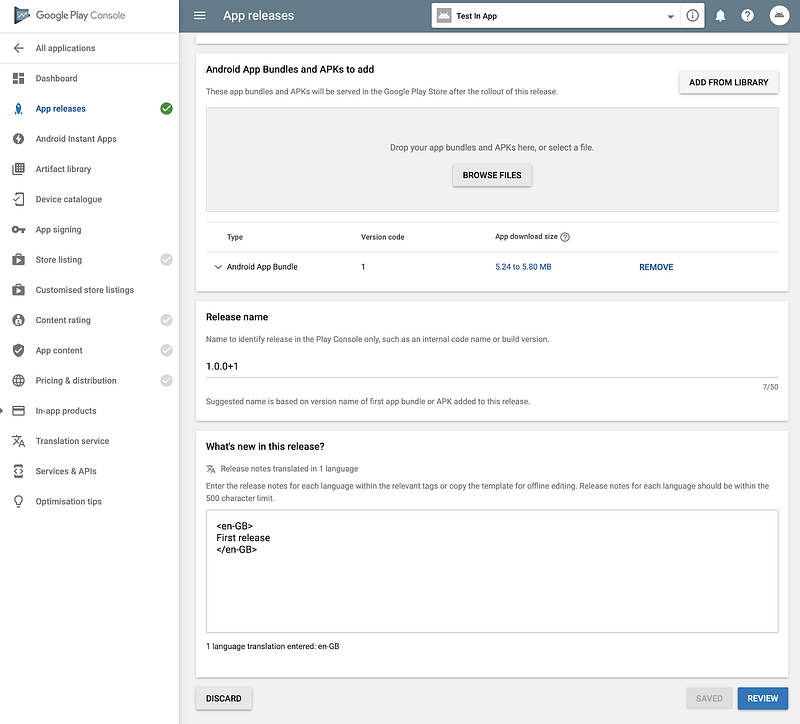
You file should successfully upload to the Play console. Add a release name and release notes and click save and then Review
You should now see a warning message informing you that this release will not be available to any users because you haven’t specified any testers for it yet. You now need to configure your testing track to ensure that the release is available to your testers.

Click on App release and then click on the ‘Manage’ button
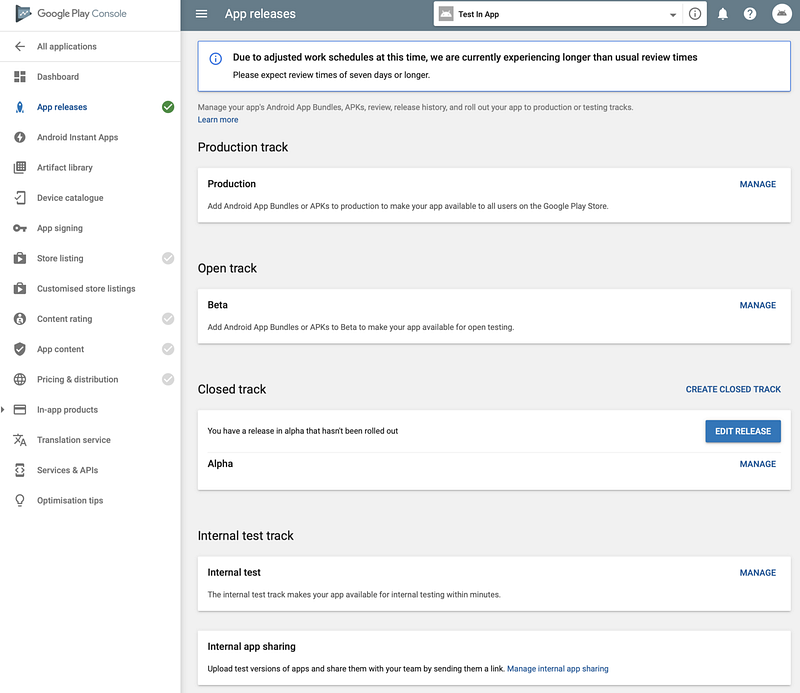
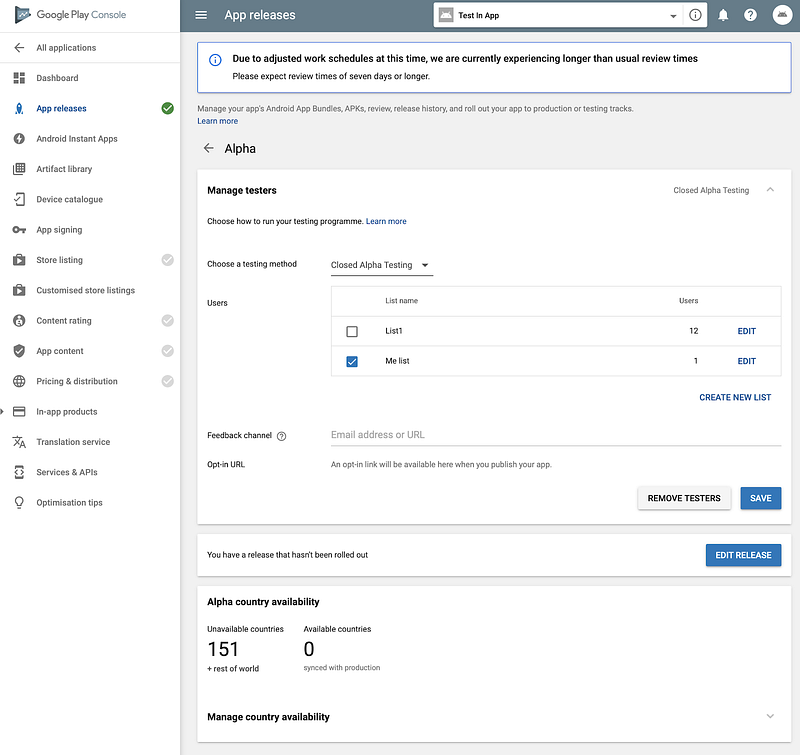
Add at least 1 user to your tester and click save and then Edit Release
Click on Review
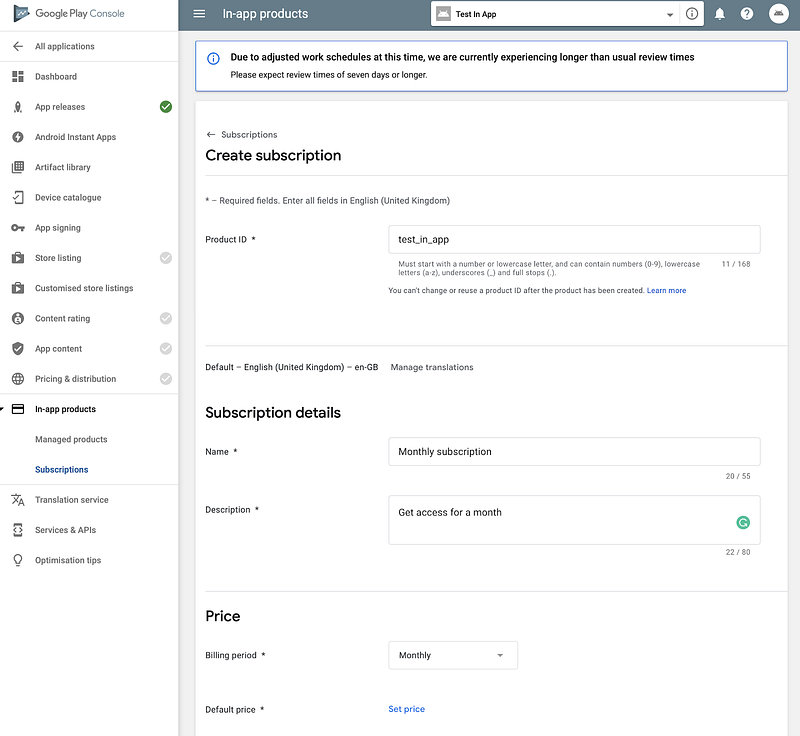
The warning message should now have disappeared but the start roll-out to Alpha button should still be greyed out. This is because we still need do some work. Don’t worry about it for the moment, so just go over the In-App product and select Subscription and click Create Subscription
You will need to add the relevant details and then click set price
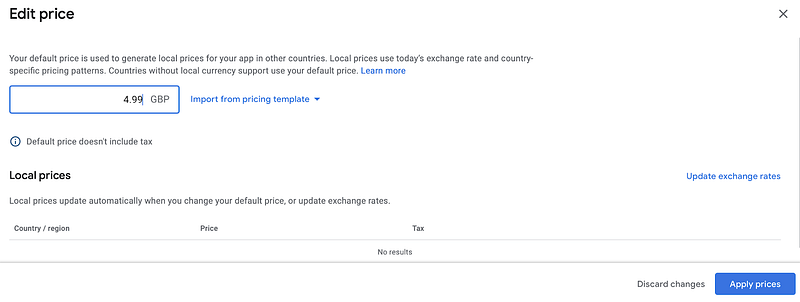
Add your price and click on apply prices. You may want to set up specific prices for other countries in the update exchange rates button otherwise Google will automatically set up exchange rate for you.
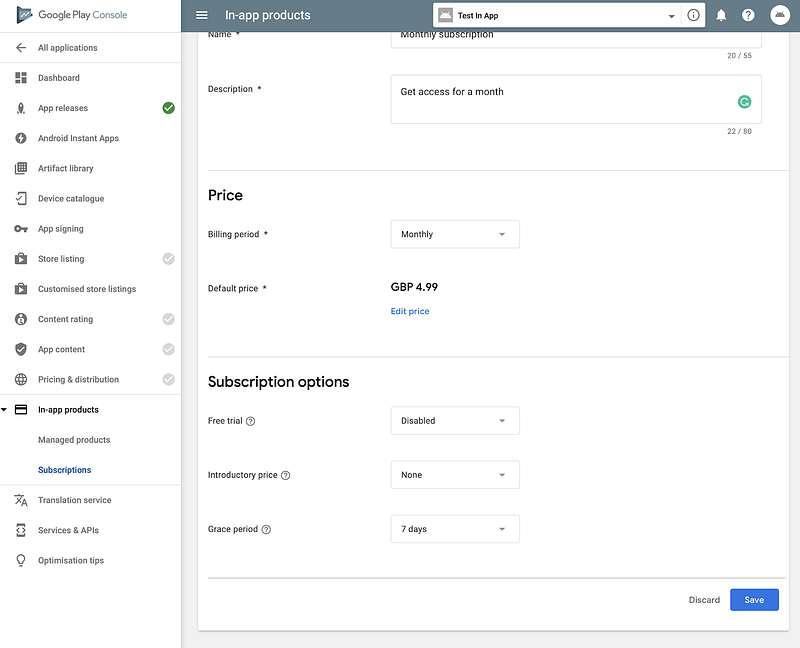
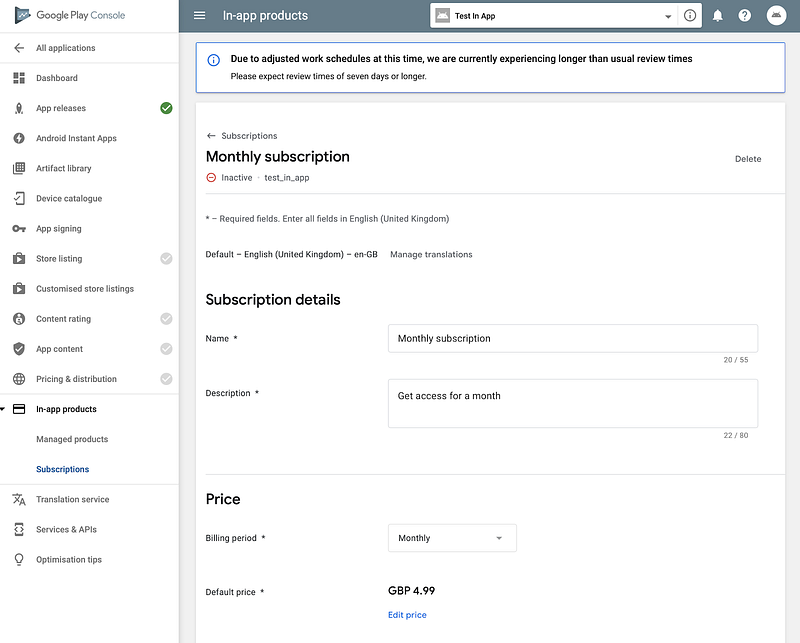
You will see an inactive tag but don’t worry.
Scroll down and click on activate
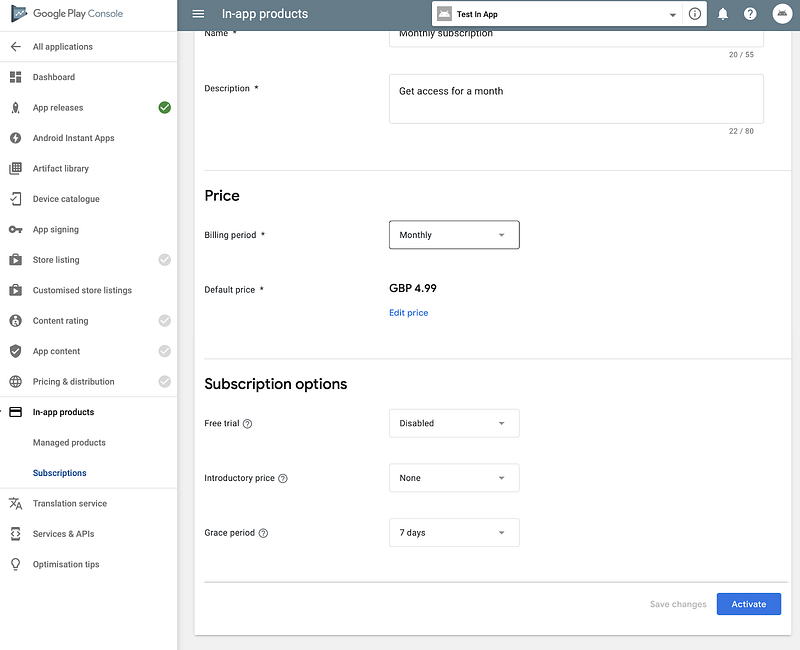
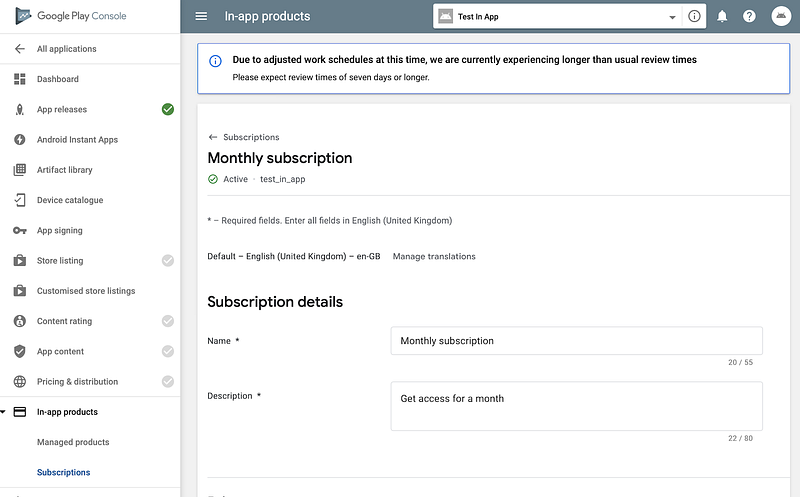
You will now see the subscription is active
Now it the last step. You need to turn green all the sections with a grey flag, ie Store listing, Content rating, App content and Pricing & distribution. It is a laborious process but a requirement to test IAP. Do not leave the site before turning all the flag green. Your side column should like this

After this go back in App release and click manage
Click edit release

Click review
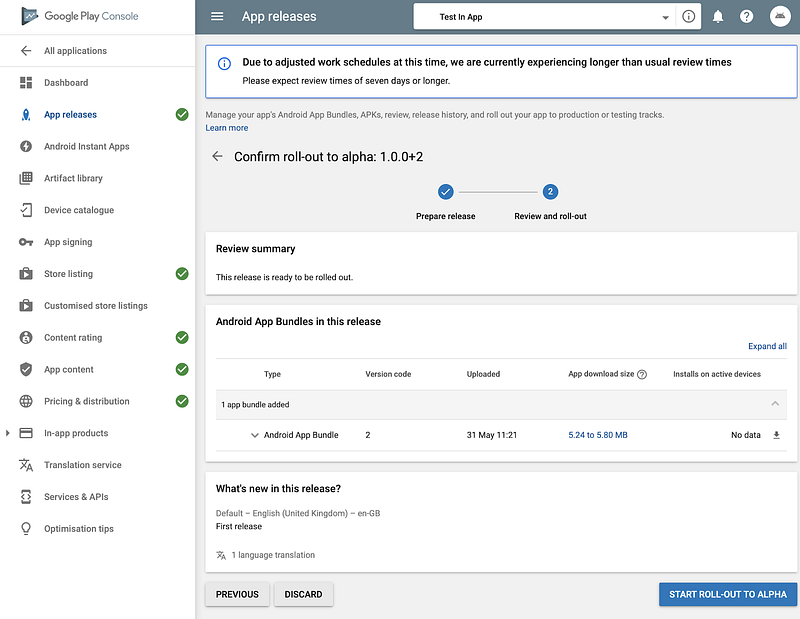
Now Start roll out to Alpha should be enabled. Click it
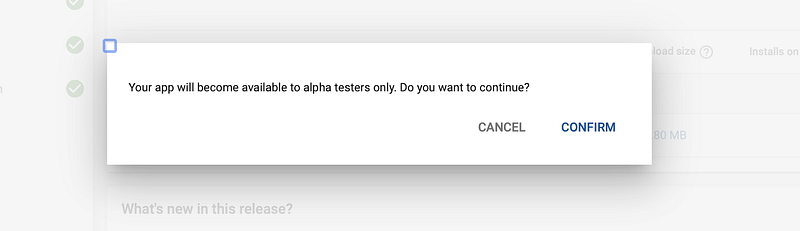
Confirm you want to make the app available
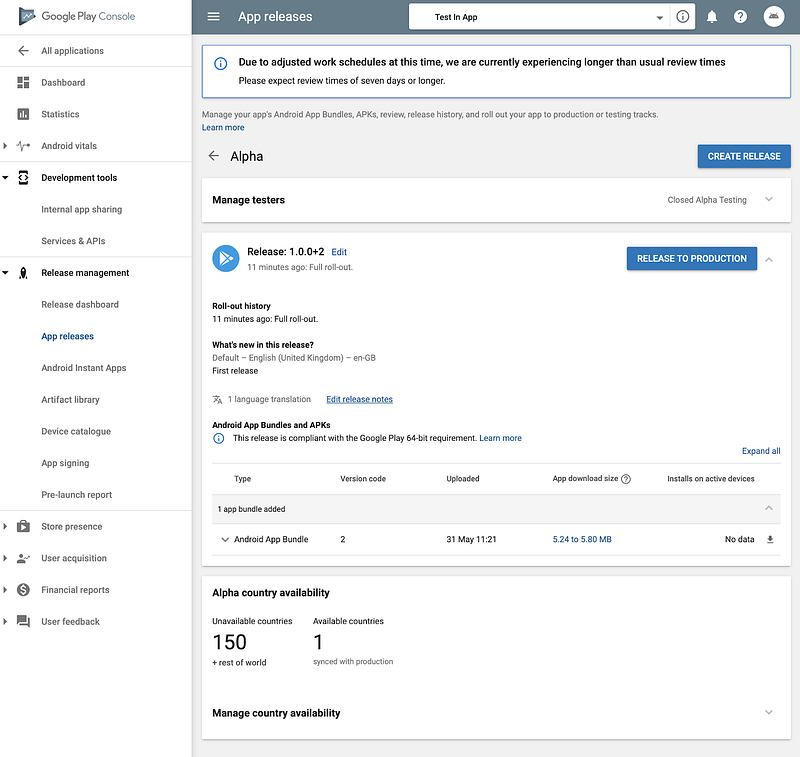
After a while your app will be released
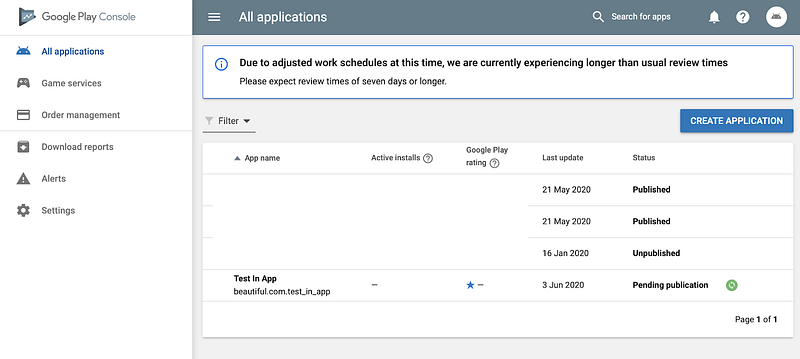
You are done! Congratulation but….… Don’t count your chickens before they are hatched! Your app is still in Pending publication! In my experience, you need to have published app to be able to test In App Purchases. Some site suggests you can do without a published app but in my case if it never worked if the app was not published!
You now need to wait that Google will approve your app and this can take from few hours to several days grrrr. You can anyway move on with the tutorial and start in parallel with the next steps and wait for Google to give an OK. You can do this free but the only problem is that the IAP will not be available to your app.
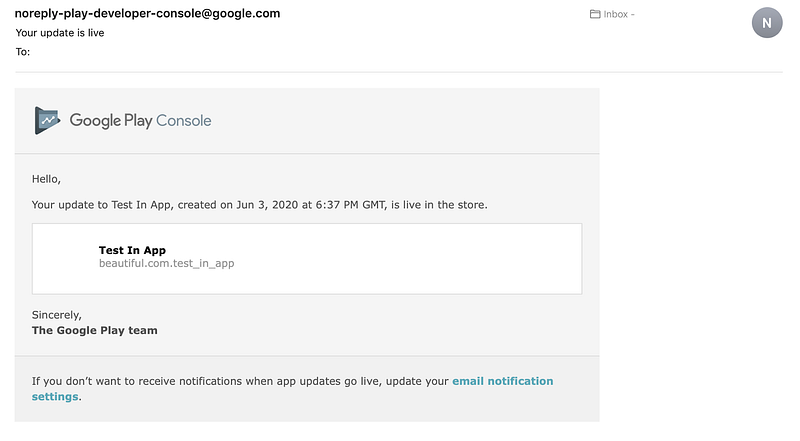
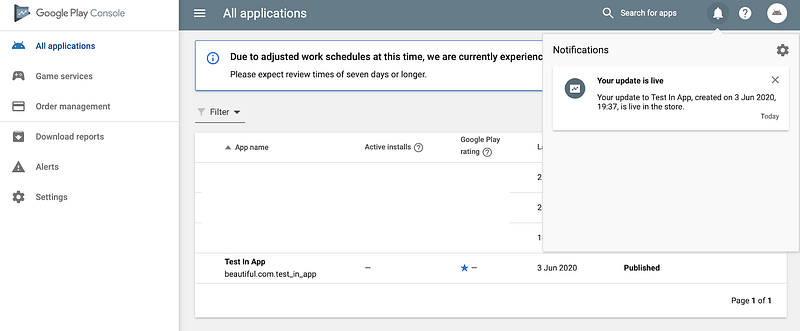
Sooner or later (I forecast 1 day since your app is very simple) your will get an email from Google saying you app is approved and the status will change to published.
Congratulation! You have managed to complete the Android set up process for In App Purchase. Be proud of what you managed to achieve and pat yourself on the back!

Where to go from here
You now have everything you need to add your IAP in your app. Navigate to the relevant resource based on your system
- Flutter: check out my article In-App Purchases with Flutter: A Comprehensive Step-by-Step tutorial where you will find a comprehensive step-by-step guide to create an app with In App Purchases.
- Swift: use the official Apple documentation to leverage StoreKit and equip your app with In App capabilities.
- Java/Kotlin: here is a nice tutorial to add IAP in your android app
If you have enjoyed the article, please clap to show your support!!!


