
How to set up CI/CD Pipeline for a node.js app with Jenkins
What is CI/CD?
Continuous Integration and Continuous Deployment are two modern software development practices. Continuous Integration (CI) is the process of automating the build and testing of code every time a team member commits changes to version control. Continuous Deployment (CD) can be thought of as an extension of continuous integration, and is the process of automatically deploying an application after CI is successful. The goal is to minimize lead time; the time elapsed between development writing one new line of code and this new code being used by live users in production.
Why CI/CD?
There many benefits for CI/CD practices. I am not going to talk about each benefit in detail but I would like to highlight few of them here:
Continuous Integration Benefits:
- Fewer bugs
- Less context switching as developers are alerted as soon as they break the build
- Testing costs are reduced
- Your QA team spend less time testing
Continuous Deployment Benefits:
- Releases are less risky
- Easy release
- Customers see a continuous stream of improvements
- Expedite development as there’s no need to pause development for releases
What are we going to build?
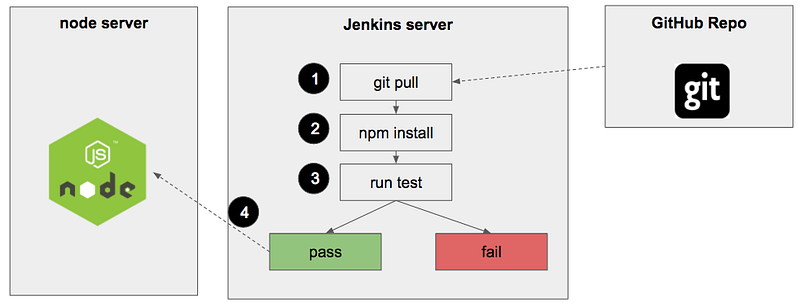
We are going to build a simple Node application and host it on DigitalOcean instance. In addition, we are going to configure an automation server and host Jenkins on a separate DigitalOcean instance. Jenkins will help us to automate the CI/CD process. On every code change from our Node app repository Jenkins will get notified and it will pull the changes into our Jenkins Server (step 1), install dependencies (step 2) and run the integration test (step 3). If all tests pass, Jenkins is going to deploy the app to the node server (step 4). If it fails, a developer will be notified.
Creating a Node App
Before we write any CI/CD pipeline we need an application to test and deploy. We are going to build a simple node.js application that responds with “hello world” text. First, let’s set up our GitHub repository for this project.
Set GitHub Repository
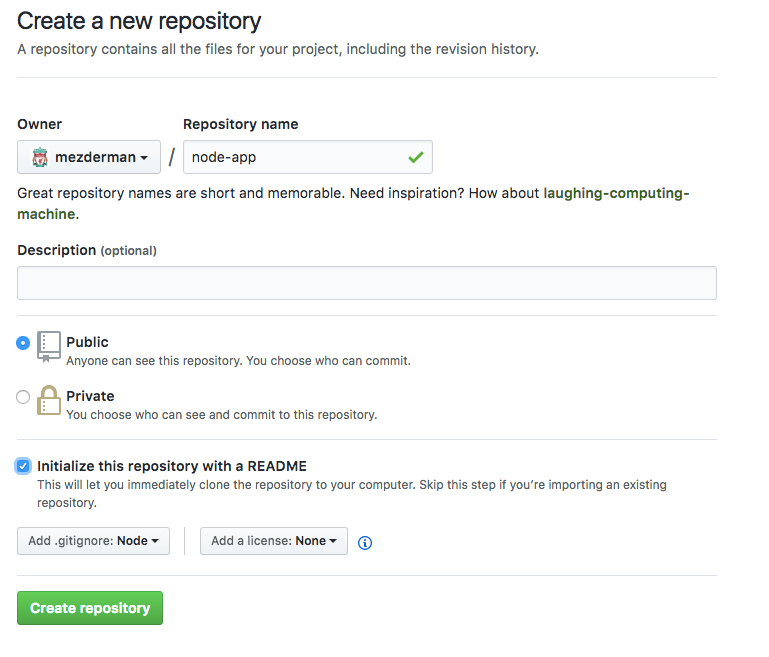
Create new repository under your GitHub account and name it “node-app”.
- You can choose public or private repo
- check the Initialize this repository with a README checkbox
- Select node in the Add .gitignore drop-down menu
- Click Create repository button
Now let’s clone our node-app repo to our local computer and navigate to it:
git clone git@github.com:<github username>/node-app.git
cd node-app
Create Node.js App
The first step when building a node app is creating package.json file. In this file, we list the application dependencies. Create a new file in your project root called package.json and copy paste the following content into it:
{
 “name”: “node-app”,
 “description”: “hello jenkins test app”,
 “version”: “0.0.1”,
 “private”: true,
 “dependencies”: {
    “express”: “3.12.0”
 },
 “devDependencies”: {
    “mocha”: “1.20.1”,
    “supertest”: “0.13.0”
 }
}- express: Node framework
- mocha: Test framework for node ( You can choose other testing framework if you wish like Jasmin, Jest, Tape etc.)
- supertest: Provide a high-level abstraction for testing HTTP
After we defined our dependencies in package.json file we are ready to install them:
npm installAwesome! Ready to write some code? Create a new file in the project root called index.js and copy paste the following code:
//importing node framework
var express = require(‘express’);

var app = express();
//Respond with "hello world" for requests that hit our root "/"
app.get(‘/’, function (req, res) {
res.send(‘hello world’);
});//listen to port 3000 by default
app.listen(process.env.PORT || 3000);
module.exports = app;Our app is going to respond with “hello world” when requests hitting our root URL (“/“).
And that’s our app!
Here is the final folder structure:
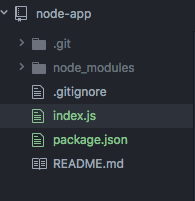
Now we are ready to run our app:
node index.jsYou can view your app on your browser when you navigate to http://localhost:3000
Writing Tests
We are ready to write our first integration test. Our test is going to navigate to the site root (“/”) and verify that the page responds with the text “hello world”.
Under a new directory /test/ create test.js. Copy and paste the following code:
var request = require(‘supertest’);
var app = require(‘../index.js’);describe(‘GET /’, function() {
it(‘respond with hello world’, function(done) { //navigate to root and check the the response is "hello world"
request(app).get(‘/’).expect(‘hello world’, done);
});
});We are going to use Mocha to run our test. We installed Mocha as part of our devDependencies in package.json file. To run the test we need to pass Mocha our /test/test.js file as an argument.
./node_modules/.bin/mocha ./test/test.jsIf you run this command from your project root you will see our test run and pass.

Looking at figure 1 step #3, we would like Jenkins to execute our integration test after it builds. To achieve that we need to create a shell script in our project that trigger our test.
Make new /script/ folder and a file name test without the file extension. Copy and paste the following code into the test file:
#!/bin/sh./node_modules/.bin/mocha ./test/test.jsGrant executable permissions:
chmod +x script/testAnd test it by executing the shell script from the project root:
./script/testBoom! integration test is ready and now we ready to push our code to GitHub:
git add .
git commit -m ‘simple node app with test’
git push origin master
Serve Node App
We are going to host our node app on a server so the entire world can see our masterpiece. We will use DigitalOcean as our hosting provider. DigitalOcean provides an easy way to configure servers and spin new instances.
Creating Node Droplet
Sign up and log in into your DigitalOcean account.
- Click on Create new droplet button.
- Choose an image: Click on the one click app tab and select node JS from the list
- Choose a size: 1GB (The cheapest one)
- Choose a datacenter region: Chose the closest to you. I choose New York Zone 3
- Add your SSH keys: Add your local machine SSH key. If you don’t have SSH key follow this to create one. This command will copy your SSH public key and paste it into the textfield
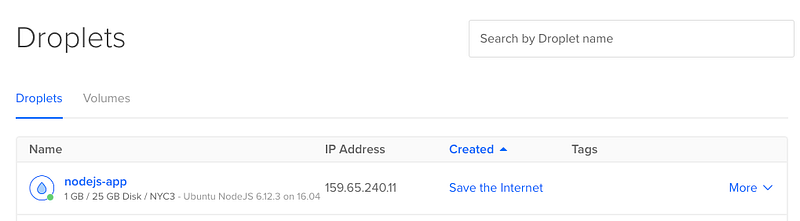
pbcopy < ~/.ssh/id_rsa.pub- Choose a hostname: name it “nodejs-app”
- Click the create button
The droplet will be ready in few seconds.
Nodejs-app Server Configuration
Let’s put the DevOps hat on and set up our node server
Open your terminal on your local machine and login into your nodejs-app server as a root user:
ssh root@NODE.SERVER.IPNow you loged in as root user which is a super power user. And “with great power comes great responsibilities”.

Since we don’t like responsibilities let’s create a new user to do the server configuration work and name it after your last name:
adduser <lastname>Choose user password and follow the prompts. Before we are switching to our new user we need to give him sudo privileges:
usermod -a -G sudo <username>Now you can switch to your new user.
su — usernameDeploy the node-app
Our DigitalOcean server comes with Node but not Git. Lets install git using app-get:
sudo apt-get install gitClone our node app repo:
git clone https://github.com/<username>/node-app.gitNavigate into the project folder and install app dependencies:
cd node-app
npm install — production
Before we can access our app on the browser we need to complete an additional step. As you recall we are running our app on port 3000 by default. DigitalOcean firewall blocks clients accessing any port but 80. Thankfully Ubuntu includes UFW firewall configuration tool that adds firewall rule to unblock specific ports.
Let’s unblock port 3000 and run our app:
sudo ufw allow 3000
node index.js
Now you can access your node app by appending the PORT to your IP address:
Running Node App Forever
Starting node app like above is good for development purposes but not in production. In case our node instance crash we need a process that will do the auto restart. We are going to use PM2 module to help us with this task. PM2 is a general purpose process manager and a production runtime for Node.js apps with a built-in Load Balancer. Let’s install PM2 and start our node instance:
sudo npm install pm2@latest -g
pm2 start index.js
Now our node server is configured and running.
Set Up Jenkins Server
Creating Jenkins Droplet
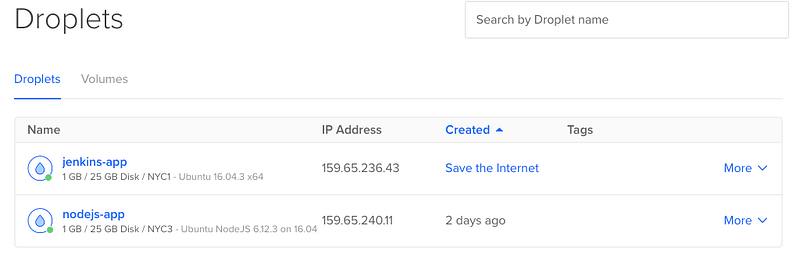
Let’s start by creating a second DigitalOcean Droplet that will serve our Jenkins app. Follow the instructions under Creating Node Droplet section above and choose “jenkins-app” as your hostname. You will end up with 2 droplets:
Create New User
SSH into the new droplet as root user, create a new user, give it sudo privileges and switch to the newly added user:
ssh root@JENKINS.SERVER.IP
adduser <username>
usermod -a -G sudo <username>
su — <username>
Jenkins will need to be able to pull changes from the node app repo, therefore, we need to install git on the instance:
sudo apt-get install gitInstall Jenkins
Get Jenkins:
//add the repository key to the system
wget -q -O - https://pkg.jenkins.io/debian/jenkins-ci.org.key | sudo apt-key add -
//append the Debian package repository address to the server's echo deb https://pkg.jenkins.io/debian-stable binary/ | sudo tee /etc/apt/sources.list.d/jenkins.list//update
sudo apt-get updateInstall Jenkins:
sudo apt-get install jenkinsStart Jenkins:
sudo systemctl status jenkinsJenkins run on port 8080. Remember the Firewall? Lets open the port:
sudo ufw allow 8080And now we can access Jenkins on the browser by navigating to:
Configure Jenkins
When you navigate to Jenkins homepage you probably noticed additional step you need to do. You need to unlock Jenkins
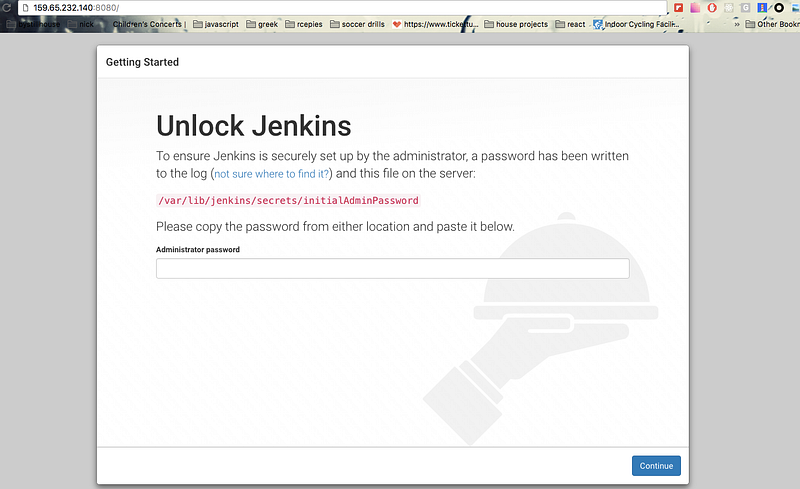
Copy the Jenkins password hosted on your Jenkins server
sudo vim /var/lib/jenkins/secrets/initialAdminPasswordPaste the the password into the text field. You are ready to set up Jenkins. First, we would like to add GitHub plugin. From the left menu select manage Jenkins and go to manage plugins. On the plugins page select the available tab and look for GitHub plugin, select its checkbox and click the Download now and install after restart button.
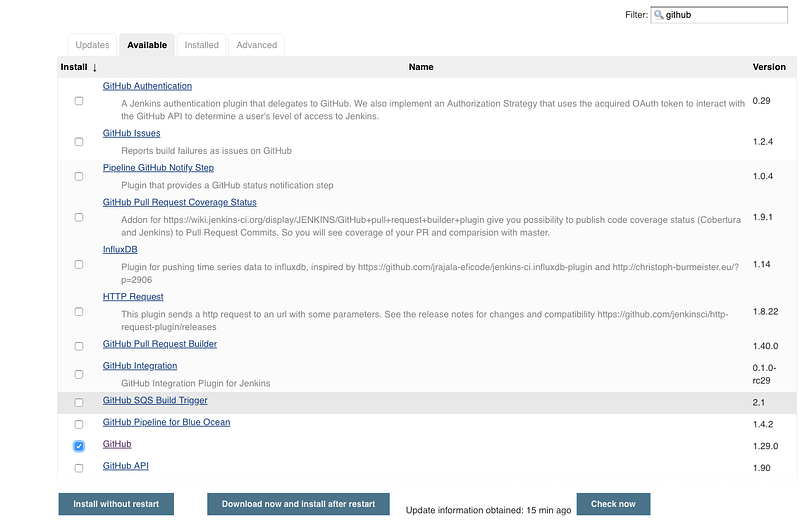
Once the installation is complete scroll down the page and select the Restart Jenkins when installation is complete. This will restart Jenkins and complete the installation.
Change Your Jenkins Admin Password
I suggest at this point to change your Jenkins admin user password. Select Manage Jenkins from the left menu and click on Manage Users. Select the admin user and choose a new password. You will use the new password when you log in to Jenkins in the future.
Create Jenkins Job
We are going to create our Jenkins job that will be responsible for pulling code changes from node-app git repo, install dependencies, run integration test and deploy the application every time a developer push changes to the nodejs-app repo master branch.
Click on New Item button, name the item node-app and select Build a free-style software project option and click the OK button.
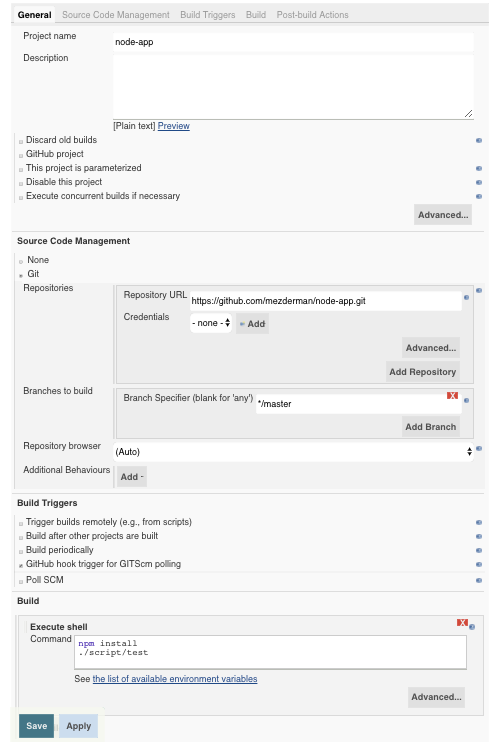
Configure Jenkins Job
Source Code Management: Select git radio button and enter github https link to the node-app repo:
https://github.com/<username>/node-app.gitBuild Triggers: Select option GitHub hook trigger for GITScm polling. This will start our Jenkins job on every git push on the master branch
Add Build Step: Click on Add Build Step button and select Execute Shell option. Enter the following commands into the text area:
npm install
./script/test
In this build step we are going to install dependencies and then run our test shell script.
Add Git Webhook
We are going to add Git Webhook to inform Jenkins every time a developer push new code to master branch.
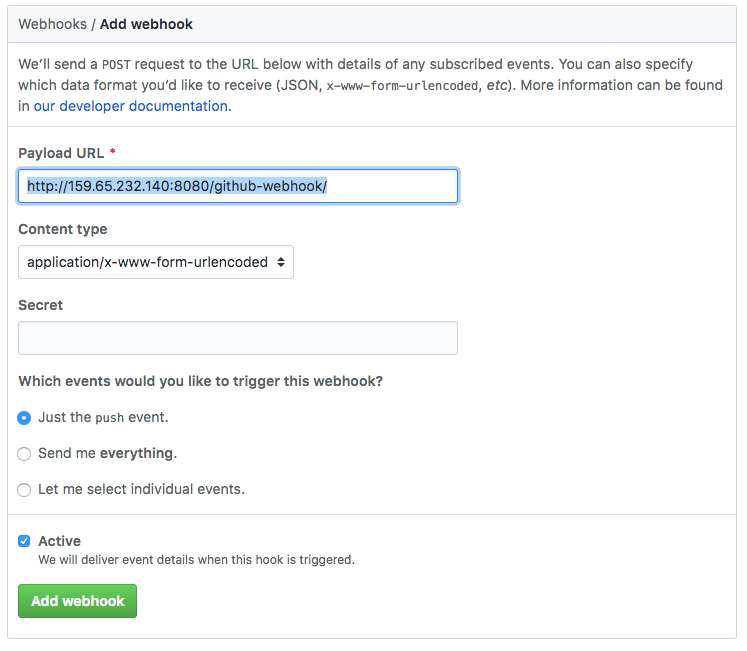
Go to node-app GitHub, click on the Settings tab, select Webhooks from the left menu and click on the Add Webhooks button. Enter your Jenkins webhook URL under Payload URL:
http://JENKINS.SERVER.IP:8080/github-webhook/and select Just the Push Event option. Click the Add webhook button.
Let’s test what we have so far. Go to your node-app project on your machine and change the version in the package.json to 0.0.2. Commit and push this change to GitHub. After you push, go to your Jenkins job on the browser and observe that the Jenkins job started and completed successfully.
Deployment
The last piece of the puzzle is deploying our node application into the node-app server when our test passes.
SSH Authentication
In order to do that, Jenkins Server will need to ssh into the node-app server, clone the repo, install dependencies and restart the server. Lets set up ssh access to Jenkins first.
When we install Jenkins it automatically created Jenkins user. SSH into our Jenkins server as root user:
ssh root@JENKINS.SERVER.IPSwitch to Jenkins user:
su — jenkinsGenerate SSH key:
ssh-keygen -t rsaAnd save the generated key in /var/lib/jenkins/.ssh/id_rsa
Print the SSH key you just created:
cat ~/.ssh/id_rsa.pubAnd Copy the output to your clipboard. Now we are ready to put the public key on the nodejs-app server to complete the authentication between Jenkins server and nodejs-app server.
SSH into the nodejs-app server as a root and switch to your user:
ssh root@NODE.SERVER.IP
su - <username>
Open the the file where authorized keys are stored:
vim ~/.ssh/authorized_keysAnd copy paste the Jenkins public key we just created into that file. Save by pressing the esc button on your keyboard, type :x and press enter.
Set the correct permission on the .ssh folder:
chmod 700 ~/.ssh
chmod 600 ~/.ssh/*
Before we are moving on lets test our SSH set up. If set up is correct we will be able to SSH from JENKINS.SERVER.IP as jenkins user to
ssh root@JENKINS.SERVER.IP
su - jenkins
ssh <username>@NODE.SERVER.IP
Success!
Automatic Deployment
We are going to create another shell script that responsible for the deployment. Create a file under script called deploy and add the following script:
#!/bin/shssh [email protected] <<EOF
cd ~/node-app
git pull
npm install — production
pm2 restart all
exit
EOFThis script will SSH to the node server, pull changes from GitHub, install dependencies and restart serve.
Make our new script file executable:
chmod +x script/deployBefore we commit our changes lets add the deployment step to our Jenkins Job:
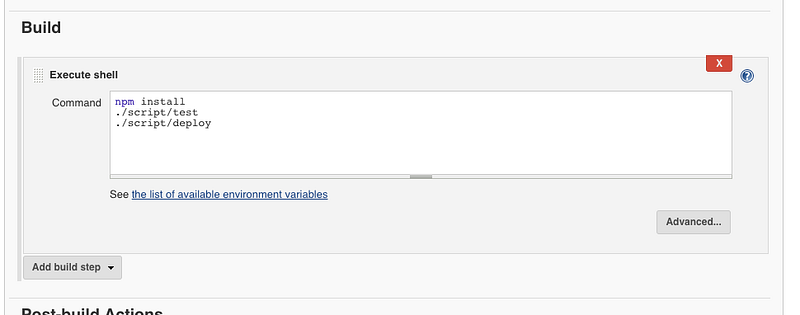
And save.
The Moment of Truth
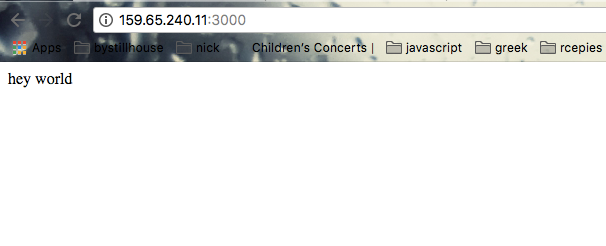
We are ready to test everything we built. Go to your nodejs-app project and edit the index.js file to respond with “‘hey world’”. Don’t forget to change your test/test.js to test for that string as well.
Commit and push:
git add .
git commit -m ‘add deployment script’
git push origin master
After you push you should see Jenkins Job starts. When complete, you should see your changes on http://NODE.SERVER.IP:3000
And we are DONE!


