
How to Set a Profile Picture for Substack Emails
I recently launched Discovery Dose on Substack. I really like the platform, especially with the new features they’ve been rolling out. However, not having much control over customization was starting to become a deal-breaker for me.
You know, creating a home page that doesn’t look like the other gazillion newsletters on Substack, setting a profile picture for my emails, am I expecting too much?
Luckily, I found a way around both those issues. My custom homepage is in the works at the moment — might write an article on that too — but here is how to set a custom profile picture for your emails!
P.S. This process also works with any email address on any custom domain.
Why Do You Need a Custom Profile Picture?
Here’s what having a custom email photo does, as per research:
- Increases brand recall by 18%
- Improves open rates by 21%
- Boosts purchase likelihood by 34%
- Reinforces confidence in email by 90%
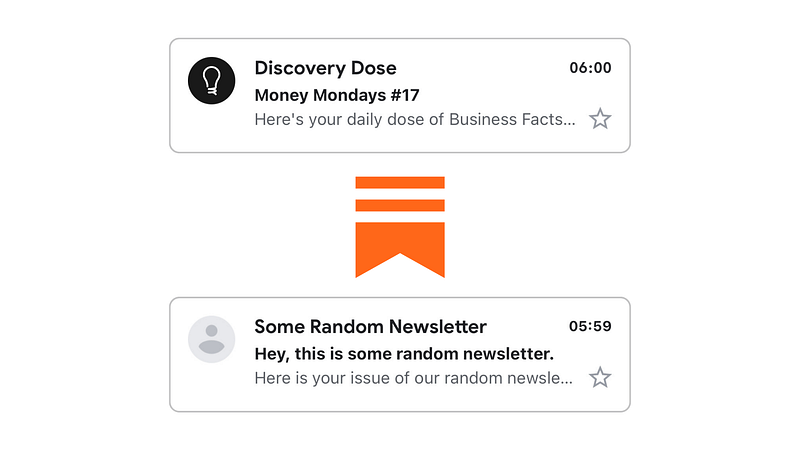
See for yourself:
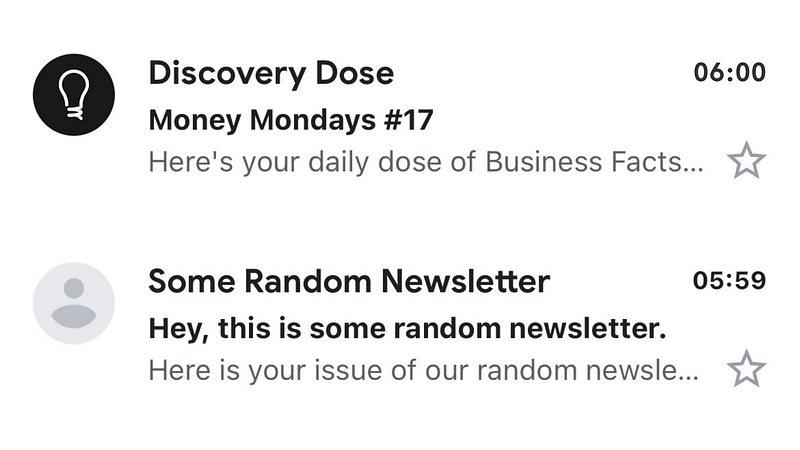
From the above, which email do you notice more? Pretty obvious, right?
So, let’s see how you can achieve the same thing!
Enable Email Replies On Substack
Normally, you would have access to the email address you’re trying to set a profile picture for. However, since the email is hosted on Substack, we need to work our way around it.
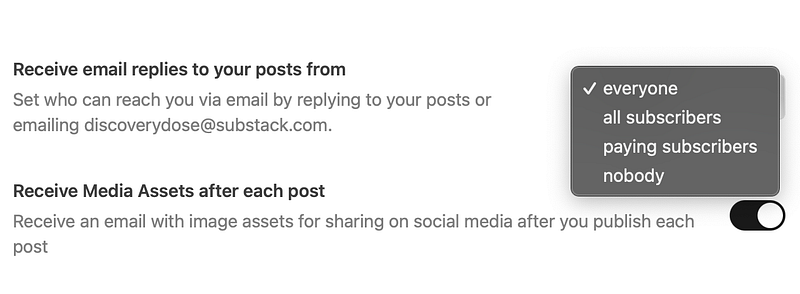
By default, all emails sent to your Substack email are forwarded to the email address registered with your account. We just need to make sure that everyone can send emails to that address, not just subscribers.
Follow the steps below to enable this:
- Go to your Substack “Dashboard”
- Then head over to “Settings”
- Scroll down to the end of the “Basics” section
- Choose “everyone” under “Receive email replies to your posts from”
After this step is completed, you can perform verifications if need be to prove that you are the owner of the email address in question. Now, there are three ways to add a profile picture to your email.
1. Google Alternative Emails
You can add your Substack / custom email as an alternative email address to an existing or newly created Google account. Doing so will automatically show the picture you set for the Google account on the alternative email as well.
Follow the steps below to do this:
- Go to myaccount.google.com and log in with the account whose profile photo you want to use. You can also create a new Google account from scratch.
- Click on Personal info on the left sidebar menu.
- Scroll down until you find Contact info, and click on EMAIL.
- Scroll down again until you reach Alternative emails, and click on Add alternative email.
- Once you click Add alternative email, you’ll get an option to fill in your custom email address.
- After entering your custom email, click on Add.
- After adding your custom email, you’ll get a confirmation email.
- Go to your custom email inbox (or in this case, the registered email for your Substack account) and click on here to verify your request.
Now, whichever profile picture you’re using for your Google account will also be displayed for your custom email in Gmail.
2. Creating a Google Account With Your Substack Email
Another way to achieve the same effect as the previous method is to create a new Google account, but using your Substack / custom email address instead of choosing a new one upon creation.
Follow the steps below to do this:
- Go to Google.com and Click Sign in.
- Select the option to Create account.
- Make sure to click on “Use my current email address instead”
- Type in your Substack / custom email address.
- Google will send a verification email to your email.
- Open the verification email Google sent to your Substack / custom email and follow the steps.
- Fill out the profile information for your new Google account.
- Read (or don’t) the Privacy Policy and Terms, and then agree to move forward.
- Go back to Google.com and click the icon on the upper right corner to change your profile picture!
It may take a while for the changes to propagate. After about an hour, you should see the profile picture get updated! Now, when you send an email, your recipient will see the profile picture.
3. Using Gravatar to Set Your Profile Picture
Gravatar (Globally Recognized Avatar) is a widely used service that allows users to associate a profile picture with their email addresses. When you sign up for a Gravatar account, your profile picture will automatically appear on any platform that supports Gravatar.
Follow the steps below to set up your Gravatar:
- Go to Gravatar’s official website and click on “Create Your Own Gravatar”.
- After signing up, check your Substack / custom email address for a confirmation email. Click on the verification link provided in the email to activate your account.
- Once logged in, click on “Add an Email Address” and enter your Substack / custom email address. Press “Send Verification Email” to receive a verification link in your inbox. (Only if you didn’t sign up with this email to begin with.)
- After verifying your custom email address, click on “Add a New Image” to upload a profile picture from your computer, or import one using a URL.
- Upload your desired profile picture and use Gravatar’s cropping tool to adjust the image as needed. Once you’re satisfied, click “Crop Image” to proceed.
- Gravatar allows you to rate your profile picture based on its content (G for General, PG for Parental Guidance, etc.). Choose the appropriate rating for your image and click “Set Rating.”
- After setting the rating, you’ll see a list of your verified email addresses. Choose your custom email address and click “Use This Image” to associate the profile picture with it.
Your Gravatar profile picture is now set up for your custom email address. It will automatically appear on any website or platform that supports Gravatar!
Once you’ve performed all the steps, be patient for a few hours, as it may take some time for all the changes to propagate. If enough time has passed, check your Gmail on the web to see if the steps have worked!
On mobile, you may sometimes need to sync your accounts again for it to refresh and show the updated profile. No worries though, for new subscribers and recipients, it gets updated automatically!
Keep in mind, these methods are not necessarily universal. For instance, Gravatar alone is not sufficient to show profile pictures on Gmail or Outlook. Similarly, different platforms may require different settings for displaying email profiles. While the methods I’ve provided don’t include a solution for all email platforms, they should be enough for starters!
What Is Discovery Dose Though?

Discovery Dose is a publication committed to making learning fun and engaging by providing you with bite-sized pieces of information on various topics, from science and history to pop culture and everything in between.
It’s a great way to start your day and impress your friends and coworkers with your newfound knowledge!
By covering a wide range of topics, we ensure that there’s always something new for you to learn. Whether you’re a business enthusiast, a science buff, or just someone who enjoys learning new things, Discovery Dose is the perfect thing for you.
Join thousands of people on our mission to make the world smarter. Become a part of an elite group of “Discoverers” who are always on the lookout for interesting facts and new knowledge.
Subscribe to our publication to never miss a dose!
I really hope that you enjoyed this article and can now add some more customization to your Substack newsletter! Feel free to reach out to me on LinkedIn or visit my Website to get in touch!
Also, please subscribe to Discovery Dose if this article helped :)


