
How to Send Emails Using Microsoft 365 in Python Flask with OAuth2
In this guide, we will walk you through the process of setting up your Python Flask application to send emails using Microsoft 365’s OAuth2 authentication and the Microsoft Graph API.
Microsoft has shifted towards more secure authentication methods, moving away from traditional SMTP authentication. OAuth2 provides enhanced security by allowing applications to access resources without exposing user credentials. By leveraging the Microsoft Graph API, developers can send emails seamlessly while adhering to modern security standards.
1. Register Your Application in Azure AD:
Log in to the Azure Portal with your Microsoft 365 account.
Navigate to Azure Active Directory > App registrations.
Microsoft Entra ID is the new name for Azure Active Directory.


Register a new application:
- Click
New registration. - Enter a name for your application.
- Set
Supported account typestoAccounts in this organizational directory only (Single tenant). - Redirect URI: For now, you can set it to
http://localhost(we will update this later if necessary). - Click
Register.

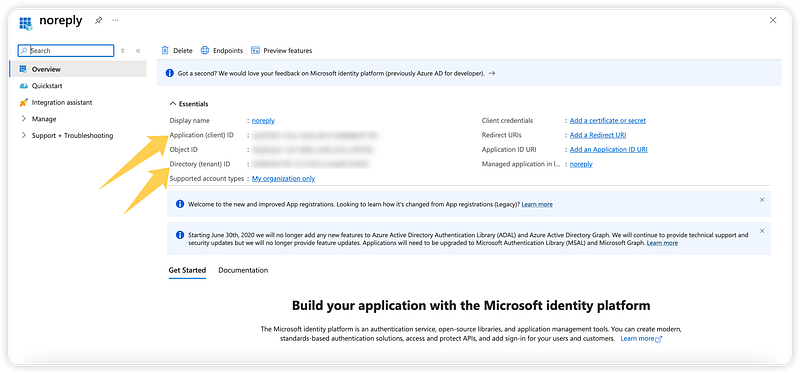
Note the Application (client) ID and Directory (tenant) ID.
Create a Client Secret:
- Within the registered application, navigate to
Certificates & secrets. - Create a new client secret and note down the
Value.

Grant API Permissions:
- Within the registered application, navigate to
API permissions. - Add permissions for Microsoft Graph API.
- Grant admin consent for the required permissions (e.g.,
Mail.Send).

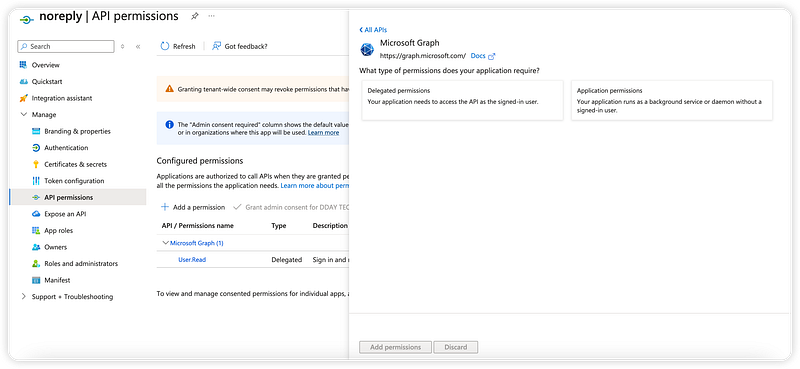
You will be presented with two options: Delegated permissions and Application permissions.
- Delegated permissions: Used when the application is accessing resources on behalf of a user.
- Application permissions: Used when the application is accessing resources directly, without a user context.
For sending emails, you typically need Application permissions.
Add the Required Permissions:
- Select
Application permissions. - Scroll down and expand the
Mailsection. - Check the
Mail.Sendpermission. - Click
Add permissions.

Grant Admin Consent:
- Once the permission is added, you need to grant admin consent to the permissions:
- On the
API permissionspage, you will see theMail.Sendpermission listed underConfigured permissions. - Click the
Grant admin consent for <Your Organization>button. - Confirm the action when prompted.

Steps to Enable SMTP Client Authentication
Sign in to the Microsoft 365 Admin Center:
- Go to the Microsoft 365 Admin Center.
- Sign in with your Global Administrator account.
Navigate to the Exchange Admin Center:
In the left-hand menu, expand Admin centers and select Exchange.

Enable SMTP Authentication for the User:
- In the Exchange Admin Center, navigate to
Mail flow>Connectors.

- Verify if any connectors are blocking SMTP authentication.
- Navigate to
Recipients>Mailboxes. - Select the mailbox you want to enable SMTP authentication for (e.g.,
[email protected]). - Click on
Manage email apps settings. - Ensure
Authenticated SMTPis enabled.
- Enable SMTP Authentication for the Entire Tenant:
- Open the Microsoft 365 Admin Center.
- Navigate to
Settings>Org settings. - Under the
Servicestab, find and click onModern authentication. - Ensure that the option
Allow clients to connect using Basic authentication protocolsis enabled.
Using the Application to Send Emails
1. Share the Application Details:
- The Global Administrator shares the
Application (client) ID,Directory (tenant) ID, andClient Secretwith the user who needs to send emails.
2. User Authentication:
- The user uses these details to obtain an OAuth2 access token using the Microsoft Authentication Library (MSAL).
3. Send Emails:
- The user can then configure their Flask application to use the access token to authenticate with the Microsoft 365 SMTP server and send emails.
Install Required Packages:
Ensure you have the necessary libraries installed:
pip install msal
Set Up Environment Variables:
Store your application credentials securely in a .env file:
CLIENT_ID=your-client-id
CLIENT_SECRET=your-client-secret
TENANT_ID=your-tenant-id
MAIL_USERNAME[email protected]
AUTHORITY = f"https://login.microsoftonline.com/{TENANT_ID}"
SCOPE = ["https://graph.microsoft.com/.default"]
Build the functions:
import os
import json
import msal
import requests
from flask_mail import Message
from flask import url_for
from app import mail
from dotenv import load_dotenv

# Load environment variables from .env file
load_dotenv()

CLIENT_ID = os.getenv('CLIENT_ID')
CLIENT_SECRET = os.getenv('CLIENT_SECRET')
TENANT_ID = os.getenv('TENANT_ID')
AUTHORITY = f"https://login.microsoftonline.com/{TENANT_ID}"
SCOPE = ["https://graph.microsoft.com/.default"]
MAIL_USERNAME = os.getenv('MAIL_USERNAME')

def get_access_token():
    app = msal.ConfidentialClientApplication(
        CLIENT_ID,
        authority=AUTHORITY,
        client_credential=CLIENT_SECRET,
    )
    result = app.acquire_token_for_client(scopes=SCOPE)
    if "access_token" in result:
        return result['access_token']
    else:
        raise Exception("Failed to acquire token", result.get("error"), result.get("error_description"))

def send_email_via_graph_api(subject, recipient, body):
    access_token = get_access_token()
    headers = {
        'Authorization': f'Bearer {access_token}',
        'Content-Type': 'application/json'
    }
    email_data = {
        "message": {
            "subject": subject,
            "body": {
                "contentType": "Text",
                "content": body
            },
            "from": {
                "emailAddress": {
                    "address": MAIL_USERNAME
                }
            },
            "toRecipients": [
                {
                    "emailAddress": {
                        "address": recipient
                    }
                }
            ]
        }
    }
    user_endpoint = f'https://graph.microsoft.com/v1.0/users/{MAIL_USERNAME}/sendMail'
    response = requests.post(
        user_endpoint,
        headers=headers,
        data=json.dumps(email_data)
    )
    if response.status_code != 202:
        raise Exception(f"Error sending email: {response.status_code} - {response.text}")

def send_reset_email(user):
    token = user.get_reset_token()
    subject = 'Password Reset Request'
    recipient = user.email
    body = f'''To reset your password, visit the following link:
        {url_for('bp_account.password_reset', token=token, _external=True)}

        If you did not make this request, please ignore this email.
        '''
    send_email_via_graph_api(subject, recipient, body)

def send_welcome_email(user):
    subject = 'Welcome'
    recipient = user.email
    body = f"Hi there, \n\nWelcome, we are glad to have you! "
    send_email_via_graph_api(subject, recipient, body)


