
How to Send an Email With Attachments in Python
Utilizing ‘smtplib’ to send images and text emails
By reading this article, you’ll learn the basic steps required to send a simple email in Python. We’ll be using a built-in module called smtplib. This means there will be no additional setup or installation required. Based on the official documentation, this module:
“… defines an SMTP client session object that can be used to send mail to any Internet machine with an SMTP or ESMTP listener daemon. For details of SMTP and ESMTP operation, consult RFC 821 (Simple Mail Transfer Protocol) and RFC 1869 (SMTP Service Extensions).”
There are three sections in this tutorial
- Flask server
- Implementation
- Conclusion
Let’s proceed to the next section to set up the Flask server.
1. Flask Server (optional)
It’s highly recommended to set up a virtual environment before you proceed. Please be noted that Flask is not needed to run smtplib module. It was included in this piece as I was testing on sending email via Flask server at the time of this writing. Kindly proceed to the Implementation section if you prefer a cleaner setup and implementation. Activate your virtual environment, and install Flask via the following code:
pip install flaskCreate a Python file, and add in the following code to create a simple server. I will be naming it test.py.
from flask import Flask, request, jsonifyapp = Flask(__name__)@app.route('/')
def hello_world():
return "Hello world!"if __name__ == "__main__":
app.run('0.0.0.0',port=5000)Save the file, and run it with the following code. Replace the name of the file accordingly. I’m using test.py for this tutorial.
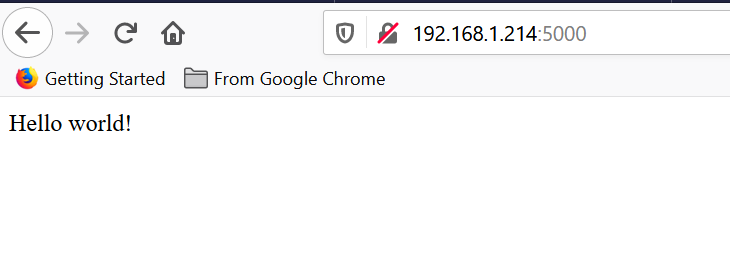
python test.pyOpen up a browser, and access it based on the IP of your machine. You can open up a command line and type ipconfig to identify the address of your machine. You should be able to see the following output.
Proceed to the next section, and start playing around with the smtplib module.
2. Implementation
SMTP Object
First and foremost, add the following import declaration on top of the Python file.
import smtplib
from email.mime.multipart import MIMEMultipart
from email.mime.text import MIMEText
from email.mime.image import MIMEImage
email.mime module is required to craft the email messages. It’s part of the legacy module that’s still quite useful. Feel free to use other modules if you intend to create complex email messages.
The SMTP objects accept two input parameters:
- server name
- port
Please be noted that I’m using Outlook as the SMTP server, and the connection is based on TLS. In fact, you can use your own SMTP server or third-party services such as Gmail or Outlook. You have to modify the parameters based on the setting of the SMTP server you’re going to use. You have to allow your email to be accessible by third-party services. The setting for Outlook is as follows. Modify them accordingly if you’re using another SMTP server.
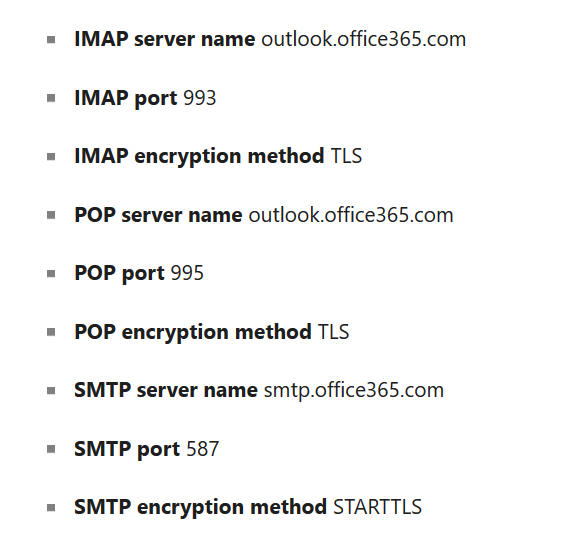
Create a SMTP object with the following code. Replace smtp.office365.com with the server name of your SMTP server.
smtpObj = smtplib.SMTP('smtp.office365.com', 587)Continue by appending the following code to start the authentication:
smtpObj.ehlo()
smtpObj.starttls()
smtpObj.login("[email protected]", "password")
MIME
The next step is to create the email messages. Let’s create a function called send_test_mail and define the sender and receiver emails. You can use your own email as both the sender and receiver to test it out. I’ve added an additional string input called body. It’ll be the main content that we’ll be sending over in the email.
def send_test_mail(body):
    sender_email = "sender@email.com"
    receiver_email = "receiver@email.com"
Inside the function, create a MIMEMultipart object that’ll be responsible for storing all the MIMEText and MIMEImage objects.
msg = MIMEMultipart()
msg['Subject'] = '[Email Test]'
msg['From'] = sender_email
msg['To'] = receiver_email
Next, create the MIMEText object using the input parameter we defined earlier. We’ll format it inside an HTML string. Attach it to the MIMEMultipart object.
msgText = MIMEText('<b>%s</b>' % (body), 'html')
msg.attach(msgText)
The last step is to call the sendemail function. It’s recommended to wrap it inside a try catch block. I will be moving the entire smtpObj inside this block using the with context manager as it will help to call quit on its own.
try:
  with smtplib.SMTP('smtp.office365.com', 587) as smtpObj:
    smtpObj.ehlo()
    smtpObj.starttls()
    smtpObj.login("[email protected]", "password")
    smtpObj.sendmail(sender_email, receiver_email, msg.as_string())
except Exception as e:
  print(e)
In order to test it, you need to make a call to the send_test_mail function. The easiest way is to do it inside the main function. Feel free to change the input text.
if __name__ == "__main__":
send_test_mail("Welcome to Medium!")
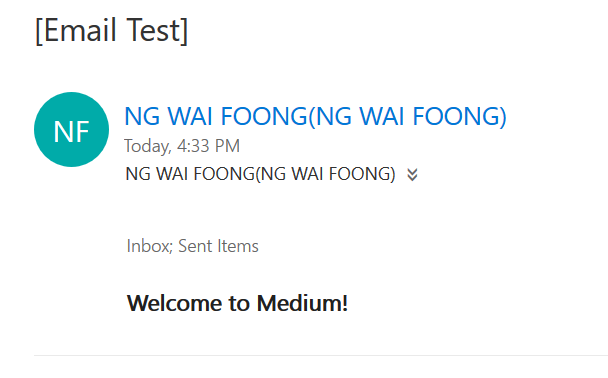
app.run('0.0.0.0',port=5000)Run the server, and you should see the following email inside your mailbox.
Text attachment
You can easily add an attachment such as a CSV or TXT file to the email message via the following code. Simply assign the proper path, and open it inside a MIMEText.
filename = "example.txt"
msg.attach(MIMEText(open(filename).read()))
You should be able to get the following result.

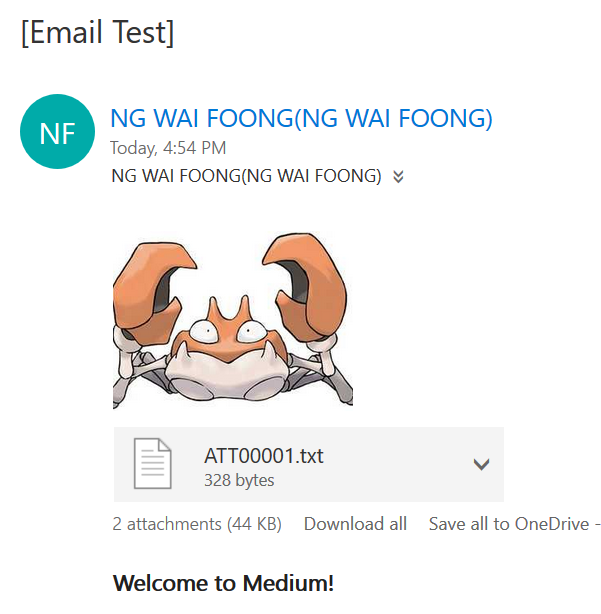
Image attachment
For image attachments, you have to use the MIMEImage object instead. You can change the name of the attachment by adding a header Content-Disposition to it.
with open('example.jpg', 'rb') as fp:
    img = MIMEImage(fp.read())
    img.add_header('Content-Disposition', 'attachment', filename="example.jpg")
    msg.attach(img)
You should get the following result once you run the server.
Binary Attachment
If you are sending pdf or ppt, MIMEApplication is the right choice for you as it helps to read it in octet-stream. Import it as follow:
from email.mime.application import MIMEApplicationRead the binary data from the file using rb mode.
pdf = MIMEApplication(open('123.pdf', 'rb').read())Then, add the corresponding header and attach it to the MIMEMultipart object.
pdf.add_header('Content-Disposition','attachment','123.pdf')
msg.attach(pdf)
Feel free to check out the complete code in the following link.
3. Conclusion
Let’s recap what we’ve learned today. We started off with a simple installation of a Flask server.
Then, we proceed with initializing the SMTP object, which is responsible for authentication and allows us to log into our own email.
After that, we crafted the email messages using MIMEText and MIMEImage. This allows us to send attachments in the form of text files and images.
Thanks for reading this piece. Hope to see you again in the next article!


