
MACHINE LEARNING
How to Run 30 Machine Learning Models with a Few Lines of Code
Learn how to run multiple machine learning models using lazy predict — code along

When starting a new supervised Machine Learning project, one of the first steps is to analyze the data, understand what we are trying to accomplish, and which machine learning algorithms could help us achieve our goals. While the scikit-learn library makes our lives easier by making possible to run models with a few lines of code, it can also be time-consuming when you need to test multiple models. However, what if we could run multiple vanilla models at once before diving into more complex approaches and have a better idea of what models in which we should invest our precious time?
That’s what lazy predict tries (successfully) to accomplish. It runs 30 machine learning models in just a few seconds and gives us a grasp of how models will perform with our dataset. To better understand how we can use lazy predict, I created a Titanic Survivor Prediction project so that you can code along. You can find the full notebook here. You can code along with me. Basic experience with Python, Pandas, and scikit-learn will help you better understand what is going on.
Importing and cleaning data
First, let's import pyforest. PyForest imports the 40 most popular Python libraries with one line of code. I wrote an article about it, and you can find it here. I will turn some ugly warning messages off using the warning library. I will also import some metrics libraries. We will need it later on.
import pyforest
import warnings
warnings.filterwarnings("ignore")
from sklearn import metrics
from sklearn.metrics import accuracy_score
Now, let's import the dataset we will be using from Kaggle. You can find the dataset on this link. Note that I didn't import Pandas. That's because it comes included with pyforest.
# importing .csv files using Pandas
train = pd.read_csv(‘train.csv’)
test = pd.read_csv(‘test.csv’)
I will skip some Exploratory Data Analysis in this article because our primary focus is to start using lazypredict. However, in my initial EDA that you can find in my GitHub, I noticed that we need to convert the column Sex into numeric. We can easily do that with a lambda function.
train['Sex'] = train['Sex'].apply(lambda x: 1 if x == 'male' else 2)We can also drop a few categorical columns that we will not be used for this micro project. For homework, I recommend you trying to play around with these features when you finish this article.
train.drop(columns=[‘Name’,’Ticket’,’Cabin’, ‘PassengerId’, ‘Parch’, ‘Embarked’], inplace=True)Train Test Split
Let's now split our train set into the variables X and y. I will address all the features to X, except Survived, which is our target label.
X = train.drop([‘Survived’], axis=1)
y = train.Survived
And now, let's split the variable into train and test sets. I will go with the default 0.25 for the test size. You can easily add other values using.
X_train, X_test, y_train, y_test = train_test_split(X, y, random_state=42)Modeling with LazyPredict
Now it's time for some fun. If this is your first time using lazypredict, you will have to install it. To do so, you can type pip install lazypredict in your terminal. If you already have it installed, let's import it to your project. Since this is a classification project, let's import LazyClassifier as well.
import lazypredict
from lazypredict.Supervised import LazyClassifier
Finally, let's run the models and see how it goes.
clf = LazyClassifier(verbose=0,ignore_warnings=True)
models, predictions = clf.fit(X_train, X_test, y_train, y_test)
models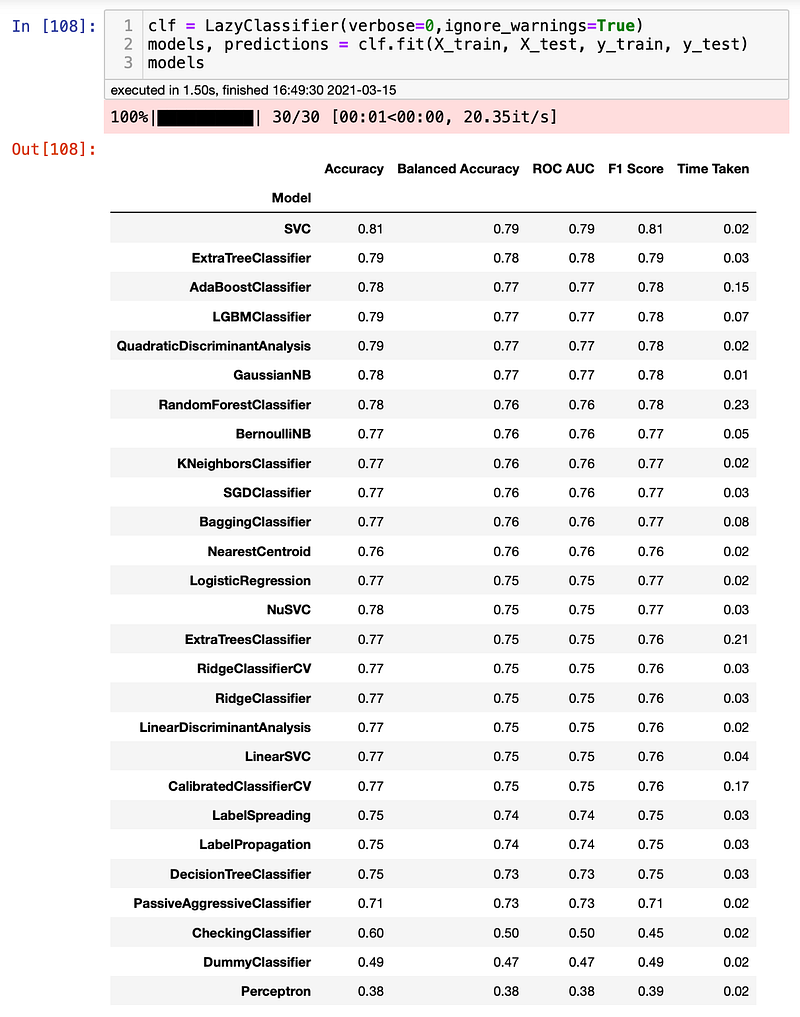
Voilá. You just iterated over 30 models in less than 2 seconds. That is incredibly fast and effortless. However, how can we make sure that these results are accurate? Well, we can now check the results by running a few models and comparing them. For this project, I will test the dataset with a Random Forest and Logistic Regression model. Let’s see if we can get anywhere close to the results we just saw. Let’s start with Random Forest.
rf = RandomForestClassifier()
rf.fit(X_train, y_train)
y_pred = rf.predict(X_test)
As we can see, the accuracy and F1-Score got a very similar result. Let's now try Logistic Regression.
rf = LogisticRegression()
rf.fit(X_train, y_train)
y_pred_lr = rf.predict(X_test)
Again, we got a very similar result. It seems that the results are trustworthy. That was easy.
Conclusion
lazypredict is an easy and fast library that gives a good prediction of how our models will behave if your dataset. Keep in mind that the results obtained with lazy predict SHOULD NOT be considered final models. Statistics is a large component of Data Science, and since different models have different approaches, you should know how each of the models works before choosing your final one. More importantly, Data Science is a complex field, and there aren’t magic solutions without pros and cons. Use it as your first iteration to confirm your approach planned and always double-check the results using tools such as scikit-learn. Have fun and let me know if it worked for you!


