
How To Reverse A Linked List With Animated Examples
Understand the algorithm with gifs
The linked list reversal algorithm can be difficult to understand without visuals. So…here are some visuals. First we’ll show just the algorithm’s raw logic, and then we’ll sync the animation to the actual code.
What is a reversed linked list?
Reversing a list means taking each next pointer and swapping it from the node to the right, to the node on the left.
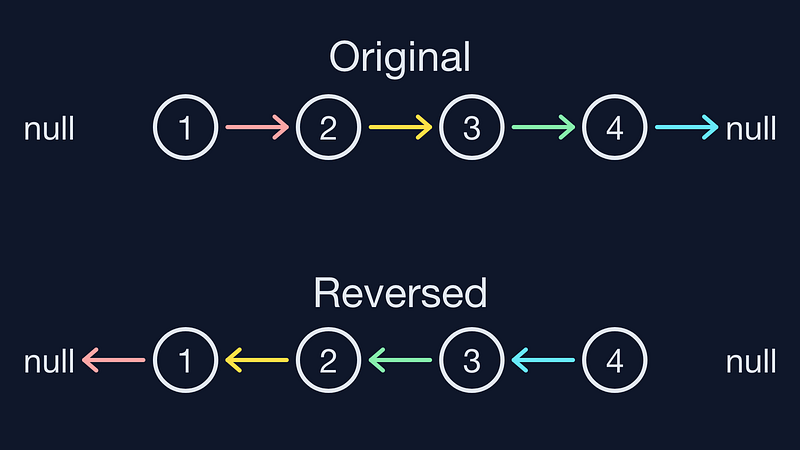
Essentially the head becomes the tail and the tail becomes the head. To be extra clear I’m not talking about doubly linked lists in this article.
Flipping without orphaning
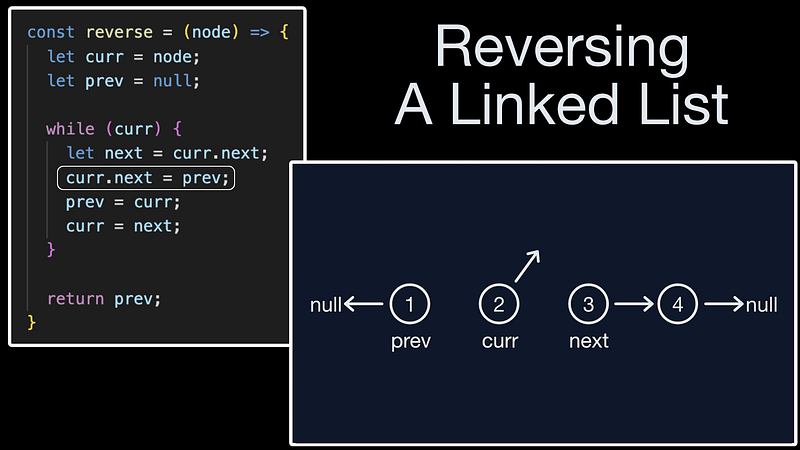
The trick to the algorithm is saving a reference to the next node before we flip the pointer. If we flip the pointer too soon, we’d break the chain and have nowhere to jump for the next iteration of the loop.
The Code
This code links exactly to the animation, and it’s only a minor change away from the final answer.
const reverse = (node) => {
  let curr = node;
  let prev = null;

  while (curr) {
    let next = curr.next;
    curr.next = prev;
    prev = curr;
    curr = next;
  }

  return prev;
}
We’re given a node, and we immediately set that as our curr node. In your code, you can call it current, I only called it curr so it would be legible in a gif. Anyway, the only other node we know prior to the loop is prev, which is null. Our loop will keep going as long as curr is a node, and the first step of each loop is assigning out the next node while curr.next still points to it. Don’t confuse the next node, with the node.next property.
Animating the code
The real way to understand it is to see it in action:
I can’t speak for you, but I only really understood this algorithm once I drew it out. I think that visually understanding these sorts of things is so important. Otherwise, you only remember what to write, but not why you wrote it.
One quick correction
The code above works, but it’s a little wasteful. Visually, it makes a lot of sense to hold off on declaring the next node until the loop starts. However, that means we are recreating a variable over and over again for no reason. We should declare it once outside of the loop with the rest of the nodes. To convey that it doesn’t really exist yet, we could leave it undefined. This differentiates it from prev which we know always starts as null by design.
const reverse = (node) => {
  let curr = node;
  let prev = null;
  let next;
  // the rest
However, you’ll almost always see it set to null. It’s functionally the same as leaving it undefined, but it looks more visually consistent. With that change, this is the final code that most people use:
const reverse = (node) => {
  let current = node;
  let previous = null;
  let next = null;

  while (current) {
    next = current.next;
    current.next = previous;
    previous = current;
    current = next;
  }

  return previous;
}
Now that you know how the code truly works, you’ll never forget it.
happy coding everyone,
mike


